PrintBoss
User Manual
www.wellspringsoftware.com
ELECTRONIC COPY
April
2004

PrintBoss 2 Electronic Copy
Wellspring Software, Inc.
© Copyright 2020 Wellspring Software, Inc. All rights reserved. No part of this document may be copied,
photocopied, reproduced, microfilmed, or otherwise duplicated on any medium without written consent of
Wellspring Software, Inc.
The references to Windows in this manual refer to the Windows® operating system software produced by the
Microsoft Corporation. Microsoft® Windows® is a trademark of the Microsoft Corporation.
Adagio® is a registered trademark of Softrak Systems Inc.
Intuit®, Quicken®, and QuickBooks® are trademarks and service marks of Intuit Inc., registered in the United
States and other countries.
Sage Software, the Sage Software logos, and the Sage Software product and service names mentioned herein are
registered trademarks or trademarks of Sage Software, Inc., or its affiliated entities.
All product trade names referenced herein are trademarks of their respective companies. All rights reserved.
All other trademarks are the property of their respective owners.
Disclaimer: This manual is not intended as a replacement to the manuals supplied with the Host Accounting
Software applications or programs. Any recommendations contained herein on hardware, software or any
combination thereto are given in good faith based on the experience and knowledge of the authors. However,
EXCEPT FOR THE WARRANTIES MADE BY THE MANUFACTURERS, ALL WARRANTIES ON THIS
MANUAL OR THE PRODUCTS REFERENCED WITHIN THE MANUAL, INCLUDING ALL IMPLIED
WARRANTIES OF MERCHANTABILITY AND FITNESS FOR A PARTICULAR PURPOSE, ARE
DISCLAIMED HEREIN.
10/08/2020
PrintBoss 6.10.3

PrintBoss
3 Electronic Copy
TABLE OF CONTENTS
TABLE OF CONTENTS ...................................................................................................................................... 3
ABOUT THIS USER MANUAL .......................................................................................................................... 7
SYMBOL KEY ...................................................................................................................................................... 7
MANUAL UPDATES .............................................................................................................................................. 7
INTRODUCTION ................................................................................................................................................ 9
PRINTBOSS PRODUCTS ........................................................................................................................................ 9
SYSTEM REQUIREMENTS .................................................................................................................................... 10
PRINTER REQUIREMENTS ................................................................................................................................... 10
INSTALLATION ............................................................................................................................................... 11
SETUP ................................................................................................................................................................ 15
STANDARD PRINTBOSS INTERFACES .................................................................................................................. 15
PRINTER SETUP ................................................................................................................................................. 16
CONFIGURATION ............................................................................................................................................... 17
PRINTBOSS DRIVER SETTINGS ........................................................................................................................... 22
ABOUT PRINTBOSS .......................................................................................................................................... 24
THE PRINTBOSS PRINTER DRIVER ............................................................................................................ 27
PRINTBOSS 50 ................................................................................................................................................... 27
MANUAL INSTALLATION OF THE PRINTBOSS 50 DRIVER ..................................................................................... 27
CITRIX OR TERMINAL SERVER INSTALLS .............................................................................................. 29
WARNINGS ........................................................................................................................................................ 29
PRINTBOSS SETTINGS ........................................................................................................................................ 30
PRINTER SELECTION .......................................................................................................................................... 31
SOFTWARE UPDATES .................................................................................................................................... 33
AUTOMATED ONLINE UPDATES ......................................................................................................................... 33
OFFLINE MANUAL UPDATES .............................................................................................................................. 34
BANK ACCOUNTS ........................................................................................................................................... 35
CREATE A BANK RECORD .................................................................................................................................. 35
COPY/TAG/PASTE.............................................................................................................................................. 43
ADDING BANKS ................................................................................................................................................. 44
BANK LIST MAINTENANCE ................................................................................................................................ 44
ADJUST MICR PLACEMENT ............................................................................................................................... 46
BANK SECURITY................................................................................................................................................ 47
FORM FILES ..................................................................................................................................................... 51
STANDARD FORM FILES ..................................................................................................................................... 51
CREATE A NEW FORM FILE ................................................................................................................................ 51
MODIFY AN EXISTING FORM .............................................................................................................................. 53
MODIFY FROM THE DOCUMENT VIEW ................................................................................................................ 54
INSERT AN OBJECT IN THE DOCUMENT VIEW ...................................................................................................... 55
FORM EDITOR ................................................................................................................................................... 57
ASSIGNMENTS ................................................................................................................................................... 57
VARIABLES ....................................................................................................................................................... 59
FORM FILE COMMANDS ..................................................................................................................................... 59
PRINTBOSS DEFAULT ASSIGNMENTS .................................................................................................................. 73
MULTI-LINE VARIABLES ................................................................................................................................... 74
PRINTBOSS CONDITIONAL COMMANDS .............................................................................................................. 74

PrintBoss 4 Electronic Copy
DATE & TIME FORMAT MASKS .......................................................................................................................... 81
DELIMITING PARAMETERS ................................................................................................................................. 81
#TEXT COMMAND .......................................................................................................................................... 83
EDIT #TEXT FROM A VIEW................................................................................................................................. 83
FORM EDITOR ................................................................................................................................................... 85
SUBSTITUTION FUNCTIONS ................................................................................................................................ 87
SECURITY FEATURES ................................................................................................................................... 91
SETTING UP SECURITY ...................................................................................................................................... 91
ACCESSING SECURED AREAS ............................................................................................................................. 95
OTHER SECURITY OPTIONS................................................................................................................................ 95
TEXT SECURITY ................................................................................................................................................ 96
SIGNATURE DISKS ......................................................................................................................................... 97
PRINTBOSS SIGNATURE CDS OR USB DRIVES .................................................................................................... 97
DUPLICATING PRINTBOSS SIGNATURE DISKS ..................................................................................................... 97
ADDING A PASSWORD TO AN EXISTING PRINTBOSS SIGNATURE DISK ................................................................. 98
CREATING NON-ENCRYPTED SIGNATURE DISKS ................................................................................................. 99
ADDING A SIGNATURE TO A CHECK ................................................................................................................... 99
USING PRINTBOSS SIGNATURE DISKS .............................................................................................................. 102
WORK/ARCHIVE FILES ............................................................................................................................... 103
CONFIGURE WORK/ARCHIVE FILES ................................................................................................................. 103
OPEN DOCUMENT WORK FILES /ARCHIVES ...................................................................................................... 105
BROWSE WORK/ARCHIVE FILE SELECT ........................................................................................................... 109
WORK FILE/ARCHIVE EDIT.............................................................................................................................. 109
DEPOSIT SLIPS .............................................................................................................................................. 111
CREATING/EDITING DEPOSIT SLIPS .................................................................................................................. 111
PRINTING DEPOSIT SLIPS ................................................................................................................................. 113
E-MAILING ..................................................................................................................................................... 114
SETUP ............................................................................................................................................................. 114
FORM SETUP FOR E-MAIL ................................................................................................................................ 123
E-MAILING...................................................................................................................................................... 124
MANUAL E-MAIL ............................................................................................................................................ 124
ASSIGNMENTS................................................................................................................................................. 125
VARIABLES ..................................................................................................................................................... 126
FORM / BANK REQUEST LIST .................................................................................................................... 127
SETUP ............................................................................................................................................................. 127
CONFIGURATION ............................................................................................................................................. 128
IMPLEMENTING REQUEST LIST FROM THE WORK FILE ...................................................................................... 129
REQUEST LIST PROCESS .................................................................................................................................. 132
POSITIVE PAY ............................................................................................................................................... 135
SETUP IN PRINTBOSS ....................................................................................................................................... 135
ENTERING ACCOUNT/ROUTING NUMBERS........................................................................................................ 137
OPERATION..................................................................................................................................................... 138
COMMON SUBSTITUTION FUNCTIONS USED...................................................................................................... 138
ACH SETUP..................................................................................................................................................... 141
BANK SETUP ................................................................................................................................................... 141
PAYEE LIST SETUP .......................................................................................................................................... 141
FORM SETUP ................................................................................................................................................... 144
CREATING THE ACH FILE ............................................................................................................................... 147

PrintBoss
5 Electronic Copy
FTP ................................................................................................................................................................... 148
SECURITY ....................................................................................................................................................... 148
FTP SETUP ...................................................................................................................................................... 148
BANK SETUP ................................................................................................................................................... 149
FORM SETUP ................................................................................................................................................... 150
MANUAL UPLOAD OF COMPLETED FILE ........................................................................................................... 151
WORKFLOW/DOCUMENT APPROVAL PROCESS…………………………………………………………151
CUSTOM INTERFACES ................................................................................................................................ 153
PRINTING TO PRINTBOSS PRINTER DRIVER ....................................................................................................... 156
SETUP ............................................................................................................................................................. 156
CAPTURING AND ASSIGNING TEXT ......................................................................................................... 159
METHOD 1: PRINTBOSS TRIGGER (USE OF PB#INFO ….) ................................................................................ 159
METHOD 2: EXPLICIT VARIABLE ASSIGNMENT WITHIN THE ACCOUNTING SOFTWARE REPORT .......................... 160
METHOD 3: CAPTURED FROM THE PRINTED DOCUMENT BASED ON COORDINATES ............................................... 160
EXAMINING ASSIGNED VARIABLES .................................................................................................................. 161
APPENDIX A: PRINTBOSS BANK LIST ..................................................................................................... 163
SAVED BANKS................................................................................................................................................. 172
APPENDIX B: FORM EDITOR ..................................................................................................................... 173
FORM EDITOR ................................................................................................................................................. 173
FORM FILE COMMANDS ................................................................................................................................... 184
PRINTBOSS CONDITIONAL COMMANDS & PARAMETERS ................................................................................... 191
APPENDIX C: #TEXT FEATURES ............................................................................................................... 195
SUBSTITUTION FUNCTIONS TABLE ................................................................................................................... 195
SUBSTITUTION FUNCTION DESCRIPTIONS ......................................................................................................... 196
APPENDIX D: SECURITY SETTINGS......................................................................................................... 203
GENERAL SETTINGS ........................................................................................................................................ 203
BASIC USER RIGHTS (STANDARD SECURITY MODE) ........................................................................................... 204
SECURITY REQUIRED (ADVANCED SECURITY MODE) ......................................................................................... 204
ADVANCED USER RIGHTS (STANDARD SECURITY MODE) ................................................................................... 204
ADVANCED USER RIGHTS (ADVANCED SECURITY MODE) .................................................................................. 204
APPENDIX E: VARIABLES BY CATEGORY .............................................................................................. 205
ACH VARIABLES ............................................................................................................................................ 205
BANK VARIABLES ........................................................................................................................................... 206
EMAIL AND SMTP VARIABLES ........................................................................................................................ 209
FORM VARIABLES ........................................................................................................................................... 212
#ASSIGN SETDUPLEXENABLED, ÷N÷......................................................................................................... 213
#ENDIF ........................................................................................................................................................... 213
THIS FEATURE CAN ONLY BE USED WITH PRINTER DRIVERS. IT DOES NOT WORK WITH THE INTERNAL PRINTBOSS
PDF FILE CREATOR AS THIS OUTPUT IS NOT ACCESSED THROUGH A PRINTER DRIVER. ......................................... 213
MISCELLANEOUS VARIABLES .......................................................................................................................... 213
PAYEE LIST VARIABLES................................................................................................................................... 214
POSITIVE PAY SUBSTITUTION FUNCTIONS & VARIABLES .................................................................................. 215
WORK FILE VARIABLES ................................................................................................................................... 217
FAQS ................................................................................................................................................................ 219
TROUBLE SHOOTING .................................................................................................................................. 221
SAGE 300 ERP ................................................................................................................................................ 221
MICROSOFT DYNAMICS GP.............................................................................................................................. 222
QUICKBOOKS .................................................................................................................................................. 222
NT/W2000/WXP WORKSTATIONS................................................................................................................... 222

PrintBoss 6 Electronic Copy
W2003 SERVER .............................................................................................................................................. 223
WINDOWS 7AND ABOVE OPERATING SYSTEMS ................................................................................................ 223
GENERAL........................................................................................................................................................ 223
GLOSSARY ..................................................................................................................................................... 225

PrintBoss
7 Electronic Copy
Chapter
1
ABOUT THIS USER MANUAL
This manual is a guide to the settings and options within the PrintBoss program. It applies to the current version of
the software and does not cover features that may have only been relevant to older versions of the software. This
manual also assumes that fairly recent versions of the Host Accounting Software are being used.
Documents viewed or printed from the VIEW NOTES button during PrintBoss installation are Host Accounting
Software specific. These notes, referred to as Installation Notes, supplement this manual, as this manual is a generic
guide for all interfaces.
SYMBOL KEY
Important items
PrintBoss Enterprise Edition specific items
Refer to another section of this manual for more detail
MANUAL UPDATES
Please check online at www.WellspringSoftware.com for an updated version of this manual.

PrintBoss
9 Electronic Copy
Chapter
2
INTRODUCTION
PrintBoss captures check runs, invoices, picking slips, and other accounting data printed from accounting software
and combine it with digital forms (PrintBoss Form files). This allows the accounting documents to be printed on
blank paper or, in the case of checks, on blank check stock.
PrintBoss eliminates the need for multiple part forms. The software creates a database to print the original and all
copies to the specified location or destination (printer, e-mail, ACH, Positive Pay, PDF, etc.). Each copy can be
printed with unique information including a legend (i.e. CUSTOMER FILE, ACCOUNTING FILE, etc.), a logo, or
any other field available from the accounting software that might pertain to the specific copy of a document.
PrintBoss captures information from the Host Accounting Software in one of two ways:
By printing directly from your accounting software to the PrintBoss Printer Driver and then printing to a
Windows printer, or
By printing from the accounting software to a file that PrintBoss can automatically capture and send to a
Windows printer.
Printing to the PrintBoss printer is preferable to printing to a file if possible. Our standard specifications and forms
determine the best method for printing and distributing files for several accounting packages.
PRINTBOSS PRODUCTS
There are three PrintBoss editions:
PrintBoss Select
PrintBoss Standard
PrintBoss Enterprise
The following is a brief description of each edition.
PrintBoss Select
PrintBoss Select is designed exclusively to print checks and Deposit Slips for Intuit QuickBooks/Quicken ONLY. It
is a faster, more efficient way of capturing check runs from QuickBooks/Quicken and accurately printing MICR
lines. This is a limited edition of our standard PrintBoss and does not have the full feature set of the Standard or
Enterprise products. Visit our web site for a list of features for this product at
http://www.wellspringsoftware.com/Marketing/Software_FB.aspx.
PrintBoss Standard
PrintBoss is designed to capture check data and more from accounting packages. Some of the additional features of
the standard edition of PrintBoss include:
Archive copies
Automatic selection of Bank Accounts

PrintBoss 10 Electronic Copy
Design custom forms with graphics
Generate Positive Pay files
Print to SMTP Email
Print other accounting forms, such as Purchase Orders, Invoices, Picking Slips, and Deposit Slips. The
available forms depend on the accounting package
Use customized forms
Work with Text Capture files
PrintBoss Enterprise
PrintBoss Enterprise has all the features of the Select and Standard editions plus more. It is designed to
accommodate special needs in capturing graphics from accounting packages and working with terminal servers.
Enterprise is available as an upgrade from the Select and Standard PrintBoss editions through Wellspring Software,
Inc. It also includes
Dynamic Naming of documents
Unlimited Bank Accounts
Positive Pay file name can include date/time
Create a library of pdf files named by any combination of date and company name, as well as other fields in
the document
Capture graphics send from host accounting system
Password protect email attachment(s)
Send outgoing email through Office 365 or Gmail in addition to SMTP
Upload documents using FTPs or sFTP
Approval Process for documents
Additional features that are only available in the Enterprise edition will be noted throughout this manual.
SYSTEM REQUIREMENTS
PrintBoss is compatible with W2008 R2 Server, W2012R2 Servers, W2016 Server, Windows 8.1, and Windows 10
operating systems. It is also compatible with 64-bit versions of these operating systems. As a general rule, 64 MB of
RAM should be available for use with PrintBoss. PrintBoss can be installed on a work station or a network. Please
see the license agreement to determine the restrictions.
PRINTER REQUIREMENTS
PrintBoss was designed to work with a Hewlett-Packard LaserJet printer. ANY PRINTER USED WITH PRINTBOSS
MUST BE 100% HP COMPATIBLE AND USE A PCL5E OR PCL6 DRIVER. If there are driver options for the printer
model, please use one of these choices. PrintBoss is not compatible with PostScript printers.
PrintBoss is guaranteed to work with most of the Hewlett-Packard LaserJet printers. Print speed requirements and
budget should help determine the best Hewlett-Packard LaserJet model for your needs.
When considering a brand other than HP, determine if your bank requires MICR ink. If the bank does require this
special magnetic ink (for reading the bank code on checks), make sure the brand and model of Laser printer you
choose has MICR toner available. Not all models have MICR toner cartridges available in the market.
NOTE:
Printers other than Laser printers have a smaller printable area and may not be able to print full documents. This is
particularly important for printing checks as models other than Lasers are often incapable of printing the MICR line.
PrintBoss is not guaranteed to work with printers that are not Laser printers.

PrintBoss
11 Electronic Copy
Chapter
3
INSTALLATION
PrintBoss can be installed locally on a single workstation (Local Install), or it can be installed to a shared network
folder where multiple workstations access the one application (Network Install). Both mapped drive letters and
UNC paths will work to identify the location of the PrintBoss Directory. We recommend PrintBoss is installed on a
shared folder if there are multiple users so bank information, forms, and other information can be shared. After
installing PrintBoss to the shared folder (Network Install), each additional workstation only needs the Workstation
Install steps.
Unless the server is used as a workstation, installation to the server folder can be performed
from a workstation.
All PrintBoss users need FULL CONTROL of the PrintBoss Home directory. Simply
having read and write permissions are not sufficient.
When running the PrintBoss setup program on operating systems beginning with Windows
7, we suggest you right-click and choose the option ‘Run as Administrator.’
If you have internet access, download the latest setup.exe from our web site. We no longer
ship CDs to ensure you receive the most current version of our software.
Citrix & Terminal Server installations are referenced in Chapter 6.
The following pages contain tables with step by step installation instructions for the 3 basic install types – local,
network, and workstation.
PrintBoss 12 Electronic Copy
S
S
T
T
E
E
P
P
1
1
L O C A L I N S T A L L N E T W O R K I N S T A L L
W O R K S T A T I O N
I N S T A L L
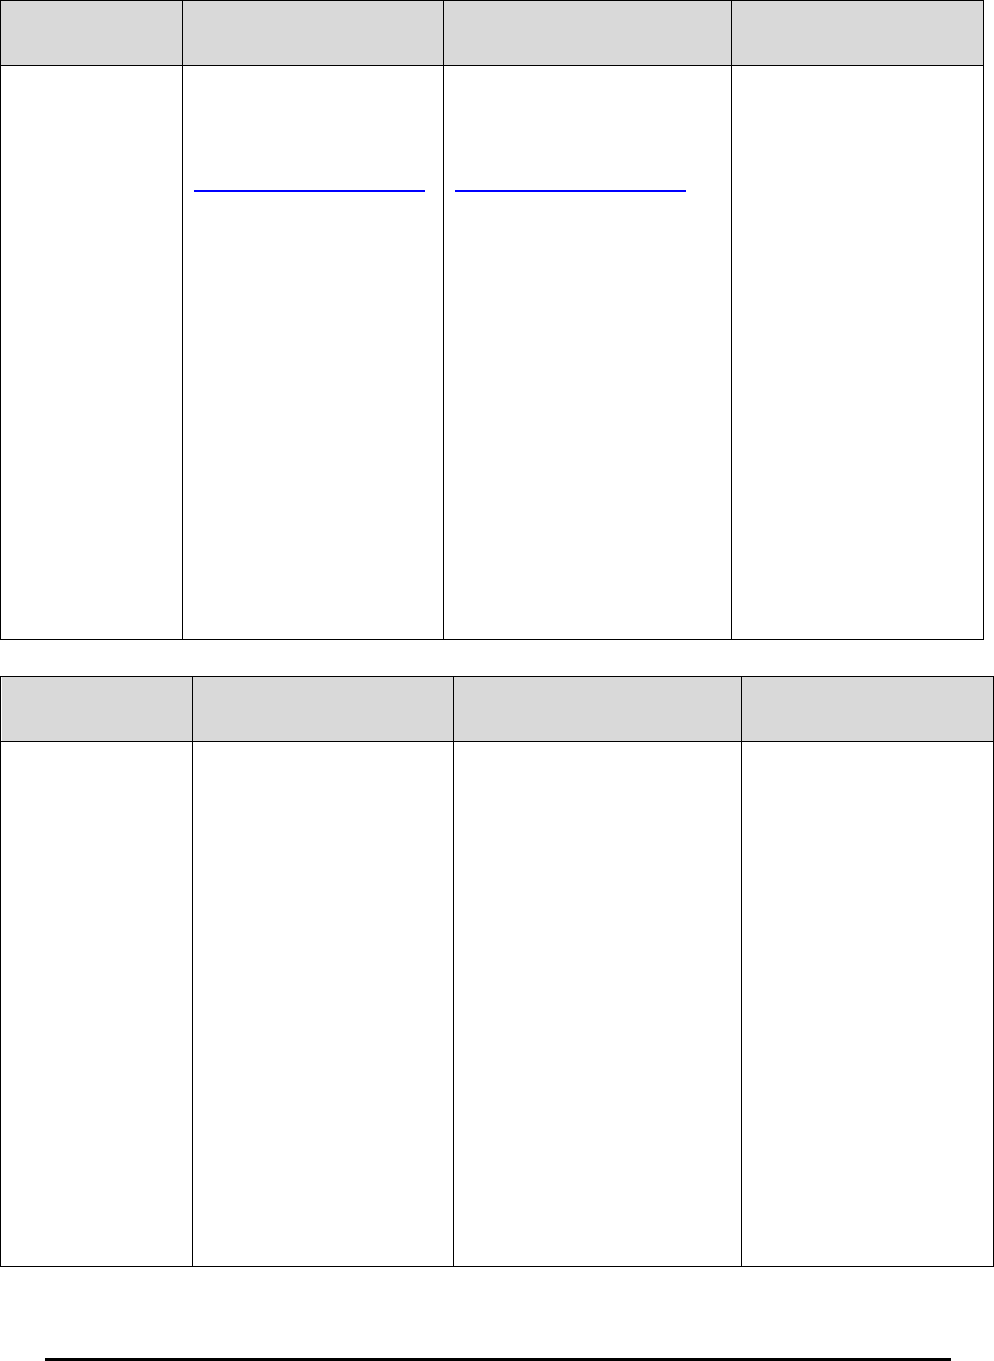
Start the
PrintBoss
Installation
Log in as
ADMINISTRATOR.
Download Setup.exe from
our website at
www.wellspringsoftware.com.
Roll your mouse over
Support and choose
Downloads.
Run X:\setup.exe (where X:
is the CD-ROM drive) or run
the setup .exe file
downloaded earlier.
Select the Accounting
Software to be used with
PrintBoss. If the Accounting
Software is not in the list,
choose Custom.
Select the directory where
PrintBoss is to be installed.
PrintBoss will default to
C:\PrntBoss.
Click on Next.
Log in as
ADMINISTRATOR.
Download Setup.exe from our
website at
www.wellspringsoftware.com.
Roll your mouse over Support
and choose Downloads.
Run X:\setup.exe (where X: is
the CD–ROM drive) or run the
setup .exe file downloaded
earlier.
Select the Accounting Software
to be used with PrintBoss. If the
Accounting Software is not in the
list, choose Custom.
Select the directory where
PrintBoss is to be installed.
PrintBoss will default to
C:\PrntBoss. Change this to
X:\PrntBoss (where X is the
shared network drive). PrintBoss
may use either drive mappings
or the UNC path.
Click on Next.
Log in as
ADMINISTRATOR.
Run X:\PrntBoss\setup.exe
(where X is the shared
network drive).
Select the Accounting
Software to be used with
PrintBoss. If the Accounting
Software is not in the list,
choose Custom.
Select the directory for
X:\PrntBoss (where
PrintBoss is already
installed).
Choose the Workstation/
Printer Driver/Special Host
Tasks option from the active
radio buttons.
Click on Next.
S
S
T
T
E
E
P
P
2
2
L O C A L I N S T A L L N E T W O R K I N S T A L L
W O R K S T A T I O N
I N S T A L L
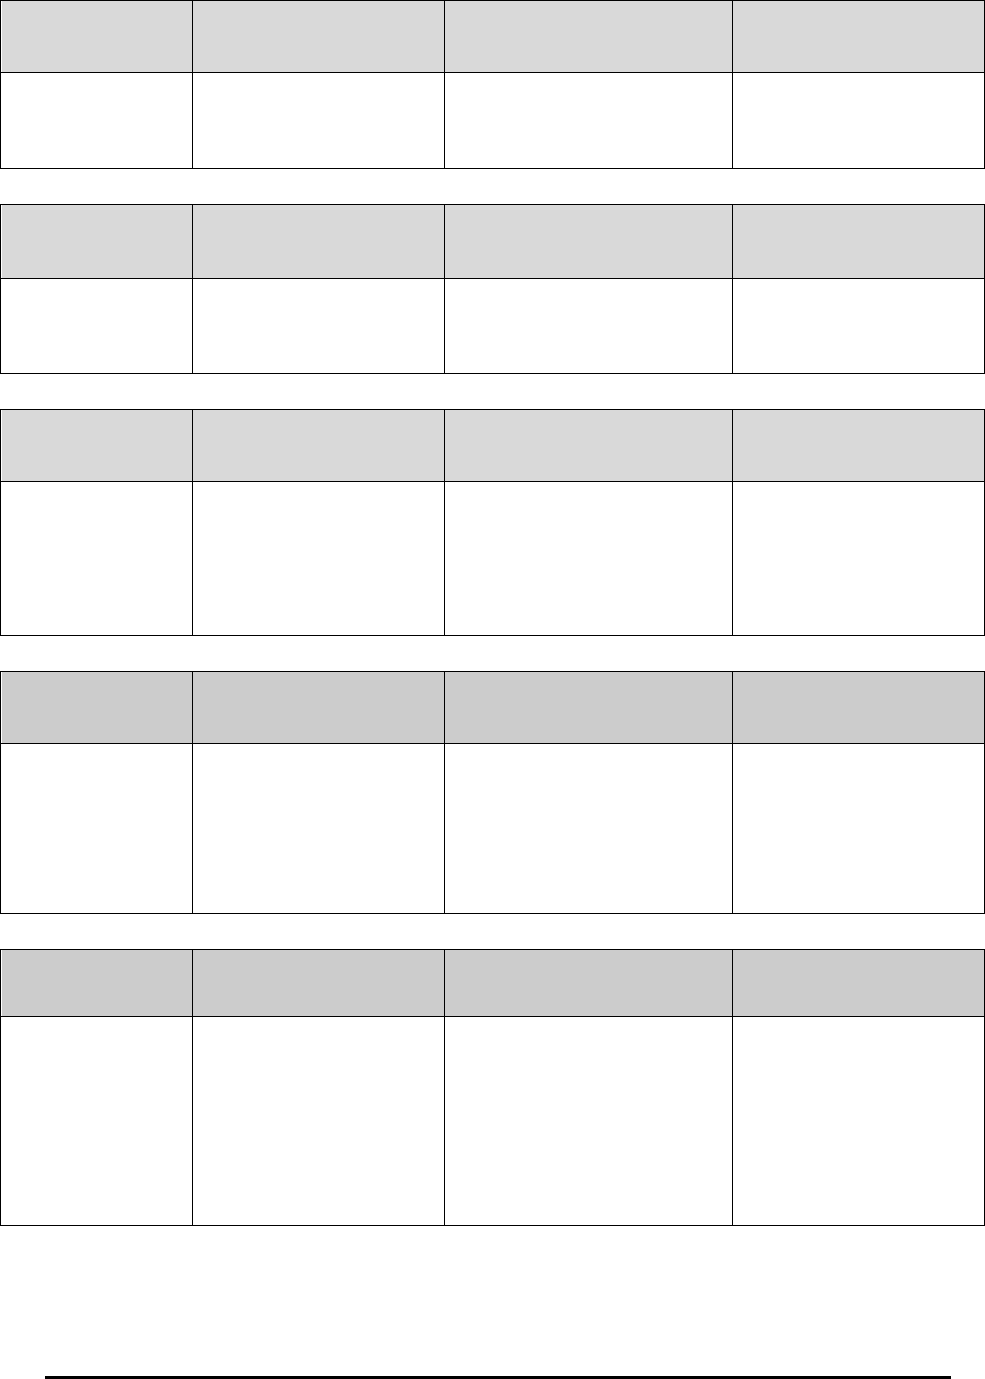
Registration &
Activation of the
PrintBoss
Software
Uncheck the ‘Install as 30-day
evaluation’ if you demoed this
copy of PrintBoss.
Enter the Serial Number,
Options, and Registration
Code received by email.
Enter the Company Name,
contact, and site that should
become permanent within the
PrintBoss software.
Confirm the information and
save the registration.
If the workstation has
internet access, click on
the online activation
option. If the workstation
does not have internet
access, choose to e-mail or
fax the activation. PrintBoss
will function for 30 days
without activation (Evaluation
Date).
Uncheck the ‘Install as 30-day
evaluation’ if you demoed this
copy of PrintBoss.
Enter the Serial Number,
Options, and Registration Code
received by email.
Enter the Company Name,
contact, and site that should
become permanent within the
PrintBoss software.
Confirm the information and save
the registration.
If the workstation has
internet access, click on
the online activation option.
If the workstation does not have
internet access, choose to e-mail
or fax the activation. PrintBoss
will function for 30 days without
activation (Evaluation Date).
This step is skipped. The
software is already
registered and activated.
PrintBoss
13 Electronic Copy
S
S
T
T
E
E
P
P
3
3
L O C A L I N S T A L L N E T W O R K I N S T A L L
W O R K S T A T I O N
I N S T A L L
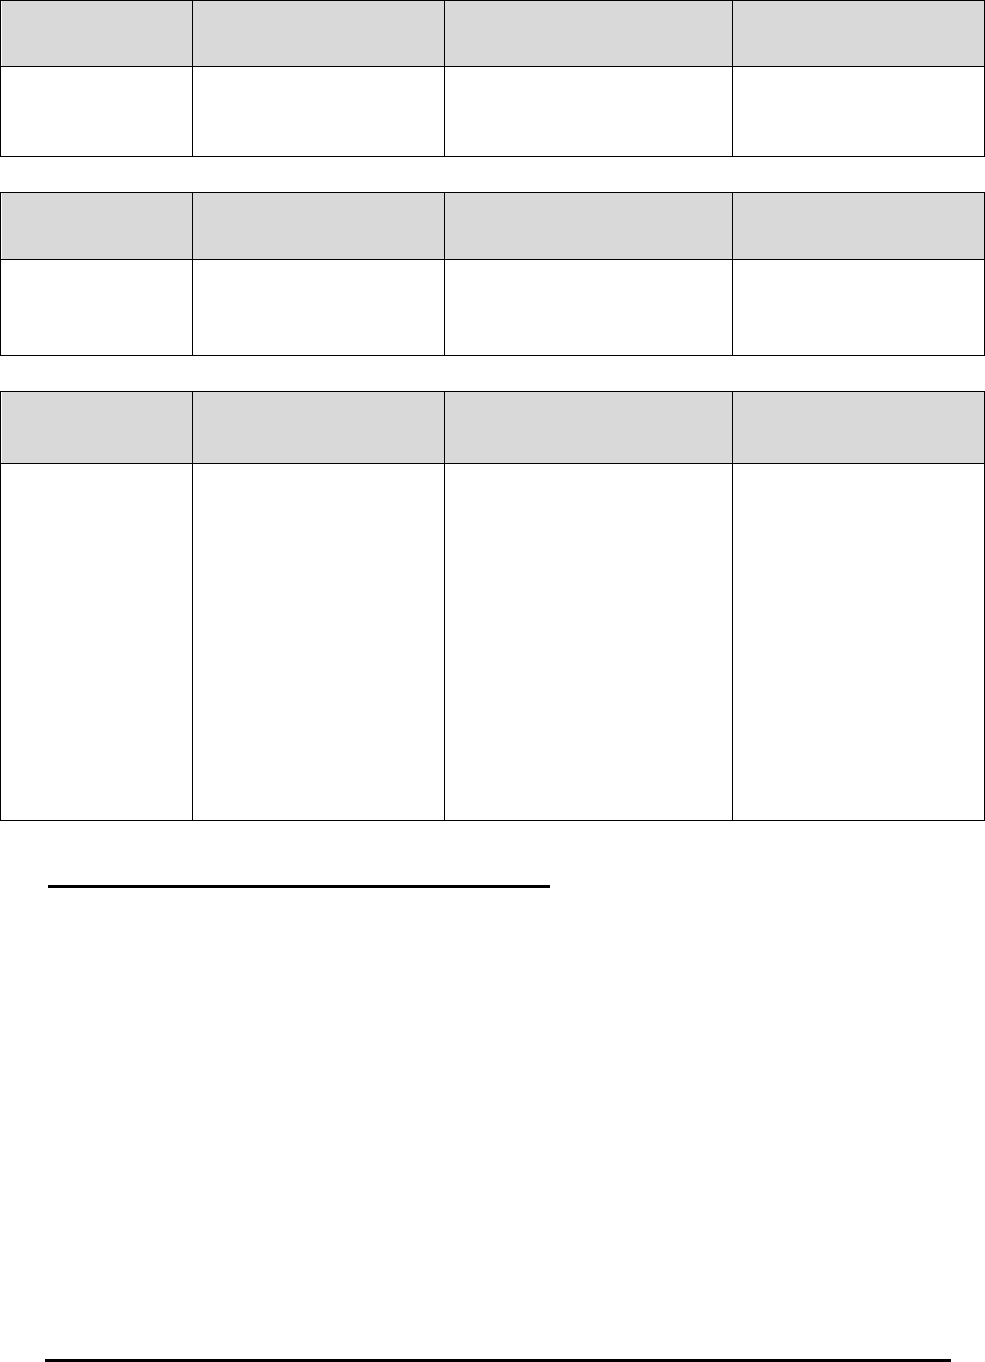
Installation of
Components
PrintBoss automatically
selects the components that
are needed. Leave the
defaults.
PrintBoss automatically selects
the components that are needed.
Leave the defaults.
This step is skipped. The
software is already installed.
S
S
T
T
E
E
P
P
4
4
L O C A L I N S T A L L N E T W O R K I N S T A L L
W O R K S T A T I O N
I N S T A L L
PrintBoss Settings
Saved
PrintBoss automatically
selects the registry that is
needed. Typically, this is the
Local and User Registry.
PrintBoss automatically selects
the registry that is needed.
Typically, this is the Local and
User Registry.
PrintBoss automatically
selects the registry that is
needed. Typically, this is the
Local and User Registry.
S
S
T
T
E
E
P
P
5
5
L O C A L I N S T A L L N E T W O R K I N S T A L L
W O R K S T A T I O N
I N S T A L L
View Notes
Click on the VIEW NOTES
button.
PRINT OUT THESE
NOTES. They will guide you
through steps specific for the
accounting software.
Click on the VIEW NOTES
button.
PRINT OUT THESE NOTES.
They will guide you through
steps specific for the accounting
software.
This step is skipped. The
document has already been
viewed and printed.
S
S
T
T
E
E
P
P
6
6
L O C A L I N S T A L L N E T W O R K I N S T A L L
W O R K S T A T I O N
I N S T A L L
Special Install
Steps
If the SPECIAL INSTALL
STEPS button is active, click
on it.
Follow the instructions per
the NOTES printed in Step 5
that are specific for the
accounting software.
If the SPECIAL INSTALL STEPS
button is active, click on it.
Follow the instructions per the
NOTES printed in Step 5 that are
specific for the accounting
software.
If the accounting software is
installed locally, then this
step may be necessary.
S
S
T
T
E
E
P
P
7
7
L O C A L I N S T A L L N E T W O R K I N S T A L L
W O R K S T A T I O N
I N S T A L L
Install the
PrintBoss Printer
Driver
The installation automatically
installs the PrintBoss 50
driver.
Click on Finish.
Restart the computer or
restart the Print Spooler if
the PrintBoss 50 driver was
installed.
The installation automatically
installs the PrintBoss 50 driver.
Click on Finish.
Restart the computer or restart
the Print Spooler if the PrintBoss
50 driver was installed.
The installation
automatically installs the
PrintBoss 50 driver.
Click on Finish.
Restart the computer or
restart the Print Spooler if
the PrintBoss 50 driver was
installed.
PrintBoss 14 Electronic Copy
S
S
T
T
E
E
P
P
8
8
L O C A L I N S T A L L N E T W O R K I N S T A L L
W O R K S T A T I O N
I N S T A L L
Setup PrintBoss
for the Accounting
Software
Follow the Installation Notes
to setup PrintBoss
specifically for the
Accountin
g Software.
Follow the Installation Notes to
setup PrintBoss specifically for
the Accounting Software.
This step is skipped. Setup
is already complete.
S
S
T
T
E
E
P
P
9
9
L O C A L I N S T A L L N E T W O R K I N S T A L L
W O R K S T A T I O N
I N S T A L L
Setup Accounting
Software for
PrintBoss
Follow the Installation Notes
to setup the Accounting
Software to interface with
PrintBoss.
Follow the Installation Notes to
setup the Accounting Software to
interface with PrintBoss.
Follow the Installation Notes
to setup the Accounting
Software to interface with
PrintBoss.
S
S
T
T
E
E
P
P
1
1
0
0
L O C A L I N S T A L L N E T W O R K I N S T A L L
W O R K S T A T I O N
I N S T A L L
Check for
PrintBoss Updates
Online
If the workstation has
internet access, check for
updates.
Start the PrintBoss program
(PB32 Program).
Select HELP / ABOUT.
Click on the button CHECK
FOR PRINTBOSS UPDATES
ONLINE.
RUN the update. This
update is accessible on the
day PrintBoss is FIRST
installed or if there is a
current service contract.
If the workstation has internet
access, check for updates.
Start the PrintBoss program
(PB32 Program).
Select HELP / ABOUT.
Click on the button CHECK FOR
PRINTBOSS UPDATES ONLINE.
RUN the update. This update is
accessible on the day PrintBoss
is FIRST installed or if there is a
current service contract.
This step is skipped. The
software should already be
updated.
Activating PrintBoss from Installed Demo
A demo version of PrintBoss can be registered as a full version.
1. Navigate to the PrintBoss home directory and locate Setup.exe. The folder name may be
‘PrntBoss’.
2. Double click on or run Setup.exe. You may need to run Setup.exe as Administrator.
3. Verify your Host Accounting System is listed at the top of the Destination Selection window.
PrintBoss will automatically install forms necessary for the selected host.
4. Verify the home directory for this installation (usually a server location). The path can be a
mapped drive or a UNC path.
5. Select Registration/Activation Only under the Install Type section.
6. Click the Next button.
7. Remove the Demo check mark at the top of the Registration window.
8. Fill in the fields.
9. Click Next.
10. Read the Software License Agreement and click Next to agree.
11. Select Online Activation as the Activation Method.
12. Click Next.
13. Click Finish. PrintBoss will verify the registration is successful.
PrintBoss
15 Electronic Copy
Chapter
4
SETUP
PrintBoss is designed to send virtually any Windows program information through the PrintBoss printer driver.
This allows the information printed by the PrintBoss program to include additional user specific data (e.g. Company
Name and Address and Bank Name and Address). PrintBoss can also add a MICR line, logo and signatures.
STANDARD PRINTBOSS INTERFACES
PrintBoss is shipped ready to interface with several software packages. Each standard interface has at least one
check form made to fit the check stock that comes pre-bundled with PrintBoss. Some interfaces include additional
forms. PrintBoss is capable of working with more than one Host Accounting Software program simultaneously.
All of the PrintBoss standard check forms are designed to place the check at the bottom of
letter sized stock.
NOTE:
Our standard check forms place the check at the bottom for two reasons:
Banks prefer the MICR edge to be the clean edge of the paper (easier for processing by equipment).
Most of our standard forms provide a mini copy of both the check and advice on the top portion of the
page. This very popular option often eliminates the need to make additional copies of checks for record
keeping.
Settings specific to each interface are described in the PrintBoss installation program under the VIEW NOTES
button. These document files are stored in the PrntBoss\Docs directory.
The list of our standard interfaces includes the following Windows based products:
PrintBoss Select - Checks & Deposit Slips; Unlimited bank accounts; Auto selection of bank account
Intuit Products:
QuickBooks by Intuit
QuickBooks Enterprise
QuickBooks Online
PrintBoss & PrintBoss Enterprise
Intuit Products:
QuickBooks by Intuit
QuickBooks Enterprise
QuickBooks Online
Microsoft Products:
Microsoft Dynamics AX (Axapta)

PrintBoss 16 Electronic Copy
Microsoft Dynamics GP (fka Great Plains Business Solutions)
Microsoft Dynamics NAV (Navision) (fka Attain)
Microsoft Dynamics SL (fka Solomon)
Other Products:
21
st
Century Accounting “C21” by Hilbert Software
21
st
Century US Payroll for Adagio by Hilbert Software
Adagio by Softrak Systems
CenterPoint by Red Wing
HAB, Inc.
Microsoft Dynamics AX (Axapta)
Microsoft Dynamics GP (fka Great Plains Business Solutions)
Microsoft Dynamics SL (fka Solomon)
QuickBooks by Intuit
QuickBooks Online by Intuit
Quicken by Intuit
Sage 50 – US Edition (fka Peachtree)
Sage 50 – Canadian Edition (fka Simply)
Sage 100 (fka MAS90 and 200)
Sage 100 Contractor (fka Master Builder)
Sage 100 Fund Accounting
Sage 300 ERP (fka Accpac)
Sage 300 Construction and Real Estate (fka Timberline Office)
Sage 300 Trade Specialty (fka Timberline Enterprise)
Sage 500 ERP (fka MAS 500)
Sage BusinessVision Accounting
Sage BusinessWorks Accounting
Sage HRMS (fka Abra SQL HRMS}
PrintBoss Enterprise is often required for Custom Programming needs.
For more information on our standard interfaces, visit our website at www.WellspringSoftware.com.
PRINTER SETUP
1. Open the PrintBoss Master Application.
2. Click on the File menu and select Printer Setup. The PrintBoss Printer Setup dialog opens.
3. Choose the default laser printer for documents printed through PrintBoss. Do Not Select the PrintBoss
printer itself (PrintBoss 50). The PrintBoss printer should only be selected by the accounting software.
a. Select Use Windows Default to use the Standard edition of PrintBoss on a terminal server.
b. Select a Specific Printer from the drop-down menu to specify a printer other than the Windows
default to use with standard PrintBoss in environments other than a terminal server or to use with
the Enterprise edition of PrintBoss on a terminal server.
4. Click OK when you are finished. The OK button is only available when changes are made to the printer
setup.
Each workstation using PrintBoss can select a different default printer. This selection is saved locally on the
workstation and will not change the selection on other workstations.
PrintBoss is very literal with printer names. If the printer name changes in any way, the
PrintBoss program will consider the new name as a new/different printer.
Settings for Terminal Servers / Citrix Servers
Often in a Terminal Server or Citrix environment, the printer name includes the session number or indicator. This
results in multiple names for the same printer. Each name is only available in the specified session. Applications
such as PrintBoss generate an error when the selected printer name is not available. PrintBoss Enterprise can define
PrintBoss
17 Electronic Copy
the session indicators and truncate the printer name so the printer is recognized in all sessions. The other option is to
save the printer choice in the PrintBoss Directory instead of the Terminal Server registry.
CONFIGURATION
The Configuration screens provide additional options for working with various accounting applications. Select
OPTIONS / CONFIGURATION from the PrintBoss Master Application window to view or change these options.
Choose the settings recommended in the Installation Notes for your accounting software. A description of the
settings on each tab follows.
Settings
Most of these settings are automatically set for the accounting software. If multiple users are working with
PrintBoss on a network, the Work Files Private Folder Name should be set to WinUserName globally for each
workstation. See Private Folder Names below.
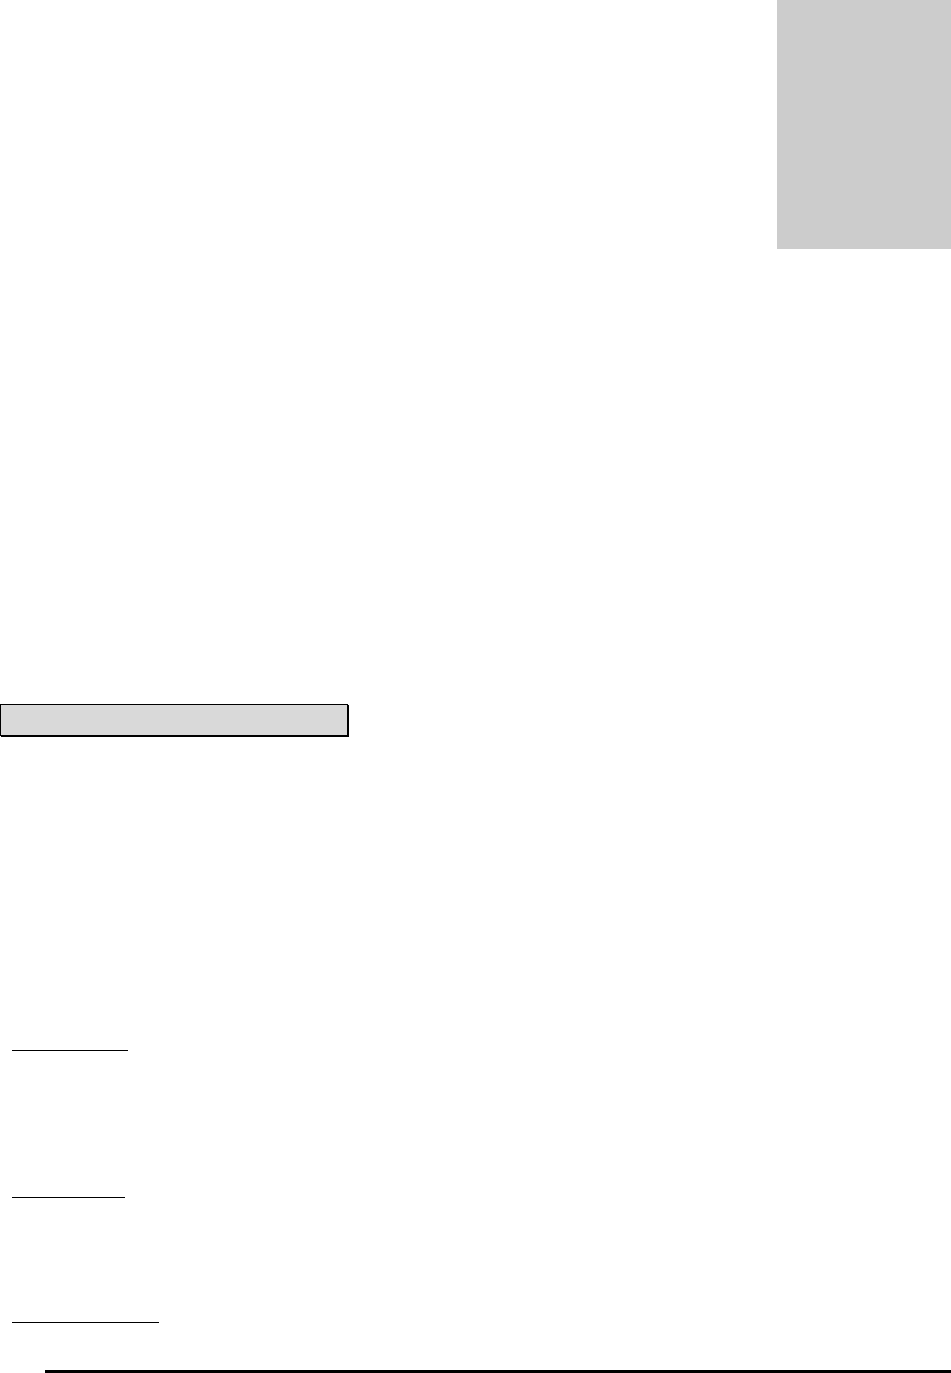
MICR OFFSET ADJUSTMENT
The location of the MICR line is calculated by PrintBoss based on the directives passed in the #MICR command.
Typically, this placement is accurate for a check printed at the bottom of an 11" page. Sometimes there are small
differences in alignment from printer to printer or between printer drivers. A separate adjustment can be made in the
Configuration of PrintBoss to correct the alignment. Once the adjustment is made, it should not need to be changed
unless the printer, printer driver, or operating system is changed. The adjustment of the MICR can be both vertical
and horizontal. This setting is global for all forms and is computer and printer driver specific.
Select OPTIONS / CONFIGURATION from the PrintBoss Master Application window to access the adjustment
settings. The adjustments may be completed with the help of the MICR Adjust Wizard or by manually adjusting the
values.
MICR Adjust wizard
Click on the MICR Adjust Wizard button to open a step-by-step adjustment wizard. This method does not require a
preprinted symbol on the back of the check and can be used with Canadian style checks.
Follow the steps for the wizard to satisfactorily adjust the placement of the MICR. Click on
Finish to exit the Wizard. Upon completion, the MICR Offset Adjustment values will be
modified. These values are in thousandths of an inch.
See Chapter 8, Bank Accounts, for additional information about the MICR line.
NON-MICR OFFSET ADJUSTMENT
This setting adjusts the entire document, except the MICR line, to center documents on the page. The purpose of
this setting is to adjust for small differences in printer driver margins and is not intended for significant shifts of
form placement. The adjustment can be both vertical and horizontal. This setting is global for all forms and is
workstation and user specific. You may need to adjust this setting if a new printer or new printer driver is used
with PrintBoss.
Start by selecting the orientation of the page, either Portrait or Landscape. If the document needs to move Right or
Down (Bottom), increase the corresponding Non-MICR offset. The values are in thousandths of an inch. The
amount of the adjustment may vary from printer to printer. Decrease the MICR offset to shift the forms Left or Up
(Top). Use negative numbers to move below zero.
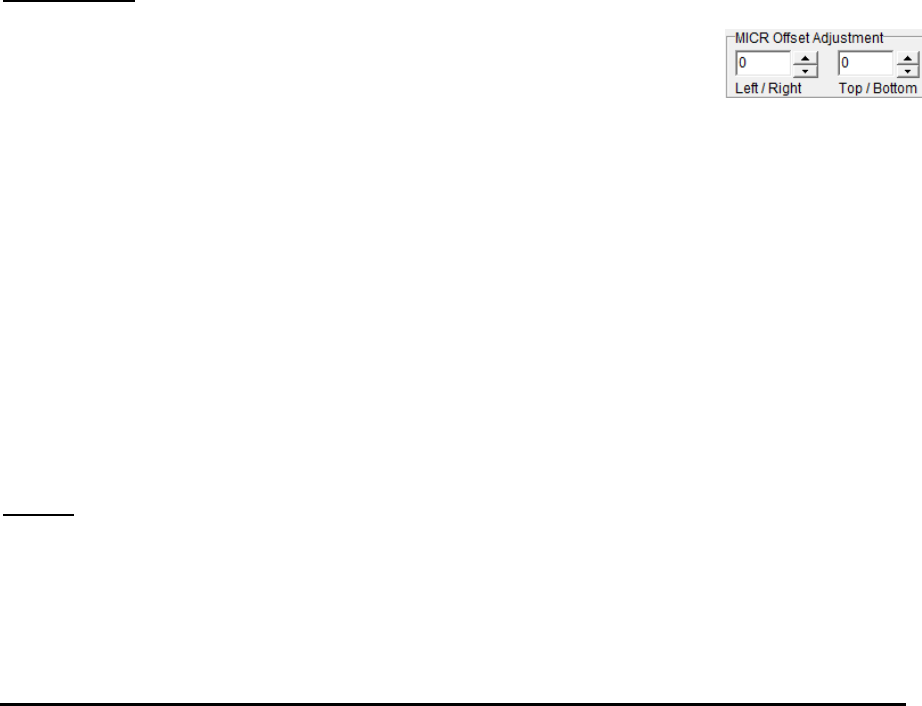
PRIVATE FOLDER NAMES
Work Files
Every time PrintBoss processes a document it creates a work file. The work files are specific to a Form. If the
PrintBoss application is on a shared drive, each workstation should have a unique work file folder name to prevent
accidentally overwriting files.
Click on the Work Files drop-down menu to change the selection from <COMMON> to something unique for each
workstation. The {WinUserName} setting creates a folder using the Windows User Name of the person logged into
the computer. You may also highlight the field and type a name. DO NOT put the arrows (< >) around the new
PrintBoss 18 Electronic Copy
name. PrintBoss creates a work file folder using the name you specified and saves it in the PrintBoss Work folder
located in the PrintBoss Directory folder.
Repeat this step on each workstation that will use PrintBoss, or check the Set Globally box.
Checking the Set Globally box changes the settings for the Private Folder Names of both the Work Files and
Archive Files to {WinUserName}.
Archive Files
Archives works similarly to W is set on the Form and applies to all users.
When the Set Globally box is checked, this field will automatically be set to {WinUserName}. The folders
generated by PrintBoss in the Archives subdirectory will automatically use the Window's system user name. This
setting functions similar to Work Files. Otherwise, PrintBoss will save Archive Files in a Common folder.
Set Globally
This option, when checked, sets the Private Folder Names for both Work Files and Archive File for all users to
{WinUserName}. This is required for Citrix or Terminal Server users. It also eliminates an extra step during the
setup of each workstation.
Allow temporary folder change when browsing work file or archive
The default setting for browsing work files or archive files is to only display work files for the person logged into
the workstation. Occasionally, a manager or Wellspring Software technician may need to review the work or
archive files of other users. This option allows all work or archive files to be viewed from this workstation. This is
faster than changing the configuration settings and returning to the work/archive file browse window.
FIX PB#INFO/ASSIGN SEGMENTING
This feature should be checked for accounting systems that use crystal reports with the PrintBoss Trigger. We
recommend this feature to always be checked as it does not interfere with the process when crystal reports are not
used.
REQUEST LIST PRIVATE FILE
This feature enables users to create unique Form/Bank Request Lists. The default value is <COMMON> so all
users share the same list. If individual lists are created, the files are saved in the ReqLists subdirectory of the
PrintBoss Home Directory.
See Chapter 18, Form / Bank Request List.
ENABLE PRINTBOSS WINDOWS PRINTER DRIVER PROCESSING
This option must be checked to activate the PrintBoss printer driver interface method. The only time this option is
not checked (other than at the direction of Wellspring Software technical support) is when the text file interface is
the only method used. All of our current standard interfaces use the printer driver interface method. Only custom
interfaces use the text file method.
Always Capture Settings
When the Flag Trigger option is selected on the PrintBoss Driver Settings window, this section will not be visible.
Set this option according to the Installation Notes for your accounting software.
Set the FORM field to Blank01 and the BANK field to NONE for interfaces that
use the Flag Trigger method.
Request List Determines Form/Bank
Select this option when instructed by the Installation Notes for your accounting software. This option directs
PrintBoss to use the entries in the Form/Bank Request List to determine the Form and Bank for a batch of
documents. This option is overwritten by PB#INFO when it is selected. (See next paragraph).

PrintBoss
19 Electronic Copy
"PB#INFO" flag overrides above
This box should be checked when using accounting software that utilizes both the Flag Trigger and Always Trigger
methods.
NT CAPTURE OFFSETS
The default values typically place data onto the forms correctly. If the data from the accounting software is not
lining up within the form correctly, uncheck the Use Default Offset box to change the values. These values are in
pixels. Adjust the values in increments of at least 10. Click the Defa. button to reset these values to their default
settings for this workstation. Positive values move data down on the form while negative values move data up.
This setting is workstation specific.
WORKFLOW
Select ‘Enable Workflow/Approval Process” to use Workflow.
Select ‘Launch PrintBoss Windows Tray Utility on Startup’ to use Workflow.
Internal
MISC LOCAL PROPERTIES
Suppress warning that PrintBoss is the Windows Default Printer
The PrintBoss printer driver should not be the Window's default printer. If the PrintBoss printer is set as the
Window's default printer, the PrintBoss program will generate a warning message. This option should not be
checked. Only check this option in special circumstances.
Save Printer Settings
This setting is checked by default and allows the PrintBoss program to retain information about specific printers and
trays.
Suppress dialogs when appropriate
Check one or all of the following options to stop PrintBoss from pop-up a window or flashing in the taskbar when it
is processing documents: Print Dialog; Archive; E-mail.
Local Drive Letter for Signature Disks
By default, PrintBoss expects the signature disks to be in the A drive of the workstation. Choose the default drive
letter appropriate for your workstation.
Remote Signature Read Delay (Seconds)
Enter an amount in seconds to delay PrintBoss from reading the signature code until the device is loaded by the OS.
Print Status Screen Position
This option allows the user to select the position of the Print Status window. The choices are Top Right, Screen
Center, or Bottom Right. The default value is Screen Center.
TextCapt Hst Last Used Count
The default setting for this feature is set to 5. It is used for troubleshooting.
Minimize PrintBoss on startup
Check this box to minimize PrintBoss after it is opened.
MISC APPLICATION PROPERTIES
When launched by Acct. Host, Terminate PrintBoss after Batch Print
Check this box to automatically close PrintBoss when it has been automatically opened by a print job. This will not
close PrintBoss if the user manually opens the program.
Windows Print Job Limit
This setting allows PrintBoss to help ease the stress of a printer queue. This setting can be used to separate a single
large batch into smaller print jobs by creating a pause between each job. The pause allows the first print job to begin
processing before the second job is sent to the printer, minimizing the backlog in the printer memory.

PrintBoss 20 Electronic Copy
Print Jobs till Prompt to Continue
This feature is available when the Windows Print Job Limit has been modified. Enter a value greater than 0 to have
PrintBoss prompt the user to send more print jobs to the printer. This feature is often used when printing large
batches and provides a prompt to allow the user time to refill a paper tray.
Delay Between Print Jobs
This feature is available when the Windows Print Job Limit has been modified. The value represents seconds and
determines the length of the pause between each print job PrintBoss sends to the printer.
Print Jobs received within these secs are treated as one batch
PrintBoss can be set to "wait" to combine all pages into a single batch for accounting software that sends each page
as a separate print job. This only works when the Append to Transfer File option is checked on the PrintBoss Driver
Settings window.
Stop Before Print Job starts when invalid printer exists
PrintBoss will determine if a valid printer is selected before it starts the print job when this checkbox is selected.
Default printer choice for new users (or Terminal Server Clients) is "use Win Default"
There are times when you want to set the printer for the PrintBoss Printer Setup for all users to use the Windows
Default printer. This is especially true for users in a terminal server environment using Standard PrintBoss. This
option will set this default for all new users. Select this immediately after the initial installation to apply to all users.
Force form pre-read for each page (helps for multiple forms per batch)
Select this option when more than one PrintBoss Form is used within a single batch.
Work/Archive File Compression ALWAYS (overrides each form’s setting)
This option is only visible with Force form pre-read for each page is selected. Select this option to override the
form’s settings and always compress Work and Archive Files.
ReqList Examines all pages for form ID within a batch (not just first page)
This option examines all pages in the batch to determine which Form should be used.
DocRecip Length
This option determines the length of the DocRecip value. The default is 60 characters.
GENERAL BANK
Method of Matching of Bank Code
There are two different methods PrintBoss uses to match the Bank Code from the accounting software with the Bank
Code in the PrintBoss Bank List (when a Bank Code is used). The most common method is Enforce Exact Bank
Code Match and requires a character-by-character match for the entire string. The Allow Partial Match of Bank
Code that follows colon: method looks for an exact match up to the colon (:) in the bank code and then any partial
match after the colon.
Allow for Selection when multiple Bank Codes match
Occasionally, there may be more than one account with the same bank code. Check this option to allow the user to
select from a list of the matching bank codes. This is a good feature to select even if you don’t expect to have
matching bank codes to alert you in case a matching bank code has been inadvertently created. This feature is
required for Microsoft Great Plains Business Solutions products when there is more than one payroll account
for the same company.
See Chapter 8, Bank Accounts.
Allow bank accounts to be AP and Payroll
Most accounting software will use the variables {ChkAcct}:{CompName} to allow PrintBoss to choose the correct
bank account for each check in a batch. Some accounting software do not print the checking account ID for payroll
checks and PrintBoss may substitute the word Payroll for the checking account ID. When the same bank account is
used for both AP and Payroll, PrintBoss may generate a list of bank codes every time Payroll is printed after AP or
vice versa. Often the Bank Code gets renamed each time. Select this option to use one bank account for both AP
and Payroll. PrintBoss will match the company name only for the Payroll checks. The Enable "Payroll" alias name
must be selected on the Bank Record as well. The alias is only available when Allow bank accounts to be AP and
Payroll is selected on the Internal tab of the Configuration window.

PrintBoss
21 Electronic Copy
Auto Populate Bank List with Unused Records
Select a value to automatically populate the Bank List in PrintBoss. The default is the number of bank records
purchased. Ten bank records are provided with each PrintBoss license. This feature is often used with the unlimited
bank module to limit the initial population of the bank list. The default for the unlimited bank module is 25.
Change Bank Code Length
The default Bank Code length is 50 characters. PrintBoss versions prior to version 5.x default to 30. Occasionally,
the accounting software sends a longer bank code. In these cases, the bank code length may be increased up to a
maximum of 60 characters. If the bank code length is set to a longer value and then decreased, any bank codes that
are longer than the new value will be truncated. This action cannot be undone. The bank code length may be
changed back to a longer length, but the actual bank codes in PrintBoss need to be edited to match their original
names.
ReqList Examines all pages for form ID within a batch (not just first page)
Some accounting software has the ability to send documents with different formats in the same print batch. Select
this option to allow PrintBoss to match each document against the Form/Bank Request List to determine the correct
Form and Bank for each document in the batch.
Search Payee List using this method:
The default method is ‘Standard Mode’ and matches by Payee Name and ID. The other two choices are:
Match on Payee
Match on Payee ID
Number of Payee Accounts Available
The default method is ‘3’. However, PrintBoss can use up to ‘9’ Payee Accounts.
Menus
ENABLE TOOL BAR
Check this option to select the menu icons you want to appear as shortcuts on the Master Application window.
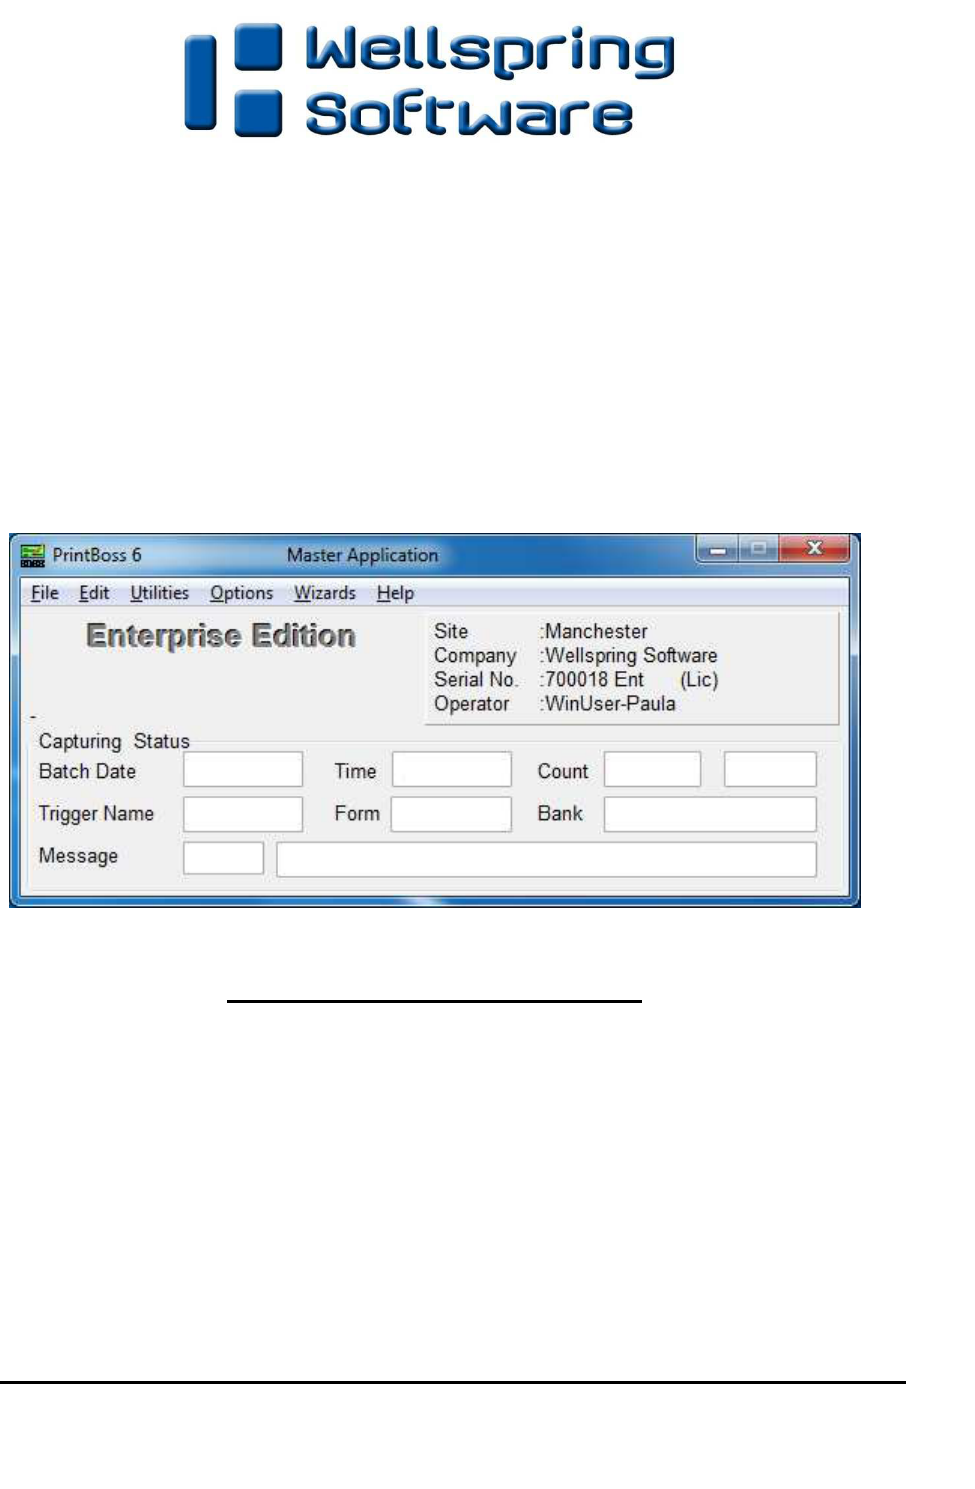
ENABLE MASTER MENU STATUS PANEL
When this box is checked, the lower half of the Master Application window shows the Capturing Status dialog.
This is a great feature for troubleshooting. When this box is not checked, the lower half of the Master Application
window is suppressed. The value is checked by default.
ENABLE MASTER MENU STATUS TRAY (NORMALLY UNCHECKED)
Select this option to display the Status Tray at the bottom of the PrintBoss Master Application window.
RESET WINDOW SIZES
PrintBoss remembers the size and location of many of the windows in PrintBoss as a user naturally adjusts them.
Click this button to reset all windows to their original default locations and sizes.
Legacy
Most of the settings on this tab are being discontinued. They are included for special cases where legacy installs of
PrintBoss have relied on these features.
SUPPRESS FORM’S COMMON PRINTER BY PROJECTING ONTO INDIVIDUAL COPIES (RECOMMENDED)
Version 5.3 and later can Suppress Form Printer and assign the selected printer to individual copies on the Multi-
Parts & Printers tab of the Form Editor. The old Form Printer choice has been replaced with Default PrintBoss
Printer on the form’s Multi-Parts and Printers tab.
SHOW "SCAN SCOPE STATUS" BUTTON ON PRINT SCREEN
We recommend to use the ‘Default’ setting.
Select Suppressed is the same as ‘Default’. PrintBoss hides this button on the PrintBoss Print Copies Dialog. The
Default setting for new installs is to suppress this button.

PrintBoss 22 Electronic Copy
Set this option to Displayed to display the Scan Scope Status button on the PrintBoss Print Copies Dialog. This
button is used to scan the status of the documents defined in the Scope. For example, it might display 3/15 next to
the Original copy, indicating 3 of the 15 documents have been processed.
"STAY ON TOP" METHOD FOR DOCUMENT PRINTING WINDOWS
This option should typically remain at the Default (Bring to front) value. Click on the drop-down menu if you prefer
a different method.
VIRUS SCANNER ALLOWANCES
The Virus Scanner Allowances include options for Alternate Workfile Delete Method and Millisecond Wait for files
to open. These options should only be used when instructed by a Wellspring Software support technician. The
‘Alternate Workfile Delete Method’ is checked by default and the Milliseconds are set to 100.
HIDDEN FILES
The following features are hidden and require the assistance of a Wellspring Software technician.
Graphic Printing Module
This should be Standard.
Pitch Method used in printing when Pitch is specified
This remains Precise Pitch.
Include Host Blank Pages
This should remain unchecked.
Show "Current Bank" on Master
This is typically not checked and the bank list appears as a drop-down menu at the bottom of the Form Select
window. When checked, the bank list appears as a drop-down menu on the Master Application screen of PrintBoss
and the list will not appear at the bottom of the Form Select window.
Allow Fragmented PB#INFO line
This option should be selected when the PB#INFO line or Trigger gets fragmented and is selected by default. It
must be checked for all Sage 300 ERP users.
Workaround for Novell bug
This should be checked for Novell clients/servers only.
PRINTBOSS DRIVER SETTINGS
PrintBoss Driver Settings provide additional features for working with various host accounting applications. Select
OPTIONS / PRINTBOSS DRIVER SETTINGS from the PrintBoss Master Application window to view or change
these features. Choose the settings recommended in the Installation Notes for your accounting software. A
description of the settings follows.
PRINTBOSS DIRECTORY
PrintBoss uses files (such as Form Files, Bank Lists, and Work Files) that are installed in the PrintBoss directory or
its descendants. This PrintBoss directory is referred to as the PrintBoss Home Directory. The location of this
directory is saved in the Local User Registry on each workstation that runs PrintBoss. Select About under the Help
menu in PrintBoss to verify the location of your Home Directory.
The location of the Home Directory can create some confusion. If the PrintBoss program is started from another
location (as per the properties of the shortcut icon that starts PrintBoss), it will still use the Home Directory that was
originally recorded. This typically occurs when PrintBoss is initially installed locally and then all files are moved to
a network location. PrintBoss still looks at the local directory as its Home.
To change the Home Directory, choose OPTIONS / PRINTBOSS DRIVER SETTINGS and change the PrintBoss
Directory accordingly. Restart PrintBoss for the change to take effect.
It is strongly recommended that the Home and EXE directories listed on the HELP / ABOUT window match. When
PrintBoss is automatically loaded by a print job, the executable listed in the Home Directory is used regardless of any
shortcut settings.

PrintBoss
23 Electronic Copy
PrintBoss cannot use two different HOME directories at the same time.
TRANSFER FILE SETTINGS
Transfer Folder/File
The Transfer Folder/File option under Transfer File Settings should not be selected unless directed otherwise by a
Wellspring Software, Inc., support technician. The transfer file is a temporary file that is generated by the PrintBoss
printer driver and then renamed and finally deleted. The user must have permissions to create, rename, and delete
this file in the Transfer folder. While the folder name is the same for all users, the actual file must be unique for
each user or multiple users could overwrite each other's files. The default folder path and file name are
{ComAppData\...\Transfer} \ {WinUserName}. This setting is the same for a Terminal Server or Citrix
environment. Click OK when exiting this dialog.
There are other options for Terminal Server/Citrix environments. See Chapter 6, Citrix or Terminal Server
Installs, for additional information.
Use Driver Port
This option should remain unchecked unless directed otherwise by a Wellspring Software, Inc., support technician
for troubleshooting.
Append to Transfer File
This option should be checked for accounting software that sends each document as an individual print job. This
allows PrintBoss to wait for additional documents to treat all of the documents as a single batch. Please see the
Installation Notes specific to the accounting software to determine if this feature should be checked. If checked, the
wait increment must be defined in seconds on the Internal tab of the Configuration window (OPTIONS /
CONFIGURATION).
Test Path
This option confirms the location specified for the Transfer File Settings exists.
Driver Log
This setting should be set to Never unless directed by a Wellspring Software, Inc., support technician for
troubleshooting.
Load PB32.exe
This option should be checked to automatically load the PrintBoss program when a transfer file is received from
your accounting software. This box should NOT be checked for Citrix or Terminal Server installations when the
users only have access to "Published Applications" on a Windows 2003 server.
See Chapter 6, Citrix or Terminal Server Installs.
PB 50 DRIVER SPECIAL SETTINGS
This section is unavailable by default and typically does not need to be edited. Check the Allow Editing box to
access this option.
Spool Dir
Users must have Read/Write permissions to this directory. The default setting is {ComAppData\...\ Spool}. A
button labeled Test confirms the actual path location. If sufficient permissions do not exist to this path and cannot
be granted, there are several options.
{PrintBoss' Transfer Folder} – This variable sets the PB 50 Driver Spool Directory to the same location
indicated by the Transfer Folder/File (see Transfer File Settings). This only works if the Transfer File is set
to the local computer.
{Program Files Dir} – This variable sets the PB 50 Driver Spool Directory to the {Program Files Dir} of
the machine where PrintBoss resides. This should NEVER point to a directory not physically on the hard
disk of the workstation.
{ComAppData\...\Spool} – This variable sets the PB 50 Driver Spool Directory to
C:\ProgramData\Wellspring\Spool on operating systems beginning with Windows 7. This is the
recommended setting for the Spool Dir.
PrintBoss will generate a reminder after clicking OK that changes to the driver spool will not take effect until the
workstation is rebooted or the Print Spooler Service is restarted.

PrintBoss 24 Electronic Copy
CONFIGURATION SETTINGS SAVE LOCATION
This is set during installation to Local_User Registry (Standard).
See Chapter 3, Step 4 – Installation.
CAPTURE MODE
Capture Disabled
PrintBoss is deactivated when this option is selected.
Flag Trigger Required
PrintBoss looks for PB#INFO (or PBZINFO) in the data. This string has no spaces and is case sensitive – all capital
letters. The string specifies the PrintBoss form used to capture the data passed from your accounting software and
possibly other requirements such as the appropriate bank record to use.
See Chapter 23, Capturing and Assigning Text.
Always Capture
PrintBoss will attempt to process anything sent to the PrintBoss printer driver when this option is selected.
MISC SETTINGS
Suppress "No Flag in Document" warning
This option may be selected for accounting software that utilizes the PrintBoss Trigger or PB#INFO line to specify
the appropriate form to use in PrintBoss. The warning that a document without the PrintBoss Trigger has been
printed to the PrintBoss printer driver will not be generated when this option is selected. The document will simply
be ignored. Nothing will print.
Operate in ASP mode
This is only for Application Service Provider installations. ASP installations are NOT the same as Citrix or Terminal
Server installations. Please contact Wellspring Software, Inc., for licensing and details when installing PrintBoss for
an ASP.
Printer List Settle Time
This allows the Windows Printers list to "settle" in an environment where printers are shared. This feature is
especially helpful in Citrix or Terminal Server environments. The default value is 200.
Print Job Delete Secs
This option should only be used when instructed by a Wellspring Software support technician.
Render Method
The Render Method applies to the PrintBoss driver and only has an impact when the textcapt.hst file is created. For
most accounting applications, this is set to Default. Original is sometimes used for Great Plains Dynamics and
Special is sometimes used for Adagio. This option should only be used when instructed by a Wellspring Software
support technician.
ABOUT PRINTBOSS
Click on the HELP menu and select ABOUT to review system information for your PrintBoss program.
CHECK FOR PRINTBOSS UPDATES ONLINE
This option allows a workstation that is connected to the internet to poll the Wellspring Software web site to check
for a newer posted version of the software. If a newer version exists, options for updating are provided.
A current service contract is required to download an update.
An update will not and cannot overwrite or delete the bank files or the forms currently
being used.
Updates should only be run when all other users have CLOSED the PrintBoss program.
This option may be restricted by the security settings within PrintBoss.

PrintBoss
25 Electronic Copy
See Chapter 11, Security Features.
VERSION INFO
This section lists the version of the executable that is currently open. It also lists the version information for the
PrintBoss printer driver installed on the workstation.
LICENSE
This section lists license information including the serial number and site location. Please see your license
agreement for more detail.
DIRECTORIES
This section lists the directories for the PrintBoss program executable that is currently open and the Home directory
indicated by the settings.
The Accounting Hosts listed include the accounting software selected during a PrintBoss Installation along with any
additional accounting software setup within PrintBoss after the initial installation. Most editions of PrintBoss can be
setup to work with multiple accounting software packages.
Please see PrintBoss Directory under PrintBoss Driver Settings earlier in this chapter.
LIST CURRENT USERS
This button lists the current computers and users running this copy of PB32.exe.

PrintBoss
27 Electronic Copy
Chapter
5
THE PRINTBOSS PRINTER DRIVER
The PrintBoss printer driver is the link between the accounting software and the PrintBoss application. The
PrintBoss printer driver is designed to appear as a normal printer driver to the accounting software. However, this
printer driver does not actually print anything. It simply passes the data printed by the accounting software to the
PrintBoss application.
The PrintBoss printer driver should NOT be the Windows default printer, nor the accounting software’s default
printer. This printer driver should only be selected for printing documents intended to be formatted or processed by
the PrintBoss application.
Do NOT rename or modify the properties of the PrintBoss printer driver.
PRINTBOSS 50
PrintBoss 50 is the newest PrintBoss printer driver. It is NOT a kernel mode printer driver. For this reason, it is the
default driver to install on Windows 8, Windows 8.1, Windows 10, and 64-bit workstations, as well as Servers 2008,
2008R2, 2012, and 2016, Citrix servers, and Terminal Services environments.
It is possible to pass graphics from the accounting software to the PrintBoss Form when using the PrintBoss
50 driver with PrintBoss Enterprise. This is only available with the Enterprise edition.
MANUAL INSTALLATION OF THE PRINTBOSS 50 DRIVER
The driver is usually installed during installation. Occasionally, the printer driver needs to be installed or reinstalled
manually.
1. Navigate to the Windows’ Printers Control Panel.
2. Click on the Add printer wizard.
3. Choose to install a local printer.
4. DO NOT select Plug & Play to automatically detect a printer.
5. Select nul: (Local Port).
6. Click Next.
7. When asked for the printer driver, click on the Have Disk button.
8. Browse to the PrintBoss directory.
9. Open the appropriate folder (NT50).
10. Select the PB50Printer.inf file from the folder.
11. Click Open.
12. Click OK.
13. Click Next.
14. Select Replace the current driver if asked this question.
15. DO NOT change the Name of the PrintBoss printer driver.
16. DO NOT Share the PrintBoss printer driver.

PrintBoss 28 Electronic Copy
17. DO NOT set the PrintBoss driver as the default printer.
18. DO NOT print a test page.
19. Despite any Microsoft warnings about certificates or testing, complete the install of the printer driver.
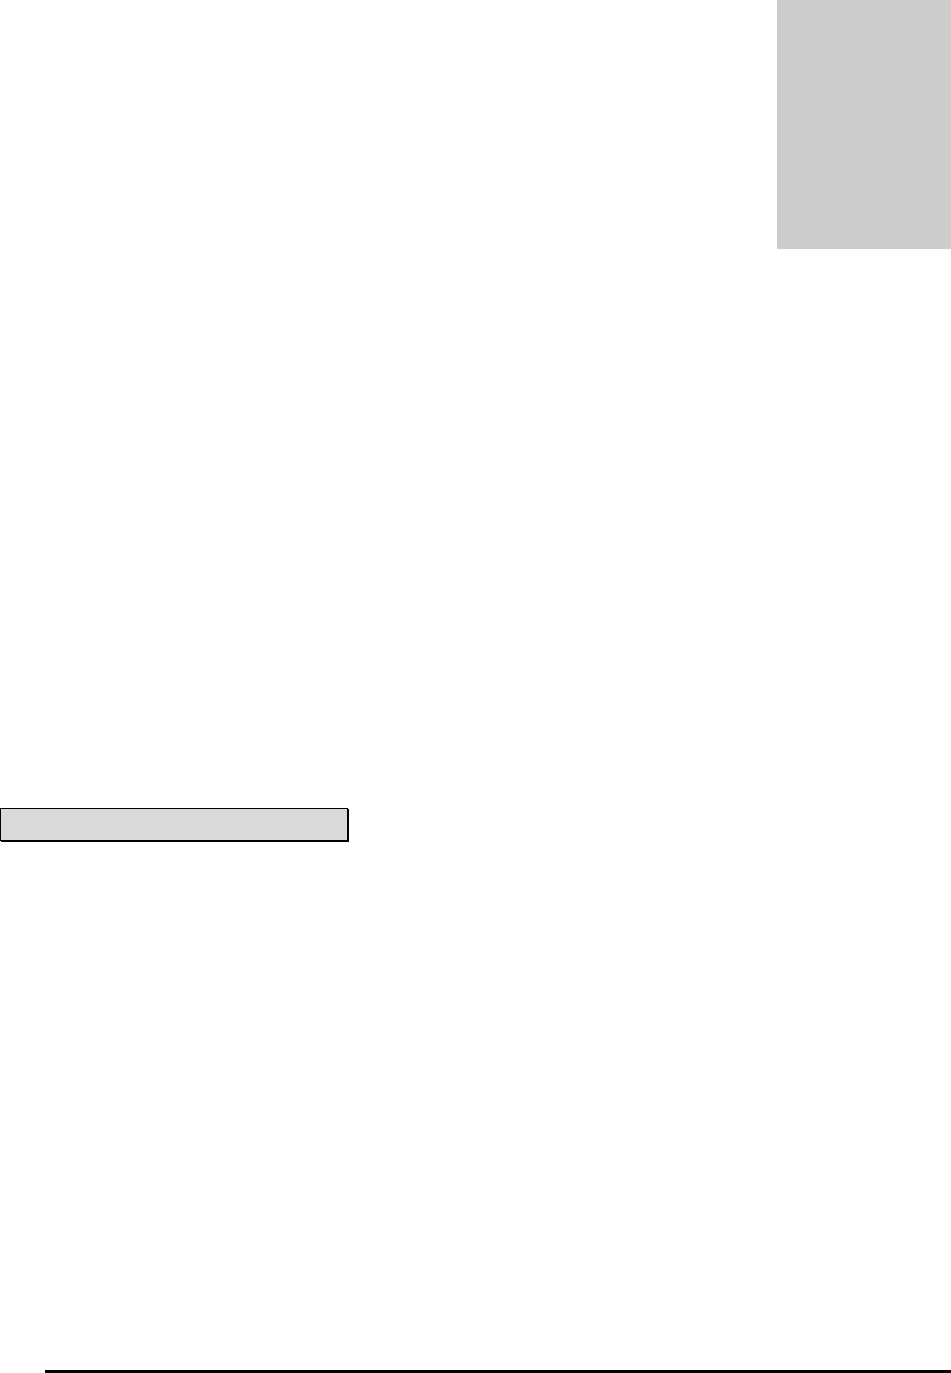
PrintBoss
29 Electronic Copy
Chapter
6
CITRIX OR TERMINAL SERVER INSTALLS
Citrix is a super-set of Terminal Services. For the remainder of this chapter, references to Terminal Server include
Terminal Server and Citrix server. Their treatment and setup for PrintBoss are the same.
A Terminal Server is actually a PC that is connected to a LAN (Local Area Network). Clients that connect to the
Terminal Server are running sessions on the Terminal Server and only the I/O (mostly keyboard, video, and mapped
printers) is transmitted back and forth to the client stations. The functions are the same as if the user is actually
sitting at the Terminal Server. As such, the PrintBoss printer driver must be installed on the Terminal Server and the
PrintBoss Home folder located on the LAN server or, in unusual cases, on the Terminal Server if ONLY Terminal
Server clients will be using PrintBoss. Since the PrintBoss Home folder is normally on the LAN server, only a
workstation install is necessary on the Terminal Server.
The installation of PrintBoss is not much different than installation on any LAN workstation (see Chapter 3,
Installation). The Setup.exe install program is run from an existing PrintBoss folder on the LAN. It is important to
run the setup while logged in as the Terminal Server Administrator. If this is the first install on the LAN, choose a
destination folder that will be accessible for all PrintBoss users, both LAN workstations and Terminal Server clients.
Within an accounting application, documents intended to be printed by PrintBoss should be sent to the PrintBoss 50
printer driver. The printer driver communicates with the PrintBoss application and will ultimately send the
documents to the printer specified by each user from the PrintBoss application.
NOTE:
The printer choices are saved by user on a Terminal Server.
Do NOT use PrintBoss with multiple operators using the same Windows User Name.
Do NOT install PrintBoss in the Program Files folder W2008 servers and above.
WARNINGS
The Terminal Server may be setup 2 different ways to operate as a workstation. This setup has a significant impact
on the settings in PrintBoss and how it is used.
Desktop Terminal Server Session
This method defines a shortcut that starts the Terminal Server session without identifying a specific application.
Once the session starts, the operator sees a Windows Desktop on the Terminal Server as if sitting at the Terminal
Server. The desktop includes the Windows Start menu, quick launch, taskbar, and tool tray along with any icons on
the desktop. When the operator starts an accounting application and that application initiates a call to PrintBoss, it
automatically loads PrintBoss and runs the batch of documents. This process is the same as a standard workstation
install of PrintBoss.
PrintBoss 30 Electronic Copy
Published Applications
This method identifies a specific application when the session is started. In fact, when the window opens, the only
application running is that specific application and there may be no other buttons within the session window (i.e. no
other application can be launched from the Terminal server). This is sometimes referred to as a Published
Application. This method is often used for security reasons. Normally when a batch is printed to the PrintBoss
printer driver, the driver loads the PrintBoss program (if it is not already running). In the case of a Published
Application, the session does not always allow other applications to start.
The work around for this is to set PrintBoss to NOT load automatically which is the default setting. Open the
PrintBoss program. Click on the OPTIONS menu and select PRINTBOSS DRIVER SETTINGS. Underneath the
Transfer File Settings area there is a checkbox called Load PB32.exe. UNCHECK this option. In addition, select
the Citrix setting that loads applications after printers are loaded or assigned. PrintBoss will open when a batch is
sent to receive the documents.
NOTE:
For Windows Servers 2008 and above, PrintBoss can be auto launched by the host accounting system. No changes
need to be made to PrintBoss to accommodate Published Applications.
PRINTBOSS SETTINGS
Many of these settings are the same as a standard PrintBoss installation.
NOTE:
Log in to the Terminal Server as ADMINSTRATOR before installing PrintBoss. After completing the setup,
individual users should be able to log in with all settings complete.
Options / Configuration
PRIVATE FOLDER NAMES
Check the Set Globally box in the upper right corner of this selection. This will set the work file and archive file
private folder names to {WinUserName}.
ENABLE PRINTBOSS WINDOWS PRINTER DRIVER PROCESSING
This option should be checked.
ALWAYS CAPTURE SETTINGS
Set according to the Installation Notes for your accounting software.
“PB#INFO” FLAG OVERRIDES ABOVE
This option should be checked.
Options / PrintBoss Driver Settings
PRINTBOSS DIRECTORY
This is the location of the PrintBoss directory, probably on the LAN server. Users will need FULL CONTROL of
this directory.
TRANSFER FILE SETTINGS
The recommended Transfer Folder/File Name for Terminal Servers is {ComAppData\...\Transfer}\
{WinUserName}. This path determines the "All Users" location on the server and creates the Transfer folder under
Wellspring\PrintBoss. It also MUST be in a location that is on the local hard drive of the Terminal Server. In some
instances, Terminal Servers are configured so the local drive is a letter other than C:\. In this case it would be
appropriate to use that letter, such as M:\ProgramData\Wellspring\PrintBoss\Transfer. This is a global setting for

PrintBoss
31 Electronic Copy
all Terminal Server users on each Terminal Server box. The Transfer File MUST be {WinUserName} (or some
other dynamic derivative) on a Terminal Server, otherwise Print Jobs will get mixed between users.
APPEND TO TRANSFER FILE
This option is checked only if required per the PrintBoss Installation Notes for the accounting software.
LOAD PB32.EXE
This should be checked for Desktop Terminal Server setups as well as Published Applications beginning with Server
2008.
PB 50 DRIVER SPECIAL SETTINGS
The default is {ComAppData\...\Spool}.
Users need Read/Write/Modify permissions to this directory, but Full Control is preferred. Restart the Print Spooler
(or restart your PC) once changes are made to this setting.
CONFIGURATION SETTINGS SAVE LOCATION
This should be set to Local Registry &User Registry (Standard).
CAPTURE MODE
Either Flag Trigger Required or Always Capture should be selected, depending on the Installation Notes for the
accounting software.
PRINTER SELECTION
Once PrintBoss is installed, each user may select a default LaserJet printer as the destination for PrintBoss
documents. Select FILE / PRINTER SETUP on the PrintBoss Master Application window.
The Windows’ printer list often displays each printer with a session label. If a user logs in during one session,
selects a printer with that session label, logs off, and then logs in at another time during a different session, the
printer will have a different session label even though it is the same printer. PrintBoss will perceive the different
label as a different printer. The original printer name will not be available and PrintBoss will generate an error
message when opening the application. PrintBoss will then automatically select the Windows default printer.
A work around is to select the option Use Windows Default in the Printer Setup window. PrintBoss will select the
default printer for the user's session.
PrintBoss Enterprise users have an option to define the "label" for the session and have PrintBoss truncate
this label or session "ID" when reviewing the list of printers. This eliminates the recognition conflict when
the user logs into different sessions and allows the specific printer to be selected and retained for all sessions.
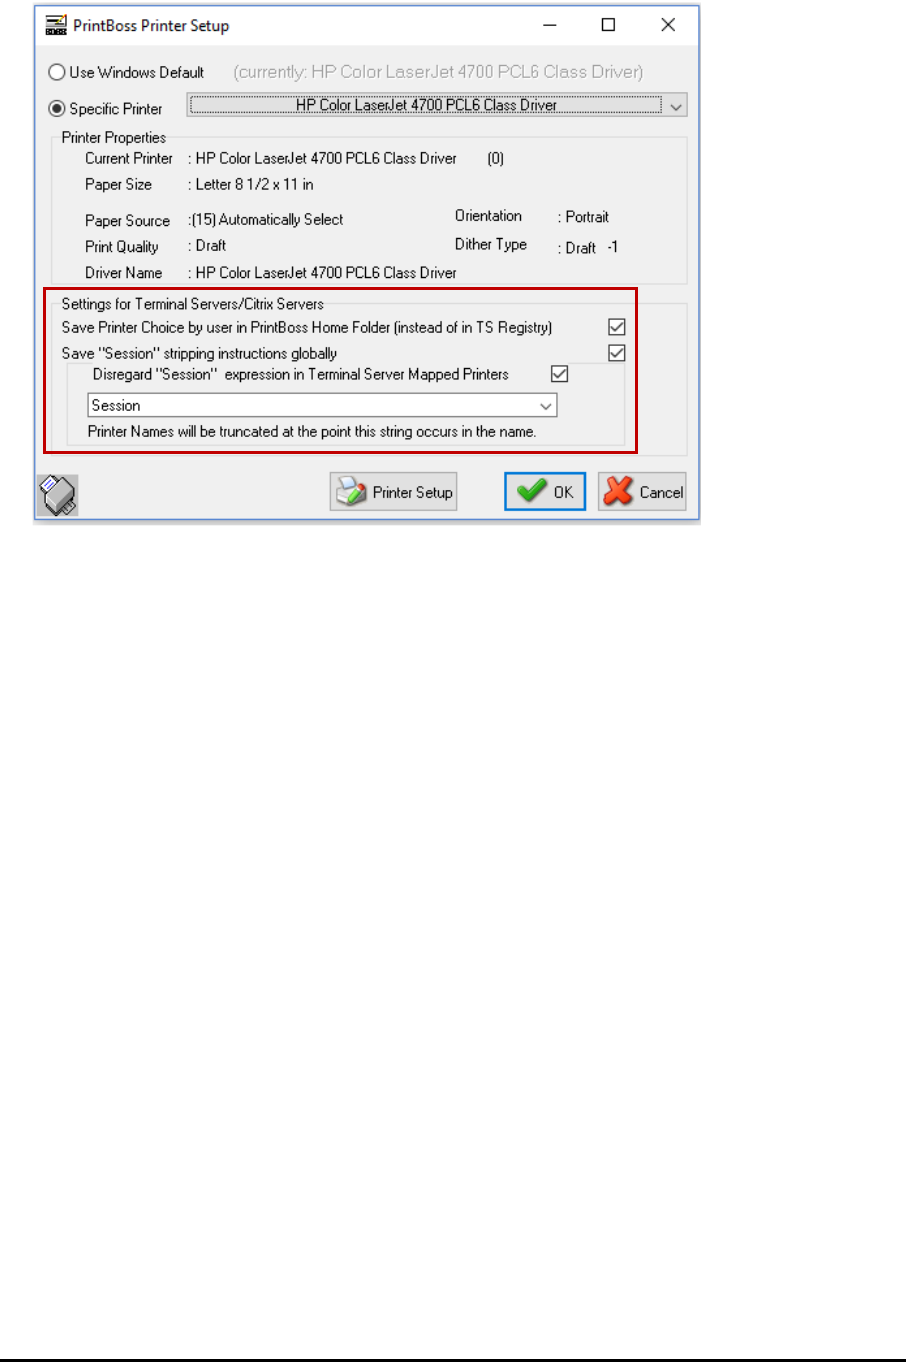
PrintBoss 32 Electronic Copy
The first checkbox saves these settings in the PrintBoss folder instead of the registry of the server.
The 2
nd
checkbox saves this setting globally so it applies to all users.
The 3
rd
checkbox enables the Session box to enter either Session or Redirected, depending on your
setup.

PrintBoss
33 Electronic Copy
Chapter
7
SOFTWARE UPDATES
PrintBoss Software can be updated with a valid service contract. This is the same service contract that allows you to
call Wellspring Technical Support for help. There are basically two ways to update your software.
1. Online through our web update.
2. Offline after a file downloads from our web site.
AUTOMATED ONLINE UPDATES
Online updates are automated for your convenience. Call your IT department if you have trouble performing live
updates through your firewall.
1. Open the PrintBoss Master Application window.
2. Click on the Help menu and select About.
3. Click on the List Current Users button at the bottom right of the About window to ensure all users have
closed PrintBoss except the person running the update.
4. Click on the Check for PrintBoss updates Online button at the top right of the About window.
a. This button is available for PrintBoss versions 5.x and above.
b. The About window also contains useful information about your version and the location of the
PrintBoss Home directory.
5. Click Yes to continue.
6. Click Run on the File Download – Security Warning window.
7. Click Continue if you receive a user account security warning.
8. Click Unblock if you receive a Block warning.
9. Other warnings may appear based on your internet browser software or setup. Answer appropriately to
continue with the live web update.
10. The PrintBoss Web Update window opens.
11. Click Update License from Web to refresh your license file.
a. PrintBoss will not allow you to continue when your License Date is expired.
b. Please call Wellspring Software to renew your Service Contract before your License Date expires.
12. Click Continue with Update if you have a valid License Date.
a. Please call Wellspring Software if you believe you have a current service contract and the License
Date shows as expired.
13. The web will initiate 2 downloads.
a. The first download is the updated PrintBoss software.
b. The second download is the updated PrintBoss Help files.
14. PrintBoss will launch Setup.exe immediately after the Help file is downloaded and will automatically
update your software.
15. Wait for the PrintBoss Setup/Update window. It should indicate PrintBoss has successfully updated. Press
OK.
You can now open PrintBoss and begin using your updated software. Please call Wellspring Software Technical
Support if you receive any errors during this process.

PrintBoss 34 Electronic Copy
OFFLINE MANUAL UPDATES
Offline updates are helpful when your firewall does not allow you to use the live update option. Even if you do not
have internet access at work, you can use this method from any computer to download an updated version of
PrintBoss and copy it to your local workstation at the office to initiate the update process.
1. Open a web browser and point it to www.wellspringsoftware.com. This opens the Wellspring Software
web site.
2. Roll your mouse over the Support in the ribbon towards the top of the page and select Downloads.
3. Click on setup.exe, which is the first entry, and Save this file to your computer or removable media.
a. DO NOT click on PBUpdate. This initiates a live web update and is available for PrintBoss
versions prior to 5.0.
4. Copy the setup.exe file to the root of the PrintBoss folder if you did not download it from a computer with
PrintBoss.
5. Double-click on Setup.exe and follow the prompts.
a. Host Accounting System – Select your current accounting system from the list if it is not
displayed.
b. Install PrintBoss into this directory – Confirm this is the current location of your PrintBoss
Home directory. This may be a server location or your local C:\ drive.
c. Install Type – Select Update.
6. Click Next to accept the License Agreement.
7. Click Next again. Select ‘Start Install Steps special for this host’ to update crystal reports or package
files for you accounting software.
8. Choose settings to complete the setup.
a. These settings are pulled from your current PrintBoss settings.
b. Re-Install “Printer 50” Printer Driver on Finish – The driver you are currently using should
already be selected.
c. Update "Desktop” icons calling PB32.exe – Check this option.
d. Update "Quick Launch" icons calling PB32.exe – Check this option.
9. Click Finish. PrintBoss will complete the installation.
10. Click OK on the PrintBoss Setup/Update window. It should indicate PrintBoss has successfully updated.
You can now open PrintBoss and begin using your updated software. Please call Wellspring Software Technical
Support if you receive any errors during this process.

PrintBoss
35 Electronic Copy
Chapter
8
BANK ACCOUNTS
Bank Accounts, or Bank Records, are typically setup in PrintBoss after the application is installed and provide
options to work with your accounting software. Additional records can be purchased as needed.
PrintBoss provides a database, or Bank List, that stores information used to print checks. Bank data is not pulled
from the accounting software’s database. The information stored can include the Bank Name, Bank Address, Bank
MICR information, and Company Information for the account. The MICR information includes the bank routing
number, account number, and check number format. Since PrintBoss can store multiple bank accounts, there is
normally some data from the accounting software that PrintBoss can use to select the correct bank record when a
check is printed through PrintBoss. Once the account is selected, PrintBoss can use any of the fields in the bank
record as the source for commands. In particular, the #MICR command is used to print the MICR across the bottom
of the check.
Initially, the Standard edition of PrintBoss provides 10 bank records for your convenience. More accounts can be
added by purchasing and installing a Bank Module. Each module, or Bank Key, adds 5 blank bank records to the
database in PrintBoss. When the number of purchased bank accounts reach 80 (14 modules), the number of available
records becomes unlimited. Contact Wellspring Software to purchase additional Bank Modules or visit our web site.
See Appendix A for a more thorough description of the fields on the PrintBoss Bank Edit window.
PrintBoss Enterprise has unlimited bank records.
CREATE A BANK RECORD
Fill in the fields that will be used for printing checks. Sample data is provided for many of the fields. If you do not
want to use or display a field, make sure it is blank.
NOTE:
Beginning in PrintBoss version 5.71.1, PrintBoss includes Wizards to assist in setting up Bank information as well
as Logo and Signature files.
1. Click on the Edit menu and select Bank List from the main PrintBoss window. The PrintBoss Bank List
opens. Initially, the Bank Code for each record starts with Unused.
2. Select the first available record.
a. Select an Unused Bank if one is available.
b. Click the plus button in the menu bar if you have unlimited banks and need to add a new
record or if you rebuilt your table after deleting records.
3. Select the PrintBoss Bank Edit window.
a. Double-click on the record; OR
b. Click the Edit Bank button.
4. Enter data for the appropriate fields. The following steps include recommendations.
a. Primary tab:
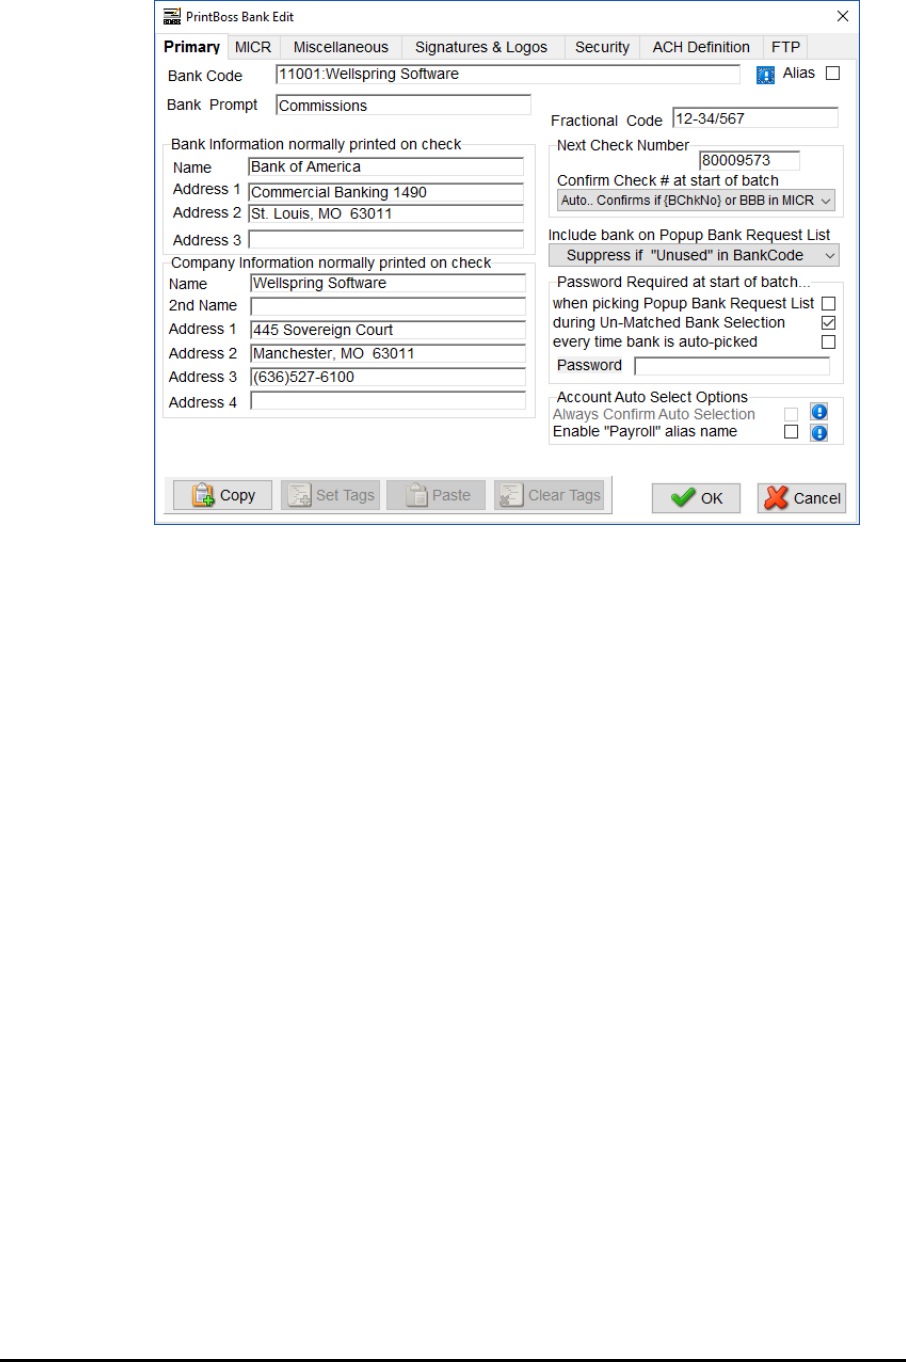
PrintBoss 36 Electronic Copy
i. Bank Code – Required. This should match the checking account code used in your
accounting software. Beginning with PrintBoss version 6.01.3, the default is 60
characters. Prior to version 6.01.3, this field is limited to 50 characters and can be
updated to 60 characters.
ii. Bank Prompt – PrintBoss will leave the Record number in this field if it is not changed.
Enter a prompt that will help you identify this account. The field length is 25 characters.
iii. Bank Information – Typically, the Name and Address1 fields are used. The Address1
field usually contains the city and state of the bank. The other fields in this section are
often blank. Each field in the Bank Information section has a length of 40 characters.
iv. Company Information – Fill in the fields to be printed on the check face. Unused fields
must be empty to prevent them from printing.
1. Name – The company name is entered when a logo is not used. The field
length is 60 characters.
2. 2
nd
Name – This field is available for a second name or d/b/a. This field is often
blank. The field length is 60 characters.
3. Address 1 – Enter the street address for the company. The field length is 40
characters for each address line.
4. Address 2 – Enter the city, state, and zip or postal code for the company.
5. Address 3 – Optional; may contain country, phone, fax, or email information.
6. Address 4 – Optional; may contain country, phone, fax, or email information.
v. Fractional Code – Enter the Transit number provided by the bank. Use the slash ( / )
symbol to represent the fraction symbol (–). The field length is 20 characters.
vi. Next Check Number – This field is ignored unless you are using accounting software,
such as QuickBooks, that does not print a check number to PrintBoss. If this is the case,
enter the next check number from the check registry. PrintBoss will prompt the user to
confirm or change this value at the beginning of each check batch. This field will NOT
update the check registry in the accounting software. The field length is 10 characters.
vii. Confirm Check # at start of batch – See the Installation Notes you printed for your
accounting software. Typically, this is set to Auto….
viii. Include bank on Popup Bank Request List – Optional. Typically, the word Unused is
left at the beginning of the Bank Code for unused bank records and Suppress if
"Unused" in Bank Code is selected from the drop-down menu. This will remove all
unused bank records from the popup Bank Request List when a Bank Code match is not
detected by PrintBoss.
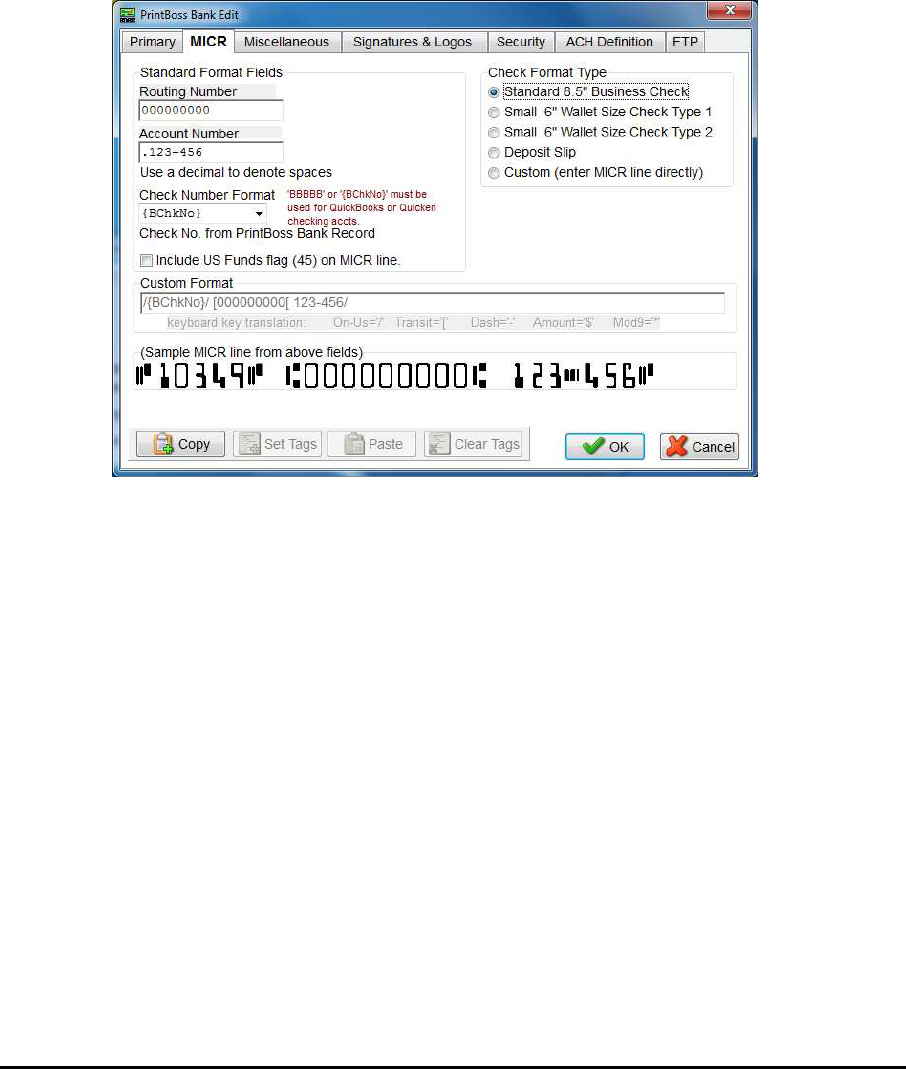
PrintBoss
37 Electronic Copy
ix. Password Required at start of batch – Optional. This feature provides the ability to
limit the use of this bank record. If a password is entered, the ability to view or edit the
bank record should be removed under Options/Security on the PrintBoss Master
Application.
x. Account Auto Select Options – Optional.
1. Always Confirm Auto Selection – This feature is only available when the
Enforce Exact Bank Code Match and Allow for Selection when multiple
Bank Codes match options are selected at the bottom of the Options /
Configuration / Internal tab in PrintBoss.
2. Enable "Payroll" alias name – This feature is only available when Allow bank
account to be AP and Payroll is selected at the bottom of the Options /
Configuration / Internal tab in PrintBoss.
b. MICR tab
i. Routing Number – Enter this value exactly as it is provided by your bank, including
dashes. This field allows a maximum of 11 characters to allow for longer routing
numbers with a dash.
ii. Account Number – Enter this value exactly as it is provided by your bank, including
dashes. Use periods to represent spaces. Spaces, and not the periods, will display in the
MICR Line. The maximum number of characters allowed is 20.
iii. Check Number Format – Select the value indicated by the Installation Notes printed for
your accounting software. Most accounting packages use CChkNo. QuickBooks and
Quicken use BBBBBB or BChkNo.
iv. Include US Funds flag (45) on MICR line – Select this option when the US Funds flag
is required. This is typically for Canadian checks written on US Funds.
v. Custom Format – This field cannot be edited unless the Custom radio button under the
Check Format Type section is selected. This is not recommended without the assistance
of as Wellspring Software technician.
vi. Sample MICR line – This graphic displays how the MICR will look on the check or
deposit slip.
vii. Check Format Type – Choose Standard 8.5" Business Checks for most applications.
c. Miscellaneous tab (Optional)
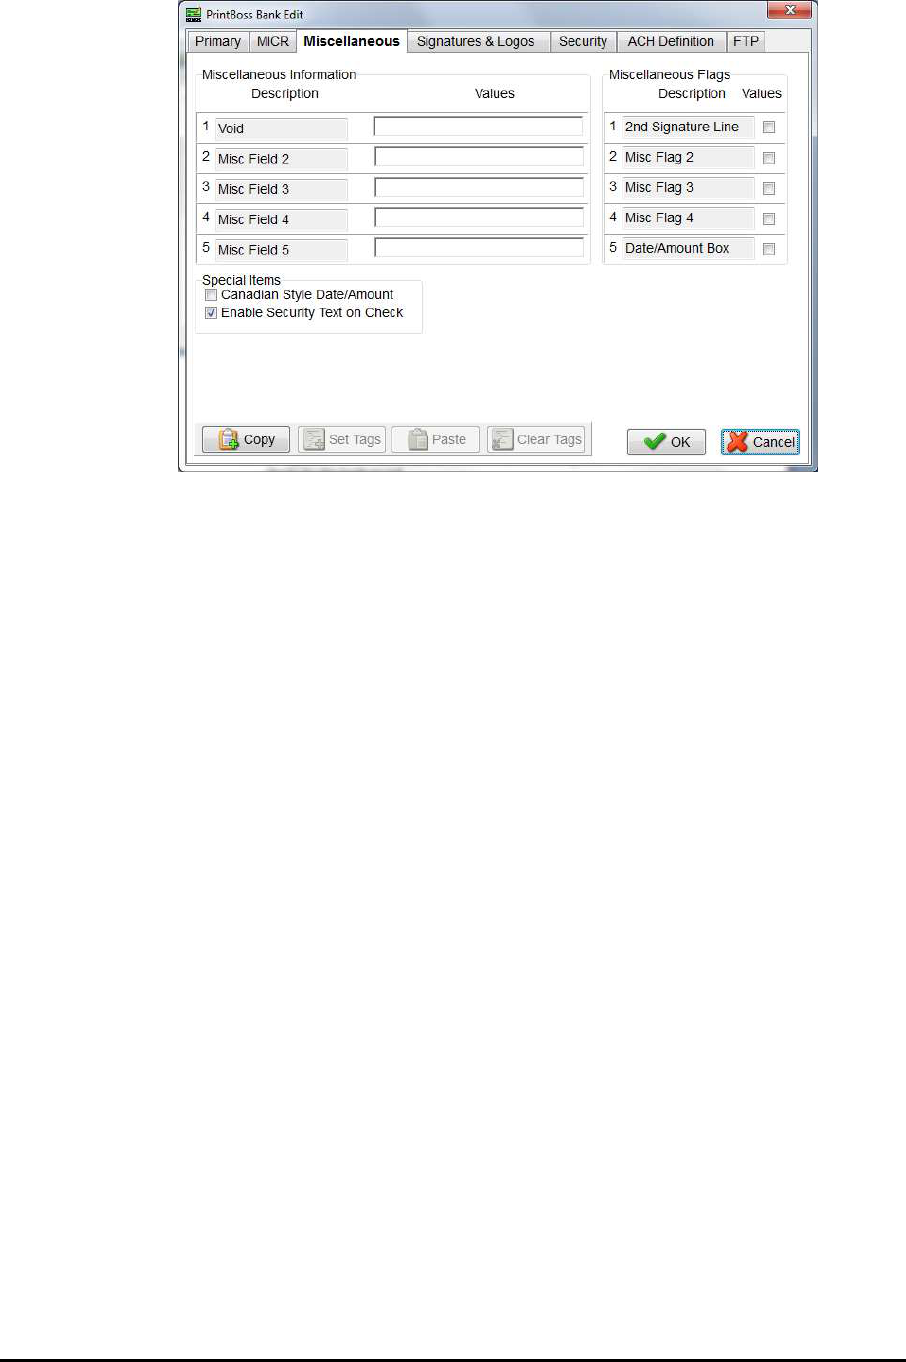
PrintBoss 38 Electronic Copy
i. Miscellaneous Information – Optional. These fields are available to accommodate
special circumstances, such as adding Text to the check that is specific to this bank
account. These fields are often used to hold EFT information as well. The Values field
can contain a special value or text and can be added to the check or used in a Positive Pay
or EFT file. The Description field can be edited to describe the item in the Values field.
The field length for each value is 40 characters.
ii. Miscellaneous Flags
1. 2
nd
Signature Line – Select this checkbox to add a second signature line to your
checks for this bank record.
2. Miscellaneous Flags – Optional. These fields are available to accommodate
special circumstances and evaluate to True when checked. The Description field
can be edited to describe the purpose of the flag.
3. Date/Amount Box – Select this flag to use the older Date/Amount Box format
instead of the newer Convenience Amount format. The newer format is often
preferred by banks that scan the dollar amount.
iii. Canadian Style Date/Amount – Select this checkbox if you want the style of the date
and amount on the check to follow the CPA Standard 006 format.
iv. Enable Security Text on Check – Remove this check box to remove the security text on
the upper right section of the check face.
d. Signatures & Logos tab (Optional)
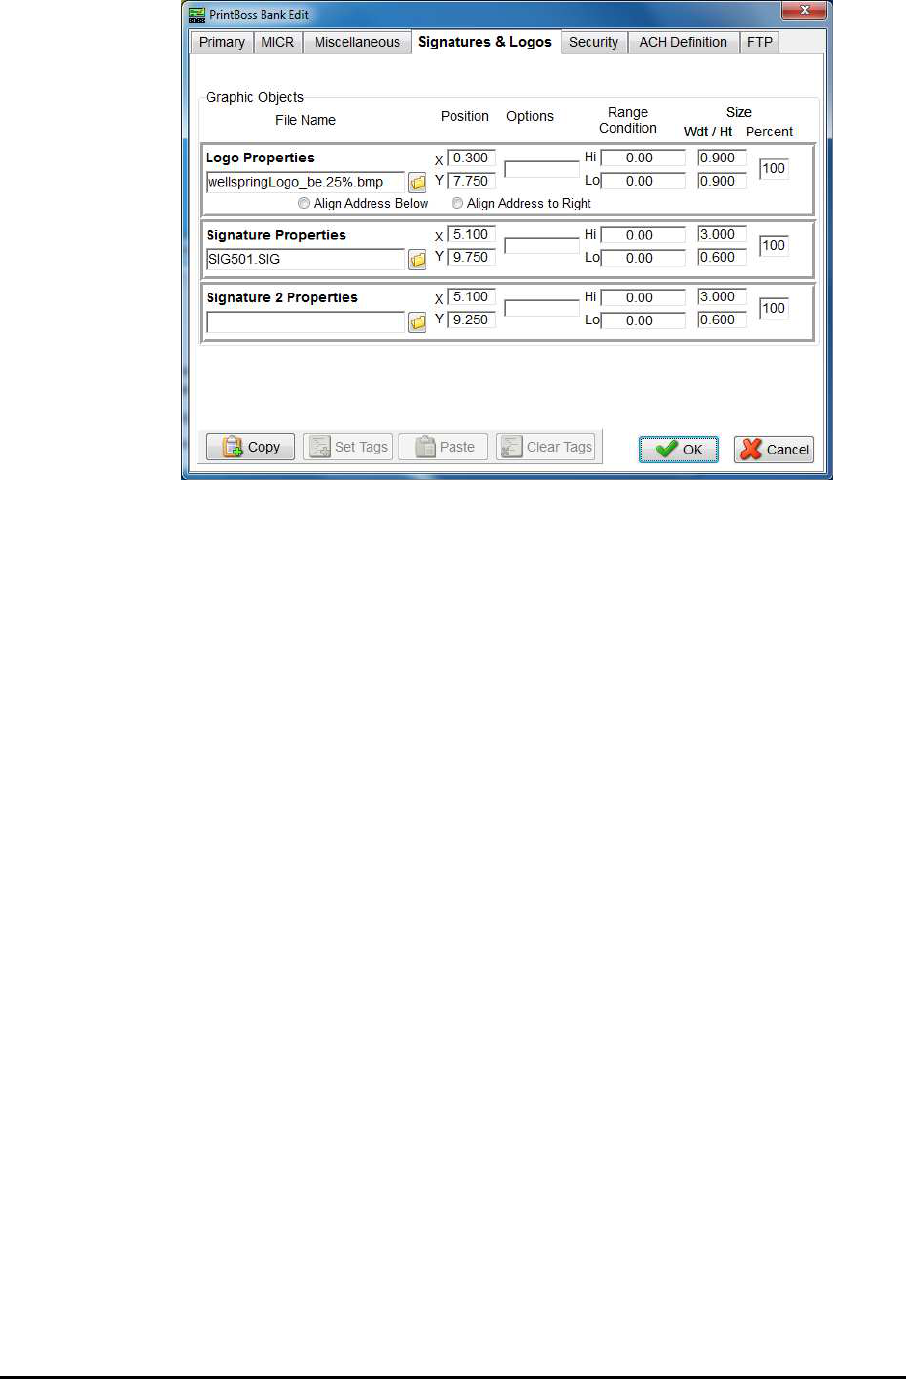
PrintBoss
39 Electronic Copy
i. File Name – Enter the file path and name, including the extension, or browse to select a
Logo or Signature for the appropriate field. The graphic files associated with these file
names should be stored in the Logos folder of the PrntBoss directory folder. These
graphics are bank specific and will only print when this bank record is used. The field
length is 40 characters.
ii. Position – Adjust the X (horizontal) and Y (vertical) positions for the graphic. These
measurements are in inches from the left and top edge of the page, respectively.
iii. Options – Enter an option to apply to the graphic. For example, /Watermark adds a
medium watermark to the graphic when the variable associated with this option is added
to the form (see Appendix A).
iv. Range Condition – Add a high and low dollar amount to determine when a signature
should print on a check. Example: Enter 10000 in the Lo field and 9999999 in the Hi
field of Signature 2 to only print the signature file associated with this field when the
check amount is greater than $10,000 and less than $10 million.
v. Size – Adjust the size of the Logo or Signature by inches (Width and Height) or
Percent. You cannot use both at the same time. Percent is the preferred method as it
maintains the aspect ratio of the Logo and Signature(s).
vi. Align Address – PrintBoss version 5.736 and above includes the options to align the
address ‘Below’ the logo or to the ‘Right’ of the logo. This feature automatically works
with newer PrintBoss Forms included with PrintBoss 6.0 and above.
e. Security tab (Optional) – See Bank Security later in this chapter.
f. ACH Definition tab (Optional) – See Ach Setup, Chapter 20, for more information.
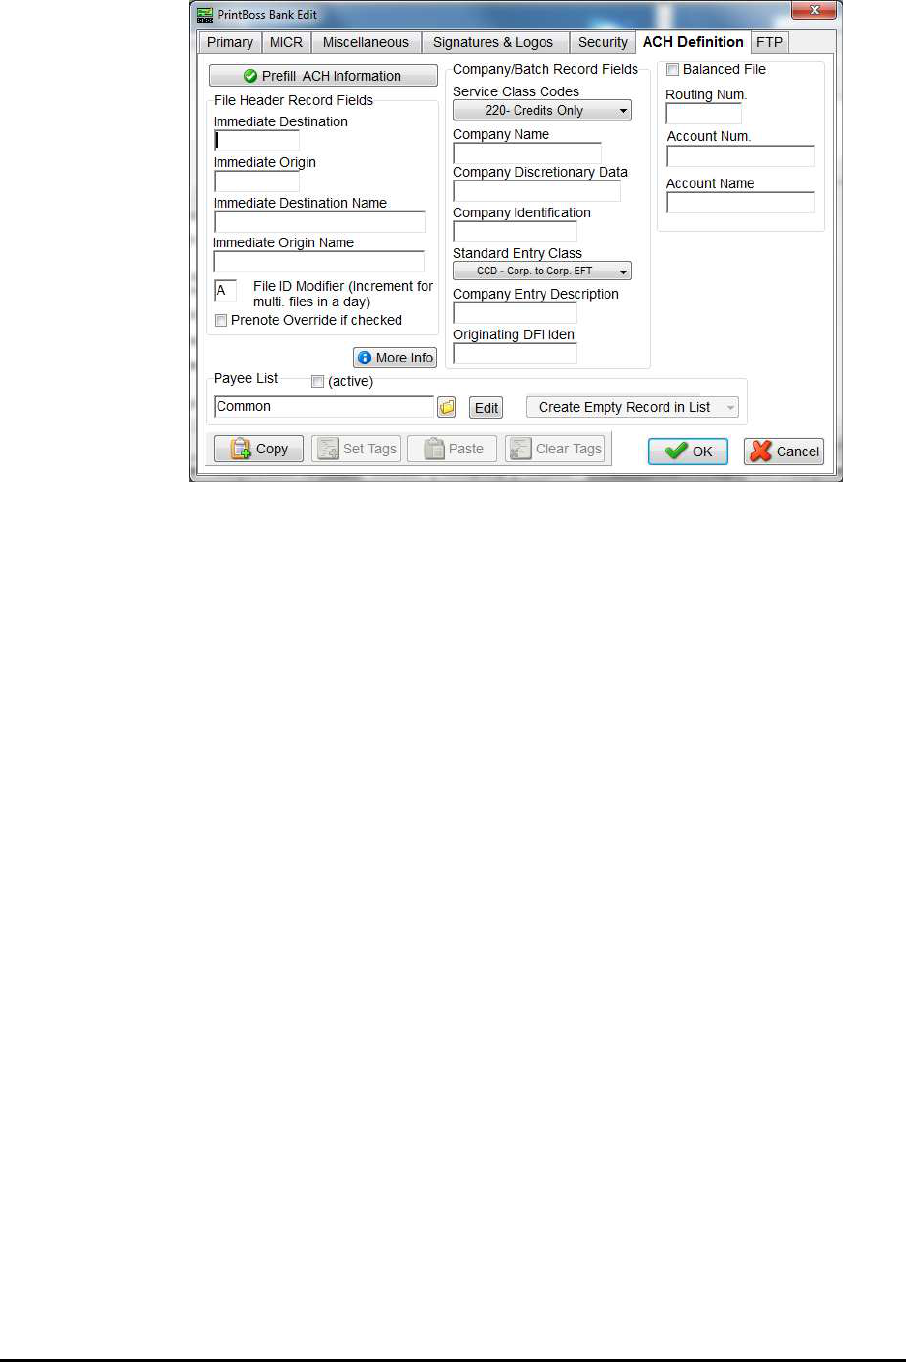
PrintBoss 40 Electronic Copy
i. Prefill AHC Information – Beginning with version 6.01.1, a prefill button has been
added to prefill fields from the Primary and MICR tabs of the Bank Record. NOTE:
This should not replace confirming this information with your bank, but does provide a
quick way to test ACH.
ii. File Header Record Fields - These are the fields referenced in the SignOn tab of the
ACH File Editor.
1. Immediate Destination – Enter the routing number for the ACH Operator that
will receive the file. The field name is {bACHImdDstNo}. The field length is 9
characters, but can be adjusted to 10 with the help of a Wellspring Software
technician.
2. Immediate Origin – Enter the routing number for the ACH Operator that will
send the file. Normally, this is the same value as the Immediate Destination
unless the bank provides other instructions. The field name is
{bACHImdOrgNo}. The field length is 9 characters, but can be adjusted to 10
with the help of a Wellspring Software technician.
3. Immediate Destination Name – Enter the name of the ACH Operator, bank, or
receiving point that will receive the ACH file. The field name is
{bACHImdDstName} and may contain up to 23 characters.
4. Immediate Origin Name – Enter the name of the ACH Operator, bank, or
sending point that is sending the file. The field name is {bACHImdOrgName}
and may contain up to 23 characters.
5. File ID Modifier – This field starts with ‘A’ and should be manually
incremented for each file printed in a single day. The field needs to be manually
reset for a new day if more than one file was sent previously. The field name is
{bACHFileIDMode} and is only 1 character in length,
6. Pre-Note Override if checked – This field is a global override command that
ignores the individual ‘Pre-Note’ settings in the Payee List records. This field
should only be checked when testing ACH with the bank or when the first file is
sent to the bank and should be removed after testing. New recipients can be pre-
noted in the Payee List.
7. The following is an image of the SignOn tab for the ACH File Spec where these
fields are used:
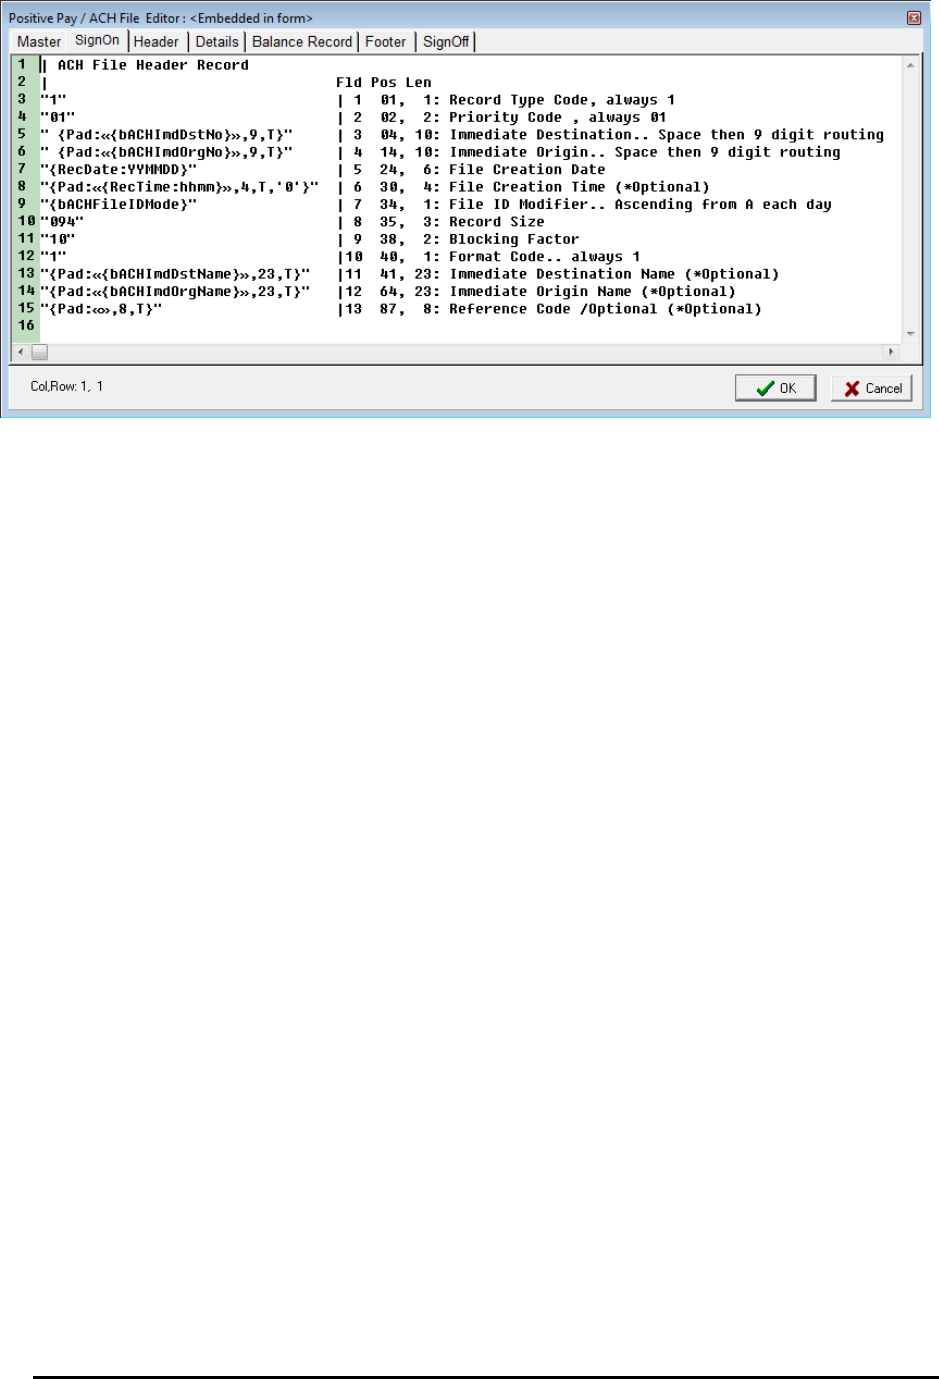
PrintBoss
41 Electronic Copy
iii. Company/Batch Record Fields – These are the fields referenced in the Header tab of
the ACH File Editor.
1. Service Class Codes – Select the appropriate Service Class Codes from the
drop-down menu. The field name is {bACHSvcClassCode} and contains 3
characters. The choices are:
a. 200 – Mixed Credits
b. 200 – Mixed Debits
c. 220 – Credits Only
d. 225 – Debits Only
e. 280 – Automated
Mixed Credits or Debits are used with banks that require a Balanced File.
2. Company Name – Enter the Company Name as it appears on this bank account.
This is typically a truncated version of the Immediate Origin Name entry. The
field name is {bACHCompName} and has a length of 16 characters.
3. Company Discretionary Data – This is an optional field to enter one or more
codes to identify this batch. This is for company use only. The field name is
{bACHCompDisc} and contains 20 characters.
4. Company Identification – Enter a specific company identifier, usually “1”
followed by the Employer Identification Number (EIN). The field name is
{bACHCompID} and is 10 characters in length.
5. Standard Entry Class – Select the appropriate code from the drop-down menu.
The field name is {bACHStdEntryClsCod} and contains 3 characters. The
choices are:
a. CCD – Corporate to corporate EFT; used to pay vendors
b. PPD – Prearranged payment and deposit; used to pay employees or
individuals
c. CTX – Corporate Entry Detail Record; A CTX file is only available as
a customization.
6. Company Entry Description – Enter a description for this batch that will be
communicated to the receiver, such as PAYROLL or PURCHASES. The
designation is established by the company. The field name is
{bACHCompEntry} and is 10 characters in length.
7. Originating DFI Identification – This value is typically the first 8 digits of the
originating bank’s routing number. The field name is {bACHOrgDFIID} and
contains 8 characters.
8. The following is an image of the Header tab for the ACH File Spec where these
fields are used:
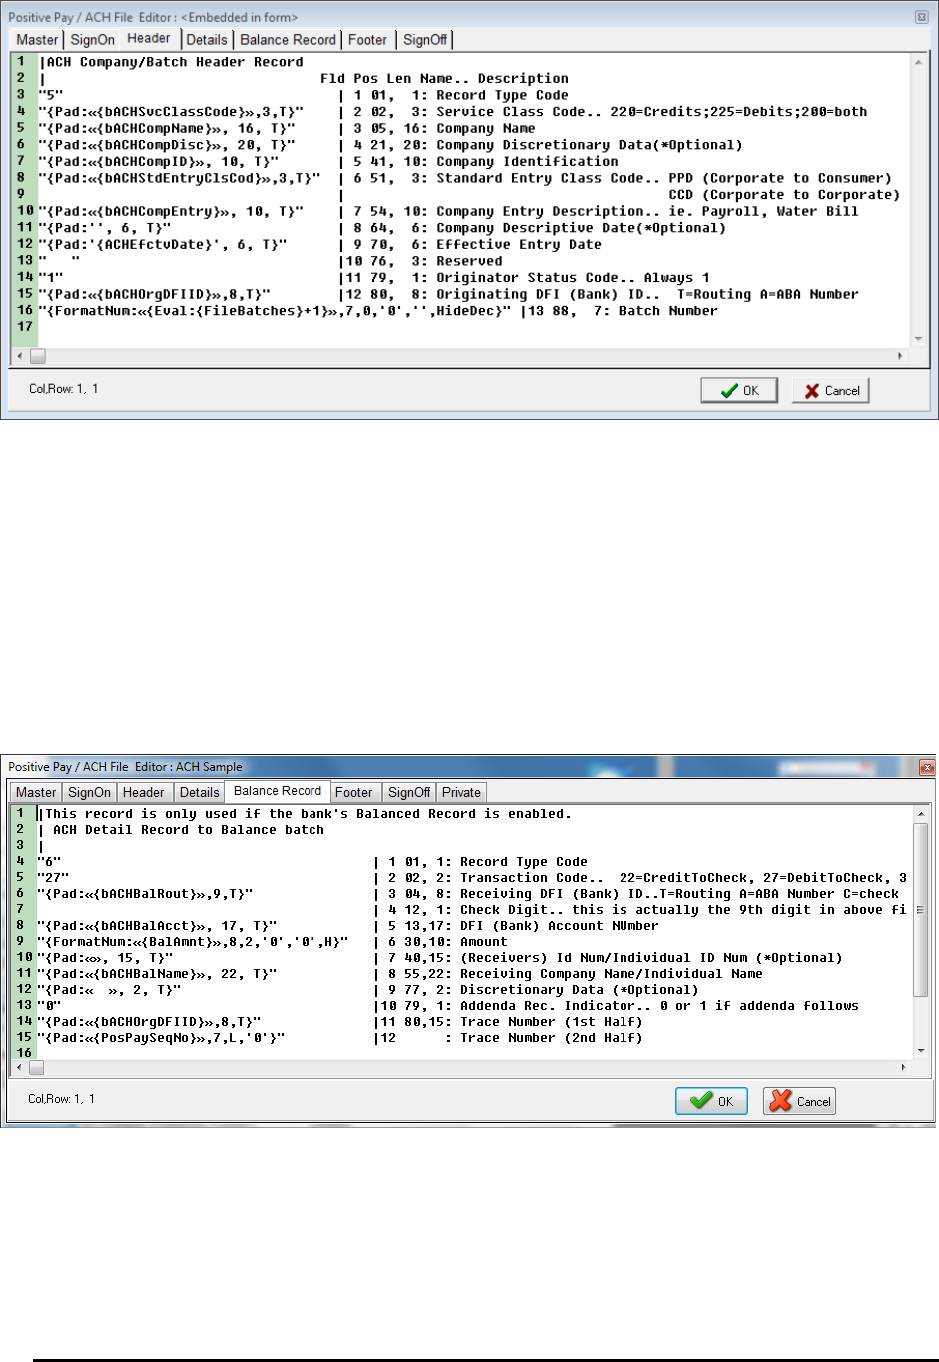
PrintBoss 42 Electronic Copy
iv. Balanced File – Select this column when the bank requires a balancing entry for the
credits (or debits) listed in the Detail section of the ACH file. The fields will then appear
on the Balance Record tab of the ACH File Editor.
1. Routing Number – Enter the routing number with leading zeros as entered in
the Originating DFI Identification field. The field name is {bACHBalRout} and
can accommodate up to 8 characters. A check digit is added by PrintBoss per
the ACH Rules to create a 9-character field.
2. Account Number – Enter the account number for this bank record. The field
name is {bACHBalAcct} and can accommodate up to 17 characters.
3. Account Name – Enter the company name as it appears on this bank account.
The field name is {bACHBalName} and includes 22 characters.
4. The following is an image of the Balance Record tab for the ACH File Spec
where these fields are used:
v. Payee List – The Payee List determines which vendors or employees will receive
payment through ACH (see the image at the beginning of page 38). This feature also
provides fields to store the required ACH information used on the Details tab of the ACH
File Editor. Alternatively, these fields may be assigned from data that is printed from the
accounting system.
1. (active) – Select the Payee List check box to activate this feature.
2. Browse button – Select the folder “Browse” button to select the name of a
Payee List. The Payee List is created under the Edit menu. Create a Payee List
for this bank before activating this option.
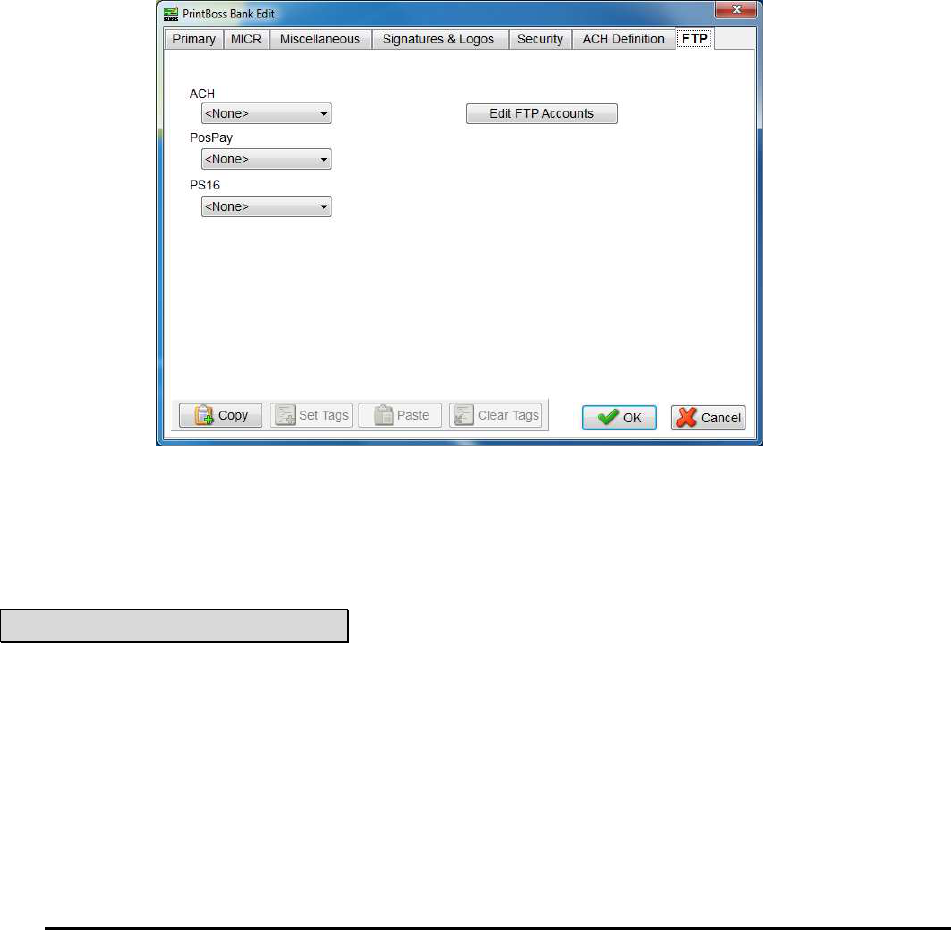
PrintBoss
43 Electronic Copy
3. Add Record – Click on the “add record” drop-down menu to choose how to
treat new records when there is no current match for the payee name. The
choices are:
a. Create Empty Record in List – Creates an empty record with only the
{DocRecip} name from the check batch. The record will not be active
in the Payee List.
b. Ignore Payee – This is the default beginning with PrintBoss version
6.01.3.
c. Alert with option to Add/Ignore – PrintBoss will prompt the user to
Add or Ignore a record that does not have a match in the selected Payee
List.
vi. More Info – Click this button to view a list of fields that must be assigned from data
printed from the accounting software or entered in the Payee List as well as optional
fields to assign.
NOTE: For more information on ACH, see Chapter 19.
g. FTP tab (optional) – See Chapter 21, FTP, for more information.
i. ACH, PosPay, and PS16 – Select a predefined FTP account if you will be using FTP
with any of these features. A separate FTP account can be selected for ACH, PosPay, and
PS16 files.
ii. Edit FTP Accounts – This button provides access to the FTP Editor if the user has
sufficient security to the FTP Editor.
5. Click OK to save changes to the information.
NOTE:
Changes made to Logos or Signatures in a bank record only apply to that bank record. If more than one bank
record includes a logo or signature that requires an adjustment, the change needs to be made to each bank record.
COPY/TAG/PASTE
Occasionally, it is beneficial to copy part or all of the information from one bank record to another. This is
accomplished using the Copy/Set Tags / Paste / Clear Tags buttons at the bottom of the Bank Edit dialog as follows.
COPY
1. Select the Bank Record you want to copy and click the Edit Bank button to open the Bank Edit dialog.

PrintBoss 44 Electronic Copy
2. Click the Copy button. Almost all of the fields from the current bank (on all tabs) will be stored on an
invisible clip board. These fields cannot be Paste at this point.
3. Proceed to Set Tags.
SET TAGS
Start with the instructions for Copy above.
1. Open the destination or new Bank Record.
2. Click the Set Tags button to select all fields. Only fields that are tagged will be filled from the clip board.
Tagged fields are displayed in yellow. Notice PrintBoss will not tag the Check Number Format, Check
Format Type, or Custom Format fields on the MICR tab. There are a couple of fields on the Primary tab
that are not highlighted as well.
3. Hold the CNTRL key and click in a field to remove the tag. This will toggle off and on.
4. Proceed to Paste.
PASTE
Start with the instructions for Set Tags above.
1. Click the Paste button after you are finished removing or adding tags to the Bank Record fields.
2. Proceed with Clear Tags.
CLEAR TAGS
This button will turn off the highlight on all fields.
1. Hold the CTRL button and click on a field to clear the highlight from that specific field.
2. Click the Clear Tags button after you finish pasting fields. This will not clear the data in the fields.
3. Click OK when you are finished.
ADDING BANKS
The Standard edition of PrintBoss includes 10 bank records. Additional bank records can be added by purchasing a
Bank Module, previously called a Bank Key, from Wellspring Software. Each bank module adds 5 bank records.
There are two ways to activate additional Bank modules. Your computer must have internet access to use either of
these methods. Please contact Wellspring Software if you do not have internet access.
PrintBoss Enterprise includes unlimited bank records. Simply click on the plus (+) sign in the menu bar of
the PrintBoss Bank List to add bank records. Beginning in version 6.01.4, PrintBoss automatically adds 5
bank records when there are no ‘Unused’ bank records.
There are two ways to activate additional Bank modules. The computer must have internet access to use either of
these installation methods. Please contact Wellspring Software if you do not have internet access.
Click UTILITIES from the main PrintBoss window and select INSTALL MODULES / BANK LIST
MODULES / INSTALL BANK MODULES. Enter the codes provided with the bank module purchase.
Or use the online installation method from any computer that has PrintBoss installed. Enter the following
URL into your web browser www.WellspringSoftware.com/downloads/demos.aspx. Click on the link for
PBBanks.exe and select Run or Save.
BANK LIST MAINTENANCE
PrintBoss has the ability to Import/Export bank lists beginning in version 5.31.1. The user must first login as
Supervisor (Administrator) before using this feature.
IMPORT BANK LIST
PrintBoss can import an Excel file saved as a *.csv file.
1. Open Excel.
2. Enter the column labels in Row 1.
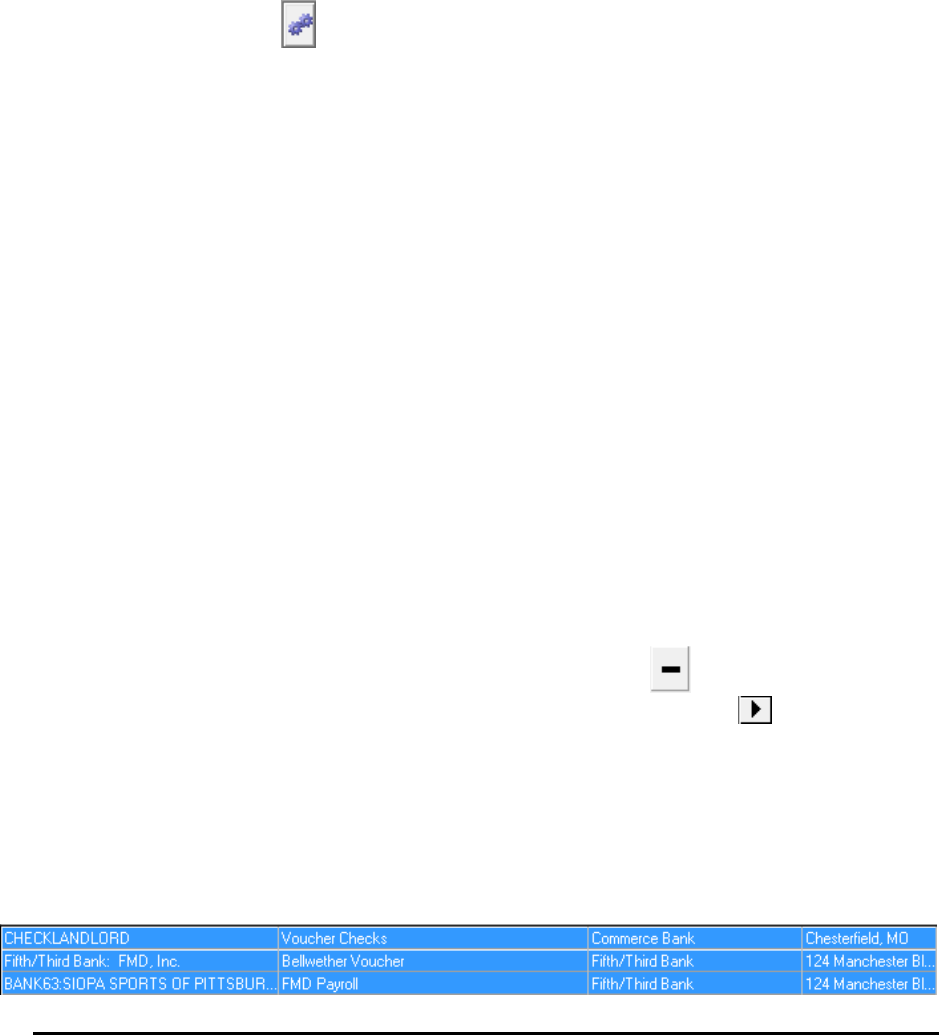
PrintBoss
45 Electronic Copy
a. The labels need to exactly match the name and order of the PrintBoss bank list.
b. You do not need to enter labels for columns if you do not have data. PrintBoss will enter default
values automatically.
3. Enter or import the Bank Records by row.
a. Do not leave blank rows.
b. You cannot import more bank records than licensed in PrintBoss.
4. Save Excel as a *.csv file.
5. Open PrintBoss.
6. Login as Administrator.
a. Click on the File menu and choose User Log-In.
b. Enter the supervisor name and password. The defaults are:
i. Operator Name – Administrator or Supervisor.
ii. Password – ADMIN (This is the Master Password and may have been changed on the
Security Settings window. It is case sensitive beginning in PrintBoss v.5.71.3).
7. Click on the Edit menu and select Bank List.
8. Click on the Tools button to the left of the Bank Code label.
9. Select Import.
10. Navigate to the location of the *.csv file.
11. Select the *.csv file.
12. Click Open.
PrintBoss will populate the Bank List with this data.
EXPORT BANK LIST
1. Open the PrintBoss Master Application window.
2. Login as Administrator.
a. Click on the File menu and choose User Log-In.
b. Enter the supervisor name and password. The defaults are:
i. Operator Name – Administrator or Supervisor.
ii. Password – ADMIN (This is the Master Password and may have been changed on the
Security Settings window. It is case sensitive beginning in PrintBoss v.5.71.3).
c. Click OK to continue.
3. Click on the Edit menu and select Bank List.
4. Hold down the Shift or Ctrl key to select a range of bank records.
a. Shift allows you to select contiguous records.
b. Ctrl allows you to select non-contiguous records.
5. Right-click on the selected records and choose Export.
6. Click Yes to continue.
7. Enter a name and destination for the file.
8. Click Save.
DELETE BANK LIST RECORDS
Single Bank Records can be deleted by selecting a record and clicking the minus button in the menu bar or by
right-clicking on a file and selecting delete. The selected record will always have the arrow in the left column.
Multiple Bank Records can be deleted using the Shift or Ctrl keys to select a range of records. Ranges are
highlighted in blue.
1. Open the PrintBoss Master Application window.
2. Click on the Edit menu and select Bank List.
3. Select a range of Bank Records. Use one of the following methods:
a. Click on the first record in the range. Hold the Shift key and click the last record in the range.
The range will be highlighted in blue. This method works for contiguous records.

PrintBoss 46 Electronic Copy
b. Click on the first record in the group. Hold the CTRL key and click each record you want to
delete. The records in the range are highlighted in blue. This method works for non-contiguous
records.
4. Right-click on one of the highlighted records and select Delete.
NOTE:
Be sure to right-click on a blue highlighted record before selecting delete. Otherwise, the wrong record will be
deleted. In the example below, the record with the arrow will be deleted instead of the blue highlighted records.
REBUILD TABLE
The Bank List table will automatically try to Rebuild after records are deleted. This can only take place when no
other users have PrintBoss open. When the table does not rebuild, the total number of records in the list does not
update to reflect the true number of records. You can Rebuild the table manually when everyone is out of PrintBoss.
1. Open the PrintBoss Master Application window.
2. Click on the Edit menu and select Bank List.
3. Left click on the Tools button to the left of the Bank Code label.
4. Select Rebuild Table.
PrintBoss will provide a confirmation window before rebuilding the table.
SORT BANK LIST RECORDS
There are two ways to sort records in the Bank List:
1. Click on the drop-down menu in the menu bar and choose a sort order.
a. Natural Order – The order the records were originally numbered (Unused Bank01, Unused
Bank02, etc.) or imported.
b. Bank Code Order – This is an alpha-numeric field.
c. Bank Prompt Order – This is an alpha-numeric field.
d. Bank Name Order – This is an alpha-numeric field.
e. Company Name Order – This is an alpha numeric field.
2. Click on one of the darker gray labels to sort by that label. These labels match the last four choices in the
drop-down menu.
Numbers appear before letters. PrintBoss adds a yellow highlight to the selected Sort column. This sort selection is
retained when closing PrintBoss.
ADJUST MICR PLACEMENT
The location of the MICR line is calculated by PrintBoss based on the directives passed in the #MICR command.
Typically, this placement is accurate for a check printed at the bottom of an 11" page. Sometimes there are small
differences in alignment from printer to printer. A separate adjustment can be made in the Configuration of
PrintBoss to correct the alignment. Once this is made, it should not need to be changed unless the printer, printer
driver, or operating system is changed.
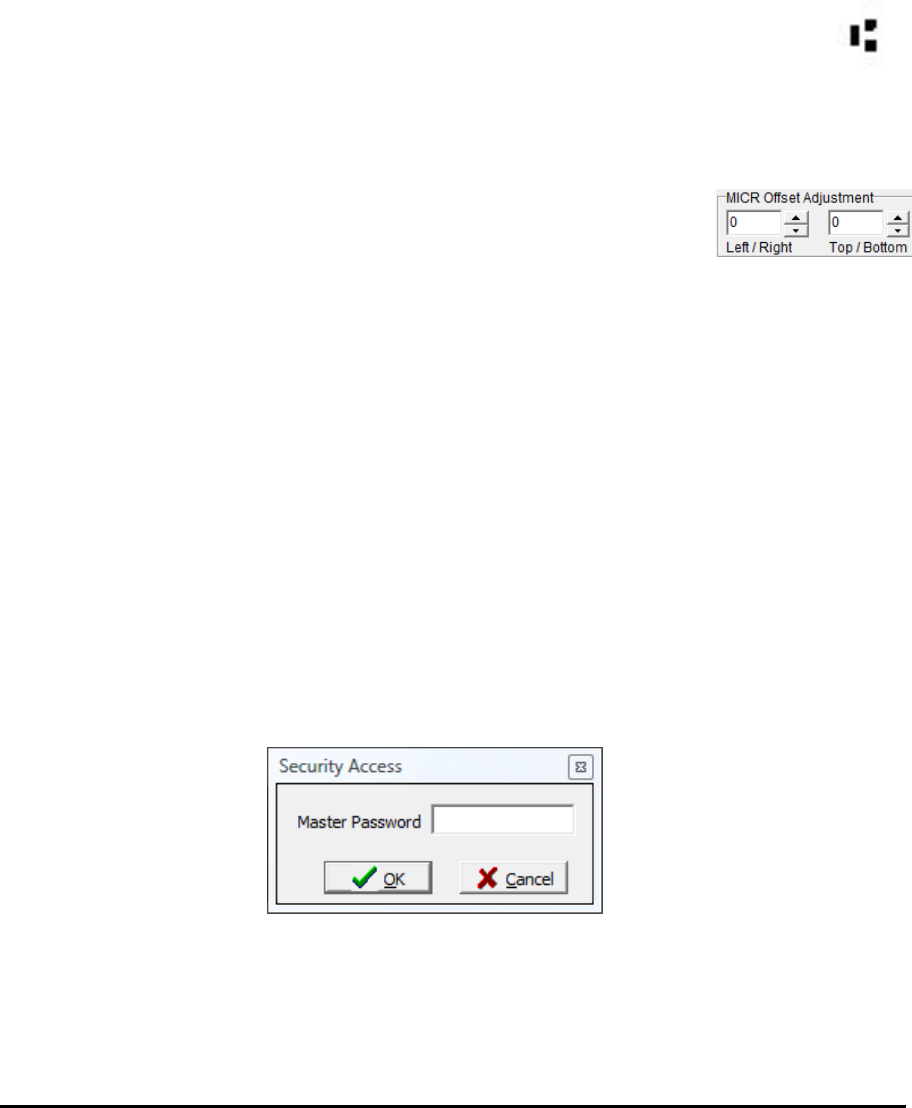
PrintBoss
47 Electronic Copy
The MICR Offset Adjustment is set in PrintBoss both vertically and horizontally. This setting is global for all
forms and is workstation and printer specific.
Select OPTIONS / CONFIGURATION from the PrintBoss Master Application window to access the adjustment
settings. The adjustments may be completed with the help of the MICR Adjust Wizard or by manually adjusting the
values. It is best to use the values calculated by the MICR Adjust Wizard.
MICR ADJUST WIZARD
Click on the MICR Adjust Wizard button to open a step-by-step adjustment wizard. This method can be used with
US and Canadian style checks. Follow the steps for the wizard to satisfactorily adjust the placement of the MICR.
Click on Finish to exit the Wizard. Upon completion, the MICR Offset Adjustment values will be modified.
MANUAL MICR PLACEMENT ADJUSTMENT
An alternative method is to manually adjust the settings. This method is seldom used as checks no longer
come with the Transit character symbol on the back of the check as shown on the right.
Adjust the horizontal (Left/Right) and vertical (Top/Bottom) alignments independently of each other so the laser
printed "Transit Character" overlays the Transit Character preprinted on the back of the check stock. (Hold printed
copy up to the light to see if it is properly aligned). This adjustment may be completed with the help of the MICR
Adjust Wizard or by manually adjusting the values.
These measurements are in thousandths of an inch to allow for very accurate placement.
Start with larger numbers such as increments of 50 to be able to see the initial adjustment,
then fine tune with smaller values. Decrease the MICR offset to shift the forms Left or Up.
Once the value reaches 0, decrease into negative numbers if further adjustment is needed.
MICR adjustment settings are saved locally on the workstation. If PrintBoss is running from a shared drive, settings
on each workstation can be adjusted without impacting the other workstations.
MICR PLACEMENT RANGE
As each piece of paper runs through the printer with slight variations, no two pages will print exactly the same. For
this reason, a range of placement is acceptable according to the American Banking Association and the Canadian
Payments Association.
BANK SECURITY
Security can be added to each Bank Record to define the users who may access the Bank Record. This process
starts with enabling bank security.
SETUP GENERAL SECURITY (OPTIONAL)
Click on the Options menu on the PrintBoss Master Application window and choose Security.
1. Enter your Master Password. The default Master Password is ADMIN. The password is case sensitive
beginning with PrintBoss version 5.71.3. If this has been changed, contact your Administrator. See
Chapter 11, Security Features, for more information.
2. Click OK. The Security Settings window opens.
3. Click on the Enable User Security in Banks button at the bottom of the General Settings tab.
4. Select Enable Bank User Security and click OK. The name of the bank security button changes to
Disable User Security in Banks.
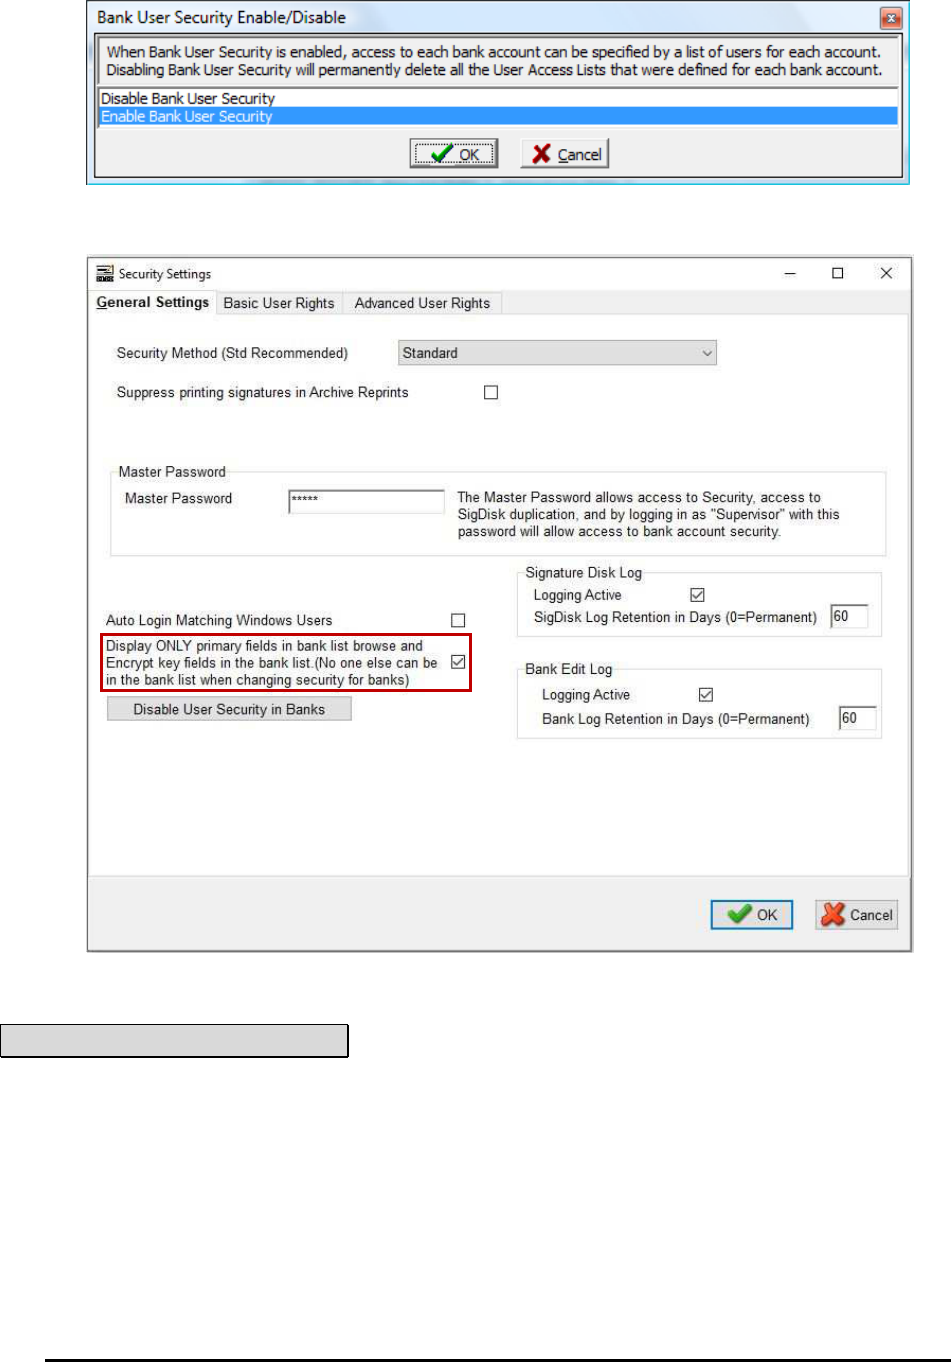
PrintBoss 48 Electronic Copy
5. Select the Display ONLY primary fields in bank list browse… option to hide sensitive information on
the Bank List and encrypt key fields.
6. Click OK to exit the Security Settings window.
Once the bank security is enabled, log into PrintBoss as the Administrator.
NOTE:
It is not mandatory to create user accounts on the Security Settings window. Bank records can be secured by
entering the Windows Users names on the Bank Edit Security tab as described below. This only applies to Bank
Security.
LOG-IN AS ADMINISTRATOR
1. From the PrintBoss Master Application, click on the File menu and choose User Log-In.
2. Enter the Operator Name for the Administrator/Supervisor (the default is Administrator).
3. Enter the Master Password (the default is ADMIN). The password is case sensitive beginning with
PrintBoss version 5.71.3. The log-in window will close after a successful log-in.
Next, add security to a Bank Record.
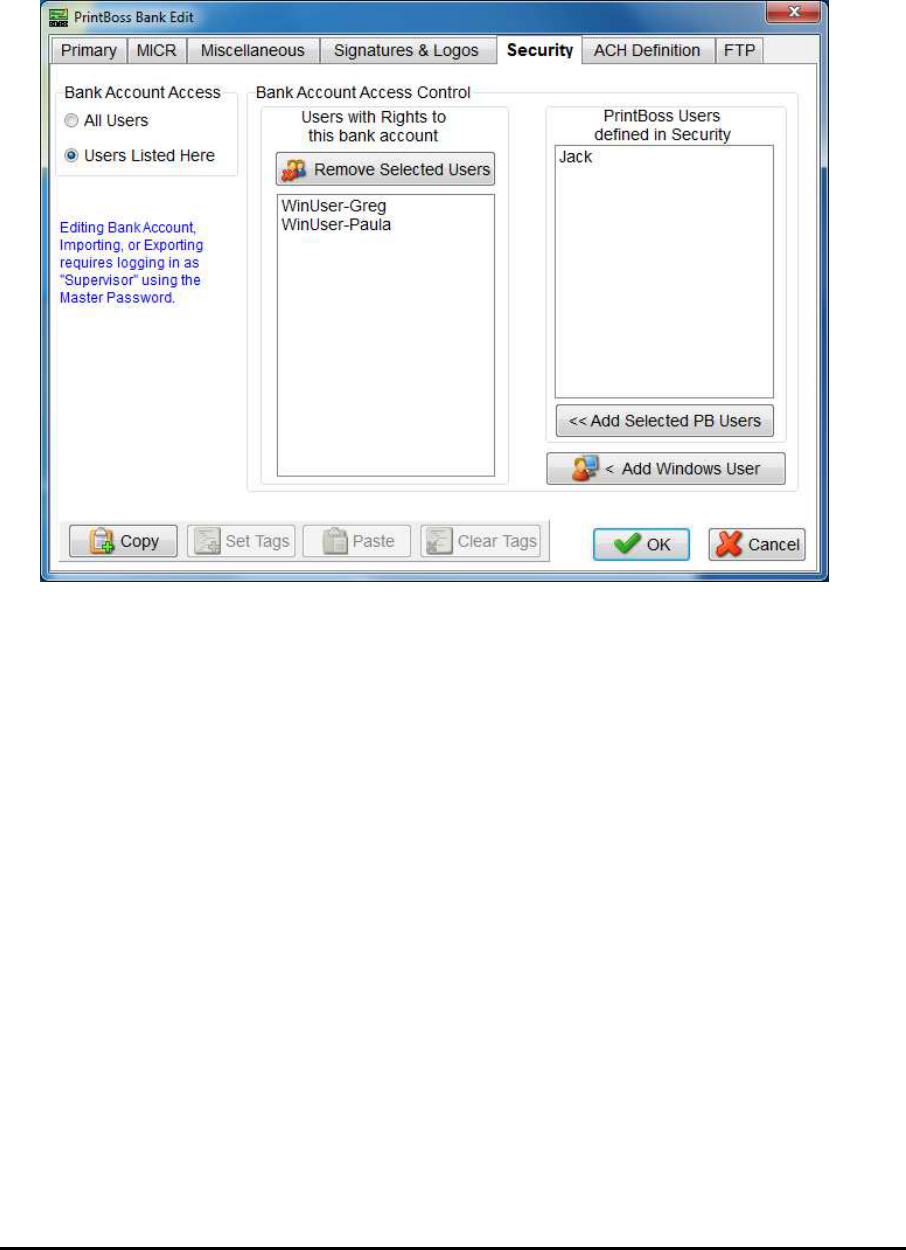
PrintBoss
49 Electronic Copy
SETUP BANK SECURITY
1. Click on the Edit menu and choose Bank List.
2. Select a bank and click the Edit Bank button.
3. Select the Security tab.
4. Click the Users Listed Here radio button.
5. There are two methods for adding names to your security list:
a. PrintBoss Defined Users
i. The far-right column lists the users defined in PrintBoss Security as described under
Setup General Security above.
ii. Select one or more name(s) from the right column and click the Add Selected PB Users
button. The name(s) will move to the left column.
b. Windows Users
i. Click on the Add Windows Users button at the bottom of the right column. The
PrintBoss ‘Add Windows User Addition’ window opens.
ii. Enter the WinUserName of the person who should have access to this Bank Record.
iii. Click OK when you are finished making changes to this bank record.
6. Click Close when you are finished with the bank list.
Only people in the Users with Rights to this bank account list will be able to open or edit this Bank Record.
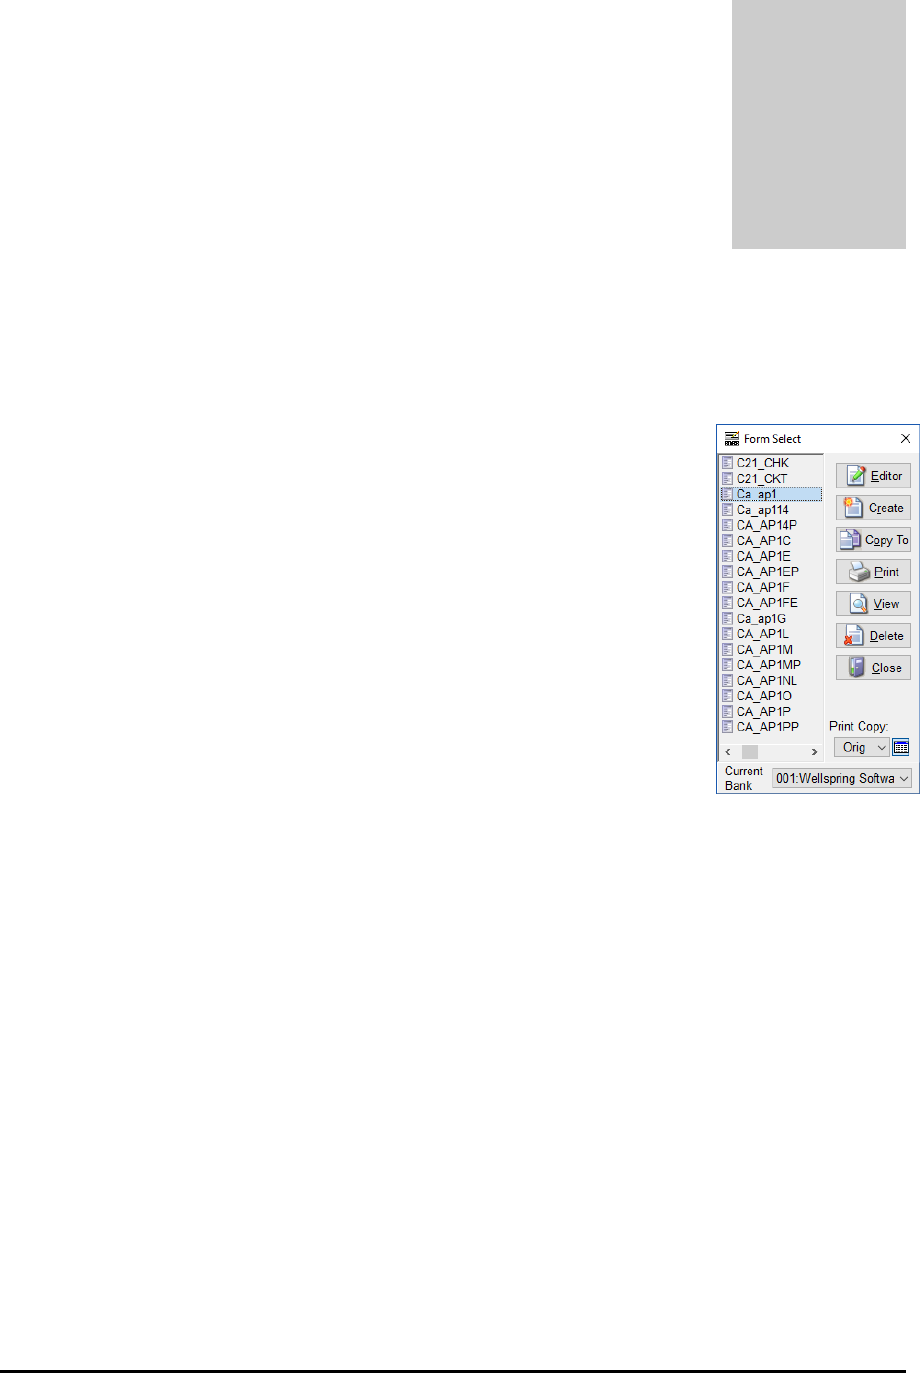
PrintBoss
51 Electronic Copy
Chapter
9
FORM FILES
When PrintBoss captures a file or a print job from the accounting software, the PrintBoss Form File (.PBF) is the
conductor that controls if and how all the data will be used. This includes:
Add background graphics and text to the form
Place data from the PrintBoss Bank Record
Select and place graphic/logo/signature files
Reformat using data passed by the accounting software
Add conditions
Manage copies
STANDARD FORM FILES
Standard check form files are provided for several accounting software packages in order
to expedite the installation and use of PrintBoss. These forms are installed automatically
during the PrintBoss setup process based on the Host Accounting Software selected on the
first installation screen. Additional forms can be added by running setup again and
selecting a different Host Accounting Software at the top of the window and then selecting
the Add Different Accounting Host Files radio button.
A list of accounting software supported by standard forms can be found in Appendix B of this manual as well as on
the Support Documents page of our web site. Click the Host Accounting Software folder and select the PrintBoss
Product Compatibility List to view this information.
CREATE A NEW FORM FILE
PrintBoss allows you to create new custom forms in addition to the standard forms included with PrintBoss. A form
is created to work with the specific data layout received from the accounting software.
Please see the Installation Notes specific for the accounting software or Chapter 22, Custom Interfaces.
1. Open the PrintBoss Master Application window.
2. Click the Edit menu at the top of the screen and select Form Files to display the Form Select window
(shown at right). The list is already populated with the standard forms available for your specific
accounting software. As you add different accounting host files, additional forms will be added to the list.
3. There are two ways to create a new form
a. Click the Create button to create a new form with all the appropriate PrintBoss structure minus
the design scripts (the Object tabs are blank).
b. Select an existing form close to your needs and select the Copy To button. This method is
described further in the Modify an Existing Form section later in this chapter.
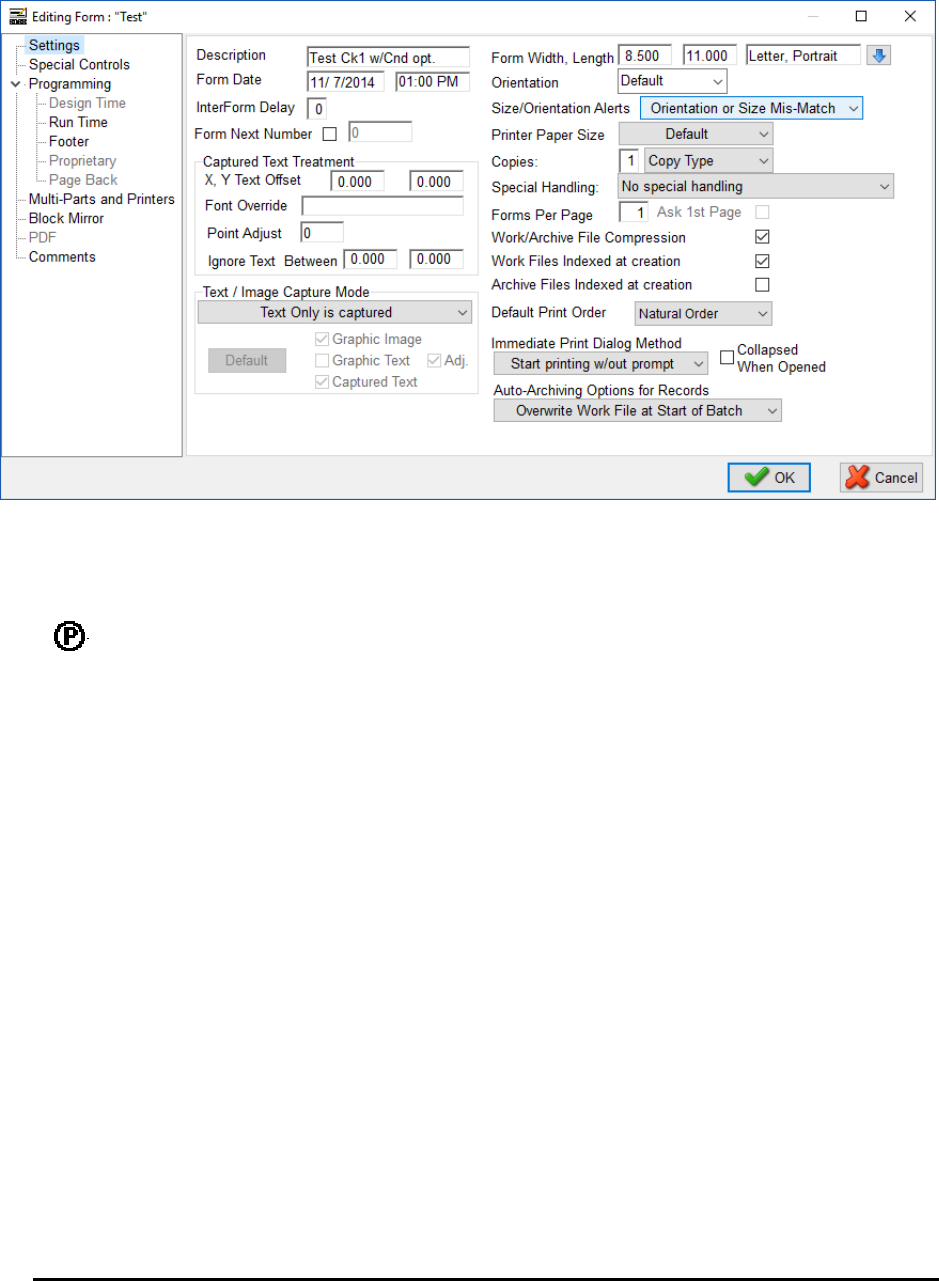
PrintBoss 52 Electronic Copy
4. Select your new form and click the Editor button. The Editing Form dialog opens. This dialog, also
known as the Form Editor, contains several tabs and many options that are described in more detail in
Appendix B of this manual. The following are a few common options to review:
a. Settings tab
i. Description – Enter a brief description of your new form. It is helpful to include the
name of your accounting software, the function, and a number if you have other forms for
the same function. Ex: QB_Chk4 w/CND opt. for QuickBooks check form 4 with
Canadian option.
ii. Text / Image Capture Mode – This is an Enterprise feature that allows the form to
capture Graphics and Text from the host accounting system. The default is to only
capture text.
iii. Form Width, Length – Choose a paper size. The default is 8.5 by 11.0, Letter, Portrait.
iv. Copies – Enter the number of copies you want to print in addition to the original form.
These copies are defined on the Multi-Parts & Printers tab.
v. Auto-Archiving Completed Records – Select your archiving option. The default is
Overwrite Work File at Start of Batch.
b. Special Controls tab
i. Pre-process Assignments – Select this option when you have a command in one of the
Objects tabs that needs to be processed before the other commands. The current version
of PrintBoss will generate a warning when this option is required.
ii. Archive File Name Suffix – When Auto-Archiving is set to Archive on the Settings tab,
add an Archive File Name Suffix to archive by Year, i.e. {YY} or {YYYY}, or Year and
Month, i.e. {YYMM}, etc.
c. Programming – There are several tabs that allow scripts to format a PrintBoss Form. A brief
description of each follows.
i. Design Time – This tab is no longer used. It is only available for legacy installs.
ii. RunTime Objects tab – Enter assignments (#Assign commands), grids (#Grid), text
labels for grids (#Text), Company Address information (#Text), and Bank information
(#Text) in this object script. The MICR Line (#MICR) is often placed here as well.
RunTime Objects are processed before the other object scripts, so these items will be
placed on the form before other items.
iii. Footer Objects tab – Enter signature lines (# Line commands), signatures (#PIC), logos
(#PIC), and miscellaneous text (#Text) in this object script. Conditions may be placed on
these objects. These items are placed on the form after the RunTime Objects are
processed.

PrintBoss
53 Electronic Copy
iv. Proprietary – This tab may also hold scripts. The scripts on the proprietary tab process
along with the Footer objects tab. Often this is used by PrintBoss technicians to separate
scripts for special purposes
v. Page Back – This tab is used to print information on the back of the page when
duplexing is set on your printer and selected in PrintBoss.
d. Multi-Parts & Printers tab
i. Copies – The copies you selected on the Settings tab will be displayed in this column.
ii. Print Time – Select when you want the copy to print. The default is Immediate.
iii. Destination Printer/Device – Select a destination printer if it is different from the printer
set as the default for PrintBoss. Other options for the copy may also be selected, such as:
1. Positive Pay
2. PDF
3. Email
iv. Source Tray – Select a source tray for the copy based on the selected printer. Files can
be selected if the Copy is set to <Positive Pay File>.
v. Copy Name – Enter a name for the copy. This is optional, though the Copy Name may
be used in a script.
e. Block Mirrors tab
i. Enable any mirrored blocks – Select this option to create a copy of a section, such as
the check and advice, and display that copy at a specified location on the page. The
default is to select the advice and check beginning at 4.1 inches from the top of the page
and extending to 10.400 inches, and then display a mirrored copy beginning at 0.2 inches
from the top section of the page with a height of 3.800 inches. It may be helpful to view
a standard check form as an example of this display.
f. Comments tab – Enter the date this form was created and document modifications made to this
form after the initial creation.
g. Misc – This tab provides the option of importing a jpg or bmp file to embed in the PrintBoss form.
Use the embedded image with a #PIC command on the RunTime Objects tab to place the
embedded image on the form. The source graphic is not needed once the image is embedded in
the form. This tab also includes special treatment of key fields during the creation of the
PrintBoss Work File. These fall into the following two categories.
i. Key Flds Re-Calc Forward – This section provides options that allow PrintBoss to carry
forward or re-calculate values from selected fields under special circumstances. This
area is primarily for use by a Wellspring Software Technician.
ii. Key Flds Re-Calc Backwards – This section provides options that allow PrintBoss to
process documents backwards immediately after they are processed forward for the
purpose of counting or calculating values from the end of a group or file. This area is
primarily for use by a Wellspring Software Technician.
h. PDF tab – This tab is only available when PDF is selected as a copy on the Multi-Parts &
Printers tab. This PDF feature has no connection to the PDF created by the Email feature.
5. Click OK to save changes made on the Form Editor.
MODIFY AN EXISTING FORM
It is often advisable to start with an existing form that is similar to your needs. This form can be copied to a new
name and modified.
1. Open the PrintBoss Master Application window.
2. Click the Edit menu at the top of the window and select Form Files to display the Form Select window.
3. Select the form to be copied, click the Copy To button, and enter a new File Name. The file name cannot
exceed 8 characters.
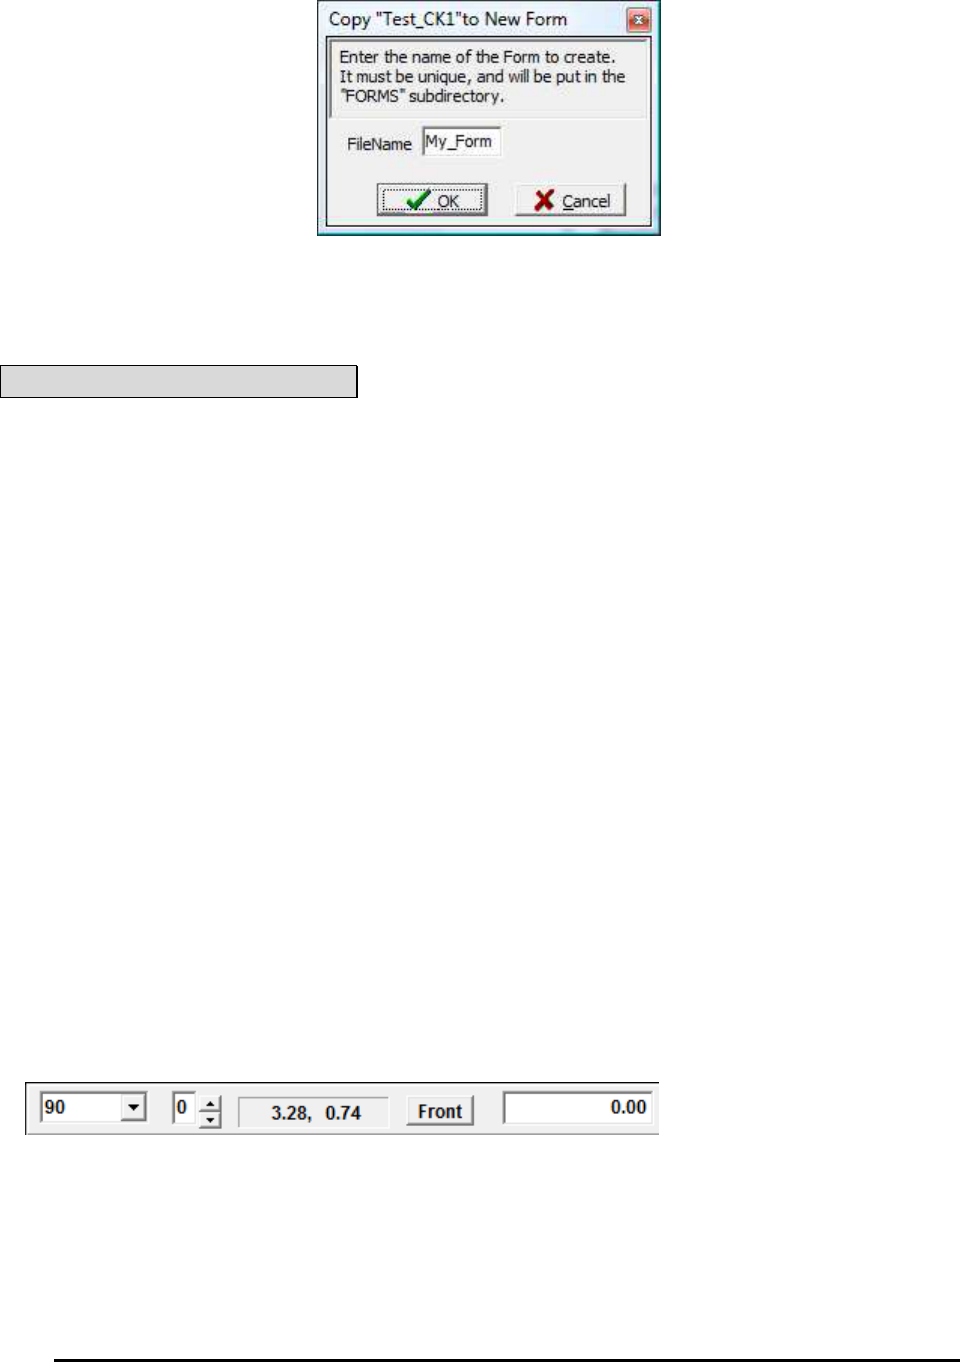
PrintBoss 54 Electronic Copy
4. Click OK to create the new copied form file.
5. Select your new form and click the Editor button to modify the form.
6. Click OK to save changes made on the Form Editor.
Details describing the options on the Form Editor can be found in Appendix B of this manual.
NOTE:
Be alert to properties of the original form that may impact the final results of the modified form, such as
#RegionMove commands and font overrides that may not be apparent when viewing a form.
MODIFY FROM THE DOCUMENT VIEW
Both the Form Editor and the Document View can be used to modify a form whether it is a copy or a new form.
Many users find the Document View more convenient for editing since the objects can be viewed immediately,
though certain elements are not accessible through the View.
1. Open the PrintBoss Master Application window.
2. Click the Edit menu at the top of the window and select Form Files.
3. Select your form, and then select a bank record from the drop-down menu at the bottom of the Form list.
This will display fields from the bank record. Click View. This opens the View of Form window. Clarity
will depend on the monitor's size and resolution.
4. Double click on an object to edit its properties.
5. Click OK on the Properties window to save your changes.
6. Right click anywhere on the form to Insert a new object.
7. Click Close and select Yes to save changes to this form.
Across the top and down the left edge of the View are rulers to indicate coordinates on the page. As you move the
cursor over the document, slight line indicators mark the matching coordinates on the rulers and a field above the
ruler displays the numeric coordinates. The coordinates are measured in inches from the top left corner of the page.
A light blue border around the edge of the document indicates the margins or unprintable area of the page. This area
adjusts according to the LaserJet printer selected within the PrintBoss program and the orientation of the form.
Above the ruler to the far left is a drop-down menu to adjust the view’s magnification. This is similar to a zoom.
The Copy Number to the right of the Magnification Percentage allows you to select different copies associated with
this form. Zero represents the original document. Use the up arrow to navigate to additional copies if there are
multiple copies set for this form. The down arrow navigates back towards the original. Any conditional items based
on copy number will be reflected in the View when the copy is selected. Copies are set and defined on the Form
Editor, typically on the Footer Objects or RunTime Objects tab.
The button to the right of Matching Coordinates appears when duplex printing is selected on the Special Controls tab
of the Form Editor. This button indicates whether the view is of the Front or Back of the page. Click on the button to
toggle between sides.
Zoom
Copy
N
umber
Matching
Coo
rd
i
nates
Simulated
Docu
me
nt
A
m
ount
Page Side
Selector
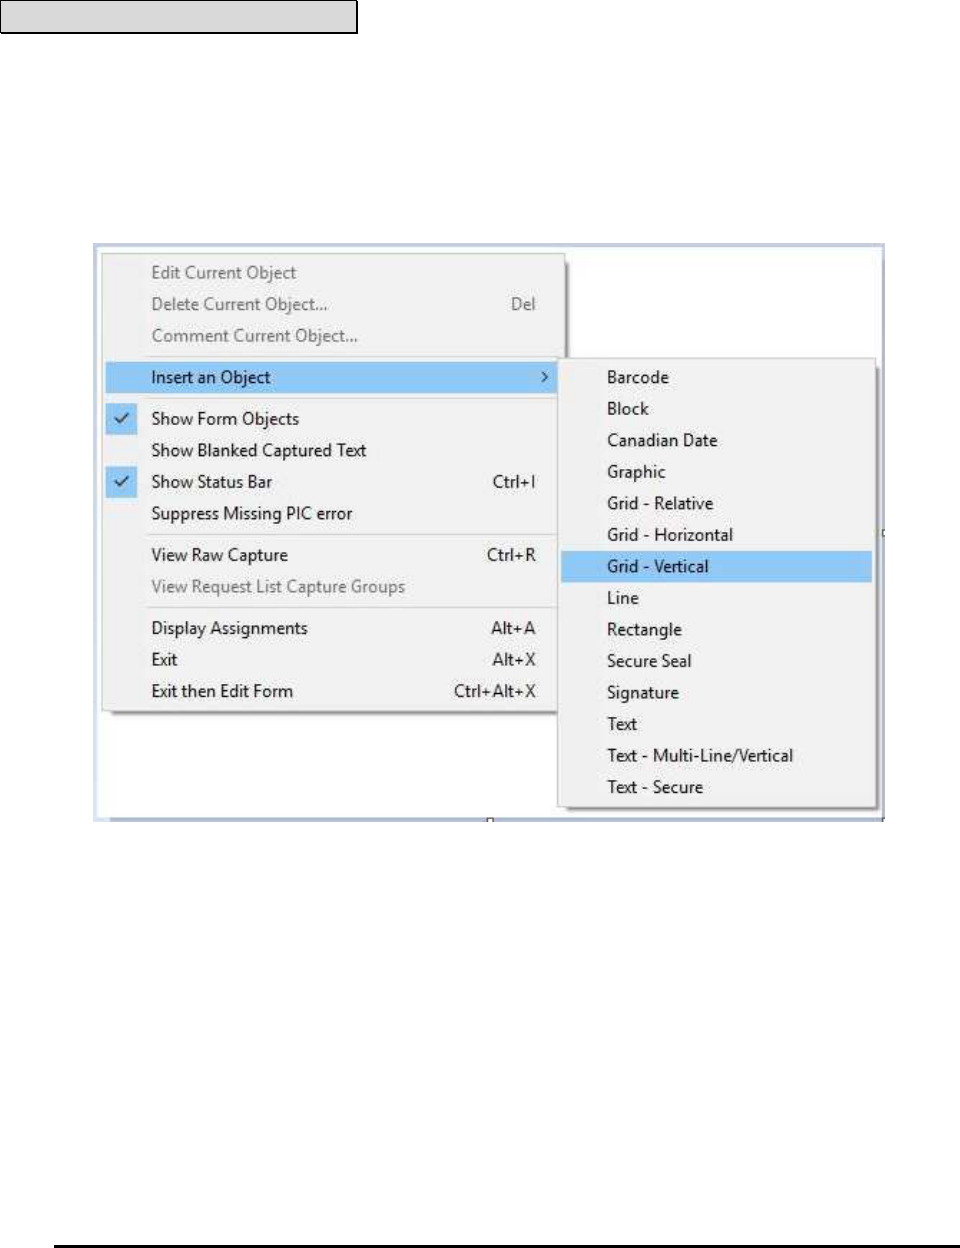
PrintBoss
55 Electronic Copy
The Dollar Value field is located to the right to the Page Side Selector (or Matching Coordinates when duplex
printing is not selected) and is used for testing objects that only appear based on a conditional Amount or an Amount
Range. Initially, the dollar value is set to 0.00. Enter an amount to test the AmntRange condition when it is used.
Please see PrintBoss Conditional Commands at the end of this chapter for more information.
NOTE:
All items inserted through the View will be placed at the bottom of the Footer Objects tab of the form. The location
of these objects can only be adjusted in the Form Editor. Location and order can affect how the objects appear on a
page.
INSERT AN OBJECT IN THE DOCUMENT VIEW
Right click anywhere on View of Form to access the following options:
EDIT CURRENT OBJECT
This option opens the Properties dialog for the selected (highlighted) item in the View.
DELETE CURRENT OBJECT
This option deletes the selected (highlighted) object from all copies and accounts that use this form. A prompt will
confirm deletion or allow the user to cancel.
COMMENT CURRENT OBJECT
This option comments the selected object in the View without actually deleting it. An object cannot be viewed when
it is commented. The command will remain on the objects tab of the Form Editor with a pipe symbol (|) at the
beginning of the line so it is not processed. A prompt will confirm this action or allow the user to cancel.
INSERT AN OBJECT
This option adds an object by opening the appropriate Properties dialog. A brief description of the use of each object
follows.
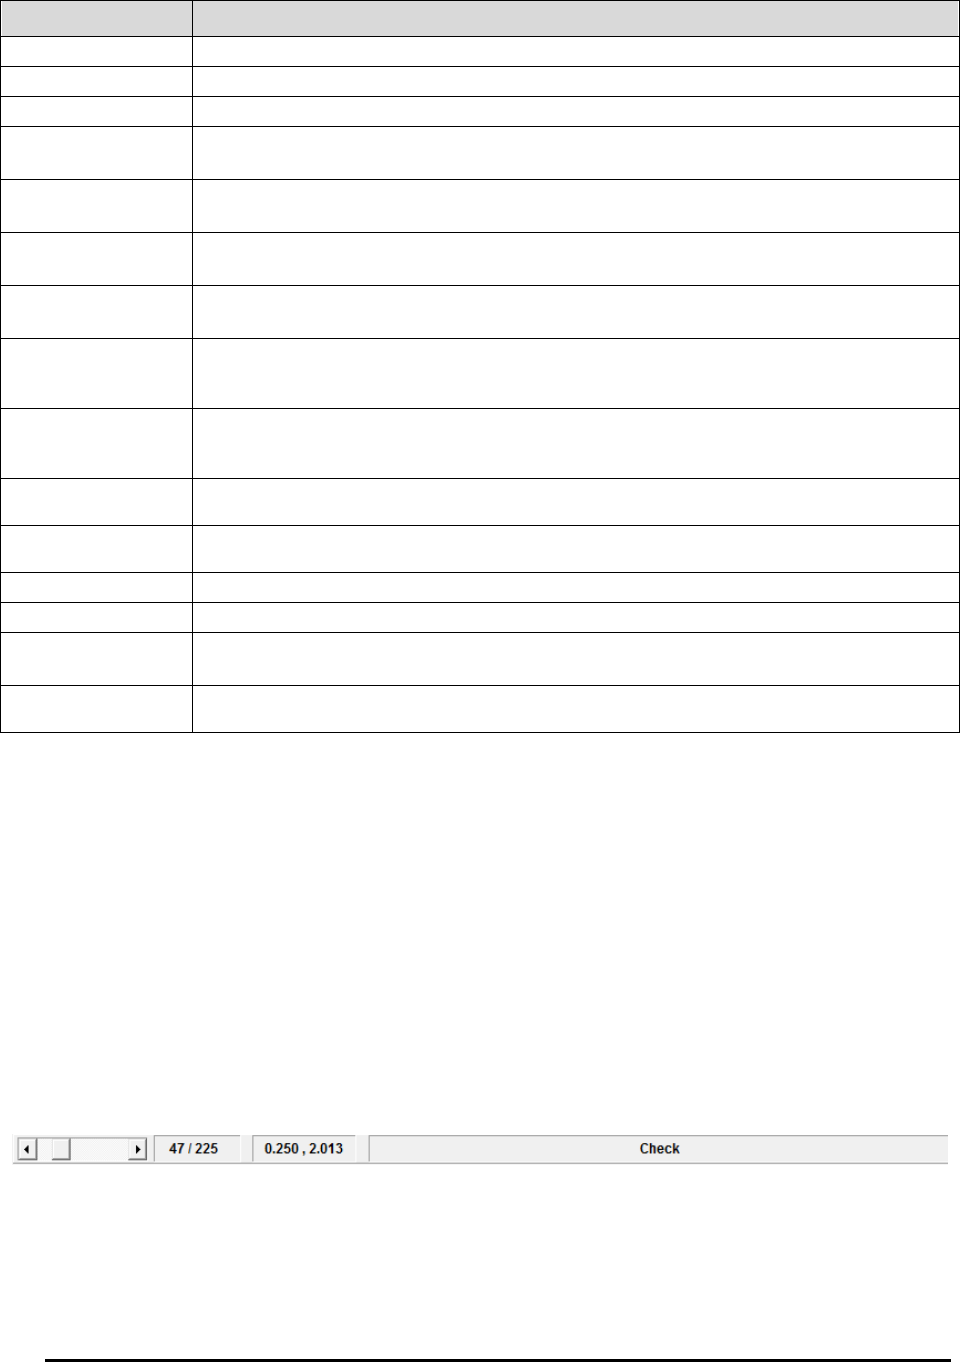
PrintBoss 56 Electronic Copy
Object Description
B
arcode
Chan
g
e
s data into a barcode. See #Barcode for m
ore information.
Block Inserts a block on the document. Rectangle (#RECT) is more commonly used.
Canadian Date
Formats
the document
date value according
to
the Canadi
a
n
CPA
006
st
a
ndard
format
.
Graphic Inserts a #PIC object to place a graphic file, such as a logo, on the document. PrintBoss
reads jpg an
d bmp file ty
pes.
Grid – relative Inserts a #GRID object with a standard 4-column advice format. Both Horizontal and
Vertical l
i
nes can be added
to the gri
d
.
Grid – horizontal Inserts a #HGRID object. A #HGrid only draws horizontal lines within the box. #GRID is
m
ore co
mmonly used.
Grid – vertical Inserts a #VGRID object. A #VGrid only draws vertical lines within the box. #GRID is
more commo
nly used.
https:/
Enter a URL after the https:/ and print the file to a PDF. The URL will be active when the
recipient receives it. If the PDF is attached separately to an email, the URL will work as
well.
For
example
:
ht
tps:/www.wellsprin
gsoftware.com
Line
Inserts a horizontal line, such as a signature line, on the document. Second signature lines
are usually selected from the Misc tab of a Bank Record rather than inserting a new line.
This object
ca
n also be u
s
ed to d
raw v
e
rtical lines.
Rectangle
Inserts a rectangle. Rectangles are often used with Security Back patterns to hide sensitive
informa
tion, such as
socia
l security numbers.
Secure Seal
Inserts an encrypted seal containing information from the check file used as verification by
t
he bank. T
h
e
bank must hav
e appropriate technology to
decipher the encrypted seal.
Signature
Inserts a #PIC
object to pri
nt an
electronic signature file.
Text
Inserts a #Text object to print static text or text
r
eferenced b
y
a
vari
able.
Text – Multi-Line /
Vertic
a
l
Inserts a #VText command. This is most frequently used to place the words ‘Pay To The
Order Of’ vertically on a check.
Text – secure
Displays check amount in blocks or with a pattern and is used to protect against fraudulent
changes
of the
check
amoun
t
.
SHOW FORM OBJECTS
This option displays the objects from the PrintBoss Form File in addition to the captured text from the accounting
software when it is selected (check marked).
SHOW BLANKED CAPTURED TEXT
This reveals the raw data captured from the accounting software that has been hidden with a PrintBoss command
such as #Assign, #RegionMove, or #BlockMove. This option is only useful when editing a work file or archive file.
SHOW INFO PANEL
This option opens a panel at the bottom of the View displaying the order and coordinates of both objects and captured
data shown in the form. Either click on the desired object or data or use the slider bar to move quickly through
objects and data in the order they were placed on the form. The next field displays the order of the item, such as item
47 of 225. The ‘Matching Coordinates’ field displays the coordinates of the selected item. The last field displays the
text or description of the item.
VIEW RAW CAPTURE
This option strips out all of the PrintBoss form elements and reveals only the data from the accounting software in
its original format. This option is only useful when editing a form from the work file or archive file.
Slider Order
Matching
C
oor
dinates
Description

PrintBoss
57 Electronic Copy
VIEW REQUEST LIST CAPTURE GROUPS
This option opens the Form / Bank Request List Manager and displays the request list entries. Edit or create the
request list entries while viewing raw data from a work file to capture coordinates and values. This option is only
available while using View Raw Capture. Not all forms use the Form / Bank Request List.
See Chapter 18, Form Bank / Request List.
DISPLAY ASSIGNMENTS
This option opens the form Assignments window containing a list of all available variable assignments for this form.
See #Assign in the commands section later in this chapter.
EXIT
Exit the view of this form. If changes have been made, you will be prompted to save or abandon changes prior to
exiting.
EXIT THEN EDIT FORM
This option leaves the View of the form and automatically opens the Editor. You will be prompted to save or
abandon changes prior to opening the Editor if changes have been made in the View of the form. This is helpful to
quickly move from viewing a work file to working in the Form Editor.
FORM EDITOR
The Form Editor has several tabs and options for customizing forms or handling special needs. There are two ways
to access the Form Editor after opening the PrintBoss Master Application:
1. Click on the Edit menu and select Form Files. Then highlight a form and click the Editor button.
2. Right click anywhere on a View and choose Exit then Edit Form. PrintBoss will notify you to save changes
before continuing if applicable.
The primary tabs that appear when you open the Editor include:
Settings Comments Misc
Special Controls Design Time Objects*
Block Mirrors RunTime Objects
Multi-Parts & Printers Footer Objects
* Design Time Objects only appears in older PrintBoss Forms. It does not appear in the Wellspring Software's
currently distributed form files. It was primarily used for backward compatibility.
Other tabs may appear depending on the settings selected in the Form Editor. These include:
Setting Location Tab
Duplex Printing Special Controls tab Page Back Objects
PDF copy
Multi
-
Parts & Printers tab
PDF
Positive Pay copy * Multi-Parts & Printers tab
Positive Pay / ACH
File E
ditor
Check box
under
Acces
s
Special Controls tab
Proprietary
* The PDF and Positive Pay features are Destinations set for a copy on the Multi-Parts & Printers tab of the Form
Editor, though Positive Pay opens in a new window rather than as a tab.
A detailed description of the Form Editor is in Appendix B of this manual.
ASSIGNMENTS
Assignments can be either Static or Dynamic. An explanation of these choices follows.

PrintBoss 58 Electronic Copy
Static Assignments
Assign static values to a variable such as DocMisc or EmailCC to set a single value for ALL instances of this
variable in the Form. For example, the office manager may need an email copy of all invoices sent by email. The
invoice form may contain an entry similar to the following:
#Assign EmailCC, "bob@yourcompany.com"
A File path and name may also be assigned in PrintBoss version 5.73.5 and above. For example:
#Assign DocMisc, "L:\PDF\{DocRecip}\*.*"
These assignments should be entered near the top of the Footer Objects tab as they contain variables that may have
been assigned on the RunTime Objects tab or need to be processed before other items on the Footer Objects tab.
The file path example can be used to create a shortcut in the DocMisc or DocMisc2 fields of the PrintBoss Work
File to access all files at the listed path. The * is a wildcard to display all files regardless of the name or file type.
A question mark ‘?’ can be used for a single letter. The DocMisc and DocMisc2 fields are limited to 60 characters
based on the resolved path.
Dynamic Assignments
Dynamic assignments are the heart of automating PrintBoss features. There are 2 ways to create a dynamic
assignment. Use one method or the other, not both.
INCLUDE IN SOURCE REPORT
Modify the PrintBossMisc or PrintBossMisc2 formula fields to represent a variable in the source report if there is a
PrintBoss Trigger. We recommend PrintBossMisc2 be used for E-mail when using this method. The source report
is typically crystal reports, though other report writers can be used.
PICKED OFF OF CAPTURED REPORT BY PRINTBOSS
This method requires the desired field is displayed somewhere on the source report. PrintBoss can capture this
information and blank it out (if desired).
1. Print a document to PrintBoss containing the desired field, such as E-mail address.
2. Click on the File menu and select Open Document Work Files on the PrintBoss Master Application.
3. Select the appropriate form and click Browse.
4. Select a document and click View.
5. Right-click anywhere in the View and select View Raw Capture.
6. Locate the desired field, such as email address, on the page. Double click on the text to open the Captured
Text Command Properties dialog.
7. Select the Click to Assign to Variable bar at the top right of the dialog.
8. Change the Variable Name from ReNameMe to EMailTo or the desired variable name. See Appendix E
for a list of variables currently used in PrintBoss. Other names can be assigned, but do not have an existing
function within PrintBoss.
9. Check the following fields:
a. Add together fields in horizontal range
b. Capture Raw Text Objects Only
c. Left Trim
d. Right Trim
e. Blank Out After Capture (optional – hides the value, such as email address. On the printed
document)
Some reporting engines (such as the latest Crystal Reports) tend to break up text fields. A
good practice is to click on the +/- button that follows the Horizontal field so it becomes to. Set
the ending coordinate far enough to the right to pick up the entire field, such as a long email
address.
10. Click OK. PrintBoss adds this assignment to the top of the RunTime Objects in the Form.
11. Right-click on the page and click on View Raw Capture to return to the formatted document.
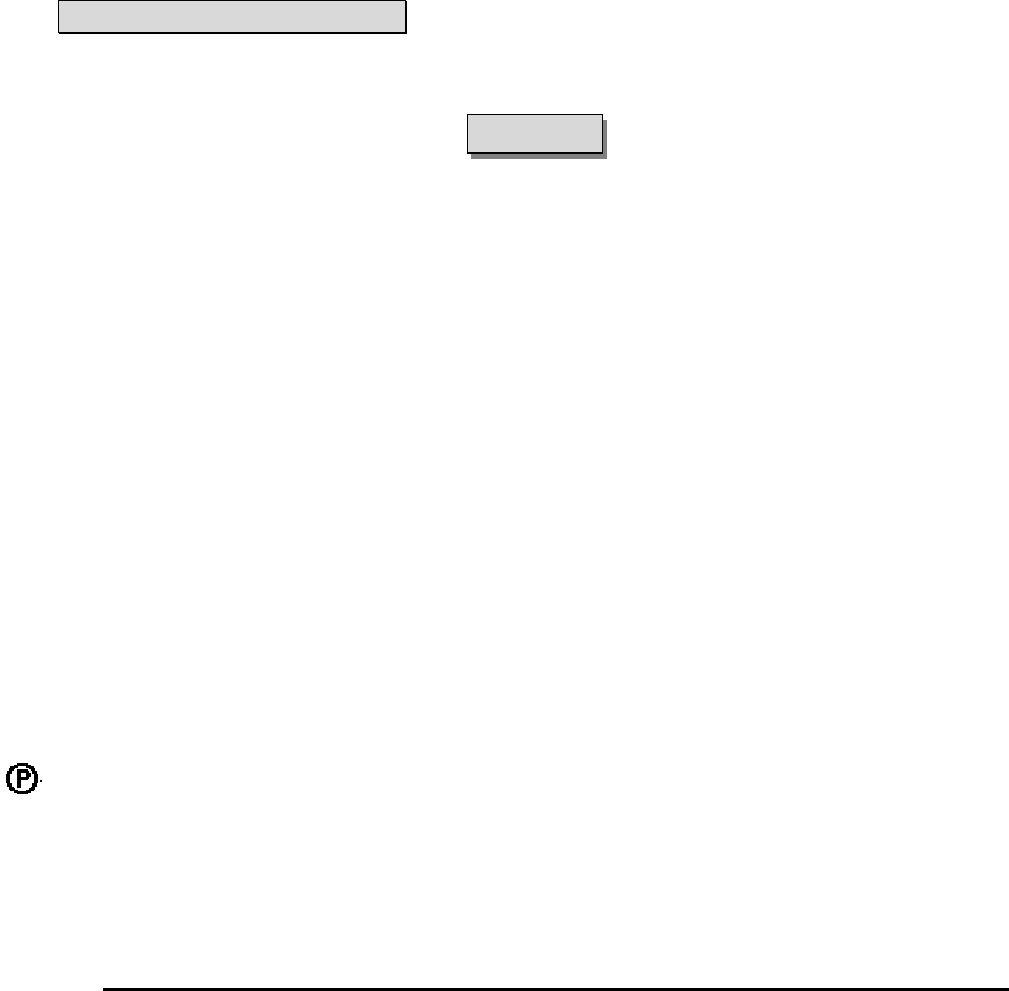
PrintBoss
59 Electronic Copy
12. Click Close to exit the View and select Yes to save these changes.
See Chapter 23, Capturing and Assigning Text, for more information.
VARIABLES
There are several variables that may be Assigned in a Form File to define values for various PrintBoss functions. A
list of all predefined variables and their purpose is included in Appendix E of this manual.
FORM FILE COMMANDS
PrintBoss Form Files combine data from the accounting software, the PrintBoss bank record, as well as graphics and
text to create a final document. The most common commands used to accomplish this task are described in this
section. See Appendix B for a list of the remaining commands.
NOTE:
Type the # symbol followed by the command in the appropriate Object tab. Then double click on the text to open a
dialog box displaying the parameters and options for the specific command.
#Assign
#Assign 'VarName', 'Value' [, CaptXRange, CaptYRange [, Options]]
There are several different assign commands:
#Assign
#AssignLines
#AssignmentsBlock
#Assigns
Use the #Assign command to assign a single value to a variable name. The other assign commands can be found in
Appendix B of this manual and assign multiple values.
#Assign uses two methods to assign a value. The first method is to enter a static value in the Variable Value
parameter field. The command can be placed in any Object tab when using this method. If an assignment occurs
more than once, the last assignment created is always the current one. Assignments are processed in the order they
appear in the Objects tab.
The second method is to specify coordinates to capture value(s) from the data supplied by the accounting software.
The #Assign command MUST be in the RunTime Objects tab when using this method. The assigned variable
should only be referenced in the Footer, Proprietary, or Page Back Objects since the value is not supplied until the
accounting software data is evaluated between the RunTime and Footer sections. Set the Pre-process Assignments
box on the Special Controls tab of the PrintBoss form to ‘Special’ when an assignment needs to be referenced in the
RunTime Objects tab. This method is useful for repositioning or reformatting captured data passed by the
accounting software. It can also be used to assign the DocNo, DocAmnt, DocRecip, DocDate, DocMisc, DocMisc2,
and DocPayeeID fields in the work file as well as adding conditional elements. One of the options for this command
blanks out the original location of the data after it is captured.
All captured variables can be used in #Text commands, as components of conditional statements, and as components
of loops and counters. In addition, they can be used in positive pay scripts, e-mails, and as parts of dynamic file
names for PDFs and Positive Pay files. The dynamic file name feature is only available in the Enterprise edition of
PrintBoss.
The following is a description of the parameters for the #Assign command.
VARNAME
The Variable Name can be a variable expected by PrintBoss, such as DocNo, or any arbitrary name.
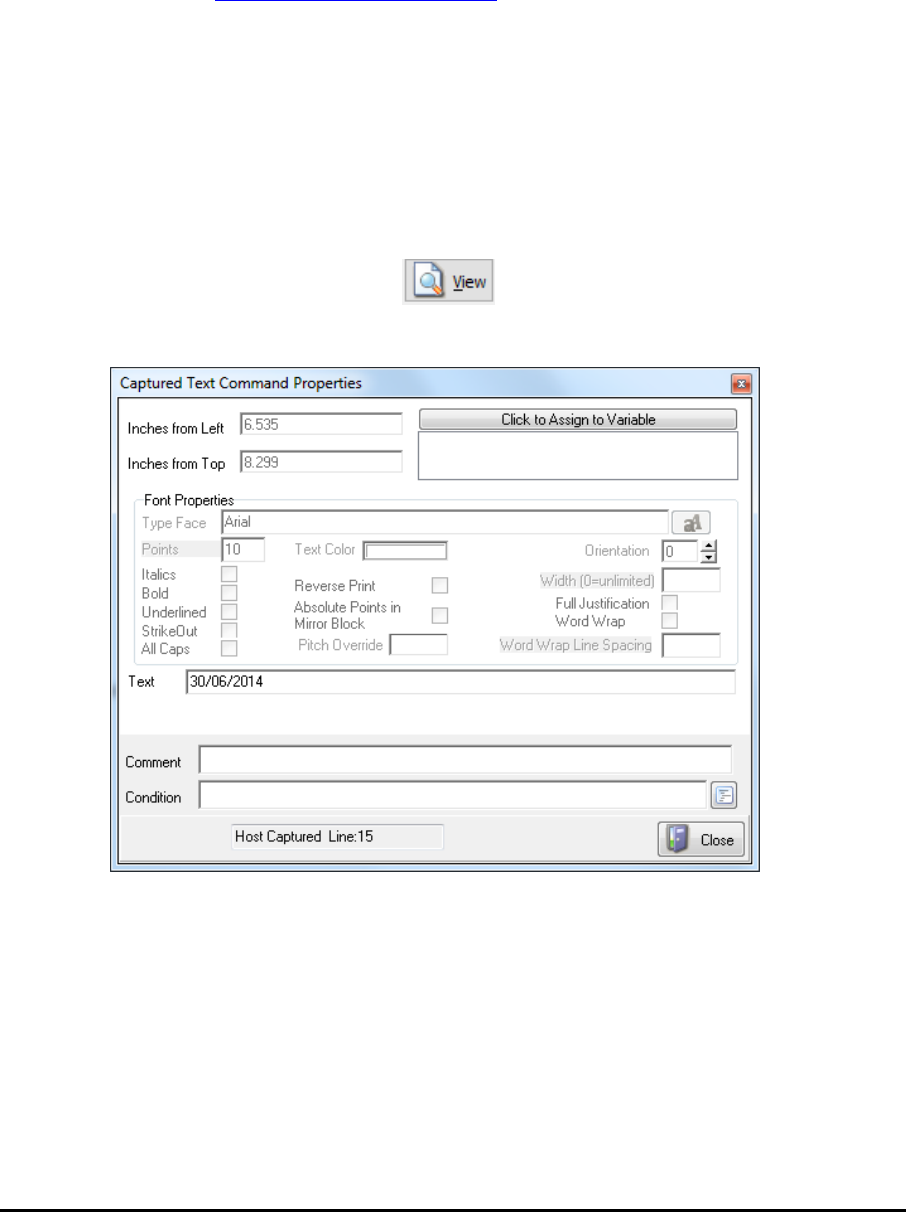
PrintBoss 60 Electronic Copy
VALUE
Only enter a static Variable Value when the CaptXRange and CaptYRange (Capture Coordinates) are not passed to
PrintBoss. If CaptXRange and CaptYRange are passed, this parameter is usually left blank. When both the
Variable Value and Capture Coordinates exist, PrintBoss will only use the Variable Value when no value is returned
for the Capture Coordinates. For example:
#Assign "EmailTo", "Support@WellspringSoftware.com" – where EmailTo is the Variable Name and the
email address is the Variable Value. No coordinates are assigned.
#Assign "DocNo","", 7.100, 0.65 – where DocNo is the Variable Name, the Variable Value is blank,
CaptXRange is 7.100, and CaptYRange is 0.65.
CAPTXRANGE, CAPTYRANGE
These are the coordinates of the captured data. You can determine the coordinates for a captured field through the
work file.
1. Open the PrintBoss Master Application.
2. Click on the File menu in PrintBoss and select Open Document Work Files.
3. Select the desired work file and click the Browse button.
4. Select a document and click the View button .
5. Right click anywhere on the View and choose View Raw Capture.
6. Double click on the object you want to capture. The Captured Text Command Properties dialog opens.
7. The beginning of the capture ranges is displayed as Inches from Left (X) and Inches from Top (Y).
8. Select the Click to Assign to Variable button to capture these coordinates. The Assign Command
Properties dialog opens.
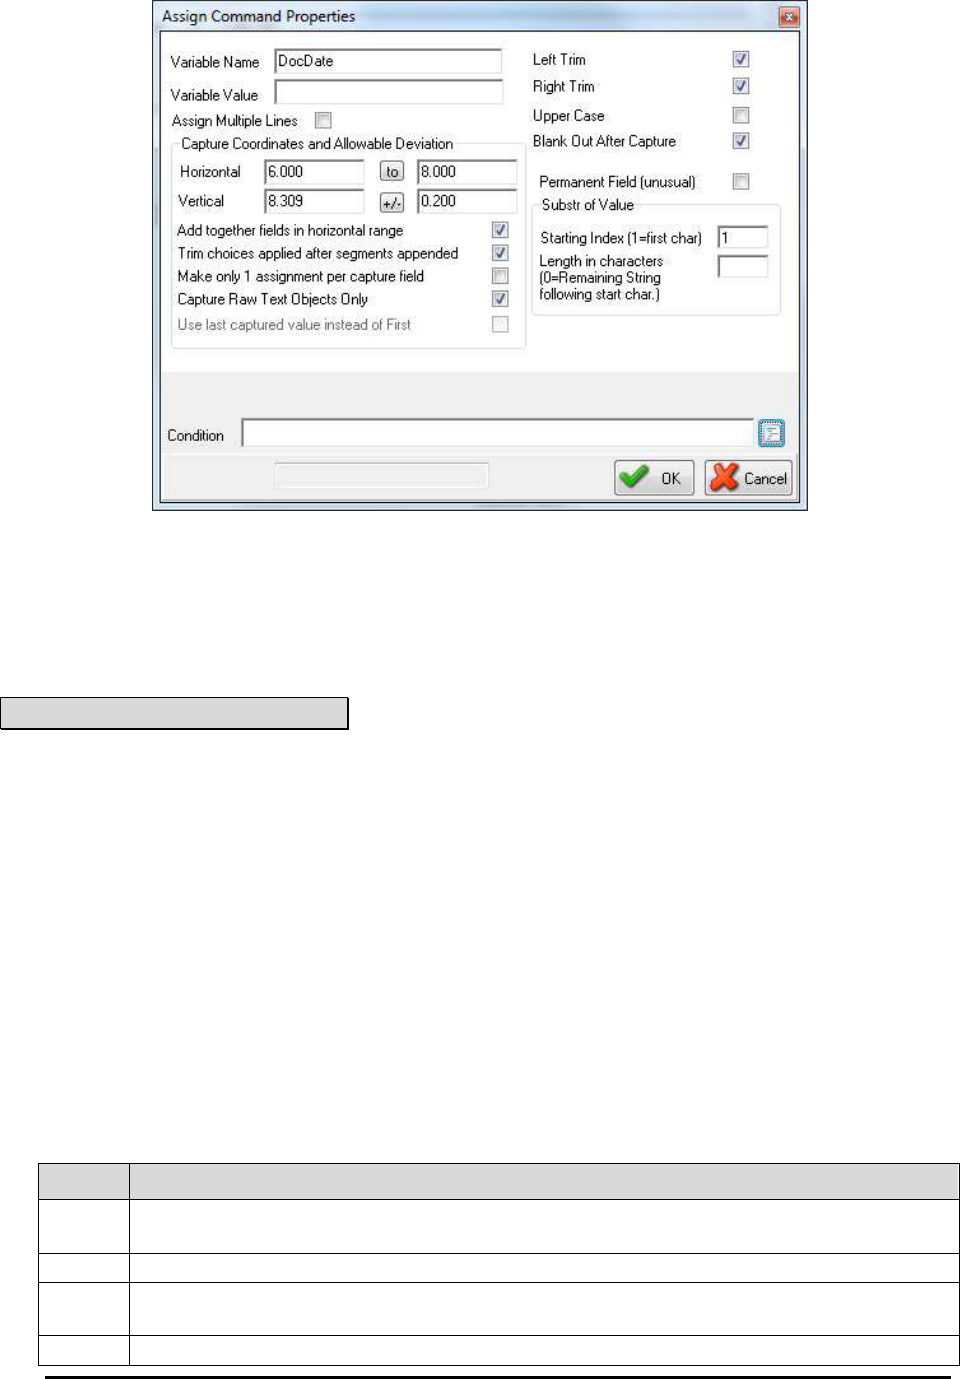
PrintBoss
61 Electronic Copy
9. Replace ‘ReNameMe with the desired Variable Name.
10. The Capture Coordinates ranges are predefined from the selected data. You may adjust the +/- values or
click on the +/- button and change it to a to range.
11. Select the desired options, such as Blank Out After Capture.
12. Click OK on the Assign Command Properties dialog to save changes.
13. Click Close on the Text Command Properties.
14. Close the View and select Yes to save the assignments.
NOTE:
Capture ranges can be entered as inches with a decimal or thousandths of an inch with no decimal.
#Assign 'DocNo', '', 7.100, .65
Or #Assign 'DocNo', '', 7100, 650
The default is to use the decimal. Often the location may vary slightly based on the length of the string. You
can assign a range using a dash:
#Assign 'DocNo', '', 7.00-7.200, .65
Alternatively, a slash represents a Plus or Minus (+/-) amount:
#Assign 'DocNo', '', 7.100/.1, .65
The #Assign command is usually entered by clicking on the Click to Assign to Variable button on the Captured Text
Command Properties dialog mentioned above. This naturally pulls in all the coordinates and places the new
command at the top of the RunTime Objects tab.
The following lists the most common options that may be used with the #Assign command.
OPTIONS
Option Description
1 Make only 1 assignment per capture field. This option is valuable when there are several capture
fields close together that may overlap
with thi
s ass
ign
men
t range.
A
Add together field
s
in the horizon
tal range specified by the CaptXRange.
B Blanks out the entire field after the assignment is captured. This prevents the data from displaying
in an unwanted location on the document.
L Left trim the captured field (eliminates any blank characters to the left of the captured field).
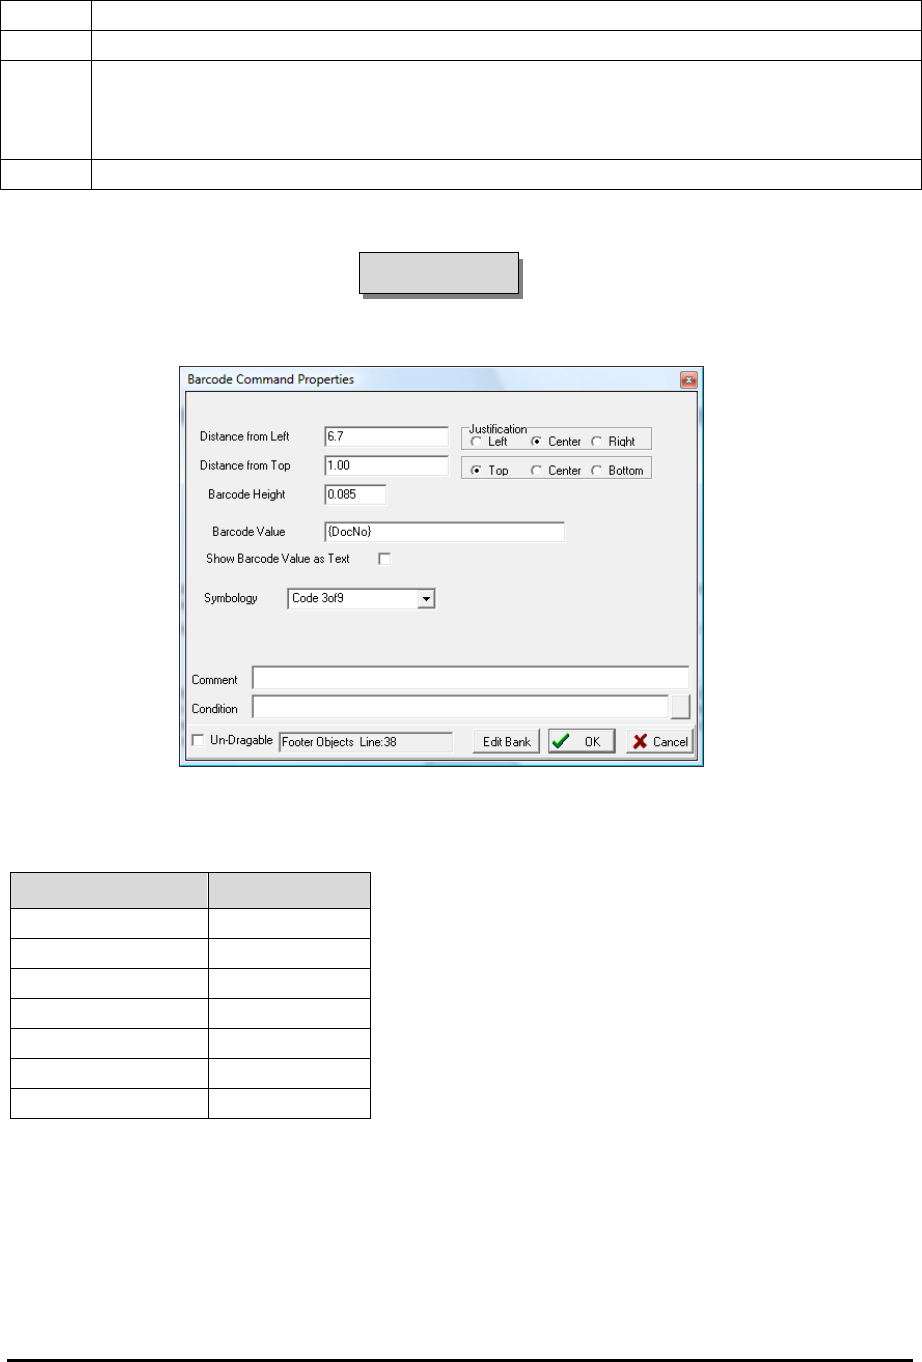
PrintBoss 62 Electronic Copy
R
Right t
rim the capt
ured field (
e
liminates any bl
an
k characte
rs to the right of the captured field
).
S Trim choices applied after Segments appended.
W Capture raw text objects only. This option only captures items from their original location – not
items moved with a #RegionMove or #Block command that might share the same coordinates. This
option is checked by default and should be used whenever assigning data captured from the
accounting software
.
Z Use last captured value instead of first.
See Chapter 23, Capturing and Assigning Text.
#Barcode
#Barcode X, Y, Barcode Height, Options, "Barcode Value"
This command is used to print a Barcode.
The top left corner, center, or top right corner is defined with the X and Y coordinates. The Barcode Height is also
assigned.
The following Symbologies can be specified as options.
Symbology Character Type
Cod
e 3 of 9
alphanumeric
UPC Version A
numeric only
UPC
Version
E
num
eri
c o
nly
Postnet Code
numeric only
Interleaved 2
of 5
numeric only
Codabar
numeric only
Code 93
al
phanumeric
The option of /SC prints the text characters below the barcode. This option is a check box in the Barcode Command
Properties dialog.
The Barcode Value can be either a variable that references captured text or specific characters. For example:
#Barcode 6.7C, 1.000, 0.850, /SYM:C39, "{DocNo}"
#Barcode 6.7, 1.000, 1.000, /SYM:PNT, "34580"
The first example centers the Barcode at 6.7 inches horizontally and 1 inch down from the top with a height of 0.85
inches. The symbology is Code 3 of 9 and the variable DocNo defines the Barcode. The second example starts at
PrintBoss
63 Electronic Copy
6.7 horizontally and 1inch down from the top with a height of 1 inch. The symbology is Postnet Code and the
Barcode value is 34580.
#Block
#Block X1, Y1, X2, Y2, Fill [, Options]
The Block command is used to place a block on the document. The top left and bottom right corners are defined.
By default, a black rectangle is drawn on the form. Options include fill patterns, corner radius, and shaded edges
(often used for the top legend row of a table). This command has been replaced by #Rect.
X1, Y1
These coordinates represent the location of the top left corner of the block in inches from the left and top edge of the
paper. Coordinates can be entered in thousandths of an inch.
X2, Y2
These coordinates represent the location of bottom right corner of the block.
OPTIONS
Option Description
/OLWnnn Outline in black with nnn thickness
/Rnnn
C
orn
er Radius of nnn inches. For
e
x
ample, /R.1 is
a 1/10" radius
/STnnn Shade Top nnn inches
/SLnnn
Shade Left
n
nn inches
/SBnnn Shad Bottom nnn inches
/SRnnn
Shade Right nn
n inch
es
/SHDnnn Shadow extends nnn inches from block
The following example prints a white box near the top of the page outlined in black with rounded corners.
#Block 3.25, .3, 4.75w, 1.0h, W_, /R.1
FILLER
Filler Description
T Clear
W W
hite (prints Op
aque)
S Shade
B B
lack
G/ or G0 …G9 Gray scale shading from lightest to darkest
P1 or PH H
orizontal
L
ine
P
a
t
t
ern
P2 or PV Vertical Line Pattern
P3 or PB B
ackward
Diagonal
P
a
ttern
P4 or PF Forward Diagonal Pattern
P5 or PR
c
R
rosshatch
P
attern
P6 or PA diAgonal Crosshatch Pattern
Color The color codes are too numerous to list. The codes display as numeric
s
t
rings,
for exa
mple
0255 is red
NOTE:
Adding an underline following the fill descriptor will outline the block with a black line.
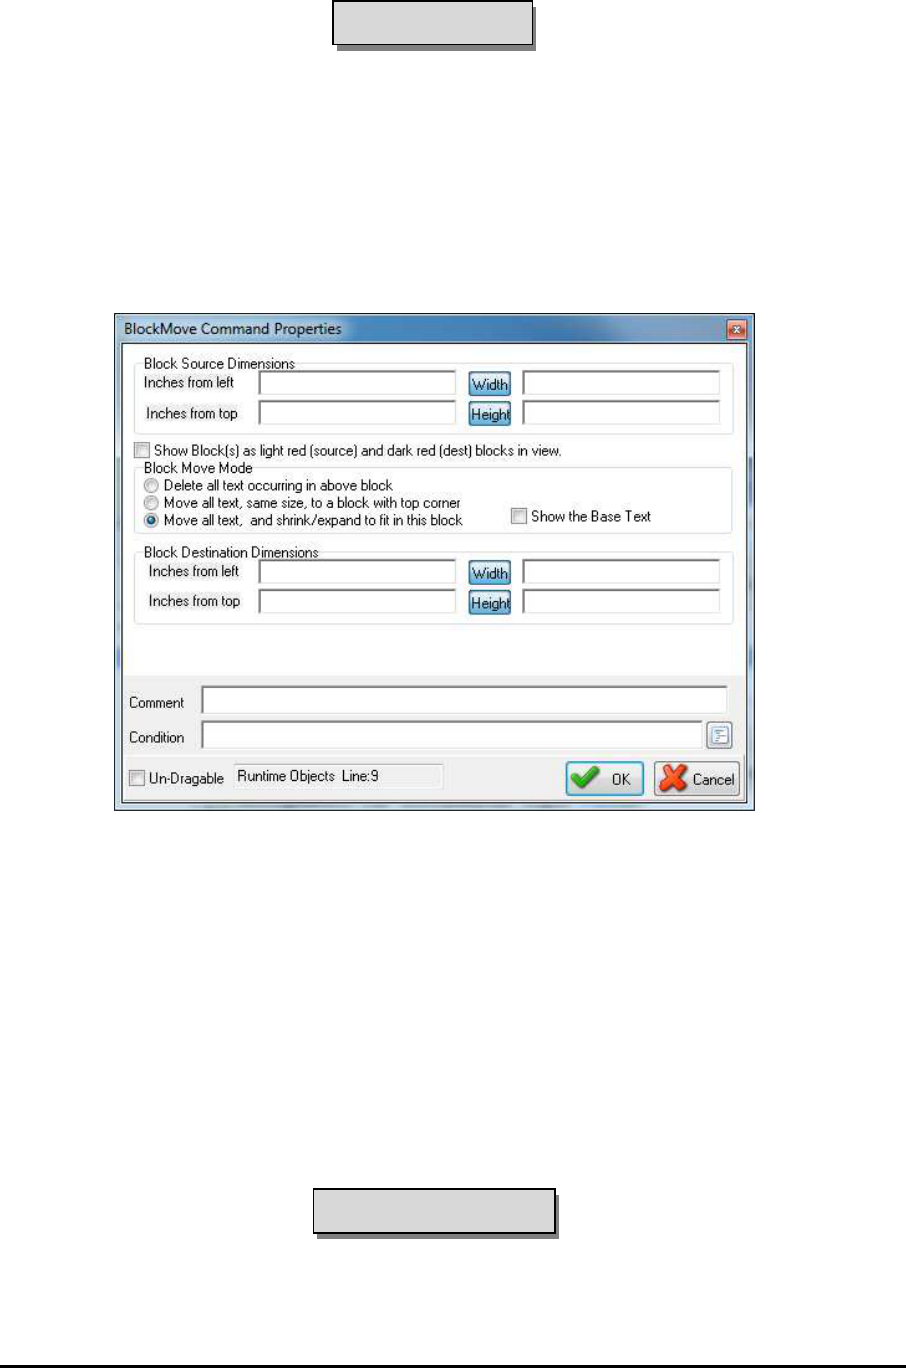
PrintBoss 64 Electronic Copy
#BlockMove
#BlockMove X1, Y1, X2, Y2 [, DestX, DestY [, DestX2, DestY2]]
This command is used to move or remove whole blocks of text captured from the accounting software. This
operates the same as the #RegionMove command, except this sets X (or horizontal) boundaries while RegionMove
includes the entire width of the page.
Every text object included in the BlockMove needs to have its beginning coordinates inside the block. If only the
beginning character of a long string occurs inside the block, the entire string will be treated as part of the block.
This command must only be placed near the top of the RunTime Objects section. #Block
and #RegionMove commands normally need to be processed prior to all other commands
except #Assign.
X1, Y1
These coordinates define the top left corner of the block to be moved or removed.
X2, Y2
These coordinates define the bottom right corner of the block to be moved or removed.
DESTX, DESTY
These coordinates define the top left corner of the destination. When these parameters are not provided, the text
objects inside the block are removed (deleted).
DESTX2, DESTY2
These coordinates define the bottom right corner of the destination. The source block will be stretched or reduced to
fit this destination block. When these parameters are not provided, the destination block will be the same size as the
source.
#CanadianDate
#CanadianDate X, Y, Font Size, "date", "Mask"[, Color[, Frame[, DateInMask[, SuppressLegends]]]]
This command formats a date in the style required by the Canadian Payments Association for their image ready
standard called the "CPA Standard 006". This command places a letter under each numeral in the date indicating
the part of the date it represents. A frame may be selected to appear around or behind the numerals in place of the
shading. The word "Date" automatically prints to the left of the formatted date.
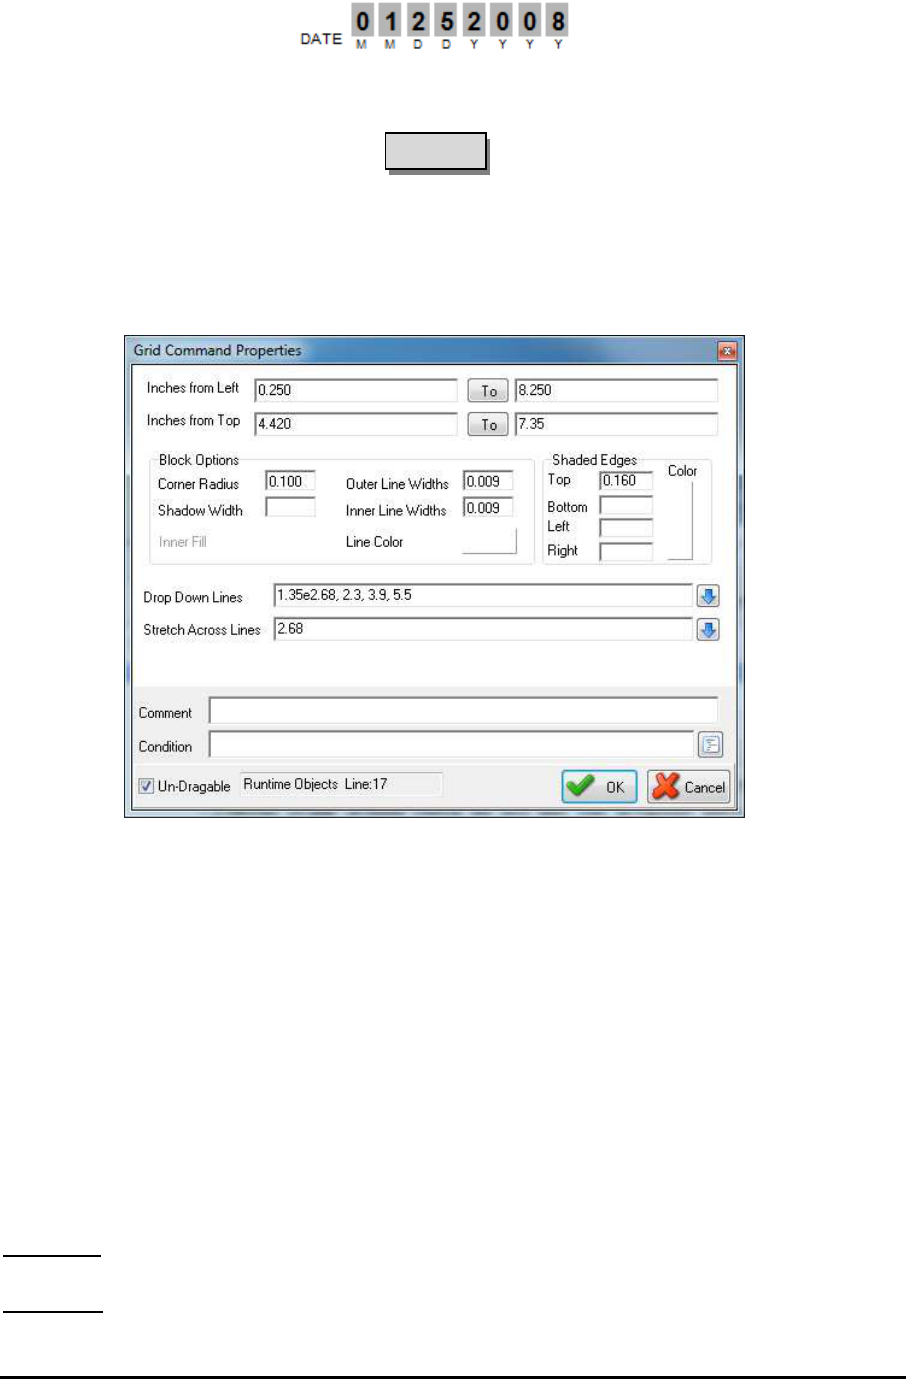
PrintBoss
65 Electronic Copy
The Canadian Date command is automatically triggered by the Canadian Style Date/Amount flag on the
Miscellaneous tab of the Bank Edit dialog for most standard PrintBoss forms.
#Grid
#Grid X1, Y1, X2, Y2[, Options]
The Grid command creates a frame and draws horizontal and vertical lines within the frame. The coordinates for
each line are relative to the frame. Options provide further modifications with corner radius, shadow, edge shading,
and line color. In most cases, #Grid is more effective than #HGrid or #VGrid commands since all the lines within
the Grid are relative to its top left corner, allowing it to be easily moved or dragged. Use this command to create the
advice grid and the Date/Amount grid on a check or the grid for an invoice or packing slip.
X1, Y1
These are the coordinates for the top left corner of the frame in inches from the left and top edge of the paper. The
coordinates may be entered in thousandths of an inch.
X2, Y2
These are the coordinates for the bottom right corner of the frame.
XA, XB…XZ
This parameter represents any number of lines drawn vertically down the frame. Each line is defined as the distance
in inches from the left edge of the frame.
YA, YB…YZ
This parameter represents any number of lines drawn horizontally across the frame. Each line is defined as the
distance in inches from the top edge of the frame.
OPTIONS
Corner Radius
/Rnnn where nnn is the radius size. For example, /R.1 is a corner radius of 1/10
th
of an inch.
Shaded Edges
/STnnn (Shade Top), /SLnnn (Shade Left), /SBnnn (Shade Bottom) or /SRnnn (Shade Right) where nnn is the width
of the edge shade in inches.
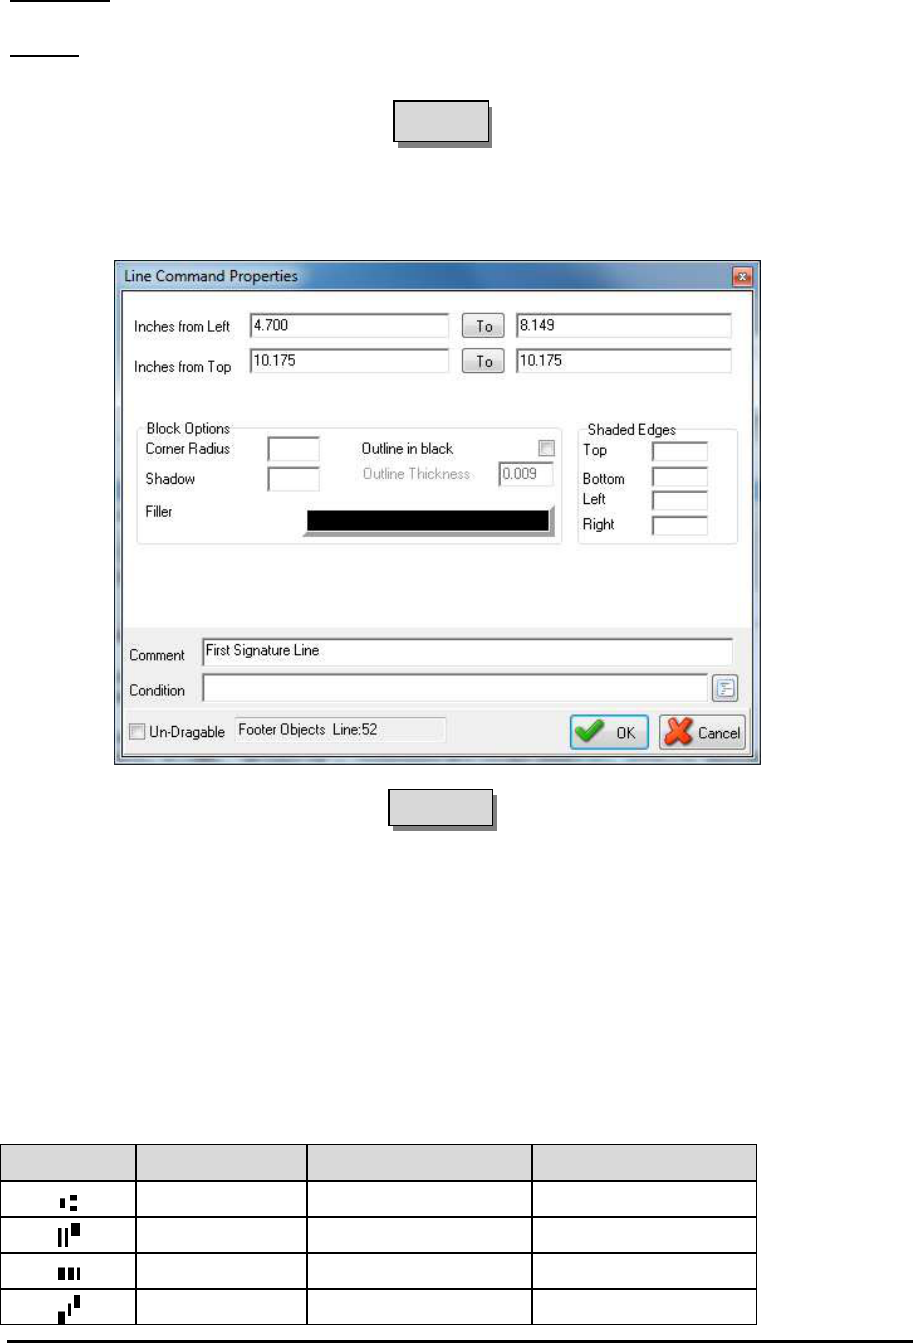
PrintBoss 66 Electronic Copy
Shadow Width
/SHDnnn where nnn is the width of the shadow in inches.
Line Color
/0LC followed by a number representing a color. The color number can be 4 to 8 digits.
#Line
#Line X1, Y1, X2, Y2[, Fill [, Options]]
The #Line command functions the same as the #Block command and is often used to draw signature lines on checks.
A vertical line has identical X1 and X2 coordinates. A horizontal line has identical Y1 and Y2 coordinates. The Y
coordinates are labeled as Inches from Top on the Line Command Properties dialog.
#MICR
#MICR "MICR string" [, Options [, X [, Y]]]
This command prints the special MICR line at the bottom of a check. Normally, the location is completely
calculated by PrintBoss based on the length of the form and position of the check. Options may be used to select
middle or top check stock, or use the X and Y to explicitly place the MICR. The MICR string is most often pulled
from the Bank List by using the following line in RunTime Objects:
#MICR "{BMICR}"
MICR STRING
This string must be entered accurately. Each character (including blank spaces) must be entered exactly as it
appears on an existing check. There are three characters that appear on the MICR line of a check that cannot be
reproduced with any computer keyboard key. Therefore, we have assigned replacement characters for the MICR
line characters listed in the following table:
Symbol Description Represented By Alternate Chars
Transit [ : A
On Us / < C
Dash - = D
Amount $ ; B

PrintBoss
67 Electronic Copy
Select the ‘Translate ABCD to ‘[$/-‘ on the MICR Command Properties dialog if using the 4
th
column in the table
above.
The left portion of the MICR line is the Check Number. Since this changes from check to check, a variable can be
entered instead of typing a specific number. The available variables are:
{BChkNo} = Check number pulled from bank record with no leading zeros
BBBBBB = 6-digit check number pulled from bank record – left zero filled
BBBBBBBB = 8-digit check number pulled from bank record – left zero filled
{CChkNo} = Check number captured from accounting software with no leading zeros
CCCCCC = 6-digit check number captured from accounting software – left zero filled
CCCCCCCC = 8-digit check number captured from accounting software – left zero filled
The following illustrates a common MICR string. Periods are used to represent spaces.
/{CChkNo}/ [123456789[ .123-12345/
OPTIONS
T
Places the MICR line for a top check (3.5" check).
B
This option places the MICR Line for a bottom check relative to the bottom of the form. This is the default value.
Mn.nnn
M places the MICR Line relative to a check section (i.e. perforation) that ends n.nnn inches from the top of the page.
For example, an 11" page perforated into sections of 3.5, 3.5, and 4.0, with a check in the middle would be M:7.00.
An 11" page perforated into sections of 3.67, 3.67, 3.67, with a check in the middle would be M:7.333.
N
No check number segment of the MICR line is printed. This is used for deposit slips.
BR or Include in Mirror Blocks
This option includes the MICR Line in the check copy (mirrored block) section usually located at the top of the
page. The length of the Block Mirrors on the Form Editor may need to be adjusted to include the MICR Line in the
source block. The MICR Line will display at full size and not reduced since the characters are not standard text.
Optional Explicit X and Y
This is optional and is rarely used since PrintBoss automatically places a line. If the X is 0 or blank, PrintBoss will
place the line relative to the placement of the Routing Number section of the MICR line. When a value for X is
passed, the line is explicitly positioned according to the value of X. The same is true for Y. The vertical placement
is relative to the bottom of the form when there is no value for Y.
NOTE:
It is best to adjust the placement of the MICR line via the MICR Offset Adjustment fields in the Configuration
Settings of PrintBoss. The settings in Configuration are workstation and user specific. Adjusting the placement in
the form impacts all users.
#PIC
#PIC X, Y, "GraphicFileName" [, Options [, SigDiskDrive]]
This command prints a graphic file at the location specified by the coordinates. It will accept graphic files with the
formats of BMP, PCX, JPG, or SIG (Wellspring Software encoded signature file). Graphics can be added using
variables, file paths, or as embedded files.
NOTE:
MICR toner is only available in black. If the bank requires MICR ink, all logos printed with the checks will print
monochromatic regardless of any color used in the graphic file.
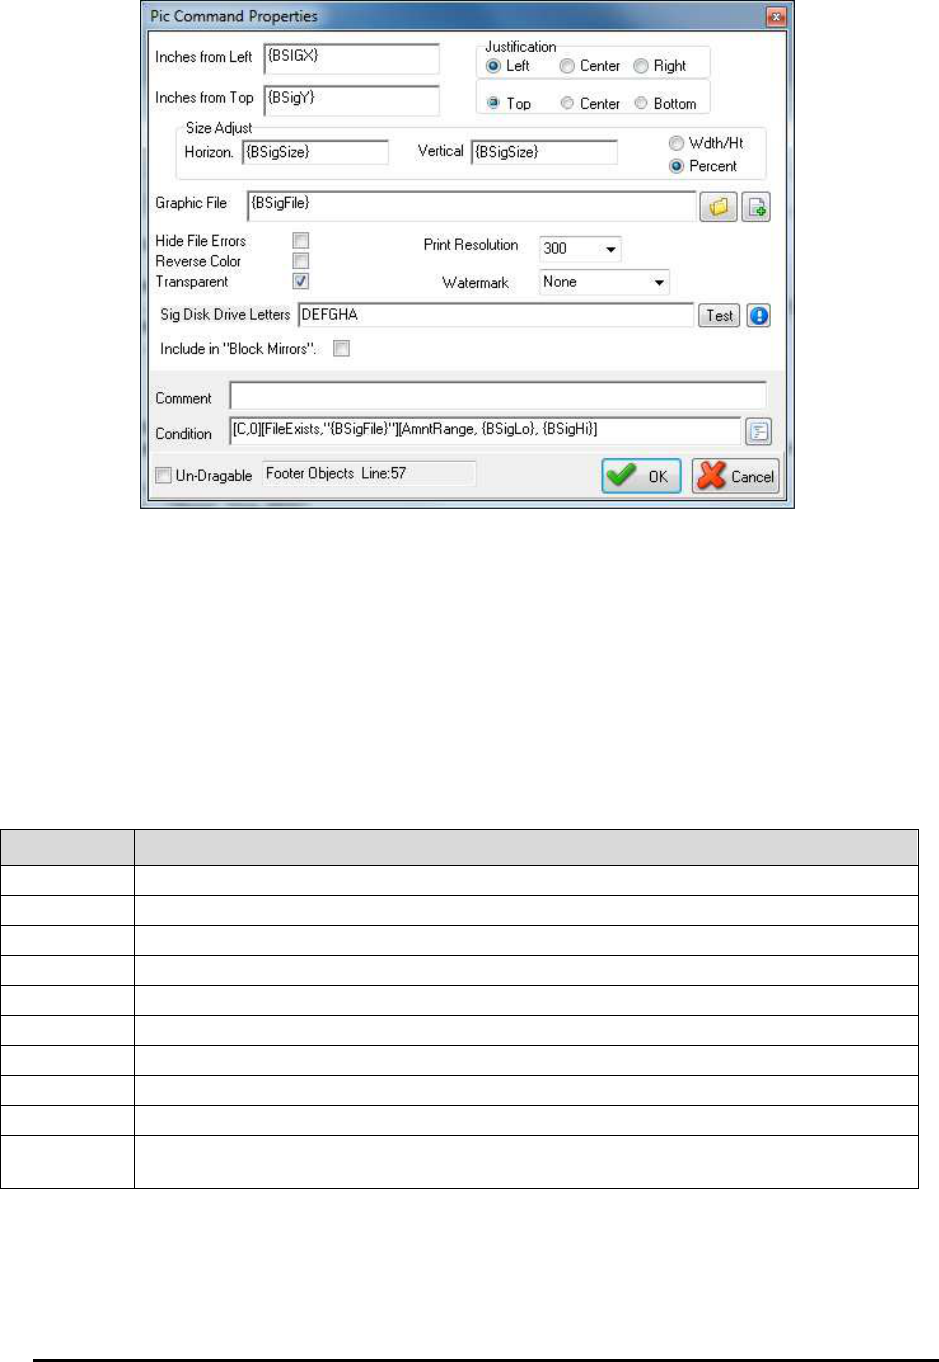
PrintBoss 68 Electronic Copy
X, Y
These coordinates represent the location of the left top corner or the graphic, in inches, from the left top edge of the
paper. Coordinates may be entered in thousandths of an inch. Variables referencing fields in the Bank Record may
also be used (see graphic above for an example).
GRAPHICFILENAME
This is the name of the graphic file to print. If no path is provided, PrintBoss will look in the Logos folder of the
PrintBoss Home directory. The file extension must be used to help PrintBoss determine the file type. The graphic
file may also be added from the Embedded File Select list on the Misc tab of the Form Editor.
OPTIONS
Any of the following options can be selected:
Option Description
/600 Forces image to be printed in 600 dpi instead of the default 300
/
REV
Reverse prints black to white a
nd white to b
lack
/HideErr Does not report file read access errors if they occur
/
MIR
Includes the grap
hic in the B
lock Mirror
Size:nnn Adjusts the size according to this percentage (100=full size, 50=half size, etc.)
SizeX:nnn
Adjusts the horizontal s
ize
to the sp
ecifie
d value
in inche
s.
SizeY:nnn Adjusts the vertical size to the specified value in inches.
Transpa
rent
Removes
the background o
f
the graphi
c if it is full white.
Watermark Prints graphic with gray instead of black
Watermark:n
Same as Watermark except n is replaced by B, M, or L for Bold, Medium, or Light. The value
is
medium b
y default.
T
he characte
r > follows
B
, M, or L for Fi
ne
Bold, Med
ium, or Light.
SIG DISK DRIVE LETTERS
PrintBoss checks the listed drive(s) for a security disk when a .sig file is selected. A default drive letter can be
assigned under Options\Configuration on the Internal tab. A series of drive letters may be entered and each
specified drive will be scanned until the target sig media is found. Commas are not necessary between drive letters
(ex: DEFG). Citrix or Terminal Services paths may be used. Each path must be followed by a semi-colon (Ex:
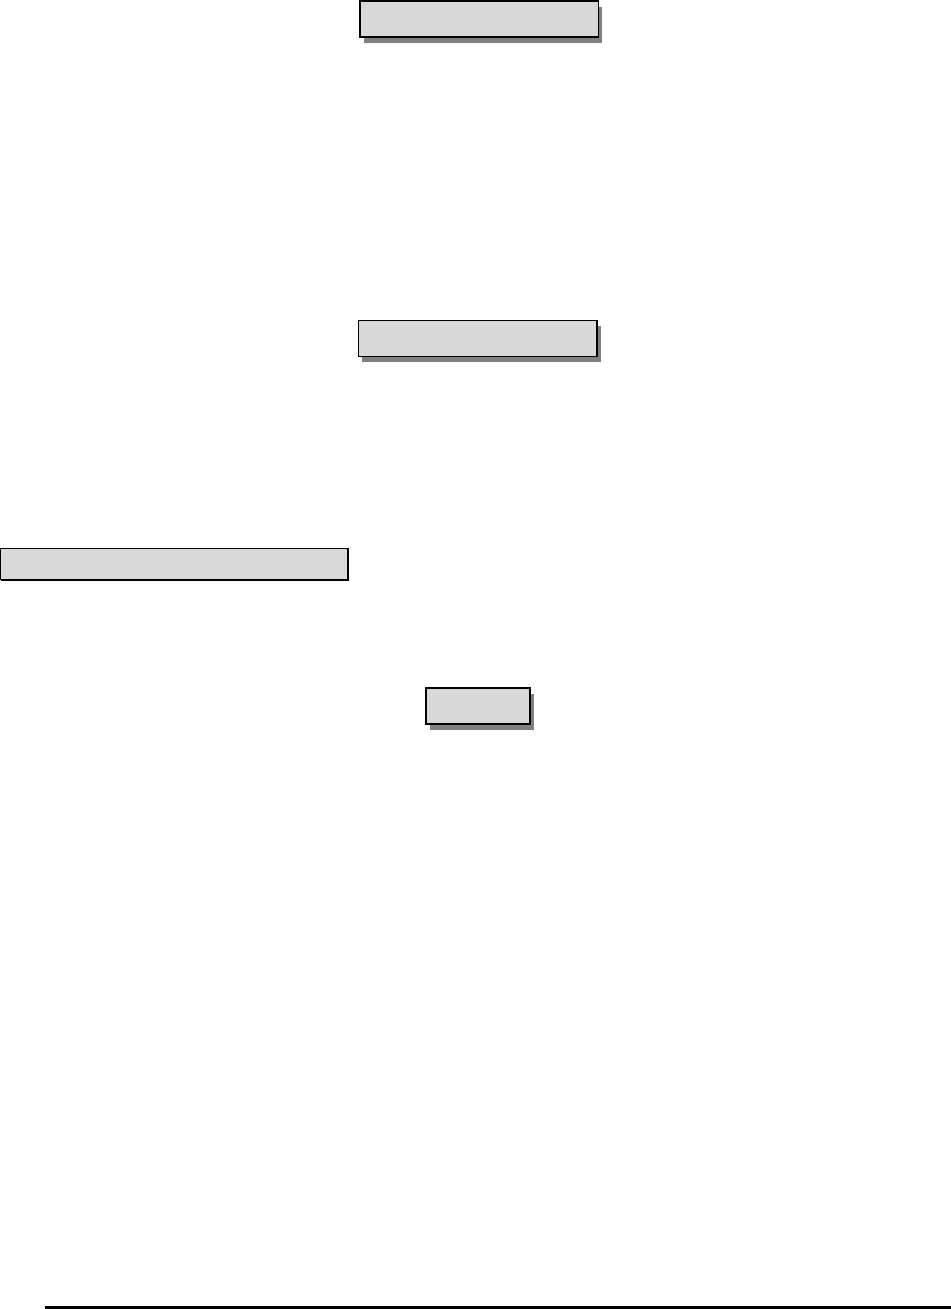
PrintBoss
69 Electronic Copy
\\TSClient\D; or \\Client\F; or \\Client\F$;). The media may be a CD or USB flash drive when PrintBoss is used
locally. CD’s do not work on Terminal or Citrix Servers.
#PrinterOverride
PrinterOverride “Name of Windows Printer Driver”
The PrinterOverride command overrides the printer set on the Multi-Parts & Printers tab of the PrintBoss form,
including the default printer. This command assigns a specific Windows printer and often includes conditions. For
example:
#[C,1][Inu, "St. Louis", ÷{Location}÷]PrinterOverride "HP Color LaserJet 4700 PCL 6"
This example assigns a specific printer only for Copy 1 when the string “St. Louis” is in the Location variable. This
command can also be used in #IF/#ElseIF/#EndIf commands.
Enter the exact printer’s name as it appears in the Windows printer list. Double click on the #PrinterOverride
command to select the printer’s name from a drop-down menu to ensure an exact match.
#ProcessPage
#ProcessPage [Parameter]
The page (or copy) will process when the parameter evaluates to True and skip when it evaluates to False. Often
#ProcessPage will specify the document copy in the condition. For example:
#[Copy, 4]ProcessPage [!Empty, {EmailTo}]
PrintBoss will only examine this condition on the 4
th
copy and process the page if the variable EmailTo does not
resolve to an empty value.
NOTE:
The Pre-process Assignments option MUST be selected on the Special Controls tab of the Form Editor to use the
#ProcessPage command (EDIT / FORM FILES / <highlight form> / EDITOR / SPECIAL CONTROLS). We
recommend selecting Special from the list.
#Rect
#Rect X1, Y1, X2, Y2 [, corner radius[, outline width[, fill of line[, color background[, pattern]]]]]
This command generates a rectangle with control over the size, thickness, and fill of the shape. This is often used to
create a patterned rectangle behind a text object to prevent fraudulent changes to a document. A selection of
patterns is provided for your use. The most common is the zigzag pattern.
This command is also used for Negative Printing. Either the Vertical Fade or Horizontal Fade under the ‘Security
Back’ drop-down menu is the best choice to use for the background. Overlay white lettering with a separate #Text
command.
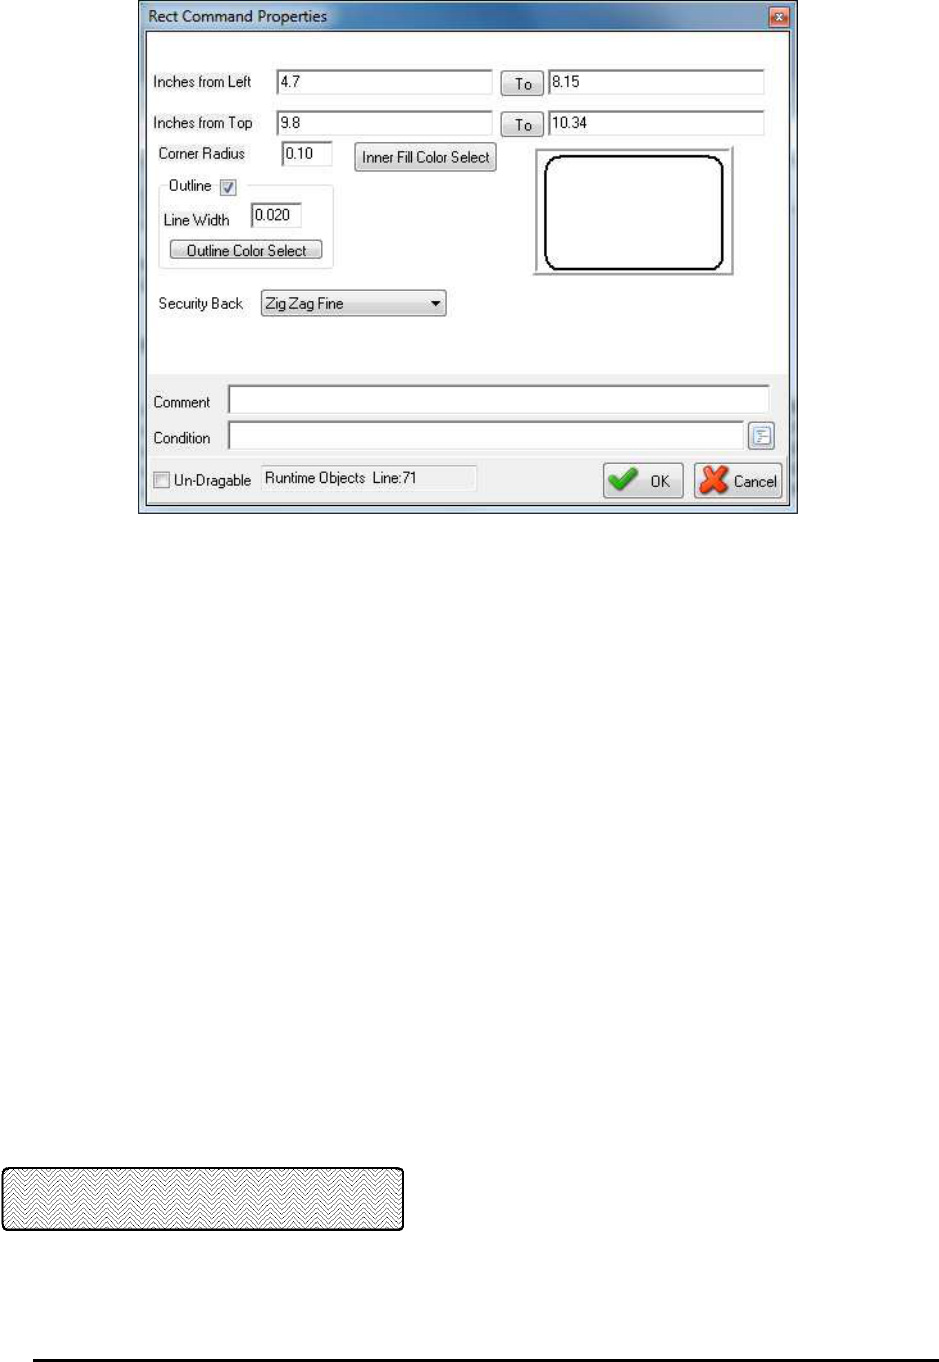
PrintBoss 70 Electronic Copy
CORNER RADIUS
This parameter defines the shape of the corners. No radius is a 90-degree corner. Larger values equate to softer
edges.
OUTLINE WIDTH
Outline width, or Line Width, defines the width of the rectangle outline.
OUTLINE COLOR SELECT
A fill may be defined if the line has a discernible width.
INNER FILL COLOR SELECT
Define a background color for the shape. The background color, or Inner Fill Color Select, is behind the security
pattern in the center of the rectangle. The default is black.
SECURITY BACK
There are several options for the Security Back in the center of the rectangle:
0 = none 1=vertical fade
2= horizontal fade 3= zig zag fine
4 = zig zag medium 5 = zig zag course
6 = half circles fine 7 = half circles medium
8 = half circles course
For example:
#Rect 4.7, 9.8, 8.15, 10.34, 0.10, 0.020, B, W, 3 (shown in the graphic above)
The object masks the signature as:

PrintBoss
71 Electronic Copy
#RegionMove
#RegionMove StartRegion, EndRegion [, StartDestRegion [, EndDestRegion]]
This command is used to move or delete whole regions of text captured from the accounting software. Moved
regions can be compressed or expanded proportionately by entering both a start and ending destination.
This operates the same as the #BlockMove command with the exception that the horizontal boundaries are the left
and right edges of the page. For example, if the accounting software prints a check with an advice at the top of an
11" page, the #RegionMove can move the advice to the center of the page. If the accounting software is passing two
advice sections, use this command to delete one of the advices in order to use the PrintBoss Block Mirror with its
compression feature to print the secondary advice section.
NOTE:
This command must only be placed in the RunTime Objects section of the Form. This command, along with the
#BlockMove command, should be used prior to other commands except #Assign.
STARTREGION
This parameter is also known as the Block Source Dimensions and defines the start of the region in inches from the
top of the page.
ENDREGION
Define the end of the source region in inches from the top of the page. This can be either a ‘To’ value with the
StartRegion as the ‘From’ value, or click on ‘To’ to change the value to ‘Height’.
SHOW BLOCKS
This option shows the area of the block as light red (source) and dark red (destination) in the Form or Work File
view.
BLOCK MOVE MODE
This section determines the action for the RegionMove as follows:
Delete all text occurring in the defined region
Move all text, same size, to a block with a top corner defined in the Destination section
Move all text and shrink or expand the text to fit in the destination
Show the Base Text will display the original text in addition to the Region Move text
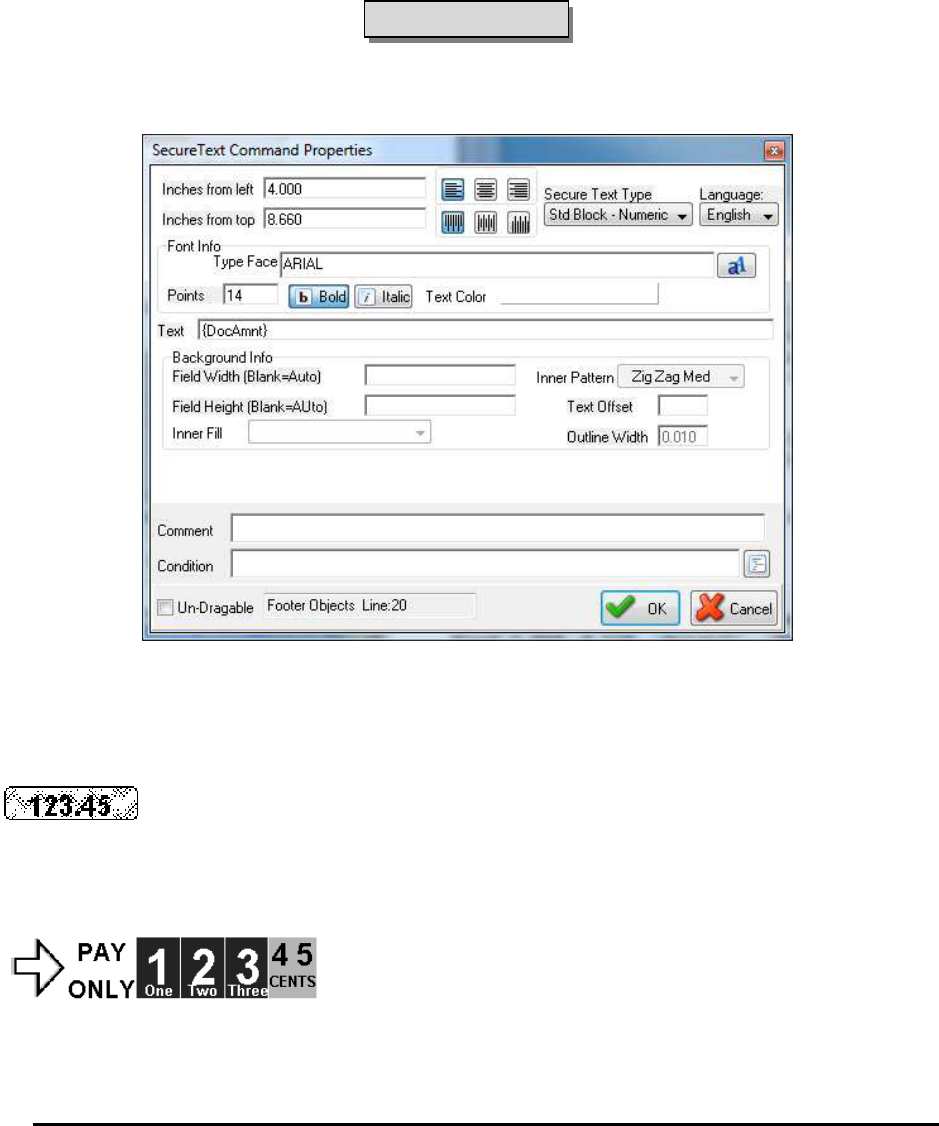
PrintBoss 72 Electronic Copy
STARTDESTREGION
This parameter is also known as the Block Destination Dimensions and defines the start of the destination of the
selected region in inches from the top of the page. The text within the region will be deleted if this parameter is not
defined.
ENDDESTREGION
Define the end of the destination of the selected region in inches from the top of the page. The source region will
proportionately fit between the destination start and end when this parameter is defined. Otherwise, the region will
be moved at its original size.
#SecureText
#SecureText X, Y, "<Font>/<Size>/<Style>/<Color>", "<Text>" [, Options]
This command is used to protect against fraudulent changes on a document. All current PrintBoss check forms
include this security feature.
There are two options for the Secure Text Type: Custom and Standard Block-Numeric.
CUSTOM
This option can be used with both alpha and numeric text. It includes a patterned rectangle behind the text. There
are a few patterns to choose from, but the default is ZigZagMed. The rectangle automatically sizes to fit the text.
STANDARD BLOCK-NUMERIC
As the name implies, this option can only be used with numeric amounts and is specifically used for the amount of a
check. It is nearly impossible to modify the printed check amount with this option.
Enlarged for better viewing
TEXT
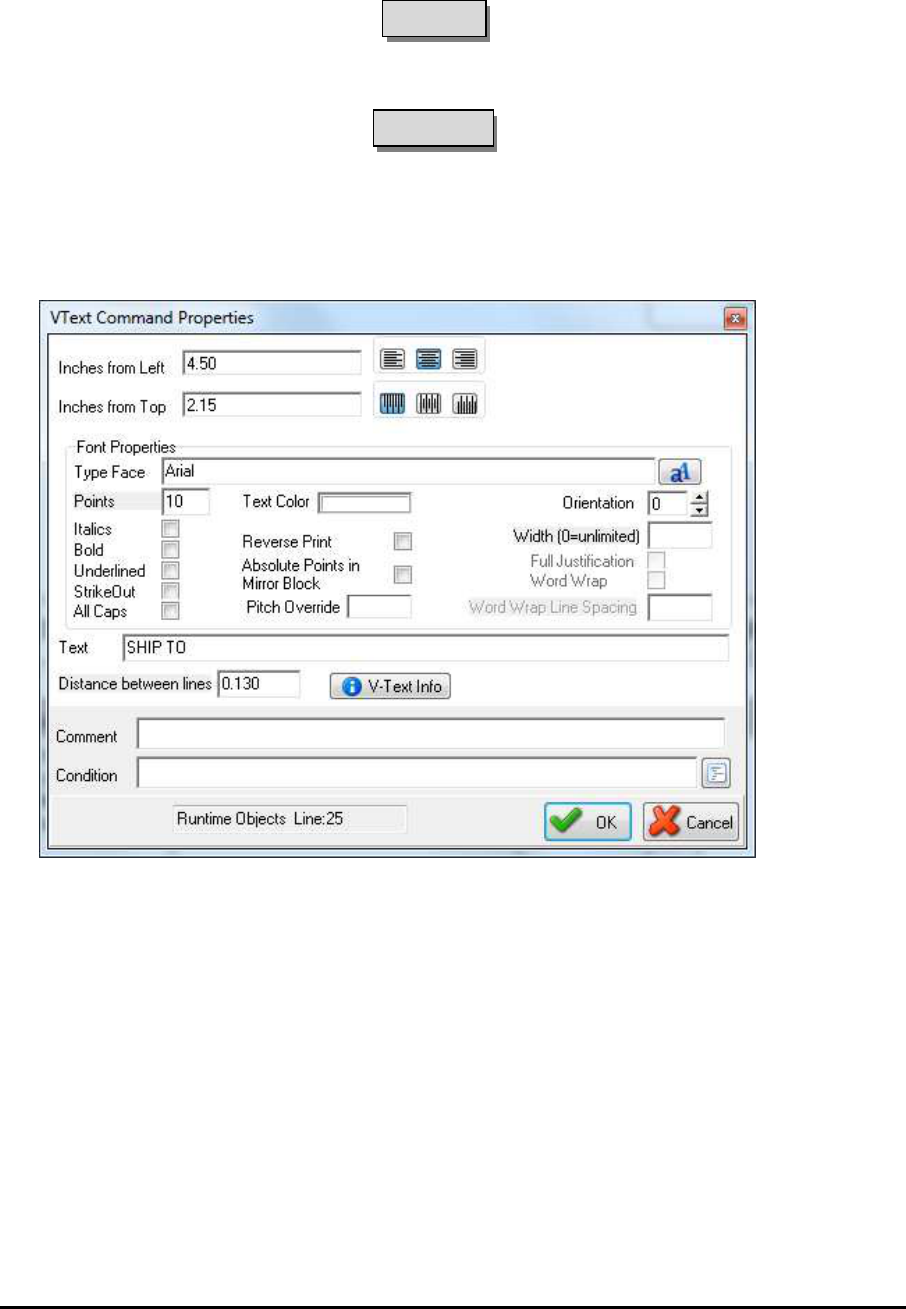
PrintBoss
73 Electronic Copy
Normally a variable is entered in the Text field to dynamically update the check amount information for each check
in the batch.
#Text
See Chapter 10, #Text Command.
#VText
#VText Xc, Y, Font/Size, Spacing, <Text>
This command prints text on incrementing lines. Each line may be a single character or it may be a phrase in a
multi-line text object. One common use is on invoices, credit notes, etc. for the Sold To and Ship To labels in the
address boxes. For example:
#VText 4.50c, 2.15, Arial/10, 0.130, "SHIP TO"
This command centers the characters at 4.50 inches from the left edge of the page. The top of the first character
starts at 2.15 inches down from the top edge of the page. The top of each character thereafter is 0.13 inches below
the top of the previous character.
Another common use is to print a captured address assigned to a multi-line variable called {Address}.
#VText 1.05, 8.1, Arial/10, .15, "{Address}"
Several lines of text can be entered into the VText command separated by commas to indicate line returns. Be sure
to use a delimiter such as quotes around the series of text.
#VText 1.040, 8.245, Arial/10, 0.180, "Pay, To The, Order Of"
See the Multi-Line Variables section later in this chapter for more information.
PRINTBOSS DEFAULT ASSIGNMENTS
A few variables should always be assigned. They are stored in the PrintBoss work file database enabling helpful
sorting and locating of records and are often used in conditions within a form. These variables are:

PrintBoss 74 Electronic Copy
DocAmnt
DocDate
DocNo
DocRecip
These will automatically be assigned when a PrintBoss Flag Trigger exists in the document (PB#INFO ….). The
Flag Trigger may also include DocMisc and DocMisc2. Otherwise, be sure to capture and assign these variables
using the #Assign command.
See Chapter 23, Capturing and Assigning Text.
NOTE:
The {CChkNo} variable is automatically assigned the value of the {DocNo} variable when the Check Number
Format on the MICR tab of the bank record begins with C. Similarly, the {BChkNo} variable is automatically
assigned when the Check Number Format begins with B.
MULTI-LINE VARIABLES
Normally an assigned or captured variable is a single line of text. Assignments made using “#Assigns” may contain
multiple lines of text with each line separated by a Carriage Return / Line Feed. A few commands accept and
process multi-line variables as multiple lines, such as the #VText command. A few standard variables, such as
EMailBody, EmailTo, EmailCC, and EmailBCC, also accept multiple lines.
A particular line of a Multi-Line Variable may be referenced by appending a line number enclosed in square
brackets as part of the variable reference. For example, the following assignment can be used to capture an
unknown number of address lines:
#Assigns AddressLines, 1.0-1.2, 8.0-9.5, BW
The third line can be printed as follows:
#Text 1, 1, Arial/12, ''The third line of the address is: {AddressLines [3]} ''
The zero element returns the total number of elements. Continuing with this example, the following loop prints all
the address lines:
#Assign LastLineY, 7.9
#For n= 1 to {AddressLines [0]}
#Text 1, {LastLineY+.18}, ''Arial/12'', ''Address Line {n} = {AddressLines [{n}]}''
#Next n
PRINTBOSS CONDITIONAL COMMANDS
Each PrintBoss command can be executed based on a condition that is evaluated at the time the line is processed.
For example, a logo may be printed based on the existence of a logo file name in the bank record, or a second
signature line on a check may only be printed if the check amount exceeds $1.000.00. The conditional statement is
one or more condition expressions with each expression enclosed in brackets [ ]. The condition statement is inserted
between the # character and the command name (for example: #[Copy, 1]Text …).
In addition to conditions for commands, several commands accept Conditional Parameters, such as the
#ProcessPage [<condition>] command. The conditional parameter is simply a conditional statement that follows the
same rules but is used after the command. It is often helpful to enclose a Conditional Parameter in a delimiter,
especially if the conditional statement has multiple condition expressions.
A conditional statement is comprised of a series of condition expressions chained together with an assumed AND or
a symbol for OR. Normally, a conditional statement is only one condition expression.
Each condition expression begins with a condition operator followed by a comma and as many parameters as
defined by the operator.
PrintBoss
75 Electronic Copy
More than one condition can be entered by chaining together the bracketed condition expressions. Multiple
conditions are considered to be joined by AND unless the OR ‘||’ symbols are added. All AND expressions must be
true for the condition to be true.
Ex: #[Copy,12][AmntRange, 0, 200]Text 1,1, Arial/12, "Prints on Copy 1 and 2 if amount is less than 200"
#[!Copy,0][Flagged, {BFlag2}]Text 1,1, Arial/12, "Prints on all Copies but 0 if banks Flag 2 is checked"
ANY CONDITION PRECEDED BY AN EXCLAMATION MARK (!) HAS REVERSED LOGIC.
A double pipe symbol may be inserted between conditions to represent OR with the next condition. Parentheses
cannot be used with conditions.
Ex: #[Inu, "Jones","{Comp}"]||[Inu, "ABC", "{Comp}"]Text 1,1, Arial/12, "Jones or ABC in Company Name"
Very complex conditions may require several lines that create variables in stages and then those variables can be used
within other conditional statements.
The following is a list of the most common conditional commands and their descriptions. See Appendix B for a list
of the remaining commands.
NOTE:
Although it is helpful for people to see the condition names spelled out completely, only as many characters as is
needed to make the condition unique are required. For example, Fi is enough to register as the FileExists condition,
or As is enough to register as the Assigned condition, or E as the Empty condition.
=
=, 'String1', 'String2',
This command returns a value of true if String1 is identical to String2 up to the length of String2. For example,
comparing "12345" with "123" is true, but "123" compared to "12345" is false.
The Compare Options include:
Option Description
E Exact match rather than stopping at the number of characters in String2
U
Co
n
verts all
charact
ers to upp
e
r
case before co
mparing
–
Not Case S
e
nsitive
T or R Right trim both strings before comparing
A or B
Trim Both (or All) sid
es o
f each string
before comparing
The following example prints the words "No Charge" if the value of the variable {Dept} is equal to "Accounting"
and is not case sensitive:
#[=U,' Accounting', {Dept}]Text 1,2.1, 'Arial/12', 'No Charge'
The following is a list of examples showing the effect of the Compare Options:
[=, "12345", "123"] true
[=, "123", "12345"] false
[=E, "12345", "123"] false
[=, "123", "123 "] false
[=T, "123", "123 "] true
[=, "ABC", "abc"] false
[=U, "ABC", "abc"] true
PrintBoss 76 Electronic Copy
=e, =eu, =u
=e, 'String1', 'String2'
Same as = condition with a Compare Option of "e", "eu" or "u" (see the table above under the = condition). The
letter ‘e’ requires an ‘Exact’ match and the letter ‘u’ is not case sensitive.
==
==, 'NumericValue1', 'NumericValue2',
Returns true if NumericValue1 is EQUAL to NumericValue2. The numeric values of the items are compared. For
example: 0 == 0.00 is true.
<>
<>, 'NumericValue1', 'NumericValue2'
Returns true if NumericValue1 is NOT EQUAL to NumericValue2. The numeric values of the items are compared.
For example: 1 <> 0.00 is true.
<=
<=, 'NumericValue1', 'NumericValue2'
Returns true if NumericValue1 is LESS THAN OR EQUAL TO NumericValue2.
>=
>=, 'NumericValue1', 'NumericValue2'
Returns true if NumericValue1 is GREATER THAN OR EQUAL TO NumericValue2.
<
<, 'NumericValue1', 'NumericValue2'
Returns true if NumericValue1 is LESS THAN NumericValue2.
>
>, 'NumericValue1', 'NumericValue2'
Returns true if NumericValue1 is GREATER THAN NumericValue2.
AmntRange
AmntRange, 'LoRange', 'HiRange' [, TestAmount]
Returns true if the Test Amount falls on or within the specified range. {DocAmnt} is used as the test amount when
the Test Amount is omitted. There is no upper limit when the HiRange is omitted or set to 0.
The following examples print a second signature line on checks with a {DocAmnt} of $1000.00 or above. The first
expression makes use of the exclamation mark "!" to reverse the logic and the second drops the HiRange parameter
to remove the upper limit.
#[!AmntRange, 0.1, 999.99]Line 4.7, 9.7, 8.15, 9.7
#[AmntRange, 1000, ]Line 4.7, 9.7, 8.15, 9.7
The following example prints the second signature line when it is flagged in the bank record and the amount is at
least $0.01:
#[Flagged, {BFlag1}][AmntRange, 0.01, 0, {ChkAmnt}]Line 4.7, 9.5, 8.149, 9.5, B, ,
Another common use is to put a condition on a signature to determine when it prints. The following example will
not print a signature when the check amount {DocAmnt} is below $0.01 and above $49,999.99.
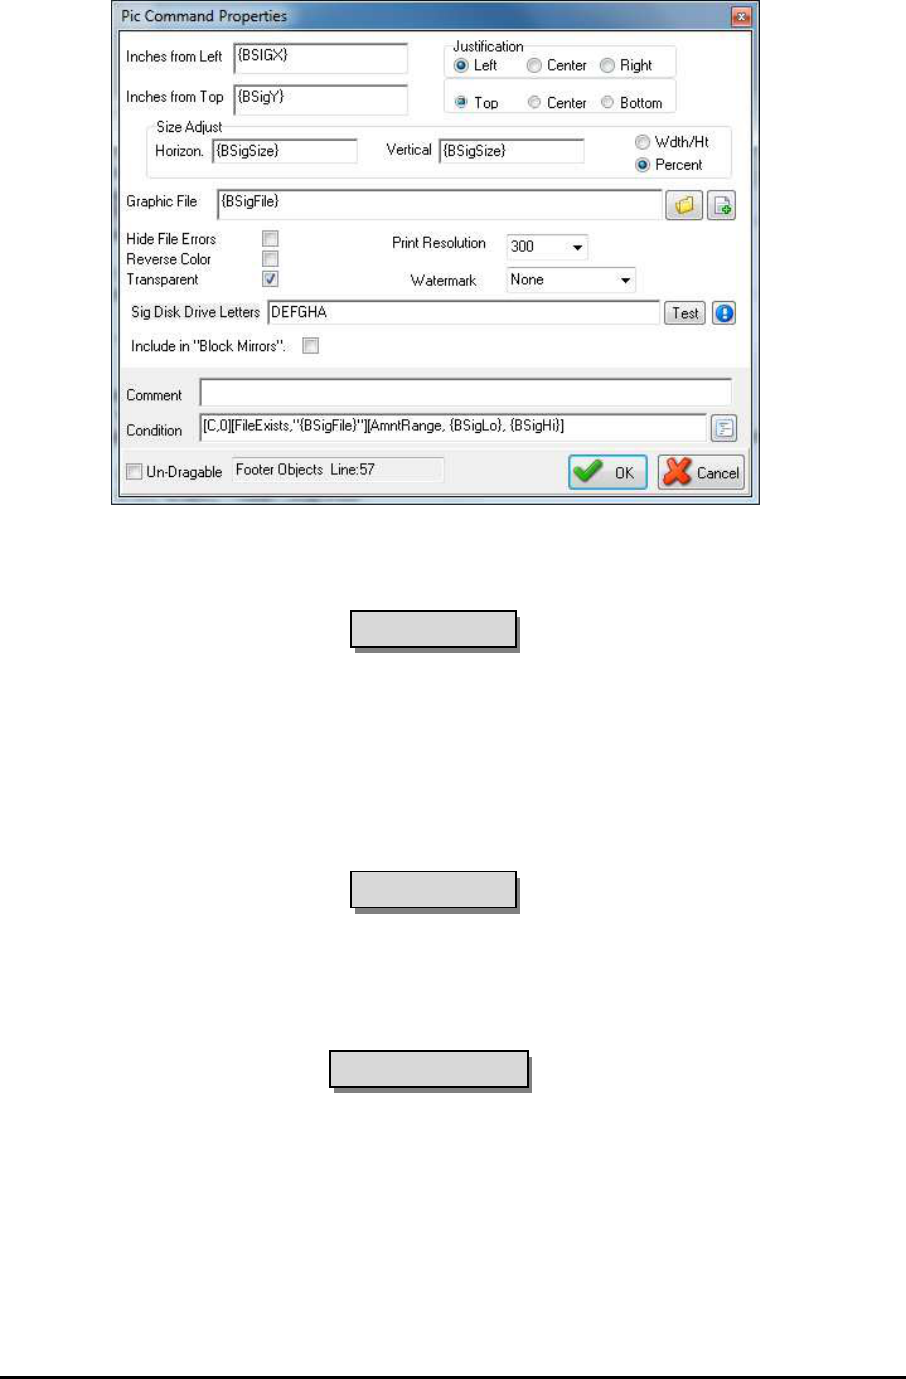
PrintBoss
77 Electronic Copy
Notice the condition was entered directly in the Pic Command Properties dialogue. The button at the end of the
Condition field opens a list of the available conditions and their parameters. The condition can be tested in the Form
File’s View by entering an amount in the Simulated Document Amount field at the top of the View.
Assigned
Assigned, '<Name of assigned variable to test>'
Returns true if the variable is explicitly assigned (i.e. #Assign 'EmailTo', "support@wellspringsoftware.com") or
assigned through capture coordinates (#Assign 'EmailTo', ' ', 1.5, 4.5). PB#INFO can also be used to assign the
variable. DO NOT include braces around the variable name. Note the value of a variable can be blank, but the
variable is still considered assigned.
The following example prints the company logo when CompName is assigned.
#[Assigned, 'CompName']PIC 0.30, 7.8, 'CompLogo.bmp'
Captured
Captured, '<Name of assigned variable to test>'
Returns true if the variable captured raw data from the accounting software. This is different than the Assigned
conditional command. Before a variable can be captured, a command must assign a variable name and define the
coordinates used to capture a value. If the raw data never has a text object that falls within those coordinates, then
NO data is Captured, but it is Assigned. DO NOT include braces around the variable name.
CHRCount
{CHRCount: ÷{mystr}÷,','} OR
{CHRCount:’one|two|three|four|’,’|’}
This function counts the number of a specified characters in the string. This is useful for determining how many
entries occur in a comma delimited string.
PrintBoss 78 Electronic Copy
Copy
Copy, 'String of Digits'
Returns true if the form copy number is included in the string of digits, where 0 represents the original copy and 1
through 7 represents copies 1 through 7. Specify each copy number when more than one copy is to be considered.
Separators are not required, but any character may be used to separate multiple copy numbers except an asterisk.
If an asterisk (*) appears after a character, the object is only printed in the mirrored block section. This is useful
with the BLOCK command that draws a frame on 11" checks. The block should not be printed on the original, but it
is nice to have a frame printed on the mirrored block on the top tear off copy.
See Block Mirror tab earlier in this chapter.
If a B appears after the copy number, the object only prints in the body of the document. It will not appear in the
mirrored block section.
NOTE:
If no condition operator is specified inside of the condition braces, the COPY operator is assumed.
Examples:
Conditional Command Description
#
[Copy, 23]TEXT 5
.00,
9.0
0, "TM/8
", "Duplicate Cop
y
"
Print
s
‘
Duplicate Cop
y
’
on copies
2
and 3
#[COPY, 0*123]Block .250, 7.6, 8.25, 10.5, /R.1 Prints a frame on the mirrored block for copies 1, 2, and 3
#[0*123]Block .250, 7.6, 8.25, 10
.5, /R.1
Prin
ts a f
rame on the mirr
or
ed
blo
ck for c
opies 1, 2, and 3
#[Copy, 1]TEXT 4.5, 10.5, '5', 'Customer File Copy' Prints ‘Customer File Copy’ on copy 1
#[!C,0]Text 4.4, 10.4, "Arial/14", "** C
OPY **"
Prints
**COPY
**
on all copies except the origin
al
Dates=, DATES>, DATES<
Dates=, '<Date1>', '<Date2>’
These conditional commands return true if date1 and date2 compare as indicated by the =, >, or < signs. If date2 is
omitted, then the current date is assumed to be date2.
The Windows’ ShortDateFormat is the assumed format for the dates. An alternate format can be specified by
appending a semicolon followed by a mask to the date string. For example:
[Dates=, "4/2/16; m/d/y"] This statement evaluates to true when the current date is Apr 2, 2016.
Empty
Empty, 'StringToTest'
This returns true if the StringToTest is empty. Use this conditional command with the exclamation mark to reverse
the condition. For example:
#[!Empty, ÷{BMisc1}÷]Text 0.3000, 8.200, ‘Arial/8’, ÷{BMisc1}÷ This command prints the text specified in the
Bank Misc1 field when BMisc1 is not empty.
#[!Empty,÷{Memo}÷]Text 8.137R, 8.813, 'Arial/9', ÷MEMO: {Memo}÷ This command prints the contents of the
Memo field when it is not empty. The Memo field is an
assigned field.
False
False
This indicates the expression is FALSE and is often helpful in debugging conditional statements.
PrintBoss
79 Electronic Copy
FileExists
FileExists, 'FileName',’DriveLetters’
This returns true if the file specified by the FileName exists. It is often used with logos and signatures. PrintBoss
will look in the Logos folder under the PrintBoss’ Home directory when no path is specified. The following
example will print the logo file when it exists:
#[File, 'Logo.BMP']PIC .4, 7.9, 'Logo.BMP'
This conditional command is most commonly used when logos are added directly to the Form File instead of
through the Bank Record.
In PrintBoss version 6.0.3, FileExists was expanded to include drive letters in addition to a path. However,
PrintBoss does not state which drive letter provided the match.
#[FileExists,'\sig1.jpg','cflhQ']Text 1.5, 1.5, 'Arial/7', 'Sig 1 Exists'
#[FileExists,'l:\sig2.jpg']Text 1.5, 1.6, 'Arial/7', 'Sig 2 Exists'
This builds a list of signatures available. More examples are provided below:
#Text 1.5, {lastliney+.53}, 'Arial/7', Number of Sigs: {eval:{SigsAvailable[0]}-1}
#For N = 1 to {eval:{SigsAvailable[0]}-1}
#Text 1.5, {lastliney+.13}, 'Arial/7', {N}: {SigsAvailable[{N}]}
#Next N
#Assign Sig1,{SigsAvailable[1]}
#Assign Sig2,{SigsAvailable[2]}
#Text 1.5, {lastliney+.53}, 'Arial/7', Using these signatures:
#Text 1.5, {lastliney+.13}, 'Arial/7', {Sig1}
#Text 1.5, {lastliney+.13}, 'Arial/7', {Sig2}
#Text 1.5, {lastliney+.53}, 'Arial/7',÷{FileList: 'C:\utilities\*.*','|'}÷
PrintBoss also added a File Location function.
{Filelocation:\sig1.jpg,CDLQF}
FileLocation
Location, 'FileName',’DriveLetters’
{Filelocation:\sig1.jpg,CDLQF}
PrintBoss added a File Location function in 6.03. After the colon, enter the filename and drive letters. PrintBoss
will return the file on the first path it finds.
{Filelocation:\sig1.jpg,CDLQF}
The function will search the drive letters you provided and stops after the first find. If you have the same file on D:
and F: it will return the D:\sig1.jpg file as passed using the above line.
NOTE: Disk I/O functionality is time intensive. If you have a number of signatures to test, the batch will take
longer.
Flagged
Flagged, 'StringToTest'
This returns true if the StringToTest begins with any of these characters: Y, y, T, t (as in Yes or True). It is often
used with the 5 bank variable fields called {BFlag1} … {BFlag5}, though it will work testing any string that can
return one yes or true value.
#[Flagged,{BFlag1}]Line 4.7, 9.6, 8.149, 9.6, '' This command prints a second signature line when the BFlag1
field is checked (flagged). The description for the
BFlag1 field is 2
nd
Signature Line and it is located on the
Miscellaneous tab of the PrintBoss Bank Edit window.
PrintBoss 80 Electronic Copy
See Chapter 8, Bank Accounts.
In
In, 'StringFragment', 'StringToSearchIn'
This returns true if the StringFragment exists anywhere in StringToSearch. This search is CASE SENSITIVE. The
following example whites out the dollar amounts when an exact match of the word Packing occurs anywhere in the
assigned variable DocDesc:
#[In, 'Packing', '{DocDesc}']Block 6.5, 4.5, 8.25, 9.2, W
Inu
Inu, 'StringFragment', 'StringToSearchIn'
This returns true if the StringFragment exists anywhere in StringToSearch. This search is NOT case sensitive. The
following example whites out the dollar amounts when the word Packing occurs anywhere in the assigned variable
DocDesc, regardless of case:
#[Inu, 'PACKING', '{DocDesc}']Block 6.5, 4.5, 8.25, 9.2, W
True
True
The condition is TRUE. This is often used in debugging conditional statements.
Type
Type, 'Source Abbreviations'
This returns true when the document Type appears in the Source Abbreviation list and is useful when certain
documents are to print only for specific types of source files.
Source
Abbreviation
Description
W Work Files
A Archive Files
S Samples in Utilities
F Form Editor
The following is an example of disabling a signature from printing when processing archive files:
#[Type, WSF]SIG 4.7, 9.8, 'Your_Sig.SIG'
Shorten the conditional command with the reverse exclamation mark:
#[!Type, A]SIG 4.7, 9.8, 'Your_Sig.SIG'
View Only
This condition sets an object to View, but not to print. This condition can be used to test the contents of a variable
prior to printing.
PrintBoss
81 Electronic Copy
DATE & TIME FORMAT MASKS
Many commands and functions allow the use of date format masks to define how a date is expressed or interpreted.
In most cases, the date format is defined in the Windows Regional Settings for the Short Date if a date mask is not
specified. Here is a list of the mask symbols:
Mask Description
d Displays the day as a number without a leading zero (1 - 31).
dd
D
isplays the day
as
a
number
with a
leading zero (01
-
31).
ddd Displays the day as a three-character abbreviation (Sun - Sat) using the strings given by the
Short
DayNames glob
al variable.
dddd Displays the day as a full name (Sunday - Saturday) using the strings given by the LongDayNames
global variable.
ddddd Displays the date using Windows’ ShortDateFormat (no other symbol would be used with these 5
ds).
dddddd Displays the date using Windows’ LongDateFormat (no other symbol would be used with these 6
ds).
m Displays the month as a number without a leading zero (1 - 12). If the m specifier immediately
follows an h or hh
specifier, t
he min
ute rather than the
month is dis
played.
mm Displays the month as a number with a leading zero (01 - 12). If the mm specifier immediately
follow
s an h or hh specifier, the minute ra
ther than the month is displayed.
mmm Displays the month as a three-character abbreviation (Jan - Dec) using the strings given by the
ShortMonthNames global v
a
r
iabl
e.
mmmm Displays the month as a full name (January - December) using the strings given by the
LongMonthNames global variable.
y or yy Displays the year as a two-digit number (00 - 99).
yyyy
Di
splays the year a
s
a four
-
d
igit number (0000
-
9999).
j The Julian date displays the day of the year as a number without a leading zero (1 - 365).
j
jj
The Julian date d
isplays the day of the year as a nu
mber with lea
ding z
eros (001
-
365).
h Displays hours without a leading zero 0 - 24 (0 - 12).
hh
Dis
p
l
ays
2
-
di
gi
t hours with
a
leading zero 0
0
-
24 (
or 0
0
-
12)
.
n Displays minutes without a leading zero 0 - 59. Note that within a time expression, m will be
inter
preted
as minutes as well
.
nn Displays minutes with a leading zero 00 -59. Note that within a time expression, mm will be
interpre
te
d
as minut
es as
well.
s Displays seconds without a leading zero 0 – 59.
ss
Displays s
econds with
a
leading
zero
00
–
59
.
t Forces 12-hour clock with a or p in place of t.
T
F
orces
12
-
hour
clock with
A
or
P
i
n
pla
ce o
f
T
.
tt Forces 12-hour clock with am or pm in place of tt.
TT
F
orces
12
-
hour
clock w
ith
AM
or
PM
in place of TT
.
DELIMITING PARAMETERS
Most PrintBoss commands require parameters. Each parameter in a list of parameters is always separated with a
comma. If no delimiter is used to enclose a parameter, PrintBoss will trim leading and trailing spaces. In the
following example, the final parameter will only be 8 characters long: ''Test 123''.
PrintBoss 82 Electronic Copy
#Text 4, 5, Arial/12, Test 123
Often it is necessary or safer to delimit parameters in case there may be a comma within the parameter or if you
want to retain leading and trailing spaces. This is especially true when you are delimiting variables like an address,
where you can’t be sure of the contents in the evaluated variable. Suppose the above #Text command includes 2
leading and 2 trailing spaces. The final parameter should be 12 characters long. This can be fixed with delimiters.
#Text 4, 5, Arial/12, '‘ Test 123 ''
The choice of delimiters is very important. If the {CompName} variable in the following line resolves to O’Neil
Decorating, Inc and the delimiter chosen is a single quote, a problem would occur.
#Text 4, 5, Arial/12, '{CompName}’ This expression evaluates to O.
The CompName would stop at O due to the apostrophe in the name. A different delimiter needs to be used.
#Text 4, 5, Arial/12, «{CompName}» This expression evaluates to O’Neil Decorating, Inc.
PrintBoss recognizes the following characters as delimiters. Delimiters are always used in pairs, though different
pairs may be used in the same expression:
Delimiter Description
'
Single quote (apostrophe)
'' Double quote (Shift + apostrophe)
~
Tilde (Shift + gra
ves above lef
t Tab key)
[ ] Starting and ending square brackets
÷
D
ivid
e sy
mb
ol entered i
n
PrintBoss edito
rs
b
y pressi
ng CTR
L + Apostrophe
« » Double arrows entered in PrintBoss editors by pressing CTRL + Comma for left arrows and CTRL
+ Period for righ
t arrows
The last two choices are the safest since they are extremely unlikely to occur in a text string. A commonly used
short cut is to omit the trailing delimiter if the parameter being delimited is at the end of a line.
PrintBoss
83 Electronic Copy
Chapter
10
#TEXT COMMAND
The #Text command has many options and can be qualified in different ways that are unique compared to all other
commands. Therefore, this command has a single chapter to explain the different options. This chapter is divided
into three sections. The first section details the #Text command as accessed from the View of a form and the second
section details the command when editing the textual scripts available in the Form Editor (normally in the Run Time
Objects or Footer Objects sections). The third section describes Substitution Functions that can be used by either
edit method.
EDIT #TEXT FROM A VIEW
To edit, insert, or delete text, it is often easier to use the document View of a Form File.
1. Click on the Edit menu and select Form Files from the PrintBoss Master Application.
2. Select the desired form and click the View button . The View of the form opens. Clarity will
depend on the monitor's size and resolution. This view only displays items generated in PrintBoss. Data
from the accounting system is not available in the form View.
See Chapter 9, Form Files – Modify from the Document View, for information on the layout of the View
window.
DATA PRESENT
The form is void of accounting data when viewed from the Form File. Bank account information displays
depending on the form and based on the bank record selected from the drop-down list at the bottom of the Form
Select window. Close the view, select a new account from the drop-down menu, and click View again to display
information from a specific bank account.
Any editing saved to a form in the View affects all bank accounts – not just the bank
currently viewed.
Other elements in the View consist of text, grid, and other objects used to create the Form File and are generated by
PrintBoss. This often includes logos, company information, bank information, signature lines, labels, and the format
for the MICR line at the bottom of a check.
DELETE TEXT
Deleting text or objects from the View removes that object from ALL documents that use this form. Click once on
the text object to select it. The text will be highlighted. Right click and select Delete Current Object. PrintBoss
will prompt you for a confirmation. The change is not permanent until you Close the view and confirm the changes
should be Saved.
Deleting text from the view will delete it for all copies and accounts that use this document.
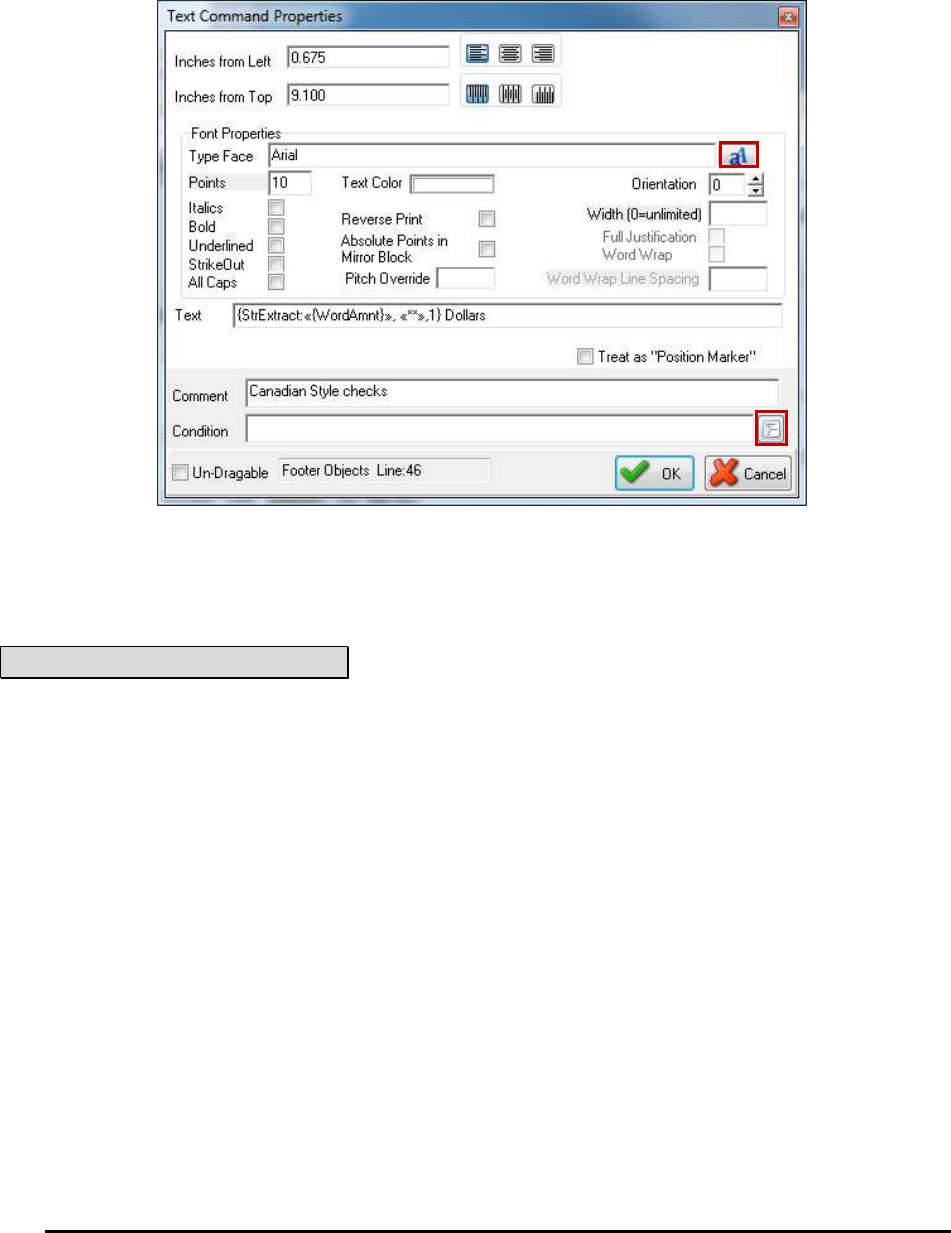
PrintBoss 84 Electronic Copy
EDIT TEXT
There are two ways to select text in the form: 1) double click on the text or 2) click once to highlight, then right click
and choose Edit Current Object. A dialog box opens with properties specific to this text item. Variable names
appear in the Text field enclosed in braces { } if the form text is the value of a variable. This is common with bank
and company information.
Adjust the coordinates listed in the upper left area of the dialog box to change the placement of the text. These
coordinates are in INCHES and measure from the left edge of the paper to the edge of the text, depending on
justification (Left, Center, Right), and from the top edge of the paper to the edge of the text, depending on
justification (Top, Middle, Bottom). The default justification is left and top. You may also drag text to the desired
location without opening the Text Command Properties.
NOTE:
Text may be dragged to change its location unless there is a variable in the Left or Top fields, such as {LastLineX}
or {LastLineY+.15}. The {CompAdsLeft} variable adjusts the left edge of the company address objects when a
logo appears on the form. The distance from the left is specified by a #Assign command.
The text dialog opens after text is dragged to verify the new location. Click OK to accept the change.
Click on the button to the right of the Type Face field with ‘aA’ on the button to change the style of the font and
browse to any font available on your system. You may also type the name of a font. Adjust the point size and style
of the font as desired. Available font properties include:
Italics
Bold
Underlined
Strikeout
All Caps
Color (If you do not have a color printer, the text will appear on the paper in a shade of gray)
Reverse Print
Mirroring
Pitch Override for fixed pitched fonts only (Courier, Line Printer, Letter Gothic)
Orientation
Width
Full Justification (Available when a Width is entered)
Word Wrap (Available when a Width is entered)
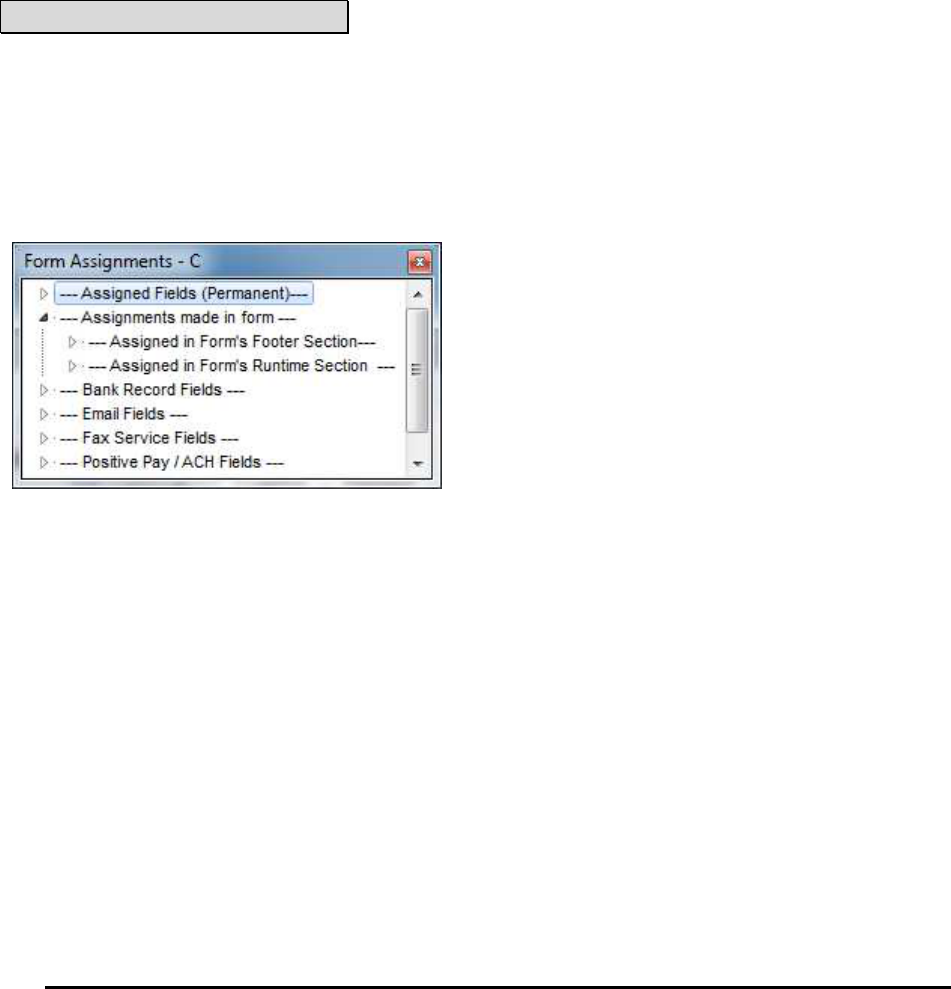
PrintBoss
85 Electronic Copy
Work Wrap Line Spacing (Available when Word Wrap is selected)
A condition may be added to the text using the Condition field near the bottom of the dialog. Type the condition or
choose one from the selector button to the right of the Condition field. Add "&&" after the condition to add another
condition or enclose each condition with brackets ‘[ ]’ and the ‘And’ is implied. It is often best to edit complex
conditions in the Form Editor.
Please see Chapter 9, Form Files, for more detail on conditional commands.
INSERT TEXT
1. Right click anywhere in the View.
2. Select Insert an Object.
3. Click Text.
The Text Command Properties dialog opens with the coordinates of the point where you right clicked. Type your
text in the Text field or enter a variable name in braces { }. Typically, the variable names are assigned in the
RunTime Objects tab or through a PrintBoss PB#INFO trigger. Change the text properties as needed.
NOTE:
Objects inserted from the View are placed on the last line of the Footer Objects tab of the Form File (or the Back
Objects tab if viewing the back of the form). Placements in other tabs or changes of order for proper formatting
need to be made in the Form Editor.
It may be convenient to view a list of available variables when inserting a new Text field.
1. Close any open windows except View.
2. Right click in the View.
3. Select Display Assignments.
These steps open the Form Assignments window. Expand the list to view the assignments for the RunTime of
Footer Objects sections. Move the Form Assignments window to the side for reference. Drag a variable from the
Assignments made in form lists or the Assigned Fields (Permanent) list onto the View of the form. A Text
Command Properties dialog opens for the variable. The coordinates in the dialog are based on the drag location of
the variable. Edit and click OK to save your changes or click Cancel to undo.
FORM EDITOR
Though it is easier to Add/Edit/Delete text objects from the View of a form, sometimes it is advantageous to access
the script behind the view. A #Text command defines text properties for every text object in the script. The scripts
are editable by opening the form editor and examining the RunTime, Footer, Page Back, or Proprietary Objects tabs
of the form. The basic syntax follows:
#TEXT X, Y, "FontDescriptor", "TextString"
Double click on an existing command or type #Text and double click on it and a line editor dialog will parse out the
script and open the Text Command Properties dialog. The following describes the parameters the parser expects.
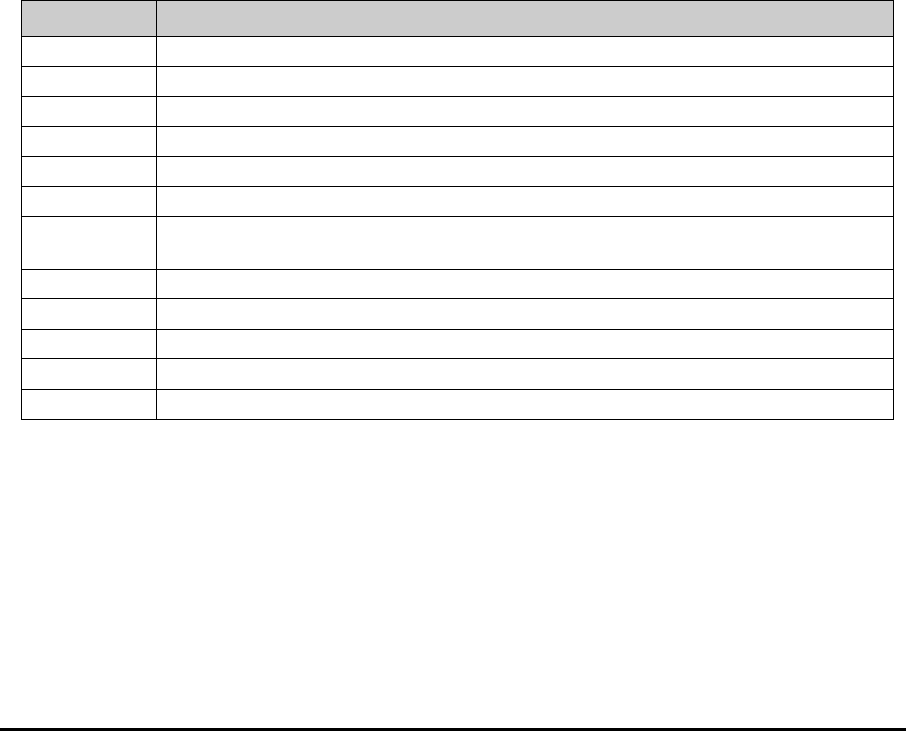
PrintBoss 86 Electronic Copy
X, Y:
These coordinates represent the location of the top left corner of the text from the left and top edges of the paper in
inches. These values may be entered in thousandths of an inch. If the X coordinate is followed with the letter L, C,
or R (case does NOT matter), PrintBoss will justify the text to the Left, Center, or Right. The text is left justified by
default. Type the letter T, M, or B after the Y coordinate to justify the text Top, Middle, or Bottom. The text is top
justified by default.
Only enter the letter representing justification in the script. The Text Command Properties dialog has corresponding
line justification buttons.
FONT DESCRIPTOR:
The Font selection button on the Text Command Properties dialog in PrintBoss opens the Windows Font dialog.
Once a font is selected, the descriptor is built automatically. The font descriptor can be typed in the script using the
following components:
'Typeface/Point Size/Options'
'Arial/12/B'
PrintBoss allows a few abbreviated Type Faces.
UV Universal*
TM Times Roman
CR Courier
LP Line Printer*
LG Letter Gothic
* Not recommended as not available in newer printers.
The font options are:
Font Option Description
I
Italics
B Bold
N
U
nderline
K Strikeout
U
All Caps
R Reverse Print
@nnn Rotation of fonts in degrees –360 …0 … 360. Often used to change the orientation of
text
f
or
Deposit
slips
+
Follows point size and s
pecifies
all
mirror
ed
blocks use original point size
Pnn.nnn
Ov
errides any F
ixed o
r Propo
rtional pitc
h with this p
itch
Xnn.nnn
Set
s
width of
text in inches when used w
it
h Fu
ll J
us
tification (
X
nn.nnn)
A
Word
Wr
ap
E.nn
S
pecifi
es Word Wrap line spacing
TEXT STRING:
This is the actual string of text that prints and can be a variable name or specific text (i.e. 'Two Signatures
Required'). The string should be delimited (see Delimiting Parameters at the end of Chapter 9). Take care to
choose a delimiter that will not occur in the string, especially when the text is an assignment from captured data.
Example: Don't use Single Quotes if the text could possibly contain an apostrophe.
One unique delimiter available to PrintBoss is Ctrl + ' (apostrophe) and appears as a ÷ (old division symbol). This
delimiter is recommended when the other options may appear in the text string.
Some examples of #Text commands commonly found in PrintBoss Form Files include:
#Text .3, 7.8, "Arial/12/B", ÷{BCName}÷ |This places the company name in the upper left of the check in a 12
point Bold Arial font.

PrintBoss
87 Electronic Copy
#[C,0]Text 4C, 10.5, "Times Roman/10/I", "Original" |This places the label "Original" centered at the bottom of the
original document, but not on copies.
SUBSTITUTION FUNCTIONS
There are times when a text command needs to be limited, formatted, or altered to account for special circumstances.
Substitution functions are available for the #Text command to accommodate those special situations. A list of
Substitution functions is available in the Form Editor by RIGHT clicking in an Objects tab and selecting List/Stuff
Assignments. Click on the arrow in front of Substitution Functions to view the list.
Substitution functions need to be enclosed in braces { }. Each Substitution function name is immediately followed
by a colon and any required parameters. Everything between and including the braces will be replaced with the
evaluation of the function when it is encountered in a script.
Functions may be embedded in functions. Use caution. Confusion may occur with delimiting the functions and
parameters. Sometimes it is preferable to create a value from a series of steps to eliminate confusion and make the
command clearer. For example, consider a field with leading and trailing spaces that is captured to a variable called
{Dept}. It may have the value: " SHIPPING ". Only the first 2 non-space characters of this field need to be
printed (SH). The following two scripts accomplish this goal. The second is a bit longer, but it is clearer and safer.
#Text 4, 10.0, "Arial/12", "Dept Code: {SubStr: ÷{TrimAll: '{Dept}'}÷,1,2}"
OR: #Assign DeptTrimmed, "{TrimAll: '{Dept}'}"
#Assign DeptCode, "{Substr: '{DeptTrimmed}',1,2}"
#Text 4, 10.0, "Arial/12", "Dept Code: {DeptCode}"
Descriptions of the more common Substitution functions follow. See Appendix C for a list of the remaining
Substitution Functions.
Case
Case: ‘<Str>',’U/L/P’
Changes the case of all the text in the <Str> to one of the following:
U – Upper Case
L – Lower Case
P – Proper Case (first character of each work is capitalized)
The <Str> is replaced with a variable assigned to text in the PrintBoss Form.
CurrentDate
CurrentDate: 'mm/dd/yyyy'
Inserts the current date formatted according to the mask. If no mask is passed, the Windows Regional date mask will
be used. See Chapter 9, Form Files – Date & Time Format Masks, for more format options.
CurrentTime
CurrentTime: 'hh:mm:ss tt'
Inserts the current time formatted according to the mask. If no mask is passed, the Windows regional time mask will
be used. See Chapter 9, Form Files – Date & Time Format Masks, for more format options.
DocAmnt
DocAmnt: /HideDec /Zero /Width:nn /Commas /Trim
This function is used to specifically format the document’s amount as recorded in the work file Amount column.
Parameter Description
HideDec
D
etermines if
a
deci
mal
appears
or not
;
only the H i
s required to hid
e
the deci
mal
PrintBoss 88 Electronic Copy
Zero
N
umber of zeros
o
r
plac
es
f
ol
low
ing
the d
e
cimal
, typically
2
Width:nn nn specifies maximum width of the value in characters, such as 10
Commas Indicates whether or not commas separate thousands and millions; only the C is
required t
o
display
commas
Trim Trims the value; only the T is required to trim both sides of the DocAmnt.
FormatDate
FormatDate: '<DateInExpr>', 'mm/dd/yyyy' [, AddDays [, AddMonths [, AddYears [,/EOM/FOM]]]]
This function is used to format a date. <DateInExpr> represents the date to format (or a variable referencing a date)
followed by the appropriate format mask. Typically {DocDate} is used as the variable when assigned in the form.
The mask may change the order or the separators of the date. By default, the AddDays/AddMonths/AddYears
parameters are 0. Insert positive or negative values for these parameters to shift the date accordingly. Include the
"/EOM" option to return the end of month, or the last day of the month for the DateInExpr. FOM will return the
first day of the month for the DateInExpr. If the DateInExpr is empty, the FormatDate will use the date displayed on
your computer.
FormatDate2
FormatDate2: '<DateInExpr>', '<DateInExprMask>', 'mm/dd/yyyy' [, AddDays [,AddMonths [, AddYears
[,/EOM/FOM]]]]
Same as FormatDate, except this function includes identifying the DateInExprMask format for those cases where the
input is different than the Windows’ ShortDateFormat.
FormatNum
FormatNum: '<NumStr>', WholeDigits, DecimalDigits, 'LeftFill', 'RtFill', 'H/C'
This function formats the structure of a numeric value and is often used for Positive Pay. The following letters are
used to represent HideDecimal/Commas:
H Hide decimal (used in Positive Pay Scripts)
C Comma is inserted as the thousands and millions separator
These letters can be used separately or together. The following are examples of Hide Decimal and add Comma
separately:
{FormatNum: '{DocAmnt}', 8, 2, '0', '0', 'H'}
In this example, the number of Whole Digits is 8, the number of Decimal Digits is 2, zeros are used to fill Left, zeros
are used to fill right, and the decimal is hidden. If the DocAmnt is $123.40 it would appear as: 0000012340
Here is an example of a #Text using the FormatNum Substitution function:
#Text 7.950R, 8.500, 'Arial/10/B', ÷**${FormatNum: '{DocAmnt}', 0, 2, '', '0', 'C}÷ |Here, the zero Whole Digits
represents any number. Notice there is no Left Fill.
Pad
Pad: '<Str>', <Len> [, <Left/Rt,/Trunc> [, <PadChar>]]
This function defines the length of the string and adds extra characters when the string is short. Spaces are the
default characters when PadChar is not defined. This function is often used with Positive Pay.
The option parameter may specify L, R, or T for Leftpad, Rightpad, or Truncate. The Truncate will truncate it to the
length <Len> specified.
For Example:
{Pad: '{DocNo}', 10, R, '0'} or
{Pad: '{DocNo}', 10, , '0'}
PrintBoss
89 Electronic Copy
The {DocNo} is a variable for the document number. If the check number was 1234, it would appear as:
1234000000.
RECAmnt
RECAmnt: '#,###,##0.00'
This function displays the amount of the document at the time the work file was generated. The only parameter is
the mask, and it is optional.
Mask Description
#
Digit placehold
ers that are
suppre
ssed if not needed
0
Digit plac
eholders that wil
l
force a
zero when no value is prese
n
t
,
Thou
sa
nds separato
r
(suppressed if
no
t
needed)
RECDate
RECDate: 'mm/dd/yyyy'
Inserts the date the PrintBoss work file was created. The optional mask uses the characters defined in Chapter 9,
Form Files – Date & Time Format Masks.
RECTime
RECTime: 'hh:mm:ss tt'
Inserts the time the PrintBoss work file was generated. The optional mask uses the characters defined in Chapter 9,
Form Files – Date & Time Format Masks.
StrExtract
StrExtract: '<OrigString>', '<Delimiter>', <Occurrence> [,'<mode>'] OR
StrExtract: '<OrigString>', 'CDF', <CommaDelimitedFldOccurrence> [,'<mode>']
This function extracts a substring from within a string. The original string is divided into substrings separated by the
specified delimiter. The following example extracts asterisks from the string before printing the word amount.
Example: #Text 0.675, 9.102, 'Arial/10', ÷{StrExtract:«{WordAmnt}», «**»,1} Dollars÷
Parameter Description
OrigS
tring
This is the o
riginal strin
g with substrings
delimited
by the delimiter.
Delimiter Delimits the substrings. Often this is a comma or semi-colon, but it may be multiple characters.
This parameter is Case Sensitive.
See CDF note b
elow.
Occurrence Identifies the substring to select within the original string. If this value is negative, it will count
occurr
e
nces from the ri
gh
t.
An occ
urrenc
e of
‘
-
1
’
returns the last substring
in the original string.
Mode Enter any of the abbreviations L, R, B or U to indicate Left trim, Right trim, All trim, or
U
p
percase.
CDF NOTE:
A special type of string is called a Comma Delimited String. In this case, each substring is delimited by a comma,
but the substring itself may also be delimited with double quotes. This enables the substring to contain commas.
Enter CDF as the delimiter for a Comma Delimited String and PrintBoss will look for the double quote substring
delimiters and treat them appropriately.
StrTran
StrTran: '<OrigString>', '<SearchKey>', '<ReplKey>'[, 'Options']
This function replaces a substring (SearchKey) with another substring (ReplKey). A number entered in Options will
limit the number of replacements starting from the left of the string. A negative number will count from the right.
PrintBoss 90 Electronic Copy
An option of -1 will replace the last occurrence in a string. The following example removes all the asterisks in the
DocAmnt string by replacing the asterisks with nothing as symbolized by the two apostrophes.
Example: #Text 7.923R, 8.641, 'Arial/11', "{StrTran: '{DocAmnt}', '*', ''}"
WordAmnt
WordAmnt: <Amnt> [, <Line1or2> [, <LineLength90> [, <CurrencyDollars> [, <Style A, B, or C> [, <Language>
[, Decimals ]]]]]]
This function takes the numeric value of a variable and translates it into English, French or Spanish text. PrintBoss
places the returned text on line 1 based on the length provided, but it will wrap to line 2 if necessary. If an entry in
the form specifies both line 1 and line 2, each line must use the same specified max line length. All parameters
except <Amnt> have defaults, so any parameter may be left blank and the default value will be used.
Example 1: #Text 0.66, 9.10, 'Arial/10', ÷{WordAmnt: ‘{DocAmnt}’, 1, 120, Dollars,A,F}÷
Parameter Description
Amnt
Amount to be co
nverted to a
text e
xpression
Line 1 or 2 Identifies the location for the returned text. Default is 1
L
i
n
eLen
gth9
0
Length of li
n
e based on chara
ct
er
s in the
line.
Default is 90
CurrencyDollars The currency phrase will use this value in the text. Default is Dollars. This can be
replaced w
ith other den
ominations.
Styl
e
AorB:
De
fault style is A
Style A example: Ten and 11/100 Dollars
Style B e
xa
mp
le:
Ten
Dollar
s
and Eleven Cents
Style C example
T
en Dinar and 000 Fils
Language Translates numeric values to French (,F) of Spanish (,S). The default is English (no
indic
a
tor neces
sary).
Decimals
Enter a va
l
u
e fo
r th
e
number of ch
a
racters to the r
ig
ht
of the
decima
l.
Example 1: #Text 0.70, 9.00, 'Arial/10', ÷{WordAmnt: ‘{DocAmnt}’, 1, 120, Dinars,C,’’,3} Fils÷
The above example is in Kuwaiti Dinars and Fils.

PrintBoss
91 Electronic Copy
Chapter
11
SECURITY FEATURES
The PrintBoss security features allow an administrator to restrict access to specified functions within the program.
Accessibility can be gained through password and each user can have a different level of access.
Windows users need FULL CONTROL of the PrintBoss directory for the PrintBoss application to function properly.
If there is a need to lock down access to the program, it should be set through PrintBoss security. Security settings
are not required but are available if desired. PrintBoss will function normally if security is not activated.
Security settings only need to be defined once for all workstations when PrintBoss is installed on a network. Multiple
users can access PrintBoss simultaneously from different workstations when PrintBoss is installed on a shared
network drive. If the PrintBoss application is installed locally on a workstation, then security settings need to be
defined for the workstation.
SETTING UP SECURITY
SECURITY ACCESS
The Administrator or Supervisor determines the restricted functions.
1. Open the PrintBoss Master Application.
2. Click on the Options menu and select Security. The Security Access window opens.
3. Enter the Master Password. Enter ADMIN (upper case) in the Master Password field for first time
installations.
4. Click OK. The Security Settings window opens.
There are three tabs on the Security Settings window, but the Basic User Rights tab changes name and function
when the Security Method on the General Settings tab is changed to Advanced. The fields on each of these tabs are
explained in more detail in Appendix D of this manual.
SET BASIC USER RIGHTS (STANDARD)
A set of Basic User Rights can be created that applies to all PrintBoss users. Additional rights can be assigned to
individual users. These users will need to be created on the Advanced User Rights tab and assigned a username and
password. The restricted features will only be available to the user when they Log-In to PrintBoss.
1. Open the PrintBoss Master Application.
2. Click on the Options menu and select Security.
3. Enter the Master Password.
4. Click on the Basic User Rights tab. This tab is available when Standard is selected as the Security Method
on the General Settings tab.
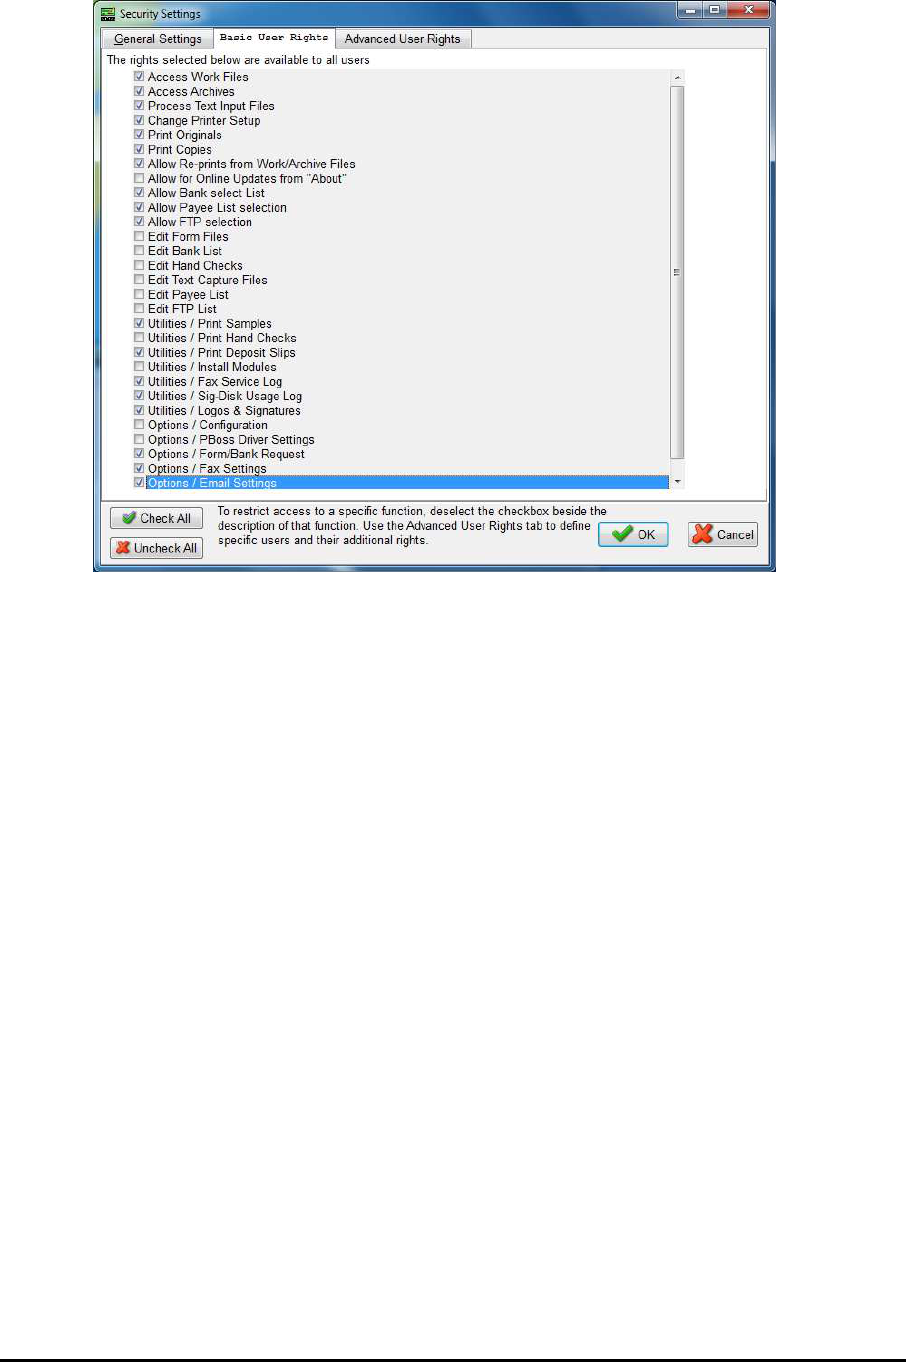
PrintBoss 92 Electronic Copy
5. Check only the features you want all users to access.
a. All features are selected by default.
b. Remove selected checkboxes to remove security or click the Uncheck All button to remove all
checkmarks and then only check the features you want all users to access.
6. Click OK when you are finished.
SET SECURITY REQUIRED (ADVANCED)
Advanced security adds another layer of security by requiring the user to insert an encoded USB key into the
computer to access specified features.
1. Open the PrintBoss Master Application window and login to Security.
2. Click on the Security Method drop-down menu on the General Settings tab and choose Advanced.
3. Select the Security Required tab. This tab is only visible when the Advanced security method is chosen.

PrintBoss
93 Electronic Copy
4. Check only the features you want to restrict from all general users.
a. Check the User Logged In column to require a login to use the feature.
b. Check the User Disk column to require the user insert an encoded disk to use the feature.
c. A check in both columns requires both a user login and insertion of an encoded disk.
d. Items NOT checked do not require a login or encoded disk to access the feature.
5. Click OK when you are finished.
CREATE USER ACCOUNTS
The steps used to create user accounts are basically the same for both the Standard and Advanced security methods.
1. Open the PrintBoss Master Application window and access Security.
2. Click on the Advanced User Rights tab.
3. Click on the Plus sign (+). The User Edit window opens. The following is an example of the Standard
security method.
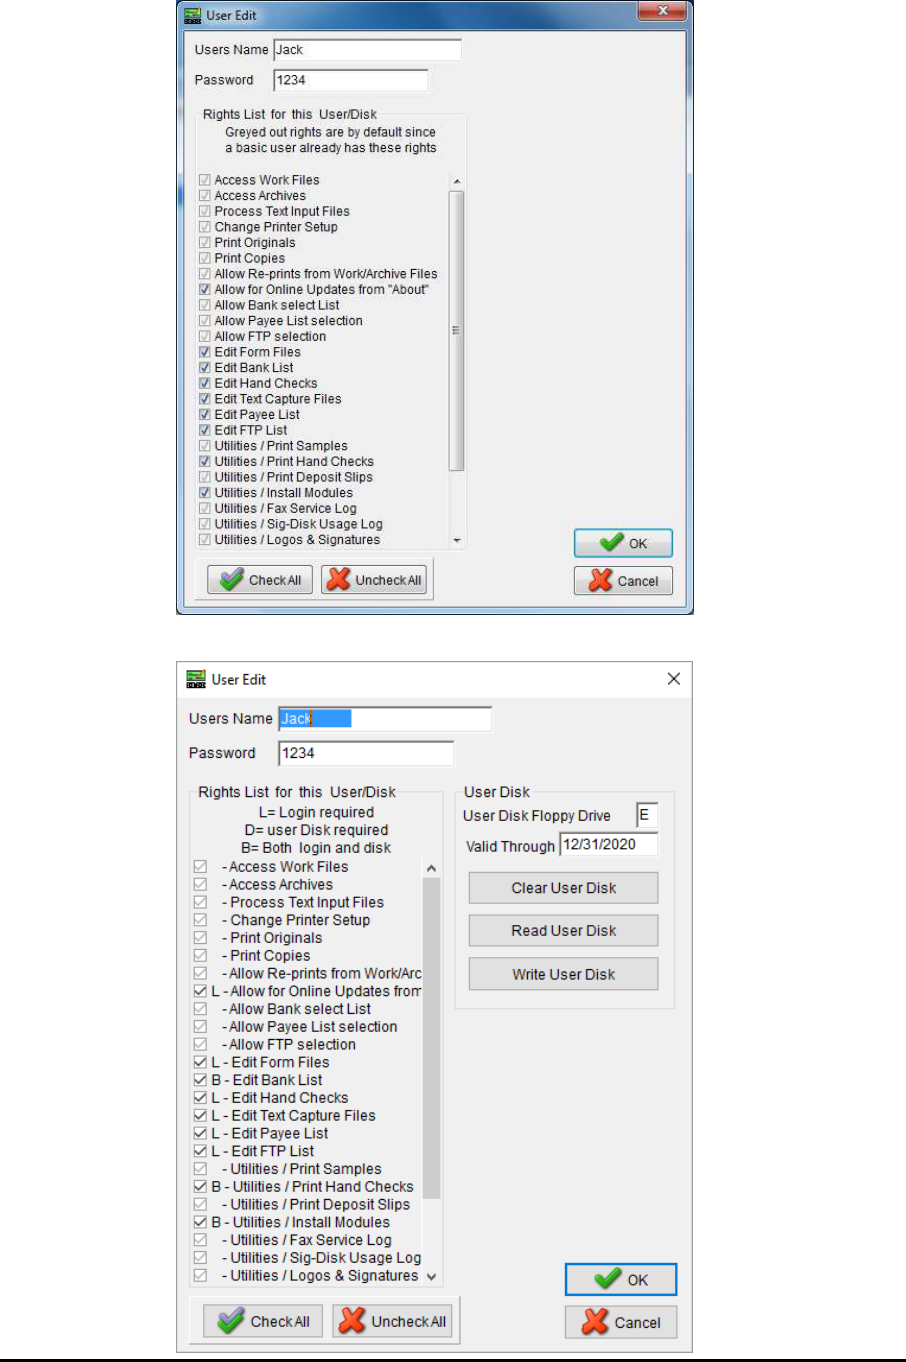
PrintBoss 94 Electronic Copy
Here is an example of the Advanced security method.
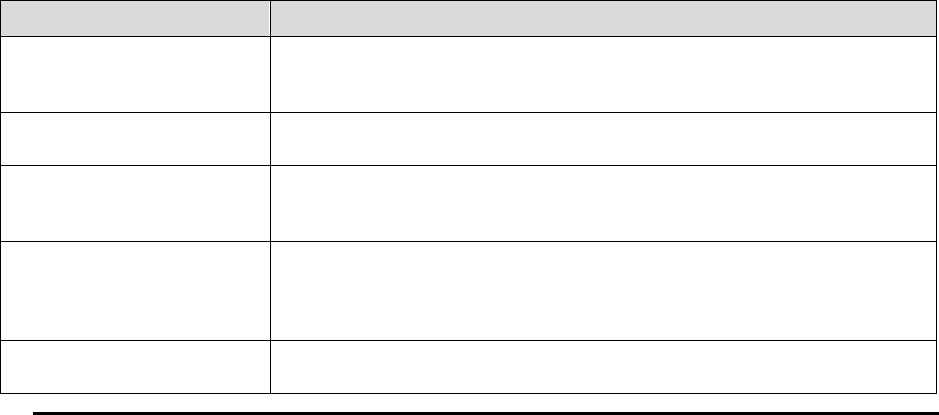
PrintBoss
95 Electronic Copy
4. Enter a User Name. Enter the user's Windows User Name if you would like to enable Auto Login on the
General Settings security tab. Otherwise, enter a User Name.
5. Enter a Password for this user. Passwords are visible to anyone who has the Master Password to access
Security.
6. Check the appropriate available features to provide secure access for this user.
a. These features will be available to the selected user after he/she successfully logs in to PrintBoss
when the Standard security method is selected.
b. The Advanced security method indicates how the user can access these features when they are
checked.
i. L – Login required
ii. D –Disk required
iii. B – Both a login and distribution disk are required for access
7. Advanced Only – Create a user Disk if the letters B or D appear next to any of the features on the User
Edit screen.
a. Insert a USB key into your computer.
b. Enter the drive letter for the USB drive in the User Disk Drive field.
c. Enter an expiration date for the disk in the Valid Through field.
d. Click the Write User Disk button to encode the disk.
e. Remove the disk when you are done.
8. Click OK on the User Edit window when you are done.
ACCESSING SECURED AREAS
Once security levels and users are defined, users must log in to access those functions. Select File / User Log-In
from the main PrintBoss Master Application window. Enter your User/Operator Name. Enter the correct password.
If only a disk is required, make sure it is in the correct drive before selecting OK.
CHANGING USERS
When one PrintBoss user is finished and a second would like to access security on the same workstation, the current
user does not need to log out. The new user just logs in. Only one user is ever considered logged in to PrintBoss on
the same workstation. Select File / User Log-Out when all users are finished to exit the security features, or simply
close the PrintBoss Master Application.
A user is automatically logged out of PrintBoss on a workstation when the PrintBoss application is closed. No user
is logged in when PrintBoss is first launched unless the option to Auto Login Matching Windows Users is selected
from the Security / General Settings tab and there is a match in the PrintBoss Advanced User Rights tab.
OTHER SECURITY OPTIONS
Other security options can be selected on the General Settings tab of the Security Settings window. Brief
descriptions of these options are provided in the following table.
Security Option Description
Suppress printing signatures in
Archive Reprints
Prevents a secure signature (file with the extension of .sig) on a document from
printing when the document is reprinted from PrintBoss Archives (File/Open
Docum
en
t
Archives
)
.
Master Password Change the Master Password the first time you use Security and anytime the
Sup
ervisor posit
ion ch
anges.
Auto Login Matching
Windows Users
PrintBoss will automatically login a user when their Windows User name
matches an entry on the PrintBoss Advanced User Rights tab
(Options/S
ecurity
).
Display ONLY primary fields
in the bank list browse and
Encrypt key fields in the bank
list.
Select this option to suppress account information on the PrintBoss Bank List
(Edit/Bank List) and only display Bank Code, Bank Prompt, and Bank Name.
This feature also encrypts the Routing and Account numbers. These fields stay
encrypted when
exported fro
m the bank list.
Enable/Disable User Security
in Bank
s
Enable or Disable the Security tab on the PrintBoss Bank Edit window
(Edit/Bank List)
. See
Cha
pter
8
,
Bank
Accounts
–
Bank
Security
, for more
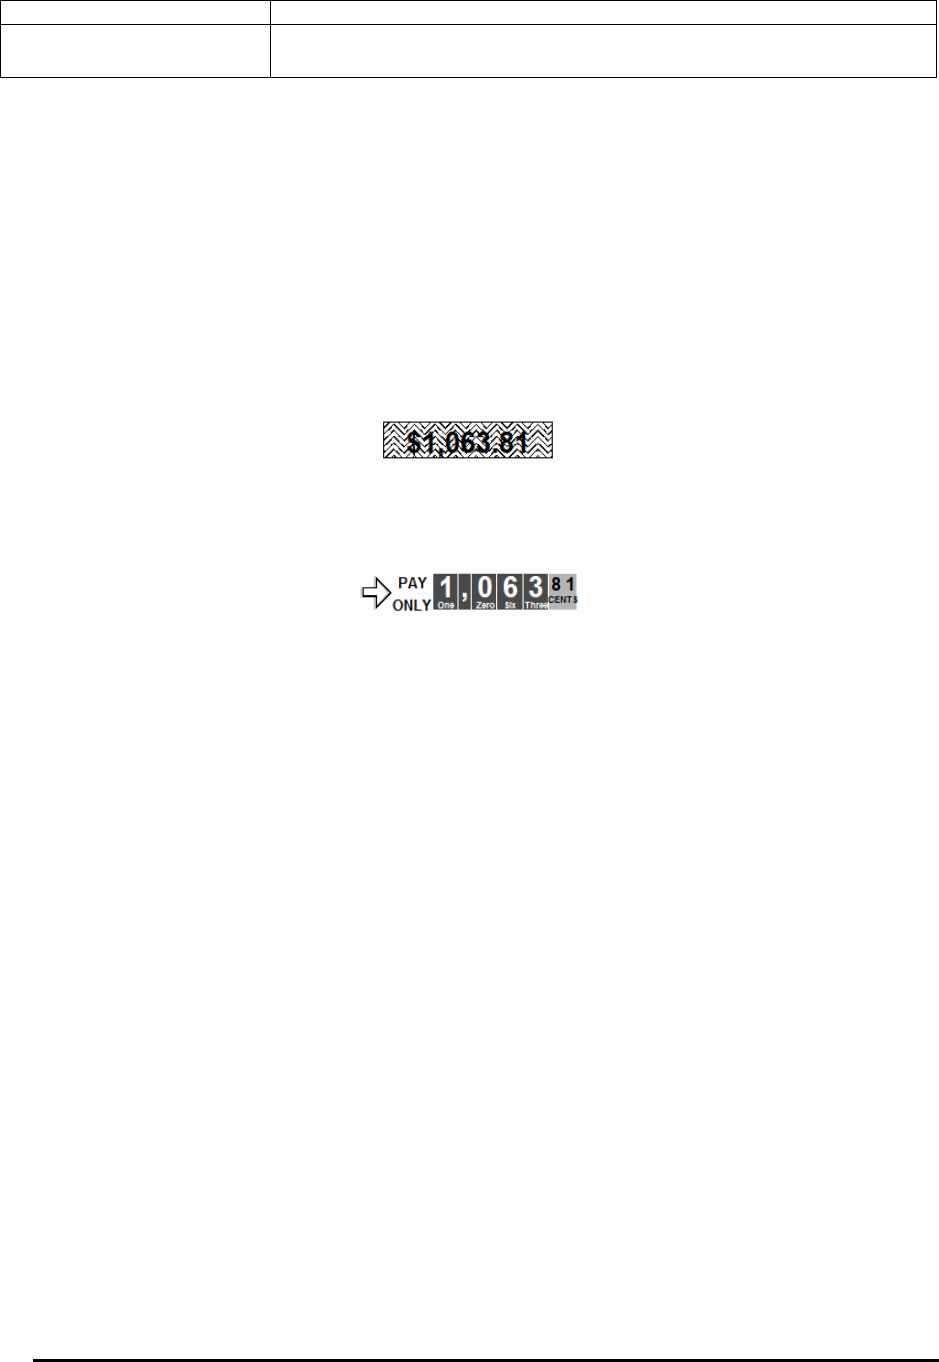
PrintBoss 96 Electronic Copy
informa
tion.
Signature Disk Log
(Enterprise
Only)
Select Logging Active and set the retention period for the log in days.
TEXT SECURITY
Another way to help prevent fraudulent changes is to secure the text on the document. Typically, the text that needs
the most security is the amount on a check. The following features discourage or make it impossible for anyone to
change the check amount once the document is printed.
SECURETEXT COMMAND
This special text command automatically formats text (alpha or numeric) in a graphical layout. There are two types
of secure text: Custom and Standard Block Numeric.
The Custom option creates a rectangle behind the text object filled with a pattern and can be used for alpha and
numeric text objects (See Below).
The Std Block-Numeric option is used for numeric text only. The words Pay Only are added and the numbers are
transparent in the middle of the black boxes and the word for each number is added. This is typically used for check
amounts (See Below).
See Chapter 9, Form Files, for more information on the Secure Text and Rectangle commands.
RECTANGLE COMMAND
The rectangle command can display a pattern behind a text object or signature, making it difficult for anyone to
modify it once printed. This same command can be used in front of text to mask it. One example is masking or
hiding the first 5 digits of the social security number on the advice of a payroll check.
White text (or negative printing) can be used with this command to make it more difficult to modify the text. The
Vertical Fade or Horizontal Fade patterns should be used with negative printing.

PrintBoss
97 Electronic Copy
Chapter
12
SIGNATURE DISKS
PrintBoss can place digitally scanned signatures on checks during the print process. These signatures can be printed
conditionally based on a number of variables. The most common conditions are bank account or dollar value of the
document. PrintBoss reads BMP, JPG, and PCX file types.
Saving a coded signature file to a disk adds a level of security by requiring the disk be inserted into the computer to
view or print the signature file(s) on the checks. Wellspring Software offers a PrintBoss Signature Disk that
provides additional levels of security to the signature printing process. First, the signature file type (SIG) can only
be read by the PrintBoss software. Second, the file is encoded so it requires the secure disk/CD/USB be inserted in
the computer to use the PrintBoss signature. The PrintBoss Signature Disk is the key to unlock the encoded
signature file. The disk is also encoded so a standard Disk Copy will not duplicate the disk. This additional security
level prevents the scanned signature file from being used fraudulently in other programs or by unauthorized
personnel in PrintBoss.
PRINTBOSS SIGNATURE CDS OR USB DRIVES
PrintBoss Signature Disks are custom created for specific files. These disks and signature files are encoded so the
disk cannot be copied using a simple Disk Copy command nor can the signature file be read by standard graphics
programs. The signature files have a ‘. SIG’ extension. The disk may be a CD or USB key.
If two signatures are to print on the same check, both signatures must be encoded for the
same PrintBoss Signature Disk.
Copy the actual signature files to the PrntBoss\Logos directory. PrintBoss reads the file and looks for the disk key to
unlock the file at the point of printing or viewing. The signature can be viewed or printed when the encoding on the
disk and signature file match. Otherwise, the signature file will not display or print.
NOTE:
Terminal Server and Citrix environments need the disk in the drive of the server or the user session must have the
drive of the local workstation mapped.
Please contact Wellspring Software to order a PrintBoss Signature Disk.
DUPLICATING PRINTBOSS SIGNATURE DISKS
The original PrintBoss Signature Disk and Security Master Password, along with access to the PrintBoss application,
are necessary to make a copy of a PrintBoss Signature Disk.
1. Open the PrintBoss Master Application.
2. Click on the Utilities menu and select Install Modules.
3. Select the Signature Disk Duplication tab.
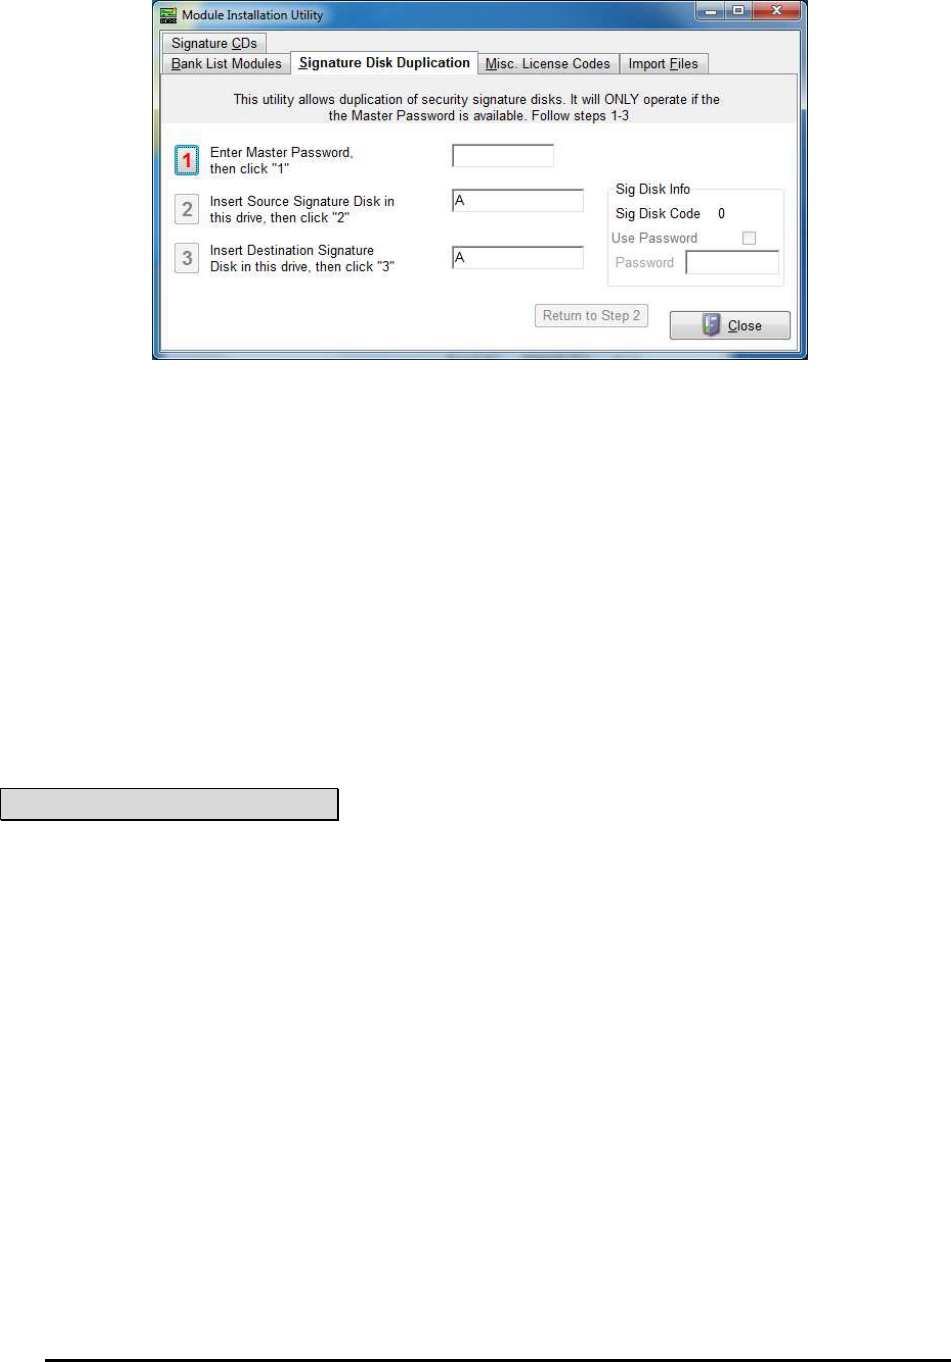
PrintBoss 98 Electronic Copy
4. Enter the PrintBoss Master Password as defined under Option / Security.
5. Click on the active 1 button after entering the password. The 1 will fade and 2 will become active.
6. Insert the PrintBoss Source Signature Disk.
7. Enter the correct drive letter for the Source Signature Disk. This may be a CD or USB flash drive.
8. Click on the active 2 button. PrintBoss reads the code from the source disk.
9. Insert a new blank disk. This does not need to be the same type of media as the original. If you are using
the same type of media, remove the original disk before inserting the new disk.
10. Enter the correct drive letter for the Destination disk. This may be the same as the original disk.
11. For a signature CD**, select the ‘Store Encoded File in {PrntBossHome}\ SigDisks’ check box.
12. To add a Password to the NEW signature disk, check Use Password on the right side of the screen. Enter
the password in the field provided under the check box. This password will not impact the original disk.
13. Click on the active 3 button.
14. Click Close when you are finished.
The newly created signature disk has the required encoding. Signature files from the source disk may also be copied
to the destination disk (except if it is a CD) through Windows Explorer, but are not required. Signature files do not
need to reside on the disk since they are normally read from the PrntBoss\Logos folder and PrintBoss will verify the
matching encoded disk.
NOTE:
The encoded file is created from the specific CD, but no file is written to the CD during the duplication process. If
you would like the signature files on the CD, burn the signature files to the CD before following the signature disk
duplication process.
ADDING A PASSWORD TO AN EXISTING PRINTBOSS SIGNATURE DISK
A password may be added to an encoded PrintBoss signature disk. Users will be prompted to enter the password
before PrintBoss accesses the disk. Adding a password is similar to the process of duplicating a disk except the
existing disk is used for both the source and destination.
1. Open the PrintBoss Master Application.
2. Click on the Utilities menu and select Install Modules.
3. Select the Signature Disk Duplication tab.
4. Enter the PrintBoss Master Password as defined under Option / Security.
5. Click on the active 1 button after entering the password. The 1 will fade and 2 will become active.
6. Insert the existing PrintBoss disk as the Source Signature Disk.
7. Enter the correct drive letter for the Source Signature Disk.
8. Click on the active 2 button.
9. Select the Use Password check box on the right side of the screen. Enter the Password in the field
provided under the check box.
10. Enter the same drive letter for the Destination as the Source drive.
11. Click on the active 3 button.

PrintBoss
99 Electronic Copy
12. PrintBoss will warn the source and destination disks are the same. The only change will be to add/edit the
signature indicated.
13. Click OK.
14. Click Close when you are finished.
CREATING NON-ENCRYPTED SIGNATURE DISKS
PrintBoss reads BMP (bitmap), JPG, PCX and PIC files. Scan a signature and save it as one of these formats.
PrintBoss can print color images in these file formats as long as you are using a color printer. Color signatures will
print in shades of gray when printing to a printer using MICR toner.
Save the scanned file onto a disk and reference the file in the appropriate Form File or Bank record. Be sure to
reference the entire path and filename, not just the filename. For example, enter E:\my_boss.bmp in the appropriate
Form File or Bank record. There is a 40-character limit for the filename and path.
Make sure the disk with the signature file is in the specified drive before printing checks to PrintBoss. An error will
pop up (unless this option has been turned off in the PIC Command Properties dialog for the form) when checks are
printed or viewed and the signature disk is not in the specified drive.
ADDING A SIGNATURE TO A CHECK
Signatures must be referenced by the PrintBoss form in order to print on a check. Add a #PIC command referencing
the signature file to each form that prints the signature (such as AP and Payroll). Add a second #PIC command
when you need to print two signatures. All Standard PrintBoss forms include these commands.
If the same signature is used for every bank account, the signature file name and path can be added directly to the
#PIC command on the form. Otherwise, add the signature file name to the PrintBoss bank record and add the
variable name associated with the field in the bank record containing the signature file name to the #PIC command,
i.e. {BSigFile}.
PrintBoss provides sample signature commands on the Footer Objects tab on all standard forms.
1. Locate the PrntBoss Home Directory. You can determine the location by clicking on the PrintBoss Help
menu and selecting About. The location for Home is listed under the Directories section towards the
bottom of the window.
2. Copy your signature files, including *.sig encrypted signature files, into the Logos folder in the PrntBoss
Home directory.
3. Open the PrintBoss Master Application.
4. Add the Signature File
a. Bank Record
i. Click on the Edit menu and select Bank List.
ii. Select the appropriate Bank record and click the Edit Bank button.
iii. Select the Signatures & Logos tab.

PrintBoss 100 Electronic Copy
iv. Click on the browse button next to the Signature Properties field. PrintBoss
automatically opens the Logos folder in the PrntBoss home directory. You may browse
to a different location if your files are not in this folder. Remember, the file path and
name cannot exceed 40 characters.
v. Select the desired signature and click Open.
vi. Repeat for Signature 2 Properties if two signatures may appear on the check.
vii. The Position coordinates properly place signatures on the bottom stub of a check.
viii. Set a Hi Range Condition if desired. For example, enter 5000.00 if the signature should
not print when the check amount exceeds $5,000.00.
ix. Set a Lo Range Condition if desired. For example, enter 5000.00 if Signature 2 only
prints when the check amount is $5,000.00 or more.
x. Click OK to save the values and exit the PrintBoss Bank Edit window.
xi. Click Close to exit the PrintBoss Bank List.
b. Form File
i. Click on the Edit menu and select Form Files.
ii. Select your form from the list and click the Editor button.
iii. Select the Footer Objects tab.
iv. Scroll through the Footer Objects and locate the Sample Signature section.
1. Use the command starting with #PIC to add a signature file directly to the form.
Remove the pipe symbol (|) if it appears before the # sign to activate the
command.
2. Use the command starting with #[FileExists if you added the signature file
through the bank record.
5. Double click on the appropriate command in the Footer Objects window. The Pic Command Properties
dialog opens.

PrintBoss
101 Electronic Copy
6. Enter appropriate values into the fields.
a. Inches from Left – Enter the inches from the left side of the page to begin the signature file.
i. {BSIGX} is the default value and refers to the value entered in the X Position field in the
Bank record.
NOTE:
Click the Edit Bank button at the bottom of the Pic Command Properties dialog to change this value if you access
the #PIC command from the Form View. DO NOT enter a specific value in place of the {BSIGX} variable. This
may adversely affect other signatures files using this same form.
ii. {BSIG2X} is the default value associated with Signature 2 in the Bank record.
b. Inches from Top – Enter the inches from the top of the page to the top of the signature file.
i. {BSIGY} is the default value and refers to the value entered in the Y Position field in the
Bank record.
ii. {BSIG2Y} is the default value associated with Signature 2 in the Bank record.
c. Size Adjust – Enter inches to adjust the width and height of the signature file to size the width
differently than the height or enter a Percent value to adjust the width and height by the same ratio.
i. Wdt/Ht
1. {BSIGWD} and {BSIGHT} are the default values referencing the Wdt and Ht
values entered in the Bank record.
2. {BSIG2WD} and {BSIG2HT} are the default values associated with the width
and height values for Signature 2 in the Bank record.
ii. Percent
1. Enter {BSIGSIZE} in both the Horizon. and Vertical fields to reference the
Percent value entered in the Bank record.
2. Enter {BSIG2SIZE} in both the Horizon. and Vertical fields to reference the
Percent value associated with Signature 2 in the Bank record.
d. Graphic File – Enter the signature file name and path. Only the file name is required if the
signature is located in the Logo folder of the PrntBoss Home directory.
i. {BSIGFile} is the default value and refers to the file name entered in the Signature
Properties field in the Bank record.
ii. {BSIG2File} refers to the file name entered in the Signature 2 Properties field the Bank
record.
e. Sig Disk Drive Letters – Enter the letter(s) associated with the drive(s) containing the signature
disk if this is an encrypted file (*.sig). A series of letters may be entered if there is more than one
possible choice, such as DEFG.
i. If Terminal Services is used, the path is \\TSClient\D; \\TSClient\E; etc.

PrintBoss 102 Electronic Copy
ii. If Citrix is uses, the path is \\Client\D; \\Client\E; etc.
f. Condition – Enter any required conditions. The example above prints the signature file if it exists
and if the check amount meets the range condition. The values for the range condition in this
example are entered in the Bank record.
7. Click OK to save changes and close the Pic Command Properties window.
8. Click OK to save changes and close the Form Editor.
Typically, placement for the signature is relatively close to the signature line. Signatures from a disk in the
computer will appear in the View if there are no conditions on the signature. Amount conditions can be simulated in
the View by entering a value in the Dollar field at the top of the window. (See Chapter 9, Form Files – Modify
From the Document View). Drag the signature to adjust placement or double click on the signature to edit the
properties, including size. Location and size will display as variables for signatures stored in bank records. It is best
to make these adjustments to the bank record, though the variables can be overwritten by numeric values. Numeric
values will overwrite the variables for all bank records, not just the currently selected bank record.
Repeat the steps for a second signature file. Verify the coordinates for the second signature file are higher on the
page so it does not print on top of the first signature.
See Chapter 9, Form Files, for more information on the #PIC Command.
USING PRINTBOSS SIGNATURE DISKS
Follow the instructions sent with the secured signature or refer to the instructions above in the Adding a Signature to
a Check Form section.
Make sure the disk is inserted in the drive before checks are sent to PrintBoss. An error will pop up (unless that
option has been turned off in the PIC Command Properties dialog for the form) when checks are printed and the
PrintBoss Signature Disk is not in the specified drive. The error allows the disk to be inserted into the drive before
continuing or allows the user to skip the use of the disk and signature(s). The checks will print without the
signature(s) when the disk is skipped.
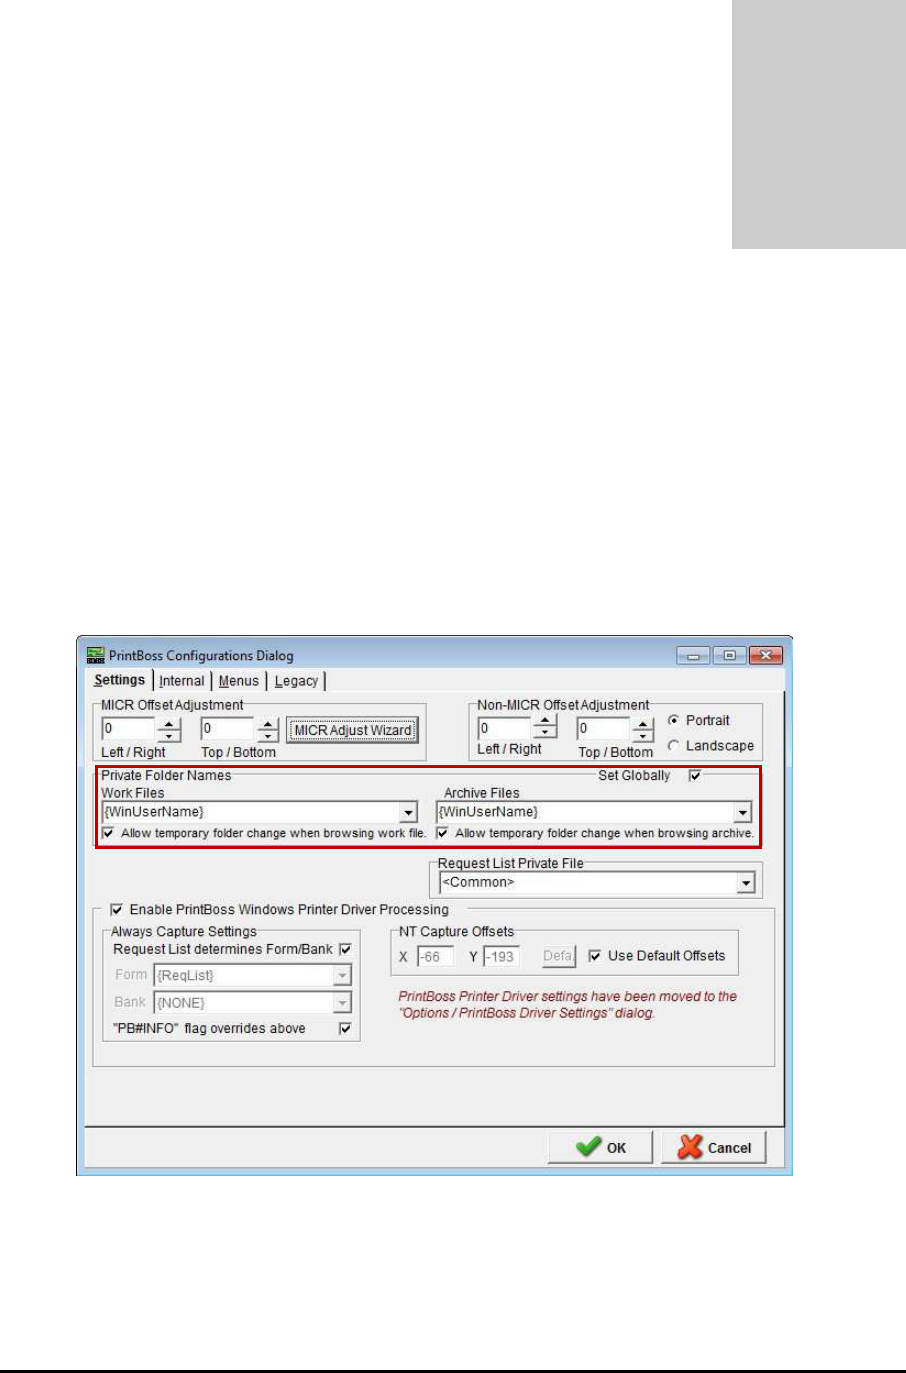
PrintBoss
103 Electronic Copy
Chapter
13
WORK/ARCHIVE FILES
PrintBoss captures documents to a work file. Documents stay in the work file until they are overwritten or archived.
Work and archive files can be reprinted and sorted. PrintBoss also allows you to create reports to view or print lists
of these documents.
CONFIGURE WORK/ARCHIVE FILES
Work and Archive files can be saved by user.
1. Open the PrintBoss Master Application.
2. Click on the Options menu and select Configuration.
3. Locate the Private Folder Names section on the Settings tab.
a. Work Files – The recommended setting for Work Files is {WinUserName}. PrintBoss will
create folders by Windows User Name in the Work folder of the PrntBoss Home directory. This
allows each user to track their own documents and prevents other users from accidentally
overwriting the work files.
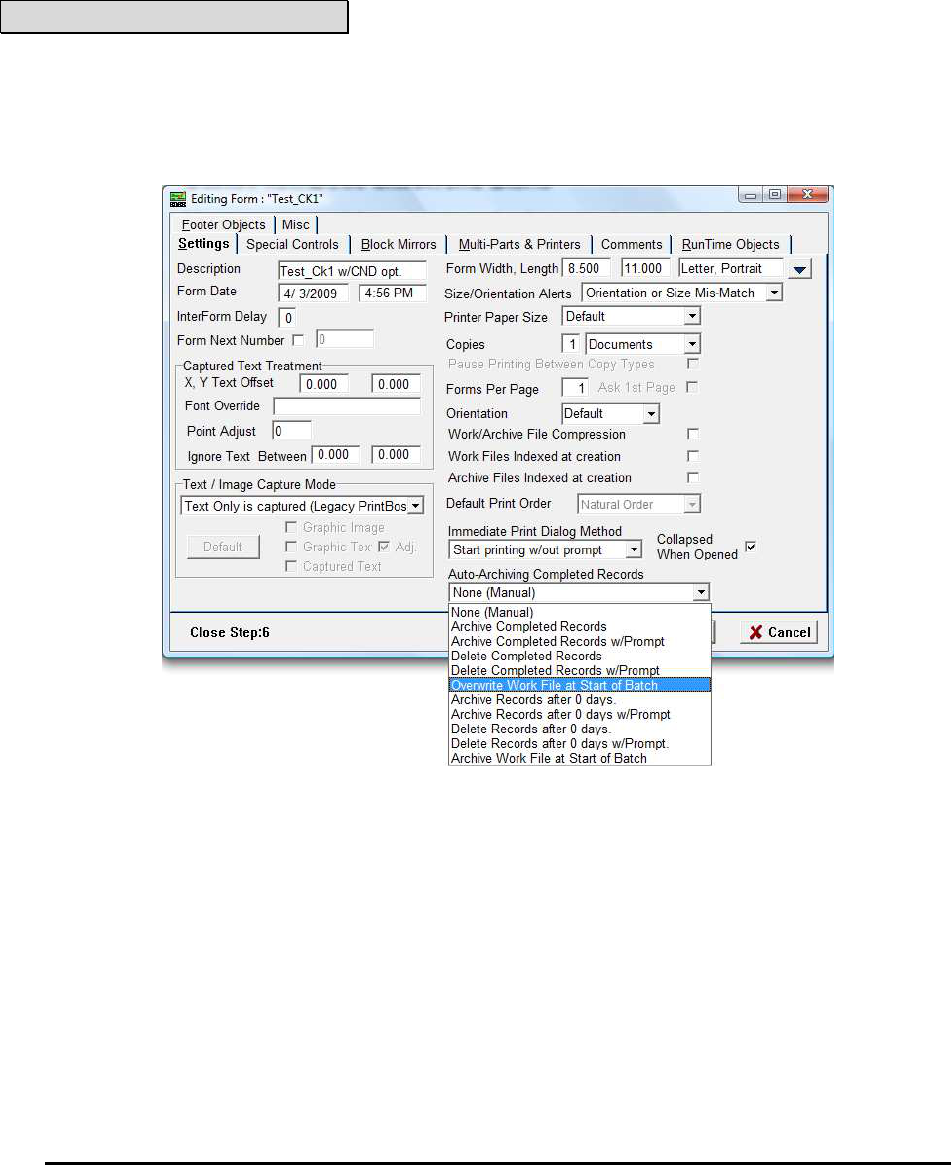
PrintBoss 104 Electronic Copy
b. Archive Files – {WinUserName} is also the recommended setting for tracking Archive
documents, but there are times when a Common folder is more advantageous for creating audit
reports.
4. Select the Set Globally check box to save the Work and Archive setting for all PrintBoss users. Otherwise,
the settings can be set separately for each user.
5. Select Allow temporary folder change when browsing work file or archive when individual folders are
used for users and a Supervisor or Wellspring technician needs to browse and view the files of another user.
Browsing these files is explained later in this section.
NOTE:
The remaining settings on the Configuration window may vary based on the accounting software your organization
is using. See Chapter 4, Setup, for an explanation of these settings.
6. Click OK when you are finished.
7. Click on the Edit menu and choose Form Files.
8. Select the desired form and click the Editor button.
9. Click on the Auto-Archiving Completed Records drop-down menu on the Settings tab and choose an
Archiving method.
a. None (Manual) – Work file documents are not archived nor deleted automatically. Any changes
to the work files need to be made manually.
b. Archive Completed Records – Work file documents are automatically transferred to Archives
after successfully processing all copies of a document.
c. Archive Records w/Prompt – User is prompted to archive documents after the batch finishes
processing all copies of each document.
d. Delete Completed Records – Work file documents are automatically deleted after successfully
printing. They are not moved to Archives.
e. Delete Completed Records w/Prompt – User is prompted to delete documents after they finish
printing. Documents are not archived.
f. Overwrite Work File at Start of Batch – This is the default setting for standard forms.
Documents remain in the Work File until the next print batch is started. Then the existing
documents are deleted and the new documents are temporarily stored in the Work File.
Documents are not archived.
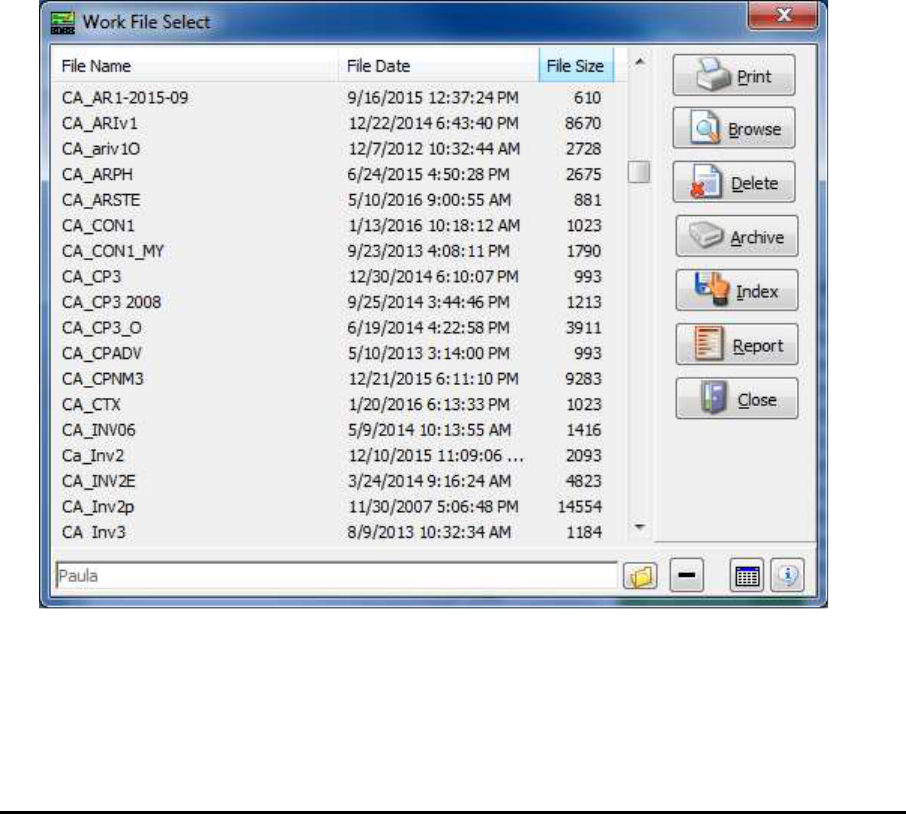
PrintBoss
105 Electronic Copy
g. Archive Records after _ days – PrintBoss displays a Days till Archiving field when this option is
selected to allow the user to input when the completed records will be automatically transferred to
Archives. The largest available value is 299999.
h. Archive Records after _ days w/ Prompt – PrintBoss displays a Days till Archiving field when
this option is selected to allow the user to input when they will be prompted to archive completed
records. The largest available value is 299999.
i. Delete Records after _ days – PrintBoss displays a Days till Archiving field when this option is
selected to allow the user to input when the completed records will be automatically deleted.
j. Delete Records after _ days w/Prompt – PrintBoss displays a Days till Archiving field when this
option is selected to allow the user to input when they will be prompted to delete completed work
file documents.
k. Archive Work File at Start of Batch – Completed work file documents are automatically
transferred to Archives at the start of the next batch printed to the same PrintBoss work file.
10. Click OK on the Form Editor to save your changes.
11. Click Close to exit the Form Select window.
OPEN DOCUMENT WORK FILES /ARCHIVES
Documents are temporarily stored in the Work File, depending on the Auto-Archive setting selected on the Settings
tab of the Form Editor. These documents may be Printed, Browsed, Deleted, Archived, Indexed, or printed in a
Report list. Document Work Files and Archives work substantially the same way.
1. Open the PrintBoss Master Application.
2. Click on the File menu and select Open Document Work Files.
a. Beginning with version 6.01.3, the list is more functional. The default value is to display the
‘Table’ View.
i. The columns included in Table View are:
1. File Name
2. File Date
3. File Size.
ii. Click on a label, such as File Date, to sort the list by that attribute.
iii. Click on the same label again to reverse the sort.
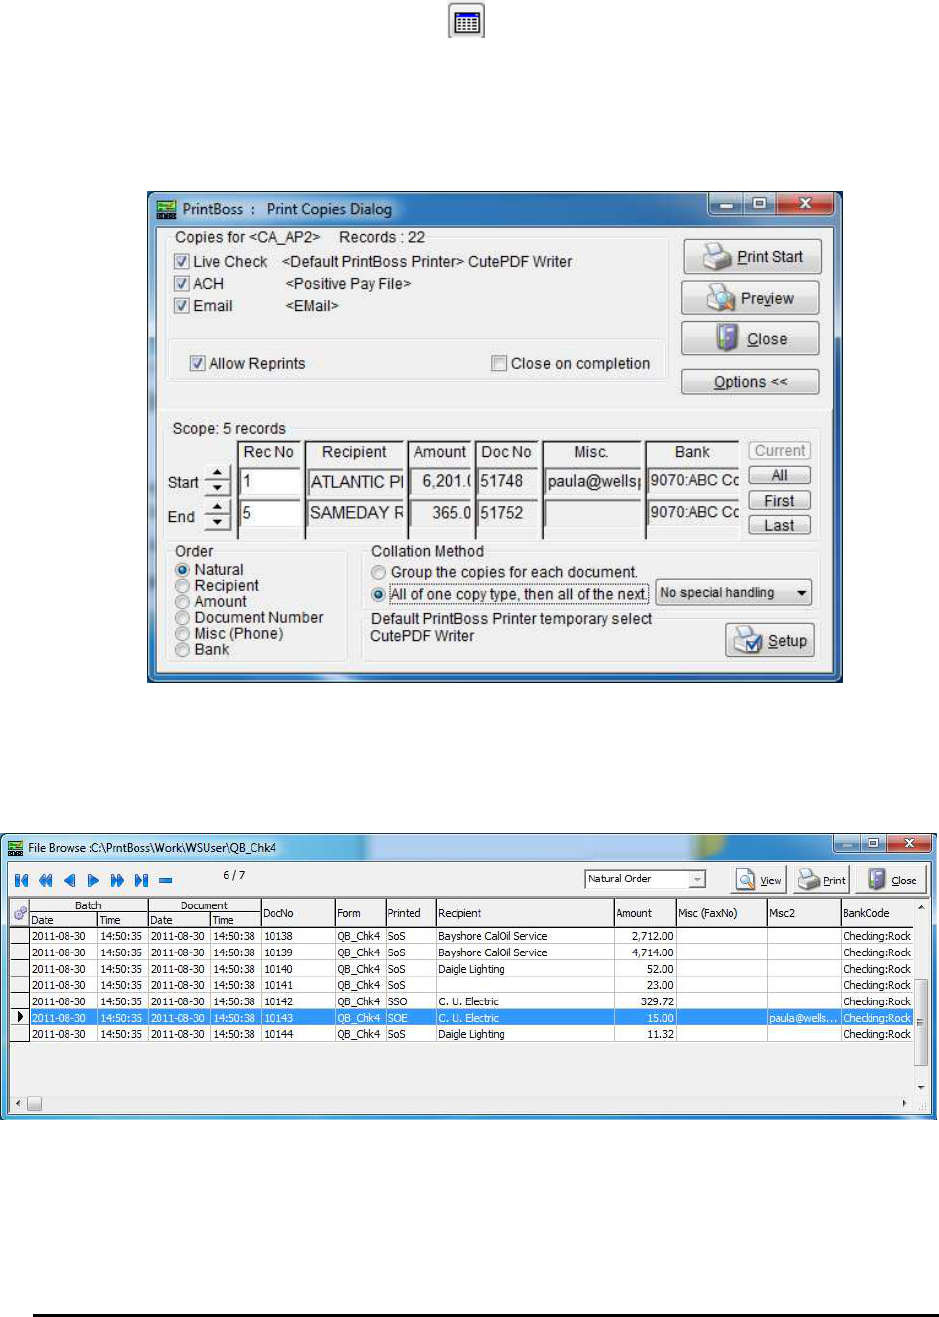
PrintBoss 106 Electronic Copy
iv. A scroll bar on the right side allows you to scroll through the Work File list if you have
many entries.
b. Click the ‘List or Table View’ button to change from Table to List View. The List View
only sorts alphabetically. There is no reverse for this feature. As always, the scroll bar along the
bottom of the List allows you to scroll when there are many work files in the list.
3. Select a form from the list and choose an action from the buttons on the right side of the window.
a. Print – Reprint a selected document or all documents in the Work File. A range can be selected
from the Scope. Select the Allow Reprints and any or all available Copies before clicking the
Print Start button.
Select the Close on completion checkbox to automatically close this window after reprinting a
doucment.
b. Browse – View a list of the documents in the selected Work file and confirm their Printed status.
Capital letters in the Printed column indicate successful printing. Lower case letters indicate
printing was not successful.
The following is a list of print codes:
1. D – PDF
2. E – Email
3. O – Positive Pay
4. P – Print
5. S – Skipped (intentionally)

PrintBoss
107 Electronic Copy
6. – A dash appears in the Printed column for a copy that is set to ‘Never’ process.
7. . – A period indicates a copy is set to Batch and has not been processed
manually.
i. Select a document and click the View button to preview the entire
document. See Chapter 9, Form Files – Modify from the Document View, to learn more
about this feature.
ii. Click the Print button to print the selected document.
iii. Click on the drop-down menu to the left of the View button or click on a dark gray
column heading to sort the list. Sorting is only available when the Work or Archive File
has been Indexed.
iv. Right-click on a document in the list to view additional choices:
1. View – View the selected document(s)
2. Print – Print the selected document(s)
3. Edit – Open the Work File Edit window
4. Hold Record – moves selected document(s) to a new work file with the same
name and appended with ‘- HOLD’.
5. Delete – Delete the selected document(s)
6. Edit Form – This is a shortcut to open the Form Editor
v. Right-click on the Misc or Misc2 fields for a record in the Browse window to open a
folder or file if one of these fields has been assigned to a file path or file path and name.
c. Delete – Delete documents in the selected Work or Archive File that meet one of the following
conditions. This action cannot be reversed.
i. Delete Only Completed Records (original and all copies printed).
ii. Delete Records Created Between a specified date range.
iii. Delete Records Between a specific Document Number (DocNo) range.
iv. Delete All Records.
d. Archive – Transfer or Delete records in the Work File that meet the selected condition. The
conditions are similar to those listed for Delete above.
i. Transfer moves the documents to the specified folder in the Archive folder of the
PrntBoss Home directory. By default, the name of the Archive folder is the same as the
Work File and Form name.
ii. Delete permanently removes the selected records. This action cannot be reversed.
e. Index – Index the documents in the Work or Archive File for sorting.
i. The two choices presented when no Index exists are: 1) Leave with no index; and 2)
Index file. Choose Index file to sort the documents in the File Browse window.
ii. The choices change when a Work or Archive File has been Indexed: 1) Disable Indexes;
and 2) Rebuild Existing Index.
iii. Select Pack Database on the Index Maintenance window to resize a file after many
documents have been moved or deleted.
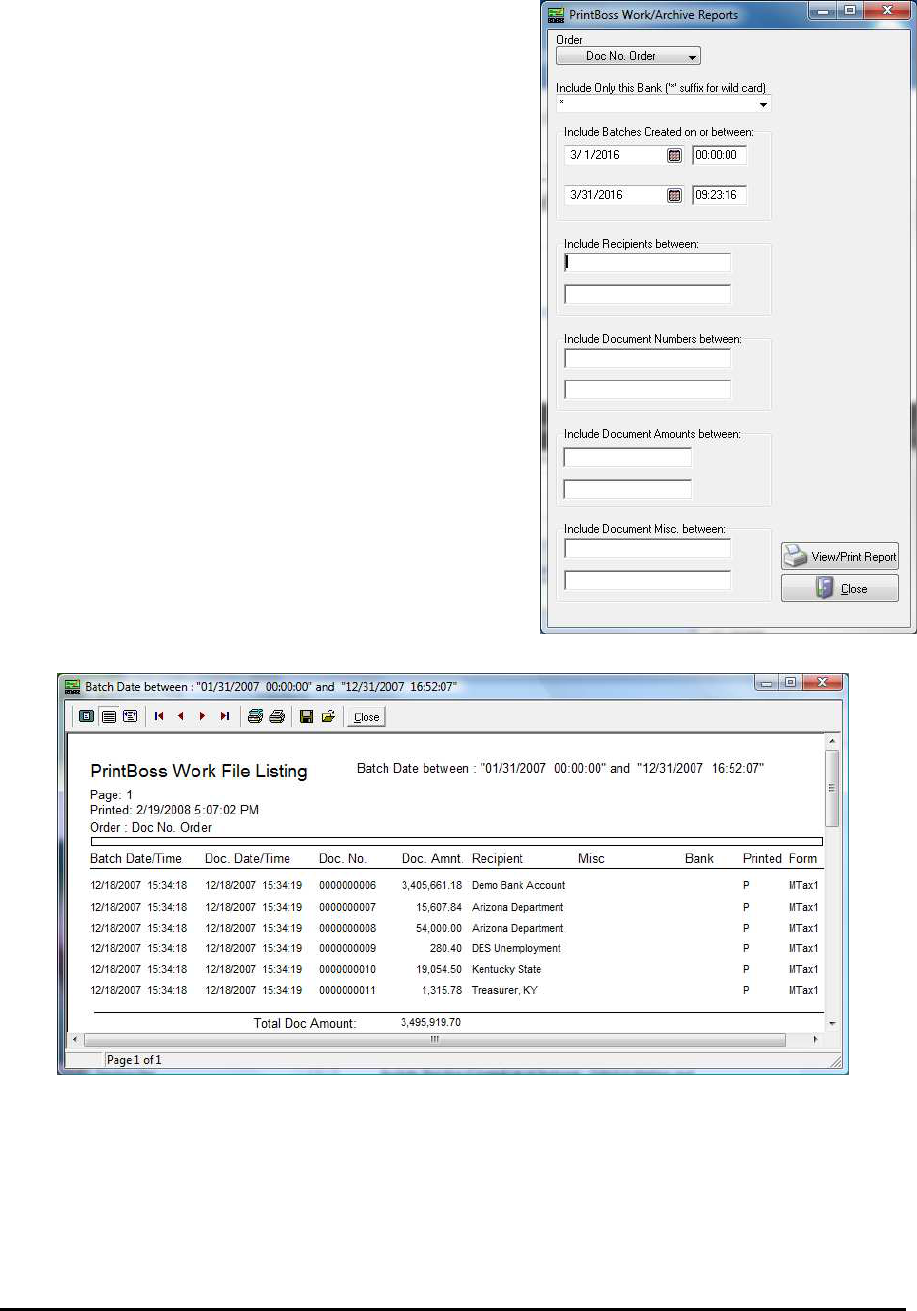
PrintBoss 108 Electronic Copy
f. Report – Work/Archive Reports create a list of reports that meet the specified criteria. This is a
great auditing and search tool. Click the
View/Print Report button after entering your
criteria to View and Print a list of the results.
i. Order – Enter a sort order if this file is
Indexed. The example to the right uses
Doc No. (Check No.) Order to sort.
ii. Bank – Select a bank record to report on
documents associated with a specific
bank account. An asterisk (*) can be used
as a wildcard to select all bank records or
bank records that start with the same
name.
iii. Date/Time Range – Use the calendar
buttons or type in the fields to specify a
data range. Type in the far-right fields to
enter a time range. This is particular
helpful for audit trails.
iv. Recipients – The recipient range is
alphabetical. Enter PrintBoss and
Wellspring to select all recipients that
appear alphabetically between these two
names.
v. Document Numbers – This range is
alpha-numeric.
vi. Document Amount – This range is only
numeric.
vii. Document Misc. – This range is alpha-
numeric.
viii. A sample of the report results is displayed below.
4. Select the Print button to print this list.
5. Click Close to close the Batch print window.
6. Click Close to close the PrintBoss Work/Archive Reports window.
7. Click Close when you are finished with Work/Archive File Select
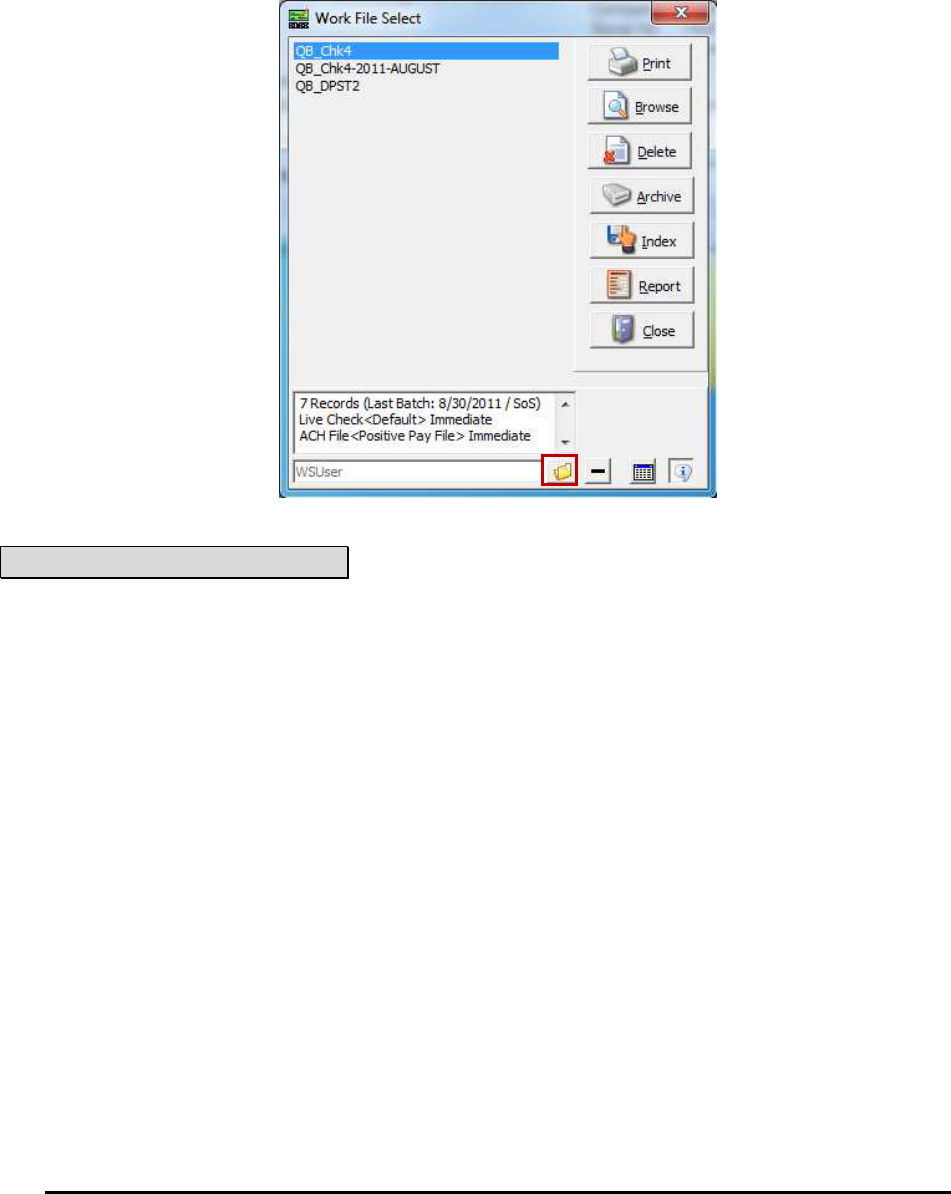
PrintBoss
109 Electronic Copy
BROWSE WORK/ARCHIVE FILE SELECT
You can browse for Work or Archive files created by other PrintBoss users when Allow temporary folder change
when browsing work file/archive is selected on the Configuration dialog under the Options menu.
1. Open the PrintBoss Master Application.
2. Click on the File menu and choose Open Document Work Files or Open Document Archives.
3. Click on the browse (folder) button at the bottom of the window.
NOTE:
The folder button is not present unless the ‘Allow temporary folder change when browsing...’ option is selected on
the Settings tab of the Configurations Dialog under the PrintBoss Options menu.
4. Select a different user from the Browse for Folder list. Occasionally there are files under the main Work
folder as well.
5. Click OK. The work/archive files for the selected user will display in the Work/Archive File Select list.
WORK FILE/ARCHIVE EDIT
The Work Edit window for Work and Archive Files contains useful information and functionality.
1. Open the PrintBoss Master Application.
2. Click on the File menu and choose Open Document Work Files or Open Document Archives.
3. Select a Form from the list and click the Browse button.
4. Right-click on a document in the list and select Edit. The Work File Edit window opens.
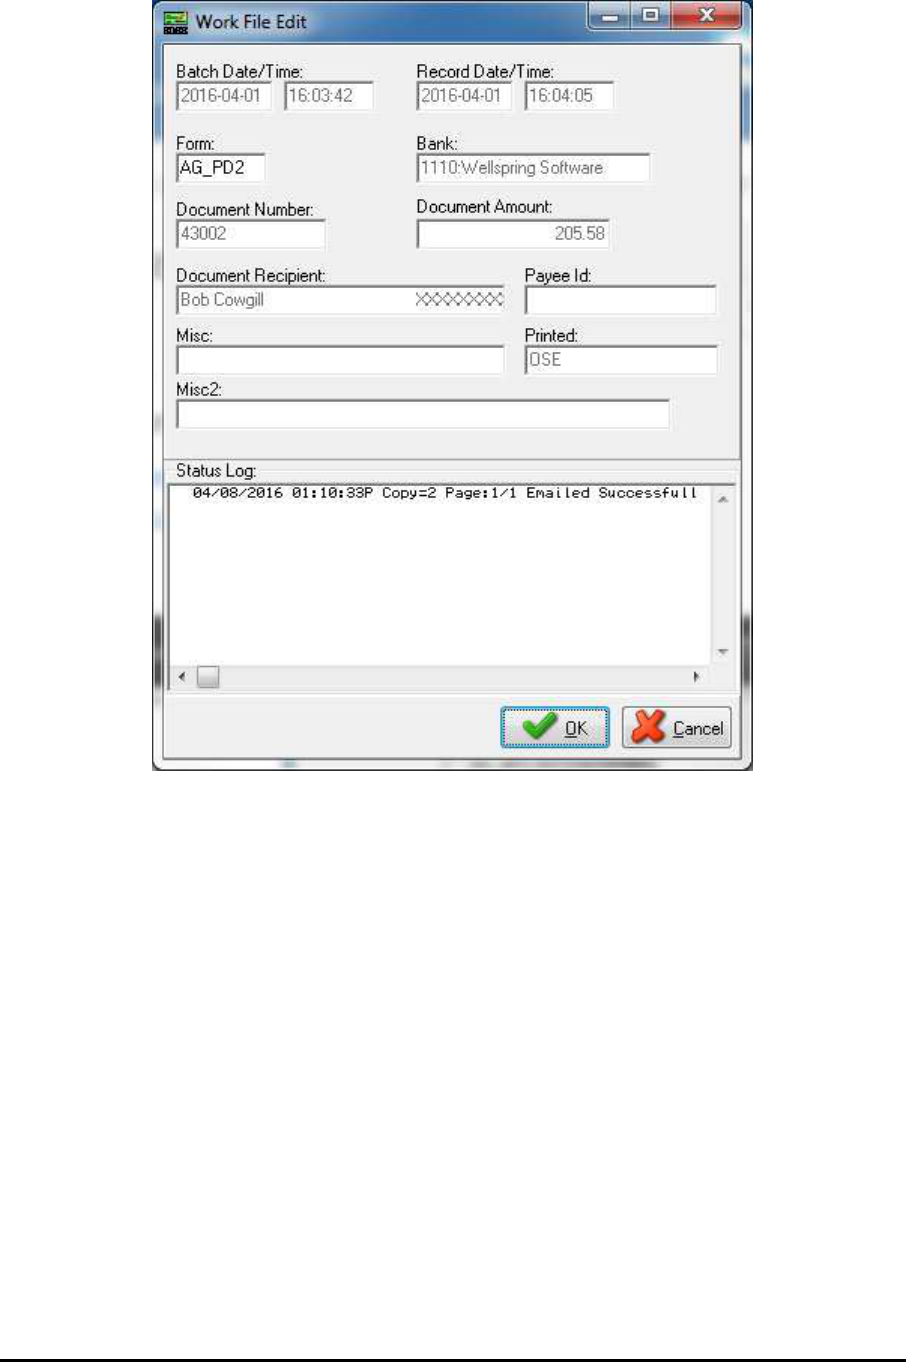
PrintBoss 110 Electronic Copy
The fields are Read Only except for the Form, Misc, and Misc2 (Email Address) fields.
5. A description of these fields follows.
a. Batch Date/Time – Displays the date and time the work file was created.
b. Record Date/Time – Displays the date and time the selected document was created.
c. Form – Displays the Form used to process this document. Edit this field to display and print this
data on a different form.
d. Bank – Displays the name of the bank used to process this document.
e. Document Number – Displays the check number.
f. Document Amount - Displays the check amount.
g. Document Recipient – Displays the Payee or Recipient if this is a check.
h. Printed – Displays the status for each copy of this document. Upper case characters indicate the
document was successfully printed or skipped. Lower case characters indicate a print failure.
Blank indicates no printing was attempted.
i. Misc – Displays the contents of the DocMisc field. This may be used to enter a special variable or
a 2
nd
email address.
j. Misc2 – Displays contents of DocMisc2. This is often used for email addresses.
k. Status Log – Displays status information for E-mail copies sent from PrintBoss.
6. Click OK when you are finished.
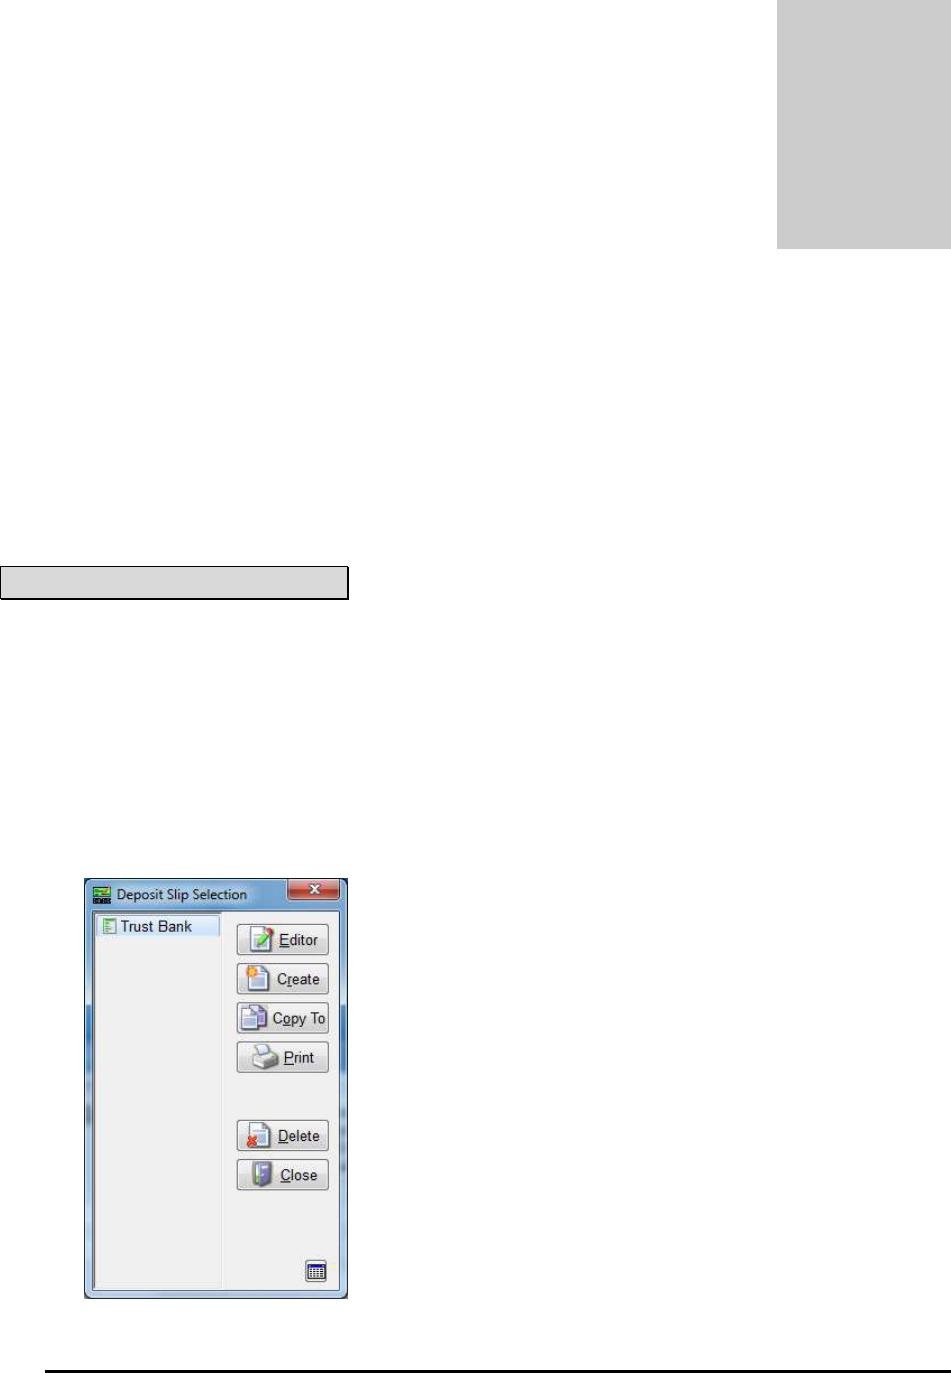
PrintBoss
111 Electronic Copy
Chapter
14
DEPOSIT SLIPS
Deposit Slips can be printed from a Form File or as a Utility. This section describes the Utility.
PrintBoss Deposit Slips are often printed independently of the accounting software. This is the more conventional
sense of a deposit slip. The Deposit Slips can include the MICR, bank information, and company information from
a PrintBoss bank record. The detail (description and amount) is hand entered on the screen.
Any number of deposit slip files may be created. Each file typically specifies the bank record and a form (Deposit1
or Deposit3).
NOTE:
Printing deposit slips from PrintBoss does NOT update the accounting software’s database.
CREATING/EDITING DEPOSIT SLIPS
1. Open the PrintBoss Master Application.
2. Click on the Utilities menu and select Deposit Slips. A list of deposit slip specs defined by others may
appear in the Deposit Slip Selection window. Otherwise, the list will be blank.
3. Select a deposit slip from the list or click the Create button and enter a Name for the deposit slip. Long
names may be truncated based on the width of the Deposit Slip Selection window.
4. Click OK. The new name appears in the Deposit Slip Selection list.
5. Select your deposit slip and click the Editor button.

PrintBoss 112 Electronic Copy
6. Fill in the following fields.
a. Bank Information – This information will update once you select a bank record from the Bank
Selection drop-down menu. The Bank Information fields are not editable.
b. Company / Account Information – This information will update once you select a bank record
from the Bank Selection drop-down menu. These fields are not editable.
c. Bank Selection – Choose the correct bank account for this Deposit Slip. This menu lists all the
bank records from the PrintBoss Bank List.
d. Form Selection – In most cases, this should be set to either the Deposit1 or Deposit3 form.
Deposit1 prints a single deposit slip with a copy above the actual slip. The copy does not print the
MICR line. Deposit3 prints a deposit slip with two copies – all of the slips print the MICR line.
e. Print Deposit Date – Check this option to print a date on the deposit slip. This field can be edited
once it is selected. It will default to the current date.
NOTE:
This Deposit Slip form is different than the form used to print deposits directly from QuickBooks or other
accounting systems. The form that is triggered from QuickBooks is QB_Dpst2 and is available in Top, Middle,
and Bottom deposit formats.
f. Print Copy – This option is only available when Printer is selected as the output. A copy of the
deposit slip is sent to the printer with the words Deposit Slip Copy printed on the second page
where the MICR line appears on the first page.
g. Send output to – There are two options on this drop-down menu.
i. Printer –Send the deposit slip(s) directly to the printer. No work or archive file is
created. The destination printer is defined by the PrintBoss Default Printer or by the
printer selection in the form.
ii. Work File – Process the deposit slip(s) using the form's settings for print time, copies,
and archiving. A work file is created. This is the recommended setting.

PrintBoss
113 Electronic Copy
See Chapter 9, Form Files, for more information on form settings.
7. Description and Amount entries made on the right-hand side of this dialog do not carry over to the Print
function when entered from the Editor. They are only for Preview purposes. They will print when entered
from the Print function.
8. Select Preview to view the deposit slip layout before printing. This is available from both the Editor and
the Print function.
9. Click Close on the Deposit Slip Print Utility dialog when you are finished making changes.
NOTE:
There should be one Deposit Slip created for each bank account that prints deposits.
PRINTING DEPOSIT SLIPS
1. Open the PrintBoss Master Application.
2. Click on the Utilities menu and select Deposit Slips. A list of deposit slip specs appears in the Deposit
Slip Selection dialog. If the list is blank or the deposit slip needed is not in the list, return to
Creating/Editing Deposit Slips above for instructions on how to create a deposit slip.
3. Select the desired deposit slip and click Print. The specification fields are displayed in the Deposit Slip
Print Utility dialog.
4. Confirm the Bank Selection is correct. This field determines the Bank Information and Company /
Account Information.
5. Enter the appropriate Descriptions and Amounts detail. PrintBoss will keep a running total at the bottom
of the screen. The final total will be printed on the deposit slip.
6. Click Preview to view the deposit slip before printing.
7. Click the Print button to create the deposit slips.
8. Click Close on the Deposit Slip Print Utility dialog when you are finished.

PrintBoss
114 Electronic Copy
Chapter
16
E-MAILING
PrintBoss can be configured to e-mail the documents it processes as PDF attachments. There are limitations to
embedding documents in standard e-mails. PrintBoss solves these limitations by converting the image of the
document to a PDF file and attaching the PDF to the e-mail. PDF readers, such as Adobe Reader, are free and can
be used to open the PDF files. Adobe Reader can be downloaded from www.Adobe.com and is often installed with
the operating system on most computers.
PrintBoss can e-mail on an individual basis (manual mode) or in batches (automatic mode).
Manual mode – PrintBoss can e-mail any page viewed from a work or archive file.
Automatic mode – One of the copies in the PrintBoss form is defined as the e-mail copy. PrintBoss can
capture and assign fields from the accounting software (such as the EMailTo address) and automatically
send batches of documents. This enables the Work file to record e-mail attempts and successes.
The user sending the e-mail must have access to an SMTP mail server. PrintBoss does not use local e-mail software
(i.e. Microsoft Outlook, Outlook Express, Netscape, Eudora, etc.), but works in parallel with it, making use of the
same SMTP mail server as the mail program.
PrintBoss Enterprise has an option to use Microsoft Outlook Outbox instead of the SMTP server. Enterprise
can also email through Office 365 and Gmail.
NOTE:
The content of the To, CC, or BlindCC fields can each include multiple addresses. Each address must be separated
by a semicolon or a line feed when the address is in a multi-line variable in PrintBoss.
SETUP
1. Open the PrintBoss Master Application.
2. Click on the Options menu and select E-mail Settings. The E-mail Settings dialog opens.
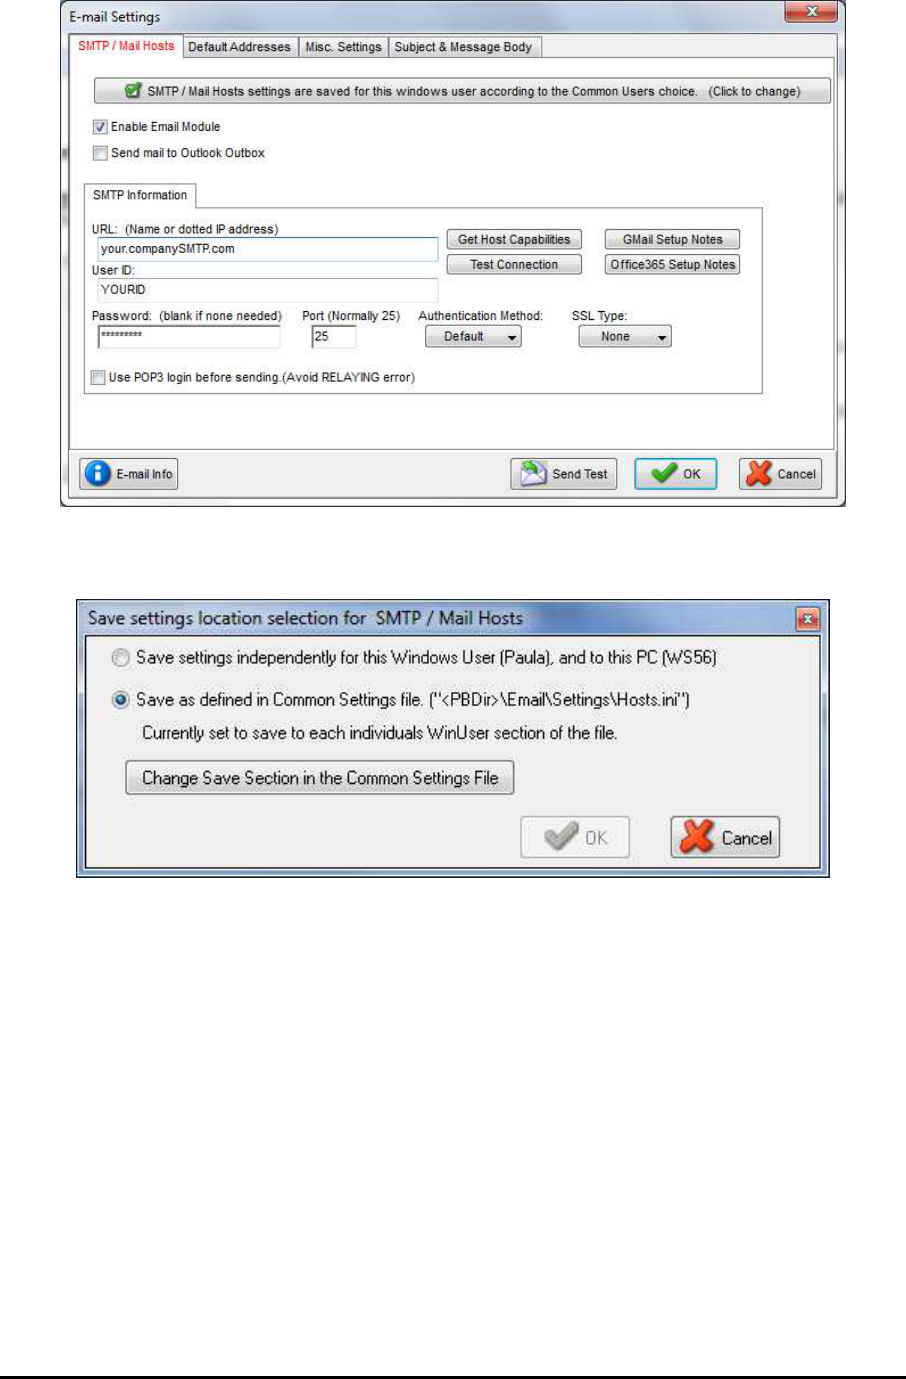
PrintBoss
115 Electronic Copy
3. The first tab is the SMTP / Mail Hosts tab. Choose the settings for saving the options set on this tab.
a. Save Settings – The settings button at the top of each tab identifies how settings are saved for the
tab. Click on this button to change the Save Settings.
i. Save settings independently for this Windows User [User Name], and to this PC
[Computer Name] – The first choice is whether to save settings on the local workstation
or terminal server or to save settings to a common location. Settings saved locally can
only be changed at the local workstation (or terminal server) while logged in as the user.
These settings are saved in the Current User registry.
ii. Save as defined in Common Settings file. ["<PBDir>\Email\Settings\Hosts.ini"] – E-
mail settings may be saved to a common file located in the PrintBoss Directory. The
advantage of this choice is the file may be edited by an administrator for these users. The
Common Settings file may contain sections unique to each user (Save Settings in Section
named by Windows User Name) or contain one group of settings that applies to all users
(Save Settings in Section named "Common Users") who chose the Common Settings
selection.
iii. Change Save Section in the Common Settings File – This button is available when
Save as defined in Common Settings file is selected.
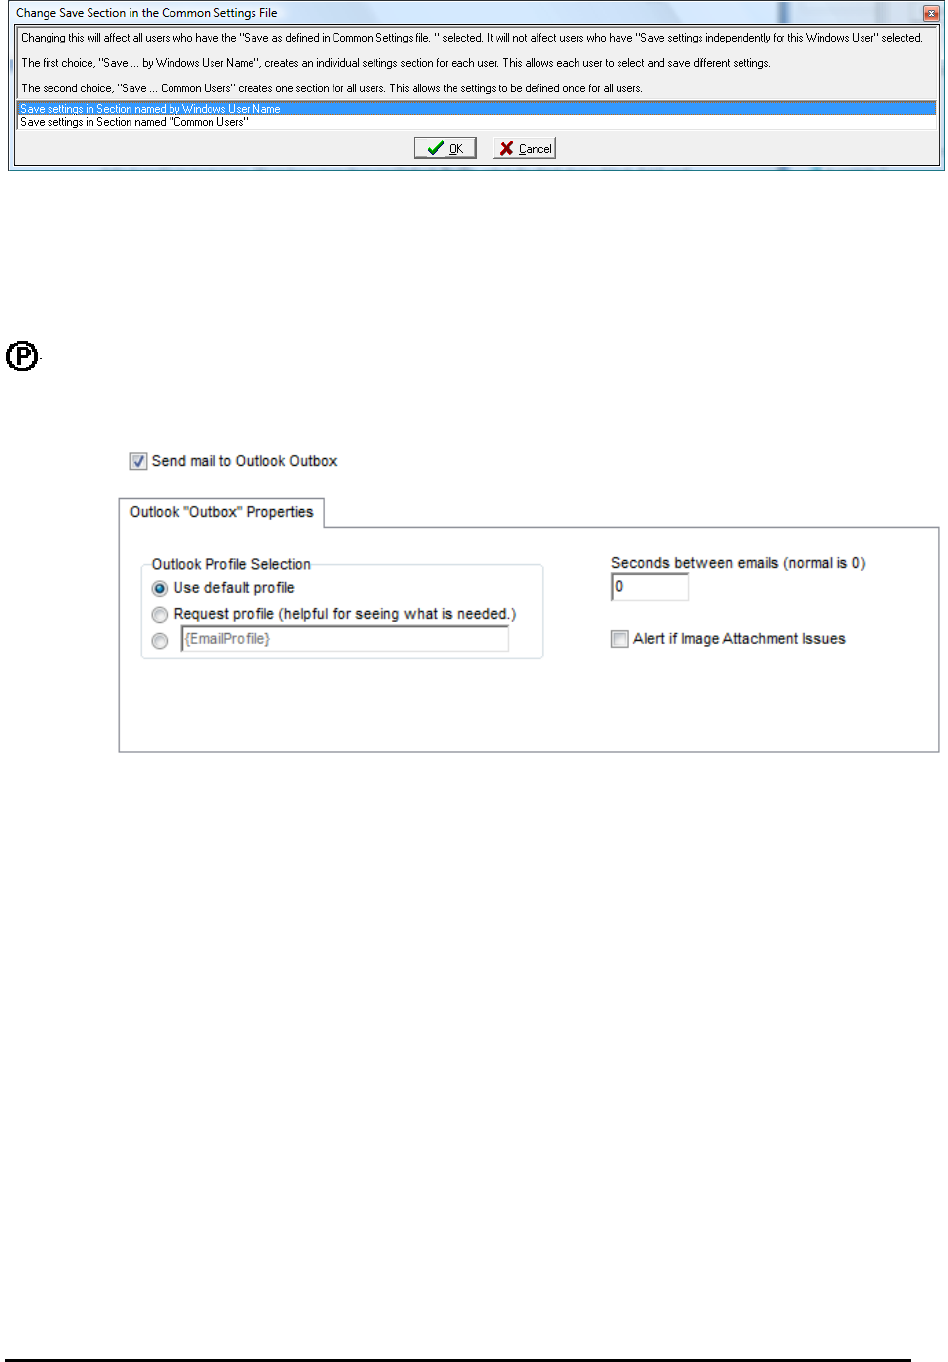
PrintBoss 116 Electronic Copy
1. Save settings in Section named by Windows User Name – Settings are saved
in a common File, Hosts.ini, by Windows User name.
2. Save settings in Section named "Common Users" – Setting are saved in a
common file, Hosts.ini, in one section named Common Users.
iv. Settings will not be saved until you click OK at the bottom of the E-mail Settings dialog.
b. Enable E-mail Module – This setting enables the e-mail function for this workstation (or user in
a Terminal Server or Citrix environment).
c. Send mail to Outlook Outbox – Select this check box to send e-mail through your Microsoft
Outlook Outbox using Microsoft’s MAPI call.
i. This feature is only available for PrintBoss Enterprise users.
ii. The Host SMTP information will be replaced with the selected Outlook Profile.
iii. Choose Use default profile when you have only one Outlook Profile or to use your
primary Outlook Profile.
iv. Select the third choice (blank field) and enter the profile name when you have more than
one Outlook Profile. The variable {EmailProfile} can be used to dynamically assign an
Outlook profile in the PrintBoss form.
v. Temporarily select Request profile when you are not sure of the profile name and
Outlook will provide a list of profiles. This enables you to identify the desired profile
name to enter in the third choice. A list only appears when you have more than one
Outlook profile. Otherwise, the only choice is Outlook. When the ‘Automatic E-mail
Pause’ setting on the Misc. tab of the PrintBoss E-mail Settings option is set to Pause, the
‘Choose Profile’ dialogue only appears after clicking the ‘Send E-mail’ button.
vi. Seconds between emails allows a value greater than zero if the system requires a delay
between sending emails. This feature should only be used at the advice of a Wellspring
Software technician.
vii. Alert if Image Attachment Issues can be selected when either sending a large number
of attachments or combining emails with a large number of attachments to receive a
warning when the Outlook attachment limit is reached.
d. Host SMTP Information – This choice is available when Send mail to Outlook Outbox is NOT
selected. Enter the values for your e-mail program.
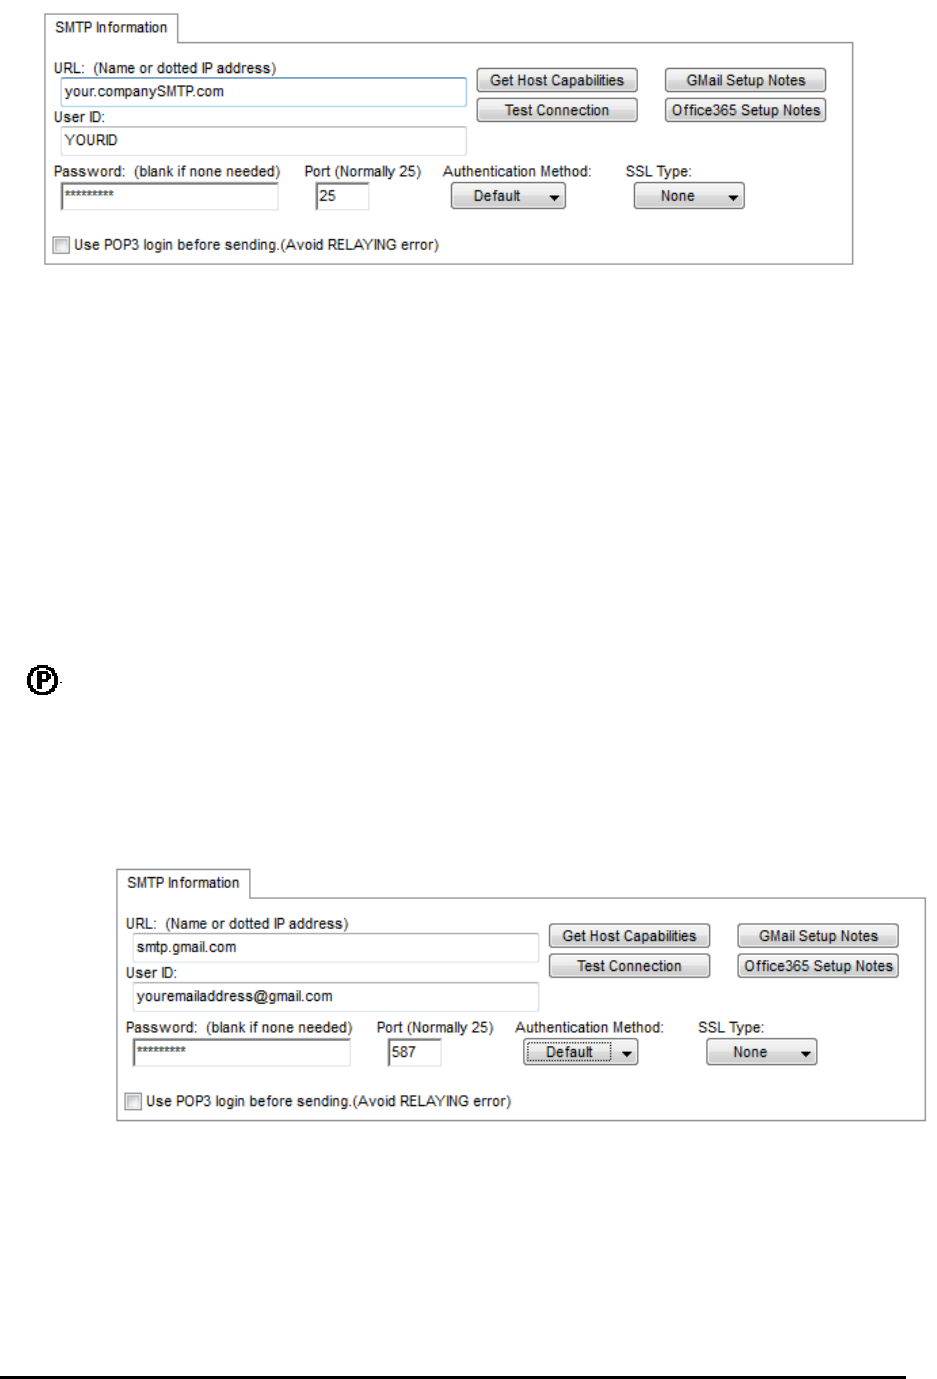
PrintBoss
117 Electronic Copy
i. URL (name or dotted numeric address) – Enter the URL. The URL can either be the
4-segment dotted numeric address or the URL name (e.g. mail.yourcompany.com).
ii. Get Host Capabilities – Click this button to verify the URL is correct. The User ID and
password are not necessary for authentication. When successful, it returns a list of
authentication methods the server supports and confirms the URL address.
iii. Test Connection – Click this button to verify the User ID and Password are valid. The
Password is not necessary when your e-mail account does not require a password.
iv. User ID – Enter your User ID. The User ID is the name of your e-mail account. It is
also the same as the name you use to log in to your e-mail account and is often your
email address.
v. Password – Enter your password if it is required to send outbound e-mails. This field
accommodates 30 characters. Leave this field blank if your system does NOT require a
password. Otherwise, the e-mail will not work.
vi. Port – Leave the default value. This is normally set to 25 unless otherwise instructed.
Port 587 is used for both Gmail and Office 365.
vii. Authentication Method – Leave on the Default value unless instructed by a Wellspring
Software support technician.
viii. SSL Type – This option is only available in PrintBoss Enterprise. Select the SSL type
that matches the security on your SMPT server. This field is required for Office 365.
The value is TLS 1.2.
ix. Use POP3 login before sending – Use this option to avoid SMTP Relay Errors when the
authentication is needed to process the relay.
e. Gmail SMTP Information – This choice is available when ‘smtp.gmail.com’ is entered in the
URL field or when a User ID contains a Gmail account. Beginning with PrintBoss version 6.01,
this button is always available.
i. URL (name or dotted numeric address) – Enter smtp.gmail.com.
ii. Get Host Capabilities – Click this button to verify the URL is correct.
iii. Test Connection – Click this button to verify the User ID and Password are valid.
iv. Gmail Setup Notes
1. Read Notes – It is important to read these notes as Account Permissions in
Gmail need to be changed to use your Gmail account with SMTP.
2. Prefill Gmail Settings – In PrintBoss version 6.01 and above, this feature will
prefill some of the fields used for Gmail.
v. User ID – Enter your Gmail email address.
vi. Password – Enter your Gmail password. This field accommodates 30 characters.
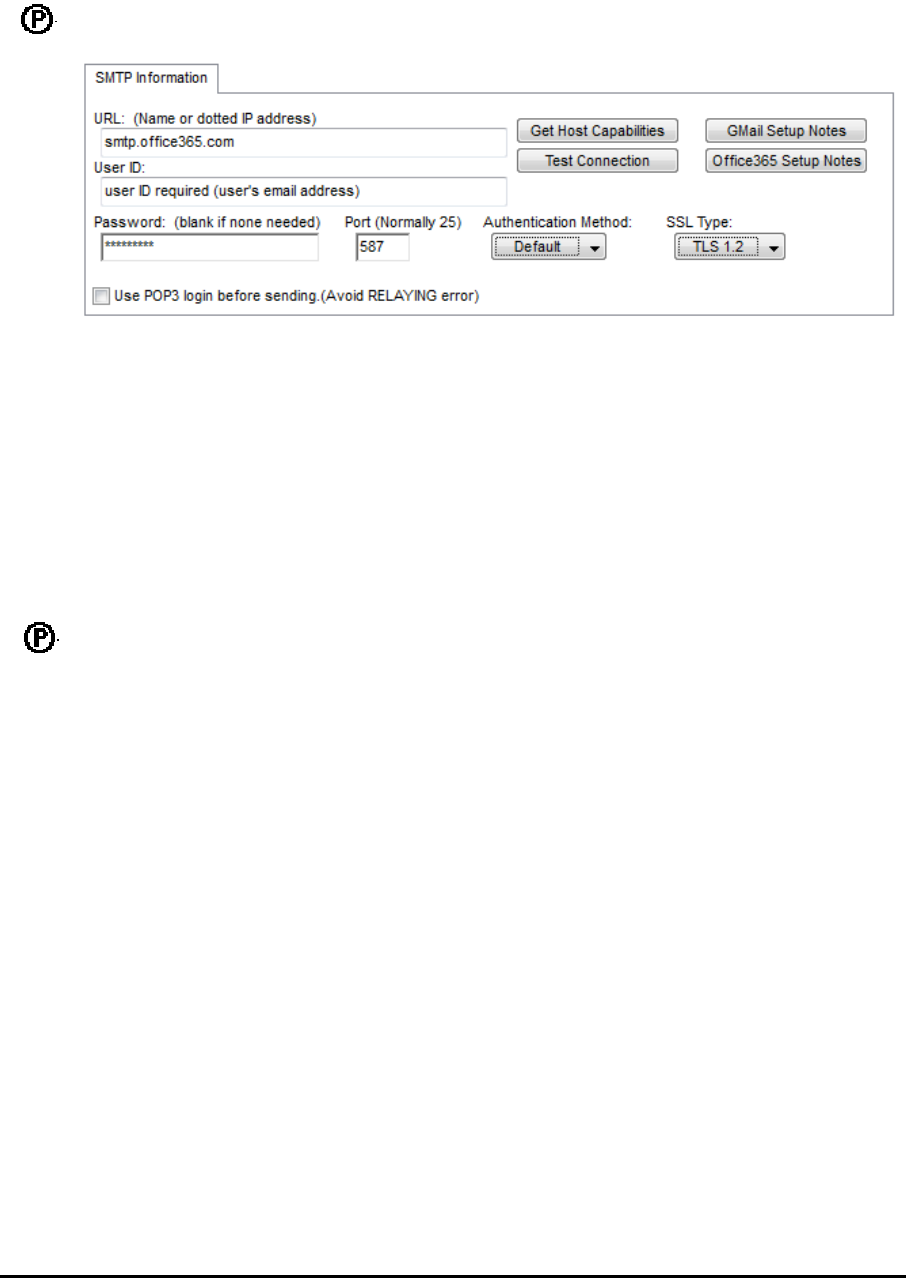
PrintBoss 118 Electronic Copy
vii. Port – Set to 587.
viii. Authentication Method – Change to the Default value.
ix. SSL Type – This is not applicable to Gmail.
x. Use POP3 login before sending – This is not applicable to Gmail.
f. Office 365 Information – This choice is available beginning in PrintBoss version 6.01 and
requires the Enterprise edition to use the SSL Type.
i. URL (name or dotted numeric address) – Enter smtp.office365.com.
ii. Get Host Capabilities – Click this button to verify the URL is correct.
iii. Test Connection – Click this button to verify the User ID and Password are valid.
iv. Office365 Setup Notes
1. Read Notes – Read these notes for information on entering the settings for
Office 365.
2. Prefill Office 365 Settings – In PrintBoss version 6.01 and above, this feature
will prefill some of the fields used for Office 365.
v. User ID – Enter your Office 365 User ID (required). This is often your email address.
vi. Password – Enter your Office 365 password (required). This field accommodates up to
30 characters.
vii. Port – Set to 587.
viii. Authentication Method – Change to the Default value.
ix. SSL Type – Select TLS 1.2 from the drop-down menu.
x. Use POP3 login before sending – This is not applicable to Office 365.
g. E-mail Info – Click this button at the bottom of the E-mail Settings window to view information
on email fields and options.
h. Send Test – Click on the Send Test button after entering settings on all tabs to test the e-mail.
The E-mail Send dialog opens. The address and message fields display the settings entered on the
tabs.
4. Default Addresses
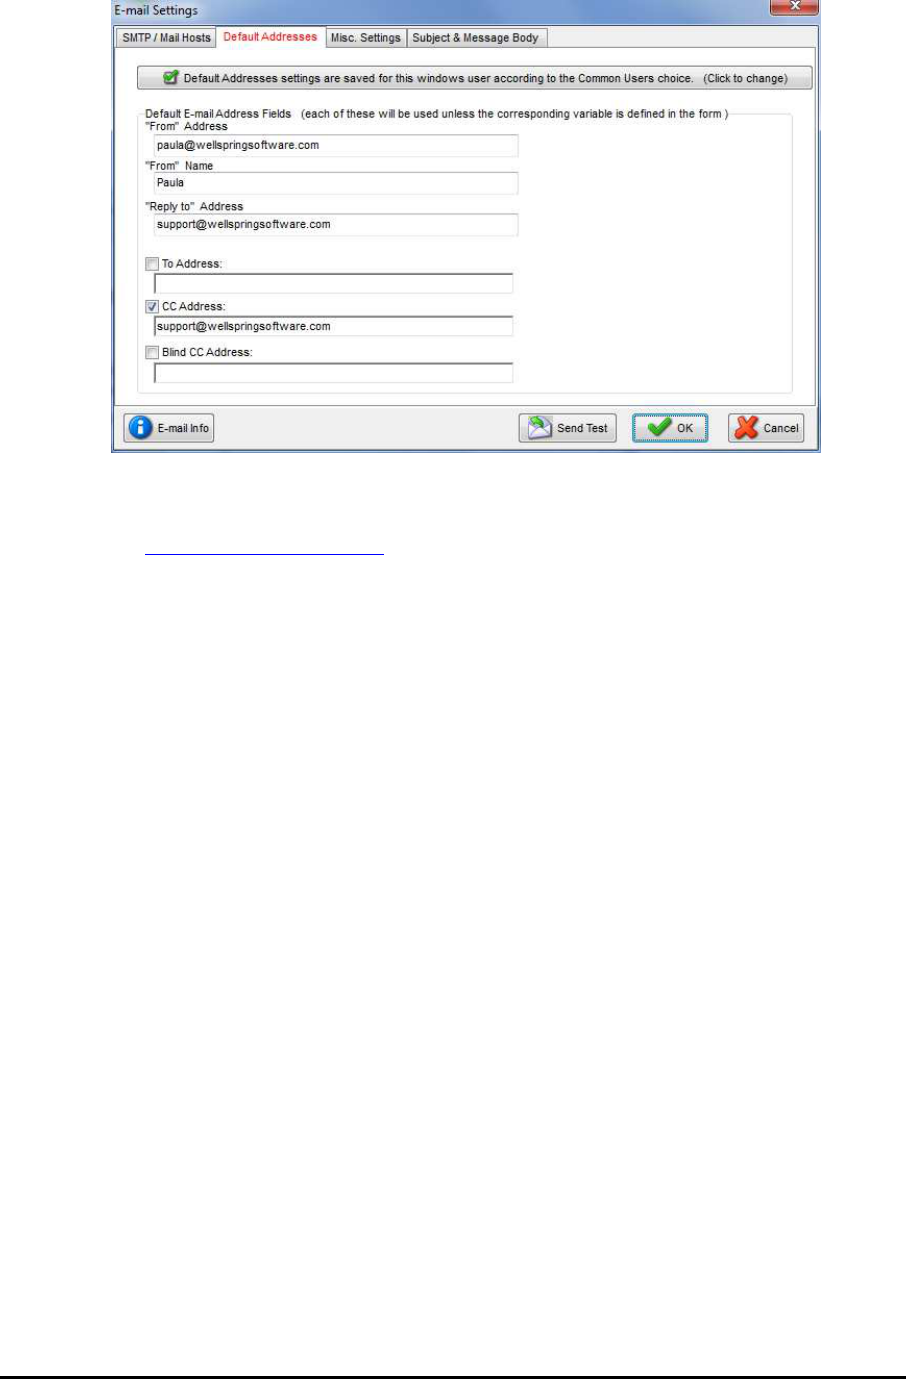
PrintBoss
119 Electronic Copy
a. Save Settings – Select the method for saving settings on this page. See Save Settings in Step 3
for more information.
b. "From" Address – Enter your default return address. This is typically the user's e-mail address,
e.g. my-name@my-company.com. All outgoing e-mails require a From Address, though this
field is only required for SMTP. Outlook, Office 365, and Gmail use the selected Profile when
sending e-mail.
i. The corresponding variable, EmailFromAddress, will overwrite the default entry when it
is assigned in the Form File.
c. "From" Name – Enter your full name. The “From” Name is an optional field for the user's
actual name (e.g. John Smith).
i. The corresponding variable, EmailFromName, will overwrite the default entry when it is
assigned in the Form File.
d. "Reply to" Address – Enter a reply address. This is the address responses are sent to when the
recipient presses Reply after receiving the e-mail. PrintBoss will use the address in the From
Address field when Reply To is blank.
i. This field can be assigned dynamically in the form or as a static address in E-mail
Settings. The corresponding variable, EmailReplyAddress, will overwrite the default
entry when it is assigned in the Form File.
e. To Address – Check the box to the left of the field to activate it. The To Address is a required
field containing the e-mail address of the recipient.
i. This field can be assigned dynamically in the form or as a static address in E-mail
Settings. The corresponding variable, EmailTo, will overwrite the default entry when it
is assigned in the Form File.
ii. PrintBoss will pop up a window to enter an e-mail address when both this field and the
EmailTo variables are blank.
f. CC Address – Check the box to the right of the field to activate it. The CC Address allows you
to send a copy of this e-mail to another recipient.
i. This field can be assigned dynamically in the form or as a static address in E-mail
Settings. The corresponding variable, EmailCC, will overwrite the default entry when it
is assigned in the Form File.
g. Blind CC Address – Check the box to the right of the field to activate it. The Blind CC Address
allows you to send a copy of this e-mail to another recipient without divulging the name or e-mail
address of this recipient.
i. This field can be assigned dynamically in the form or as a static address in E-mail
Settings. The corresponding variable, EmailBCC, will overwrite the default entry when
it is assigned in the Form File.
5. Misc. Settings

PrintBoss 120 Electronic Copy
a. Save Settings – Select the method for saving settings on this page. See Save Settings in Step 3
for more information.
b. E-mail Phone Book – PrintBoss can maintain an address book of e-mail addresses. The
following options apply to the E-mail phone book.
i. Open Phone Book – Click this button to open and edit the PrintBoss phone book.
1. The phone book can hold names and email addresses.
2. Click on the plus button to add a new entry.
a. Type the Name in the Name field.
b. Type the e-mail address in the Addres field.
c. Click OK to save this entry.
3. Click on a record to highlight the record and click the minus sign to delete it.
4. Click on a record to highlight the record and click the pencil to edit the
record.
5. Select either the Name column or the Address column and type a name or an
address in the ‘Highlighted Column SearchString’ to find an entry in the list.
The desired entry will have a gray highlight and the arrow in the far left column
ii. E-mail Phone Book File – This field displays the location and name of the phone book.
1. Click on the folder button at the end of this field to set the location of the E-
mail Phone Book. The default name is PBEmail.PEM.
2. This file may be uniquely identified and can be private to an individual user or
shared by a group of users
3. The phone book is only used when manually e-mailing individual documents. It
is not used for the automatic e-mail mode.
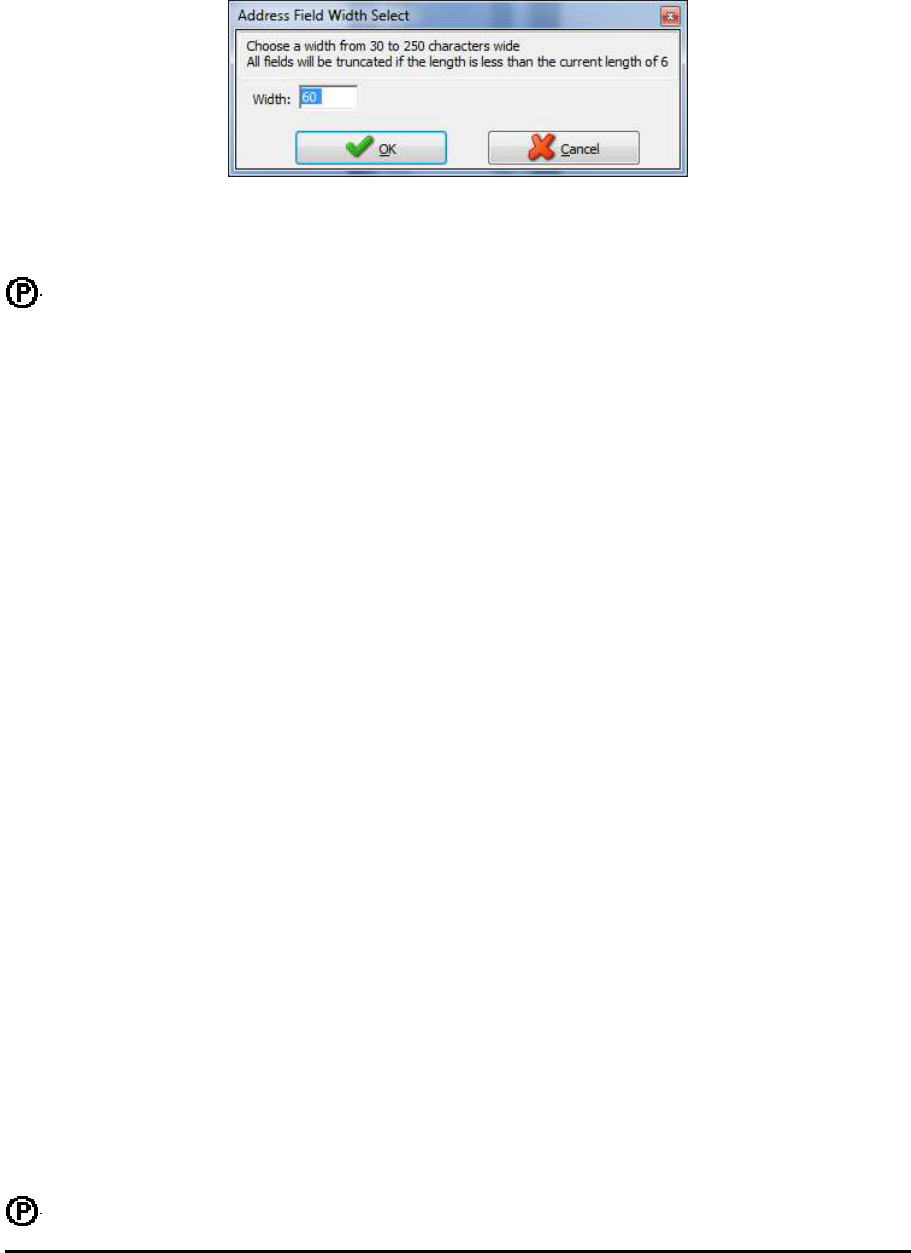
PrintBoss
121 Electronic Copy
4. The e-mail addresses need to be supplied in the document by defining the
variable EmailTo for automatic e-mails. (See section on Automatic E-mail).
5. This e-mail phone book is independent from other address books.
iii. Change Address Field Length – Click this button to change the maximum length of e-
mail addresses stored in the phone book.
1. The default length for an e-mail address is 60 characters.
2. Enter a character width (length) from 30 to 250 characters.
3. Any characters over the length you specify (e.g. 80) will be truncated.
4. This feature only applies to the e-mail addresses in the E-mail Phone Book file.
c. Combine pages into a single email – This option is only available in PrintBoss Enterprise. There
are three choices.
i. Never combine – This is the default setting.
ii. Email address is same as prior page – Select this option to combine documents with
the same e-mail address into one concatenated PDF attachment when printing a check
batch with e- mails.
iii. Same Email address AND same DocNo – Select this option to combine documents with
the same e-mail address and the same document number into one concatenated PDF
attachment when printing a check batch with e- mails.
d. Email Temporary Work Folder – Leave at the default value of {PrintBoss Home Directory}
\Email. This should only be changed with the help of a Wellspring Software technician.
e. Print status of "S" (Skipped) when "EmailTo" address is blank – Select this option to enter a
capital S in the Printed column of the work file when the document has no E-mail To address.
i. E-mails that fail to send for whatever reason leave an error code of "e" in the printed
column of the work file. This lower-case error code prohibits the work file from being
archived or deleted automatically.
ii. This feature allows PrintBoss to skip an e-mail and record a status of S in the work file.
PrintBoss will treat the document as completed.
iii. The skipped record can be handled separately or ignored.
f. Use “DocMisc2” as EmailTo address if EmailTo is unassigned – This option works with
accounting systems that use a report writer, such as Crystal Reports, and can enter the PrintBoss
Trigger. When an email address is entered in the DocMisc2 field (or PrintBossMisc2 in the
trigger), select this option to use the email address in DocMisc2.
g. Automatic E-mail Pause – Select an option to set a pause when using the Automatic e-mail mode
(see introduction to this chapter).
i. The default setting is Never. E-mails are sent automatically with no opportunity for
changes.
ii. Bad Address/Missing Attachments – Pauses at a document with a bad e-mail address or
missing attachment and provides the opportunity to enter a correct address prior to
continuing with processing. A ‘Bad Address’ is defined as an address that is missing the
‘@’ symbol or a .com, etc. If there is a missing attachment,
iii. Always – Opens the e-mail dialog for every document, requiring the user to click the
‘Send E-mail’ button to proceed. This choice is sometimes used temporarily during
initial setup and testing. Fields can be changed before clicking ‘Send E-mail’.
h. PDF Attachment Resolution – Select the resolution of the PDF files created as attachments to the
e-mail.
i. The default value is 216 dpi - Color. This option is the most robust.
ii. The size of the PDF file can be reduced by selecting one of the black and white (B/W)
options. However, shades of gray and color will show as solid black.
iii. Be sure to test the quality of the resolution before you reset this value.
i. PDF Attachment Security – PrintBoss Enterprise provides added security for PDF attachments.
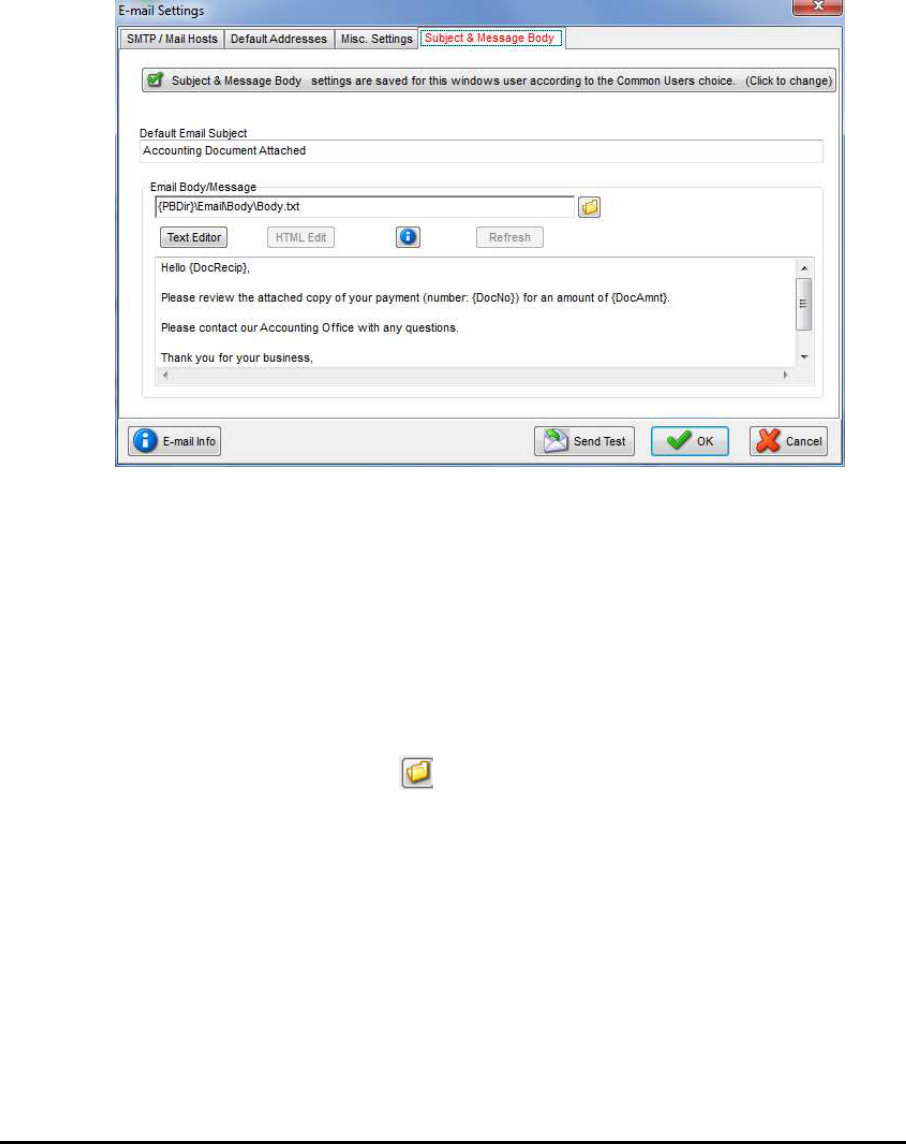
PrintBoss 122 Electronic Copy
i. View Only – Allows the recipient to open and read the PDF file attachment, but not print
or edit. The Print feature will not be available in the PDF Reader application. Any
copies made of the document will carry the same security.
ii. Read Only in a PDF editor – Allows the recipient to open and print the PDF
attachment, but prohibits edits to the original attachment.
iii. PDF Attachment Password – Enter a password that will be required to open the PDF
file. The password applies to all PDF attachments and can be assigned as a static value in
this field or a dynamic value in the Form File.
6. Subject & Message Body
a. Save Settings – Select the method for saving settings on this page. See Save Settings in Step 3
for more information.
b. Default Email Subject – Enter a default subject for all e-mails.
i. This can be overwritten at the point of sending the e-mail by assigning the EmailSubject
variable in the Form File.
ii. Example – the following assignment could be entered in RunTime Objects:
#Assign EmailSubject, "Invoice Notice from Wellspring Software, Inc."
c. Email Body/ Message – Enter the path and name of the file containing the body of the e-mail
message.
i. It is common to use a standard message for all e-mails in a batch of documents as defined
by this setting.
ii. Click on the Folder button and enter a path and filename to change the location of
the body text. Normally, the files are stored at {PBDir}\Email\Body\{WinUserName}-
Body.txt.
iii. The corresponding variable, EmailBody, will overwrite the default entry when it is
assigned in the Form File
iv. Example – the following assignment could be entered in RunTime Objects:
#Assign EmailBody, "Thank you for your order."
#Assigns EmailBody can also be used to assign multiple lines. A separate #Assigns is
used for each line. Use #Assigns EmailBody, “ “ to create a blank line between
paragraphs.
v. The E-mail Body may be a text (.txt) or HTML file. Both file types can use the PrintBoss
variable tags, such as {DocNo}, to dynamically update information for each e-mail when
the documents are processed.

PrintBoss
123 Electronic Copy
1. Text Editor – Click on this button to open a Notepad file to edit a .txt E-mail
Body message. This button is only available when the E-mail Body/Message is
a .txt file. Changes to the text file must be saved and will not show in the E-mail
Body window until you click OK at the bottom of the E-mail Settings dialog or
by pressing the Refresh button.
2. HTML Editor – Click this button to open your default HTML editor to edit an
.htm or .html E-mail Body/Message. This button is only available when the E-
mail Body/Message has an .htm or .html file extension. Typically, the editor is
Microsoft Word. Changes to the HTML file must be saved as a filtered web.
Click the information button for more details.
7. Click OK at the bottom of the E-mail Settings window to save changes made on any tab. Some changes
will not display until OK is clicked.
FORM SETUP FOR E-MAIL
The PrintBoss E-mail feature is enabled on a form-by-form basis. This only takes a few steps:
1. Open the PrintBoss Master Application.
2. Click on the Edit menu and select Form Files.
3. Highlight the form you want to e-mail and click the Editor button.
4. Increment Copies by 1 in the right column of the Settings Tab. This new copy will be treated as the E-
mail copy.
5. Select the Multi-Parts & Printers tab.
6. Set the Destination Printer/Device for the new copy to < Email>.
7. Click OK.
You may also want to setup ProcessPage commands at the top of the Footer Objects tab of the Form in order to
determine when to process the new E-mail copy vs. printing a copy. Verify the copy numbers on the Multi-Parts &
Printers tab and then follow the steps below:
1. Open the PrintBoss Master Application.
2. Click on the Edit menu and select Form Files.
3. Highlight the form you want to e-mail and click the Editor button.
4. Select the Footer Objects tab.
5. Enter the following ProcessPage command at the top of the Footer Objects tab for Email:
a. #[Copy,1]ProcessPage «[!Empty,{EmailTo}]» OR
#[Copy,1]ProcessPage «[Inu, ‘@’,{DocMisc2}]»
b. The Copy number, i.e. Copy, 1, should be the email copy. If it is not, replace the 1 with the
correct copy number.
c. The ‘!’ is ‘Not’. The page will process when the variable {EMailTo} is Not Empty.
‘Inu’ looks for a specific value in the variable. For DocMisc2, PrintBoss is looking for the ‘@’ in
the DocMisc2 field to process the email.
d. The {EmailTo} variable should be assigned as explained in the ‘Assignments’ section later in this
chapter. If the email address variable is added to the DocMisc2 field in the PrintBoss Trigger,
verify the ‘Use “DocMisc2” as EmailTo address if EmailTo is unassigned’ checkbox is selected
on the Misc. Settings tab or the E-mail Settings dialog under the Options menu on the PrintBoss
Master Application.
6. To add conditionally printing a copy when {EmailTo} is Empty, copy the ProcessPage command and
change the copy number and remove the ‘!’ condition for {EmailTo} or add it for DocMisc2 as follows:
a. #[Copy,2]ProcessPage «[Empty,{EmailTo}]» or
#[Copy,3]ProcessPage «[!Inu, ‘@’,{DocMisc2}]»
b. Verify the correct copy number. This may be set to Copy, 0 to print an original versus a copy.
7. Click OK on the Form so save these changes.
See Chapter 9, Form Files, to Modify from the Document View for more information.
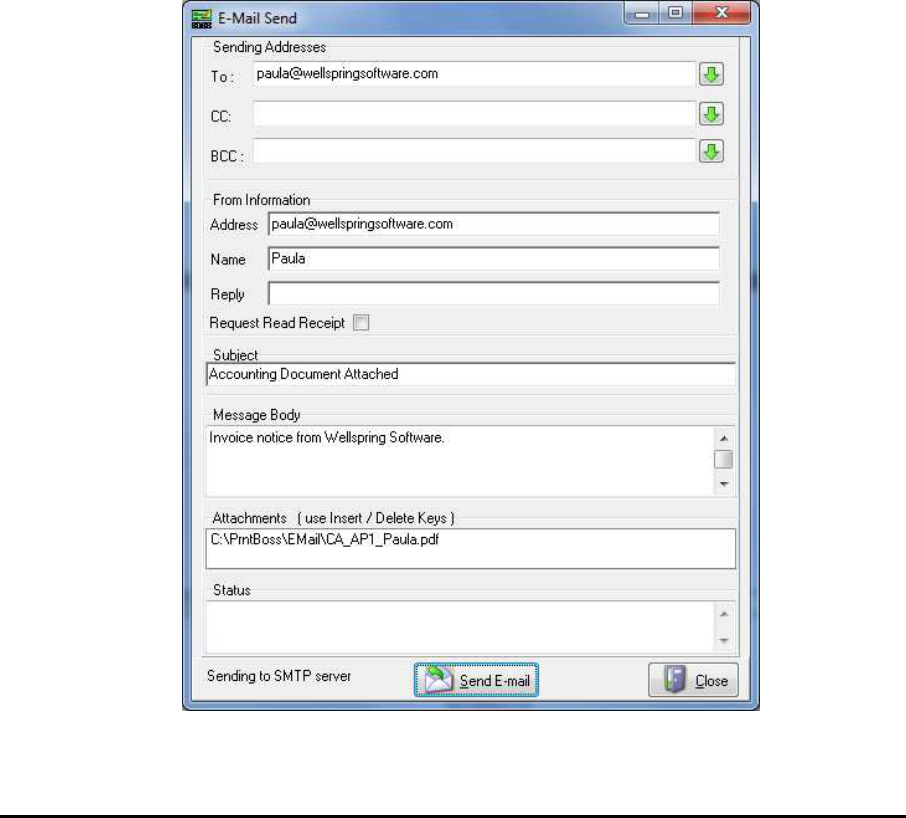
PrintBoss 124 Electronic Copy
E-MAILING
Printing documents from the accounting software proceeds as normal. Typically, the documents Original and Copy
are set to print/e-mail immediately.
When the Print Time on the Multi-Parts & Printers tab of the Form Editor is set to Batch, documents can be e-
mailed manually from the View or directly from the Work File. See Manual E-mail below for step-by-step
instructions on sending e-mail from the Work File.
MANUAL E-MAIL
When Enabled E-mail Module is checked at the top of the E-mail Settings dialog, all document Views will have an
E-mail button at the top of the window near the Close button.
1. Open the PrintBoss Master Application.
2. Click on the File menu and select Open Document Work Files or Open Document Archives.
3. Highlight the desired work or archive file and select Browse.
4. Select the appropriate document from the list. There are two ways to proceed from this point.
a. Click View.
i. Click on the E-mail button at the top of the window to manually send this document.
ii. There is a short delay while PrintBoss creates the PDF file to attach to the e-mail.
iii. The E-Mail Send dialog opens.
iv. The ‘To’, ‘CC’, and ‘BCC’ fields contain the values entered in the E-mail Settings
window unless the variables EmailTo, EmailCC, and EmailBCC are assigned in the
Form. Fields that are not required, such as ‘CC’ and ‘BCC’, may be blank.

PrintBoss
125 Electronic Copy
v. The assignments can be static (same value for all documents using this form) or dynamic.
Dynamic variables capture a different value for each document.
vi. Click on the drop-down menu to the right of the field to select an address from the ‘Email
Phone Book’. The Email Phone Book is set up on the Misc. Settings tab of the E-mail
Settings.
vii. Click Send E-mail to complete the process.
viii. Close the E-Mail Send dialog when the Status displays Successfully Mailed.
ix. Close the View when you are finished.
b. Click Print.
i. Select Allow Reprints.
ii. Select the copy identified as <EMail>.
iii. Adjust the Scope to include additional documents if desired.
iv. Click Print Start to send the e-mail. PrintBoss will only stop on the E-mail Send dialog
when ‘Automatic E-mail Pause’ is set to ‘Always’ or ‘Bad Address’ on the Misc. Settings
tab of the E-mail Settings.
v. Click Close to close the Print Copies Dialog.
5. Review the File Browse table. The Printed column displays a capital E when the e-mail is sent
successfully. A small case e displays when the e-mail was not sent successfully. An “S” appears when
there is a ProcessPage command and the condition for the ProcessPage is not met for the E-mail copy.
a. Right click on a document and select Edit to view the Status Log.
b. The Status Log records e-mail activity. Example:
5/09/2016 02:30:40P Copy=1 Emailed Successfully to Info@wellspringsoftware.com
ASSIGNMENTS
Assignments can be either Static or Dynamic. An explanation of these choices follows.
Static Assignments
Assign static values to the EmailCC or EmailBCC variables to set a single address for ALL e-mails. For example, a
department may need a copy of all invoices. The invoice form may contain an entry similar to the following:
#Assign EmailCC, "department@my-Company.com"
Static assignments should be made in the RunTime Objects tab of the PrintBoss Form File (EDIT / FORM FILES /
<highlight the PrintBoss Form> / EDITOR).
Dynamic Assignments
Dynamic assignments are the heart of automatic e-mailing. Normally, the ‘To’ address changes with each
document. There are 2 ways to create a dynamic assignment. Use one method or the other, not both.
INCLUDE IN SOURCE REPORT:
If you have control over the information sent to PrintBoss, define a field in the source report to pass the e-mail
address. It is important that this is just ONE field. You may need to create a variable in the source report that uses a
combination of text and database fields. The value of the resulting field must be similar to the following example:
PB#Assign EmailTo, support@WellspringSoftware.com
Note this is the value of the field after it is evaluated. The actual content might be similar to the following, although
the actual syntax and field names are dependent on your report writer:
"PB#Assign EmailTo, " + CustomerDBF.MiscInfo
See Chapter 23, Capturing and Assigning Text.
PICKED OFF OF CAPTURED REPORT BY PRINTBOSS:
This method requires that the e-mail address is displayed or printed somewhere on the source report. PrintBoss can
capture this information and blank it out (if desired).
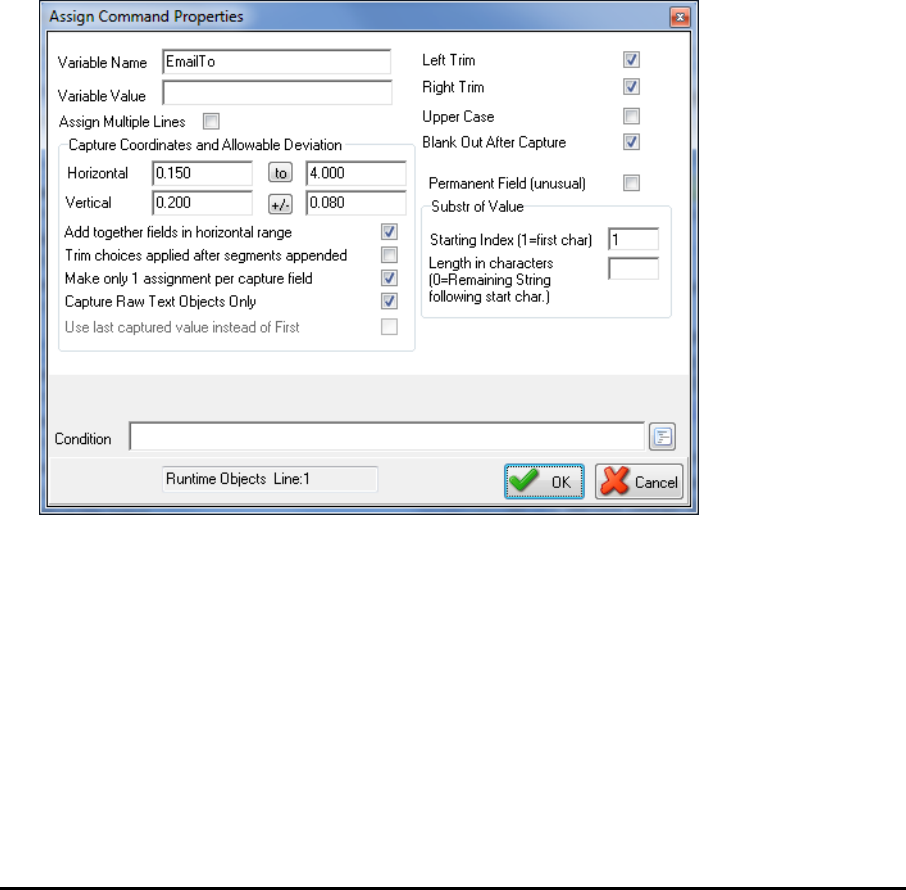
PrintBoss 126 Electronic Copy
1. Send a document to PrintBoss containing an e-mail address field.
2. Click on the File menu and select Open Document Work Files on the PrintBoss Master Application.
3. Select the appropriate form and click Browse.
4. Select a document and click View.
5. Right-click anywhere in the View and select View Raw Capture.
6. Locate the e-mail text on the screen. Double click on the text to open the Captured Text Command
Properties dialog.
7. Select the Click to Assign to Variable bar in the top right of the dialog.
8. Change the Variable Name from ReNameMe to EmailTo (or EmailCC or EmailBCC).
9. Check the following fields:
a. Add together fields in horizontal range
b. Make 1 assignment per capture field
c. Capture Raw Text Objects Only
d. Left Trim
e. Right Trim
a. Blank Out After Capture (optional – hides e-mail addresses on printed document)
Some reporting engines (such as Crystal Reports) tend to break up text fields. A good
practice is to click on the +/- button that follows the Horizontal field so it becomes to. Set
the ending coordinate far enough to the right to pick up a long e-mail address.
10. Click OK.
11. Click Close on the Capture Text Command Propertied dialog.
12. Right-click on the page and click View Raw Capture to deselect this option and return to the formatted
document. PrintBoss will add this assignment to the top of the RunTime Objects in the Form.
Test the assignment by clicking on the E-mail button in the top right corner of the View. The E-Mail Send dialog
displays the address fields filled with the assigned values.
VARIABLES
There are several variables that may be Assigned in a Form File to define values for an e-mail.
See Chapter 9, Form Files, for more information on Assignments.
A list of the e-mail variables along with a description of each is included in Appendix E of this manual.
PrintBoss
127 Electronic Copy
Chapter
17
FORM / BANK REQUEST LIST
The Request List determines the Bank Account and PrintBoss Form used when printing. This is only necessary for
accounting software that does not use a trigger or text capture file.
NOTE:
The Request List is NOT used with Sage 300 ERP and Sage HRMS
PrintBoss scans the list of entries in the Request List for an automatic match of predefined characteristics against the
contents of each print job. For example, a particular word appearing at a defined location on the page might be
enough to identify the document.
If one record matches, PrintBoss uses the form and bank identified in the Request List record. If more than one
record matches, PrintBoss provides a list of all the matches to allow the user to choose from the entries. When no
match occurs, PrintBoss generates an Unrecognized Doc Alert, a default Form and Bank, or a pop up containing the
entire Request List, depending on how the Request List is setup.
This is a very powerful tool that automates your work flow and avoids erroneous selections from the list of forms or
banks. Set up requires a good understanding of the data provided by your accounting software.
SETUP
Request List entries are automatically imported for the standard Host Accounting Software selected during the
installation of PrintBoss. Editing the Request List is only necessary for custom interfaces or forms you create.
1. Open the PrintBoss Master Application.
2. Click on the Options menu and select Form / Bank Request List. The Form / Bank Request List
Manager opens.

PrintBoss 128 Electronic Copy
NOTE:
This feature is not available with PrintBoss Select.
3. Import Existing Request List File
a. Click the Import button to import an updated request list record. These are stored by specific
accounting software in the ReqList folder in the PrntBoss Home directory. Only accounting
software packages chosen during installation or setup will appear in this list.
b. Select the appropriate *.prq file and click Open. The new record will appear at the bottom of the
list.
4. New / Edit – It is easier to create a new or edit an existing Request List record from the Work File. Please
see Implementing Request List from the Work File later in this chapter.
5. Click Close to save your changes.
CONFIGURATION
Your Configuration and PrintBoss Driver Settings may need to be changed to use the Request List.
1. Open the PrintBoss Master Application.
2. Click on the Options menu and select PrintBoss Driver Settings.
3. Select Always Capture in the Capture Mode section.
4. Click OK to save your changes.
5. Click on the Options menu and select Configuration.
6. Check the Request List determines Form/Bank field in the Always Capture Settings section in the
bottom left corner. This will gray out the Form and Bank choices.
7. Select the "PB#INFO" flag overrides above check box.
8. Click OK to save your changes.
NOTE:
Run PrintBoss as Administrator if you cannot change the Capture Mode settings under Options/PrintBoss Driver
Settings. Running as Administrator will provide the needed permissions to the Local Machine registry where these
settings are saved.
PrintBoss
129 Electronic Copy
IMPLEMENTING REQUEST LIST FROM THE WORK FILE
Auto Pick reviews documents printed through PrintBoss for specific traits. When these traits match conditions in a
record in the Request List, PrintBoss processes the document with the form and bank specified in the Request List
record. The entire Request List pops up when no matches are found. The Request List also pops up when more
than one match is found, BUT it will only include records that match.
1. Print a document from the accounting software and select the appropriate Request List record or Form File
so the document Work File can be examined.
a. Verify the Auto-Archiving feature in the Form Editor is set to None or Overwrite Work File at
Start of Batch before printing to ensure the document stays in the work file for viewing.
b. If the file automatically prints to Blank01 or Unknown, start with the Work File.
2. Click on the File menu and select Open Document Work Files from the PrintBoss Master Application.
3. Select the appropriate Work File and click Browse.
4. Select a current record in the list and click View.
5. Right click anywhere on the View and select View Raw Capture. The view will change to show only the
data passed from the accounting software minus the PrintBoss formatting.
6. Right click again and select View Request List Capture Groups. The Form / Bank Request List Manager
opens.
7. Stretch and move both the View and the Request List Manager to see both screens as much as possible.
8. Determine if there is an existing entry that matches you r data.
a. Click the Test For Matches button on the Request List Manager to test if there are any existing
entries that match. Otherwise …
b. Select the Request List record desired or add a new record.
9. New/Edit Record
a. Click on the plus button to add a new blank record in the list. Otherwise, select an existing
record.
b. Click the Edit button while the record is selected. The Request List Editor opens.
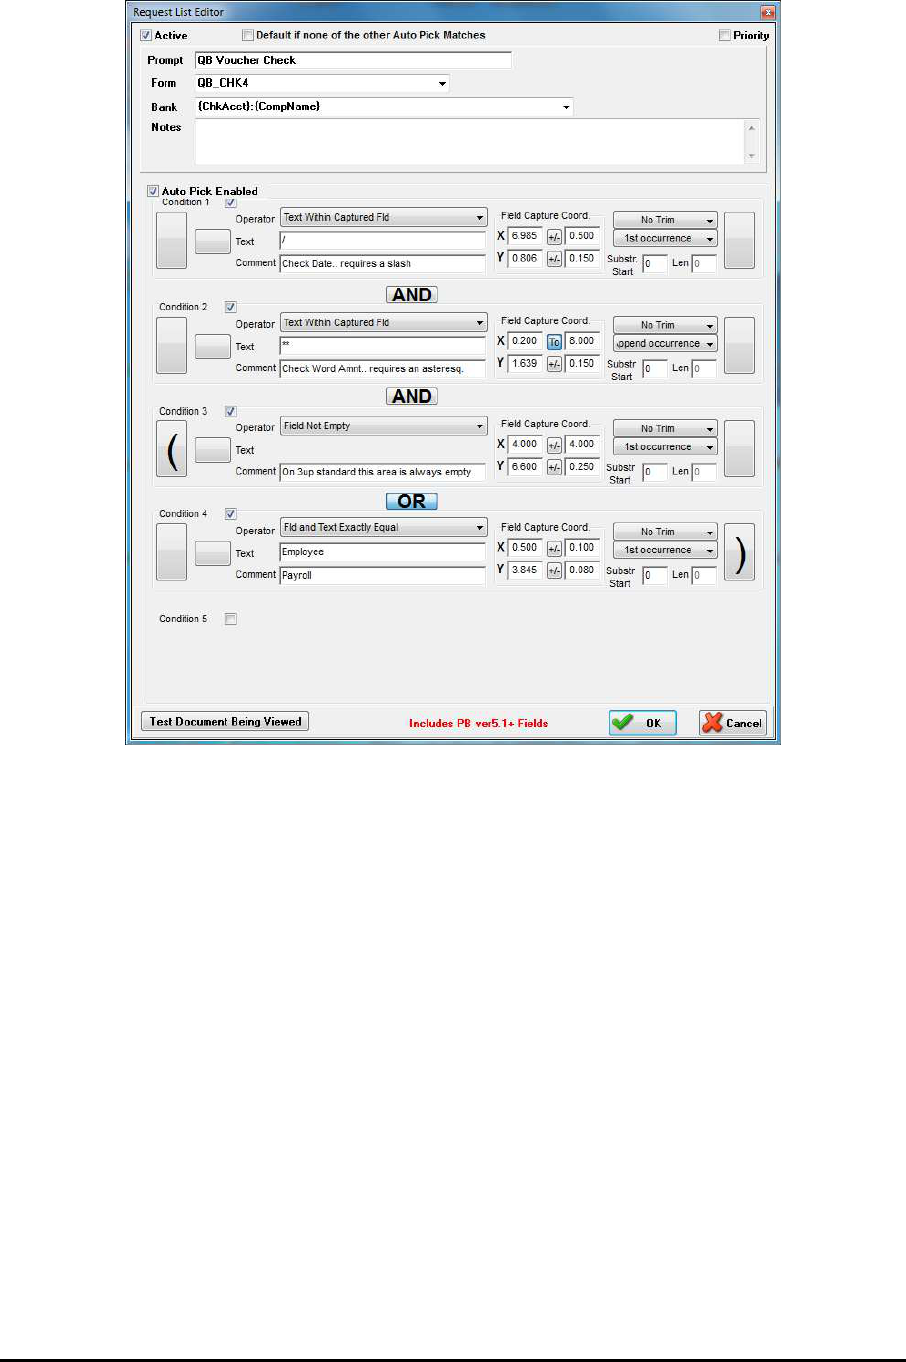
PrintBoss 130 Electronic Copy
10. New Record
a. Check Active in the top left corner of the window. The fields are now available to edit.
b. Prompt – Enter a word or phrase users will recognize as the form and bank combination.
i. AP is often used to designate accounts payable activities.
ii. PR is often used to designate payroll activities.
c. Form – Choose the appropriate PrintBoss Form from the drop-down menu. If you need to create
a custom form, exit the Request List Editor, create the new form, then return to this window and
continue.
d. Bank – Choose the appropriate BankCode from the drop-down menu.
i. If you need to create a new Bank record, exit the Request List Editor, create the new
Bank record, then return to this window and continue.
ii. Choose a bank format.
1. {ChkAcct}:{CompName} – Choose this entry when the accounting software
passes the checking account name and company name. QuickBooks has this
capability.
2. {DocBank} – Choose DocBank when the accounting software only passes one
set of data to identify the bank record, such as checking account name or
company name. Peachtree has this capability.
3. {None} – Choose None when the form is not a check (e.g. Invoice).
iii. {Request} – Choose Request when you would like PrintBoss to provide a list of all Bank
Records and allow you to choose from the list.
e. Notes – Enter notes to describe the purpose of this Request List entry, record special conditions,
or log changes. This is an optional field. Click on the top or bottom edge of the Request List
Editor dialog and drag to expand the Notes field.
11. New/Edit Record
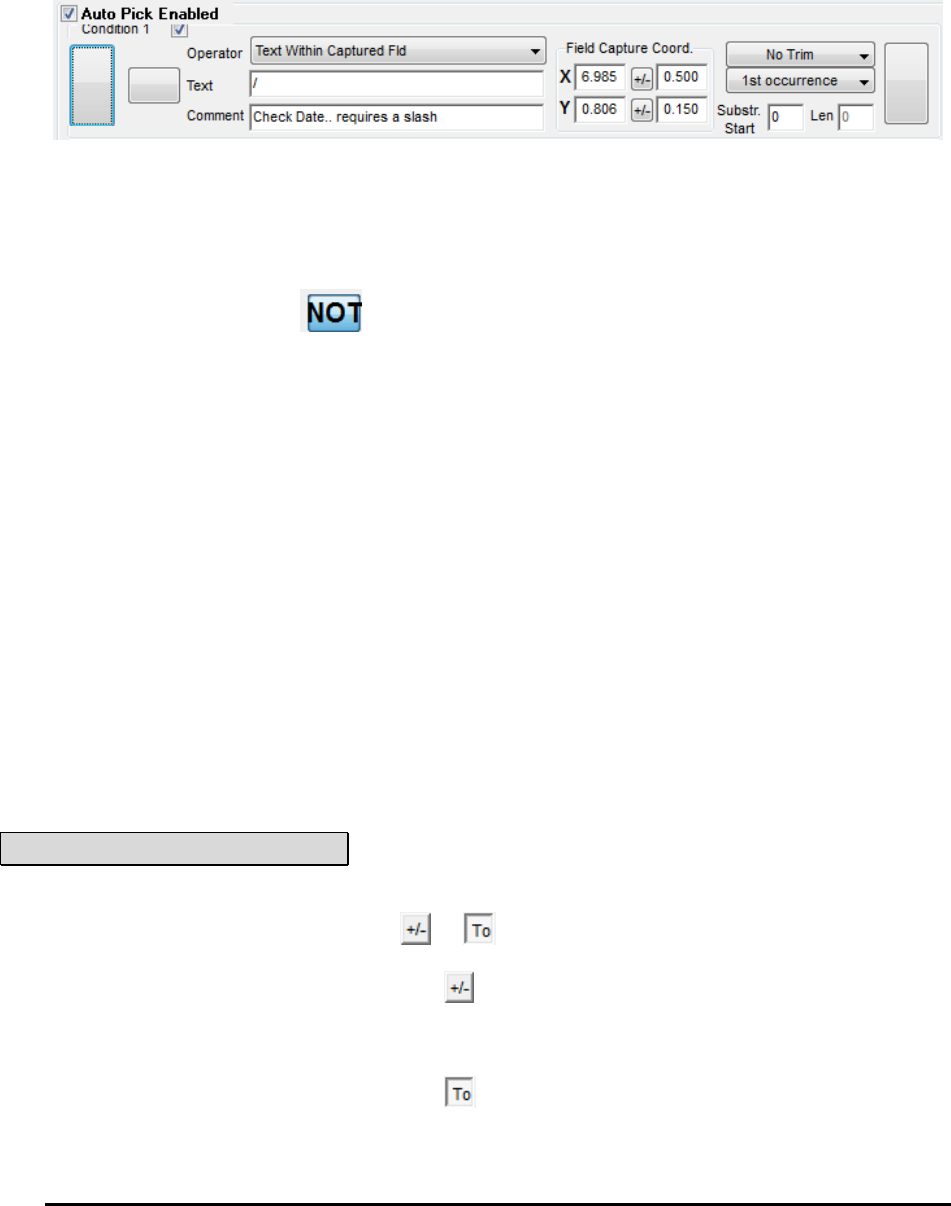
PrintBoss
131 Electronic Copy
a. Check Auto Pick Enabled to define conditions. PrintBoss will automatically select this Request
List record when the conditions are met during printing and this box is checked.
i. Review existing Request List records for samples on how to setup conditions.
ii. You may skip this step and the Conditions if you prefer to choose from a list instead of
using automatic selection.
b. Conditions
i. Check Condition 1 to activate it.
1. Left and Right Rectangles – Click on the rectangle button to enclose two or
more conditions in parentheses. You will need to select a Right Rectangle at
some point as well.
a. Click once for a single parenthesis.
b. Click twice for double parentheses.
c. A third click will remove the parentheses.
2. – Click on the short rectangle to the left of the Text field to reverse the
condition.
3. Operator – Select a statement about the captured field from the drop-down
menu to determine how PrintBoss reads the condition. ‘Fld’ is an abbreviation
for Field. The most common choices are:
a. Fld and Text Exactly Equal
b. Fld Begins with Text
c. Text Within Captured Fld
d. Field Not Empty
4. Text – Enter the specific text PrintBoss will find at the specified coordinates.
This field is only available when you choose an operator that uses text.
5. Comment – Enter a note to help identify this condition. This field is optional.
6. Field Capture Coord.
a. X – Enter the horizontal coordinate for the left side the field.
i. Review the Raw Data on the document. Look for data or parts
of data that will ALWAYS appear on this document (e.g. a
specific word such as Invoice, or a check number, or a dollar
amount beginning with asterisks).
ii. Click on the data element to give it focus. Return to the
Request List Editor.
iii. Hold down the Ctrl key and click in the X field. PrintBoss
will automatically enter the coordinates of the selected data.
NOTE:
The Ctrl and click feature is only available in PrintBoss versions 5.21.9 and above.
b. +/- ; to button – This is a toggle button used to set a range for
the coordinate.
i. – Enter a range value in the field. A value of 0.100 will
cause PrintBoss to look 0.100 inches before the X value and
0.100 inches after the X value to find the data in the
specified area.
ii. – Enter an end value for the range. PrintBoss will look
from the X value to this value to find the data in the
specified area.

PrintBoss 132 Electronic Copy
c. Y – Enter the vertical coordinate for the top of the field. This works
exactly like the X coordinate. You can Ctrl + Click on both the X and
Y coordinates while a field is highlighted on the View.
7. Trim – Trim the field to remove blank spaces. The choices are:
a. No Trim (default)
b. Left Trim Field
c. Right Trim Field
d. All Trim Field (trims both the left and right side)
8. Occurrence – Select the occurrence of the text within the specified area. Some
data, such as asterisks, may appear more than once. The choices are:
a. 1
st
Occurrence (default) – evaluates to the first occurrence within the
coordinates and stops. PrintBoss will not examine the rest of the string.
b. All Occurrences – evaluates the entire string for a match.
c. Append Occurrences – concatenates the string before evaluating the
match.
9. Substr Start – Choose a starting point for the occurrence in the string.
Normally this is left at the default value of zero, representing the beginning of
the range. You may enter a different value. For example, PrintBoss will start
evaluating at the 5
th
character when a 5 is entered in this field.
10. Len – Enter a length for the substring to set a shorter end point for evaluating
the string. This field is only available when a value is entered in Substr Start.
PrintBoss will evaluate the remainder of the string from the start of the substring
when a value of zero is entered in the Len field.
ii. Check Condition 2 to activate it.
iii. An ‘And’ button will appear between the two conditions. This indicates the next
condition must ALSO be true for a match. Click the button to change to OR for either
condition to be true to constitute a match.
1. Single parentheses are often added at the beginning of one condition and the end
of the second when OR is selected in between. See example earlier in this
section.
iv. Continue filling in the fields for Condition 2.
1. The rules are the same for all 4 Conditions.
2. You only need to setup more than two conditions when two is not enough to
make this entry unique or you have a special condition.
c. Click the Test Document Being Viewed button at the bottom of the Request List Editor to test
whether the Request List record matches the open Form File.
d. Adjust as necessary until you receive the ReqList Record MATCHES!!! message.
e. Click OK on the Request List Editor when you have a successful match.
f. Click the Test for Matches button at the top of the Form / Bank Request List Manager window to
test the number of entries that match the open Form File.
i. You should only have 1 match.
ii. If there is more than one match, change or add a condition to the current Form / Bank
Request List record to make it unique.
12. Click CLOSE on the Form / Bank Request list Manager when you are finished and Close the View.
Repeat as often as necessary to create a list of all required form and bank account combinations. DO NOT create
more than one entry for the same Form File. The Notes field can be used to track updates to the record.
There are four conditions you can use to make a Request List record unique. It is very important to make each
request list entry as unique as possible to avoid multiple matches when Auto Pick is enabled.
It is very important to make each Request List entry as unique as possible to avoid multiple matches when
Auto Pick is enabled.
REQUEST LIST PROCESS
Click Close once all of the Request List records are complete. The next time a document is printed through
PrintBoss, PrintBoss will evaluate the document for matches to the defined conditions and automatically select the
appropriate Form and Bank combination to process the file.

PrintBoss
133 Electronic Copy
PrintBoss may open the Bank List to choose a bank the first time you print using that account. This happens when
the Bank Code does not exactly match the information from the accounting software. A check box at the bottom of
the popup list will update the Bank Code to match the data passed from the accounting software. This allows
PrintBoss to automatically pick the correct Bank Record the next time you print to that account.
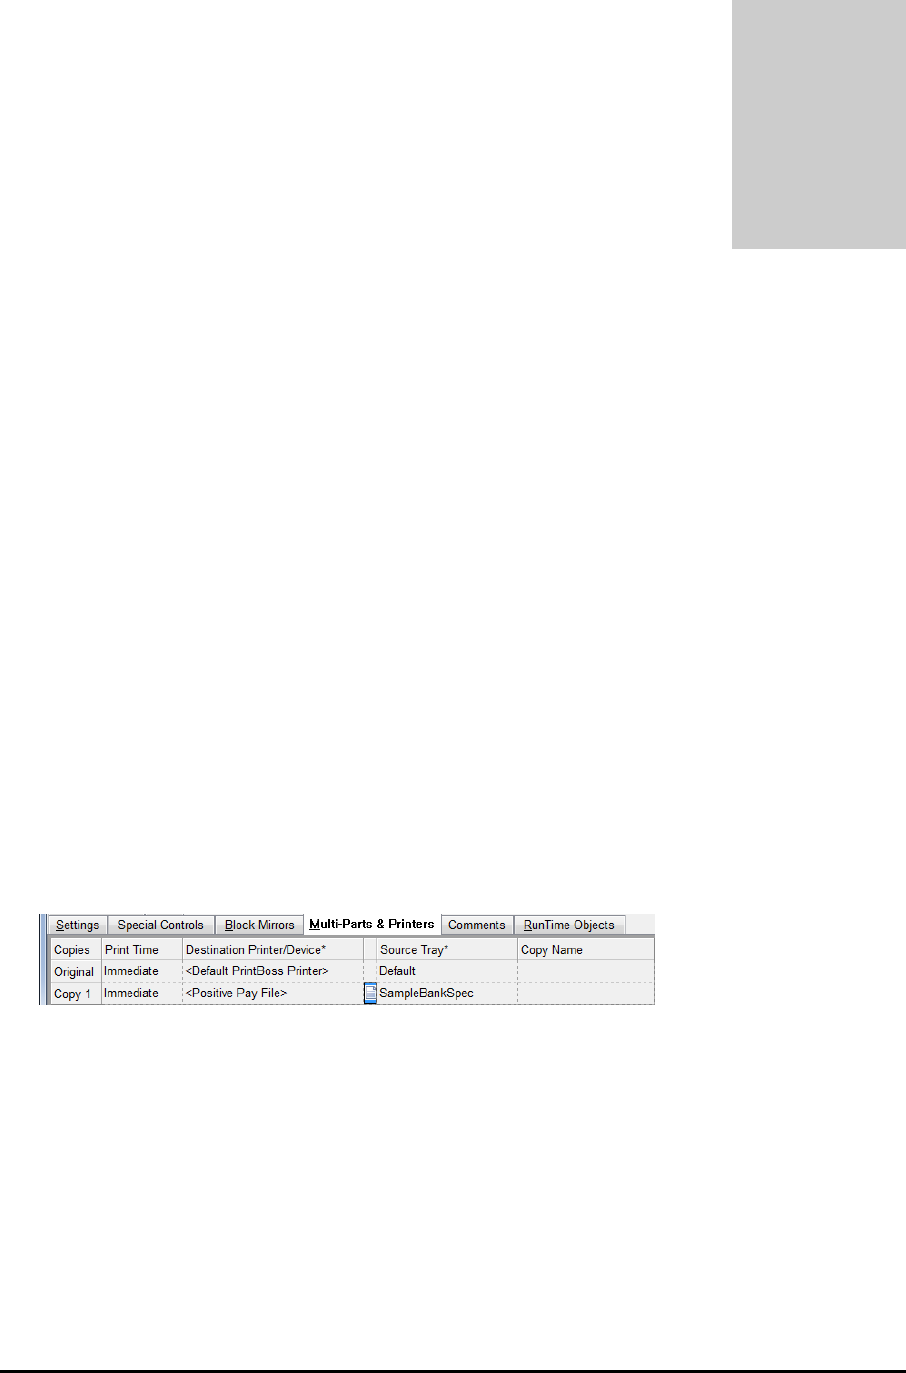
PrintBoss
135 Electronic Copy
Chapter
18
POSITIVE PAY
Banking institutions often offer a service called Positive Pay. This is a specially formatted file listing all valid
checks written on the bank account. The file is sent to the bank and only checks identified in this file are cashed by
the bank. If the bank receives checks that are slightly different, the bank will not accept the checks. This feature is
offered for fraud prevention.
PrintBoss can generate a Positive Pay file for each check in a batch. The form must be edited to add and assign a
copy to enable this feature. The copy is designated as a Positive Pay file. The structure of the Positive Pay file is
designed to match individual bank requirements. Rarely are requirements the same for different banks.
The Positive Pay specifications become part of the Form File. The specifications can be exported to a PrintBoss
Positive Pay file (extension of ".ppx" in the PosPay subdirectory of PrintBoss). This file can then be selected in
another form. Note that the .ppx files exported from within the PrintBoss Form Editor are NOT the actual Positive
Pay files sent to the bank. They are simply the scripts PrintBoss uses to create the file.
SETUP IN PRINTBOSS
1. Open the PrintBoss Master Application.
2. Click on the Edit menu and select Form Files.
3. Highlight the appropriate form and click the Editor button.
4. Increase the number of Copies by 1on the Settings tab.
5. Click on the Multi-Parts & Printers tab and select <Positive Pay File> as the Destination for the new
copy. A page symbol will appear in the column to the right of the Destination column.
6. Click on the page symbol to open the Positive Pay Editor.
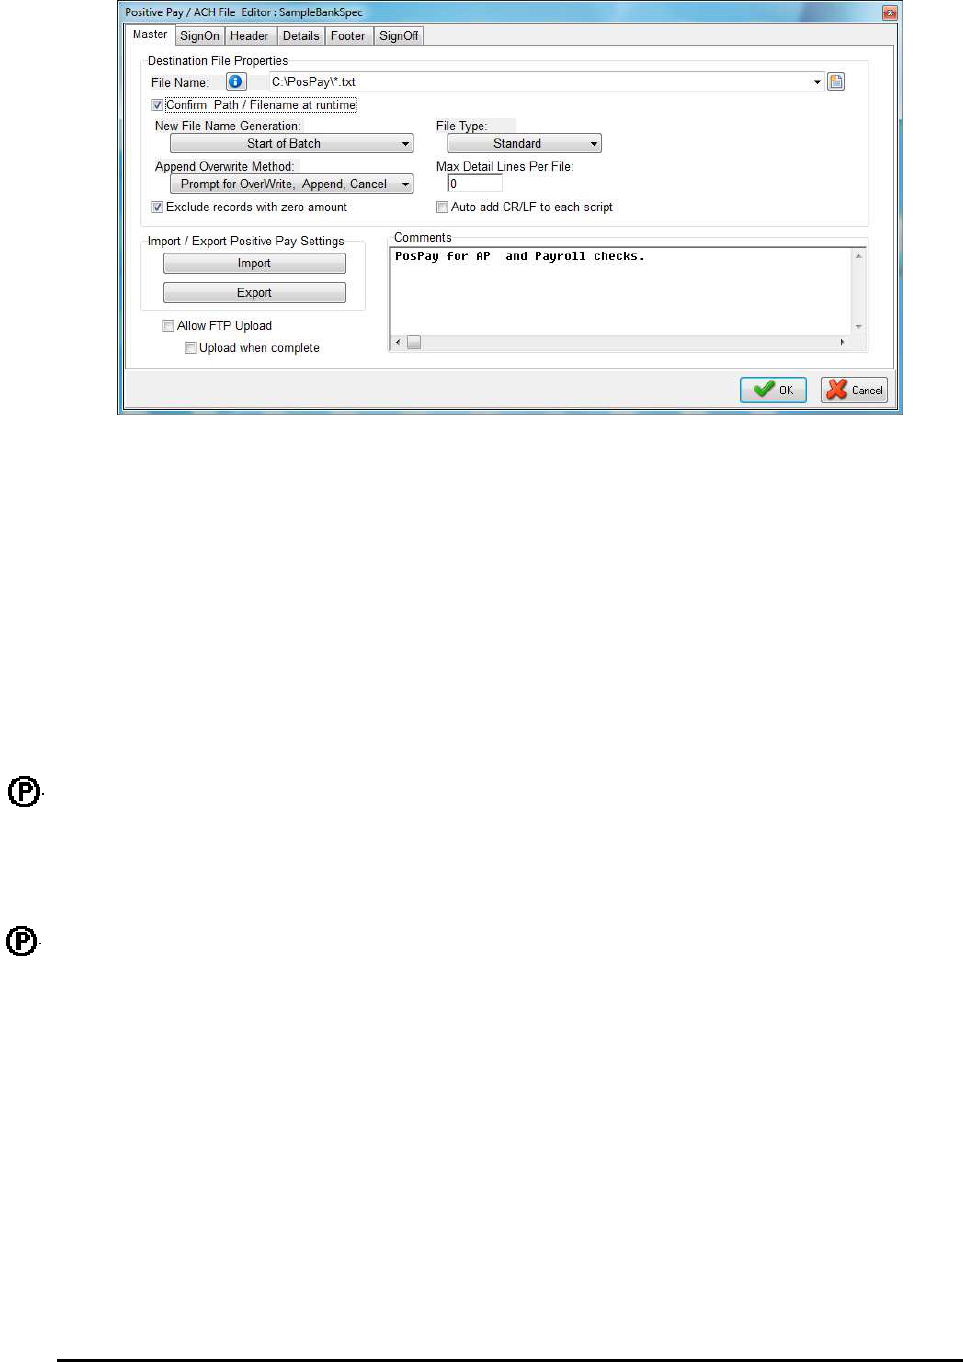
PrintBoss 136 Electronic Copy
7. Typically it is easier to import a sample Positive Pay spec and modify it to meet the specifications of the
current bank. Start with <Embedded in Form> prior to opening the Positive Pay / ACH File Editor, then
click the Page symbol.
8. Click on the Import button on the Master tab of the Positive Pay Editor. The browse opens to the PosPay
folder in the PrntBoss Home directory
9. Select the SampleBankSpec included with PrintBoss and click Open. You may also select the
SampleCSVPosPay spec.
10. Enter a File Name and path for this Positive Pay file. This field is limited to 80 characters. The Enterprise
edition of PrintBoss allows macro characters to be used in the file name to create a dynamic file name when
a batch of checks is printed.
11. Select Confirm Path/Filename at runtime. This can be skipped in the Enterprise edition if macros are
used in the file name path.
12. Choose a New File Name Generation method. The default is Start of Batch. The choices are:
a. Start of Batch
b. Each new page
c. Each new DocNo – Select this option when using variables in the file name. The use of variables
in file names is only available in the Enterprise edition of PrintBoss.
13. Select the File Type. The default of Standard should always be used when creating Positive Pay files.
14. Choose Append Overwrite Method. The default is Overwrite existing File. The choices are:
a. Overwrite existing File
b. Append to existing File
c. Prompt for Overwrite, Append, Cancel
15. Max Detail Lines Per File allows you to enter a maximum number of detail lines when required by the
bank. This feature is only available in the Enterprise edition of PrintBoss. PrintBoss will automatically
increment the file name using the {##} variable when the max detail lines are exceeded.
16. You may select the Exclude records with zero amount option.
17. Select Auto add CR/LF to each script only when you are creating a new Positive Pay File and would like
PrintBoss to automatically add this carriage return/line feed command at the end of each script.
18. Only select one or both of the FTP options after FTP is setup. See Chapter 21, FTP, for more information.
a. Allow FTP Upload – Only select this option when FTP has been setup for ACH. This feature is
only available when Security is enabled.
b. Upload when complete – Select this option to automatically upload the FTP file once it is created
by PrintBoss. Only select his option after FTP has been setup. This feature is only available when
Security is enabled
19. The Comments field is optional and for your use.
20. The SignOn tab is provided for the rare occasion when a sign on or introduction to the Positive Pay file is
required by the bank. This is also known as a File Header.
21. Fill in the Header section when a Batch header is required by the bank. This information usually includes:
a. Account number
b. Company name

PrintBoss
137 Electronic Copy
c. Batch date
22. Fill in the Details section according to the bank's specifications. This section is always required for a
Positive Pay file and often includes:
a. Account number
b. Check number
c. Check amount
d. Check date
e. Check recipient
23. Fill in the Footer section according to the bank's specifications. This section is often required and provides
a summary of the batch. This may include:
a. Batch count
b. Batch amount sum
c. Batch date
24. The SignOff tab is provided for the rare occasion when a sign off or File Footer is required for a file
summary, such as a File Count or File Amount value.
25. Click OK at the bottom of the Positive Pay Editor to save changes and close the window.
26. Click OK on the Editing Form window.
NOTE:
The following are tips for the Header, Details, and Footer sections.
Each line is usually treated as a field with the content enclosed in quotes.
Often it is helpful to add comments to the end of a line, starting the comment with the pipe character ( | ).
The pipe character is the Shift and \ keys on your keyboard.
Substitution functions are available within PrintBoss. Right click on any Positive Pay tab (except the
Master) to select List / Stuff Assignments and then select the plus sign (+) next to Positive Pay / ACH
Fields to view a list of available substitution functions specific to Positive Pay. PrintBoss evaluates each
function and substitutes the resulting value in place of the function including the braces that surround the
function. Functions can be nested within other functions. Use caution. Confusion may occur with
delimiting the functions and parameters. Sometimes it is preferable to create a value from a series of steps
with delimiters to eliminate confusion and make the command clearer. See Chapter 10, #Text Command –
Substitution Function Description, for an example.
Most sections usually end with a Carriage Return/Line Feed. This is represented with the expression
Chr(13)+Chr(10) or {CF/LF}.
Often there are fields relative to a bank account that need to be entered into the Positive Pay file. It is
helpful to make use of the miscellaneous 1 through 5 fields in the PrintBoss bank record and reference the
information using the variable names {BMisc1} … {BMisc5}.
ENTERING ACCOUNT/ROUTING NUMBERS
There are 3 ways to enter an Account Number or Routing number into a Positive Pay spec.
1. Explicitly type the Account or Routing number into the spec. This is the most direct method, but it
becomes a problem when more than one bank account is used by the same form since these values will not
change dynamically.
2. Enter the Account or Routing number into one of the five MISC fields on the bank record. An advantage to
this method is that you can type the number exactly as the bank wants it to appear. On rare occasion, the
display of these values on the MICR line is not the way the bank wants them expressed in the PosPay file.
The down side is remembering to keep the MISC field current in the bank record.
3. Use the calculated fields, {BMicrAcctNo} and {BMicrRoutNo}, in PrintBoss. The values of these fields
are calculated each time they are accessed by examining the full MICR line and pulling out the appropriate
sections. The advantage is no additional support is needed. The disadvantage is that on rare occasion the
format of the account number in the Positive Pay file needs to be a different than the MICR line.

PrintBoss 138 Electronic Copy
OPERATION
Once the Positive Pay file is configured, it is treated as another printer. Select the Multi-Parts & Printers tab in the
Form Editor and set the Print Time to print Immediate or as a Batch. Click on the File menu, select Open Document
Work Files and select the form name to print when the Print Time is set to Batch. Print the whole file or set a range
in the Scope to print only part of the file.
The work file may also be used to reprint or test print portions of the file. Be sure to check Allow Reprints as well
as the copy marked Positive Pay when reprinting checks from the work file.
NOTE:
The Printed column in the Browse list of the Work file indicates the status of the printed documents. Positive Pay
copies display the letter O (for pOsitive pay) when printing is successful.
It is important that the form’s Auto Archiving method on the Settings tab is NOT set to Overwrite Work File at
Start of Batch when the Print Time for the Positive Pay copy is set to Batch on the Multi-Parts & Printers tab of the
Form Editor. You could potentially overwrite a work file before the Positive Pay copies have been printed to a file.
See Chapter 9, Form Files.
COMMON SUBSTITUTION FUNCTIONS USED
There are a number of functions in PrintBoss that are helpful when setting up the Header, Details, and Footer
sections. A list of these functions can be accessed by right clicking in the scripting areas and choosing List / Stuff
Assignments.
A few of the most commonly used functions are defined in Chapter 10, #Text Command, under Substitution
Functions. These include: CurrentDate, CurrentTime, FormatNum, Pad, RECDate, and RECTime. See Chapter 10
for the complete explanation of these functions.
In addition, there are several Substitution functions specific for Positive Pay files. A complete list of Positive Pay
variables and substitution functions can be found in Appendix E. A few of the commonly used functions follow.
BatchAmnt
{BatchAmnt}
This function provides the sum of all the checks in a batch and is placed in the Footer tab of the Positive Pay File
Editor. Use this function with the FormatNum function to specify the length.
Example: "{FormatNum: '{BatchAmnt}', 8, 2, '0', '0', Hide}” |This function formats the batch amount to 8 digits to
the left of the decimal, 2 digits to the right of the
decimal, fill left with zeros, fill right with zeros,
and hide decimals.
BatchChkNoSum
{BatchChkNoSum}
This function provides the sum of the check numbers in a batch and is typically placed in the Footer tab of the
Positive Pay File Editor.
Ex: "{FormatNum: ÷{BatchChkNoSum}÷, 10, 0, '0', '', Hide}"
BatchCount
{BatchCount}
This function provides the number of checks in a batch and is placed in the Footer tab of the Positive Pay File
Editor. Use this function with the FormatNum function to specify the length.

PrintBoss
139 Electronic Copy
Example: "{FormatNum: '{BatchCount}', 10, 0, '‘, '', Hide}” |This function formats the batch count to 10 digits to
the left of the decimal, 0 digits to the right of the
decimal, fill left with spaces, no fill right, and
hide decimals.
CR/LF
{CF/LF}
This function adds a carriage return / line feed at the end of each Positive Pay tab that is used. This is the same as
using: Chr(13)+Chr(10). Unlike most of the other functions, there are no double quotes around CR/LF.
CSV or TSV
{CSV: ÷<string>÷ [,<ForceQuotesY/N> [,<SuppressTrailingCommaYN>]]}
{TSV: ÷ <str>÷ [,<ForceQuotesY/N> [,<SuppressTrailingTABYN>]]}
This function creates a complete line for csv fields and encloses commas occurring in the string in double quotes as
well as quotes occurring in the string in double quotes. Unlike the CommaDelimit and DBQuotes functions, quotes
are not used to offset this function. An option allows forcing a field without quotes to be encapsulated in double
quotes if double quotes may occur in the field for uniformity in displaying the data.
TSV works the same as CSV to create a tab delimited file.
Example: {CSV:÷{DocRecip}÷,'Y'} |Forces all DocRecip fields to be enclosed in double quotes. Note there are no
quotes surrounding this function. The ‘Y’ at the end removes
the last comma or tab.
DBQuotes
{DBQuotes: '<string>'}
This function is similar to the Comma Delimit function, but it only looks for double quotes in the string and applies
to Positive Pay files saved to the .txt format. The function can be used in either the Detail or Footer tab of the
Positive Pay File Editor.
Example: "{DBQuotes: '{DocRecip}'}" |The name Robert "Bud" Shipman will display fully in the Positive Pay
file using this function. Otherwise, the name would display as
Robert only.
FileAmnt
{FileAmnt}
This function returns the sum of all checks in a file and is usually placed in the SignOff tab of the Positive Pay File
Editor.
FileBatches
{File Batches}
This function returns the sum of all batches in the Positive Pay file and is usually placed in the SignOff tab of the
Positive Pay File Editor.
FileChkNoSum
{FileChkNoSum}
This function provides the sum of all check numbers in the Positive Pay file and is usually placed on the SignOff tab
of the Positive Pay File Editor.

PrintBoss 140 Electronic Copy
FileCount
{FileCount}
This function returns the number of records in a file and is usually placed in the SignOff tab of the Positive Pay File
Editor.
PosPayFileCounter
{PosPayFileCounter: '<ZeroFillDigits>'}
This function adds a unique file creation number for those banks who require this feature and is normally added to
the Header tab of the Positive Pay File Editor. The value after the function indicates the number of characters in the
file counter. PrintBoss will automatically increment the counter by 1 every time a Positive Pay file is printed.
Example: "{PosPayFileCounter: '8'}" |This function creates a unique file creation number filled with zeros up to 8
characters.
PosPayFileExt
{PosPayFileExt}
This function provides the extension of the current positive pay file that is created by PrintBoss.
PosPayFileName
{PosPayFileName}
This function provides the name that is being used for the current positive pay file.
See Chapter 10, #Text Command, for additional information on Substitution Functions or Appendix C,
Positive Pay Substitution Functions.
PosPayLineCount
{PosPayLineCount}
This counter increments with each new PosPay line created to generate a total count. Use with the Pad function to
set the length when displaying this field.
PosPaySeqNo
{PosPaySeqNo}
This function adds a sequence number for each line added. This value is retained between batches and is most
commonly used in ACH files to generate the Trace Number. Use with a Pad function to set the length for displaying
this field.

PrintBoss
141 Electronic Copy
Chapter
19
ACH SETUP
ACH file specifications are established by NACHA – The National Automated Clearing House Association.
PrintBoss 5.65.1 and above contains a file with the standard NACHA specifications for use with PrintBoss. This file
is accessed through the Positive Pay feature in PrintBoss.
Company (originator) specific data is stored on the ACH Definition tab of the Bank Records in PrintBoss. Receiver
specific data can be stored in a Payee List in PrintBoss and associated with a bank record.
NOTE:
A charge of $250.00 is required if a Wellspring technician is needed to assist with ACH Setup.
BANK SETUP
This is outlined in Chapter 8, Bank Accounts, under item ‘4f’ of the ‘Create A Bank Record’ section.
PAYEE LIST SETUP
PrintBoss can use data required to create the Detail records for the ACH file from the Payee List. This section
covers setting up the Payee List.
1. Open the PrintBoss Master Application.
2. Click on the Edit menu and choose Payee Lists.
3. Click Create to start a new Payee List.
a. Enter a File Name for this list. There are no requirements for the File Name.
b. Click OK to create the list entry.
4. Select the list you created and click the Editor button. The Payee List Browse opens.
5. Entries can be made one at a time in the list by clicking on the + sign, or by importing a list formatted as a
csv file. This section covers exporting a template to a csv file and importing back into the Payee List when
completed. The first step is to create 1 record in the list to export the column headings.
a. Click the plus sign (+) to create the first record. The Payee List Edit window opens.
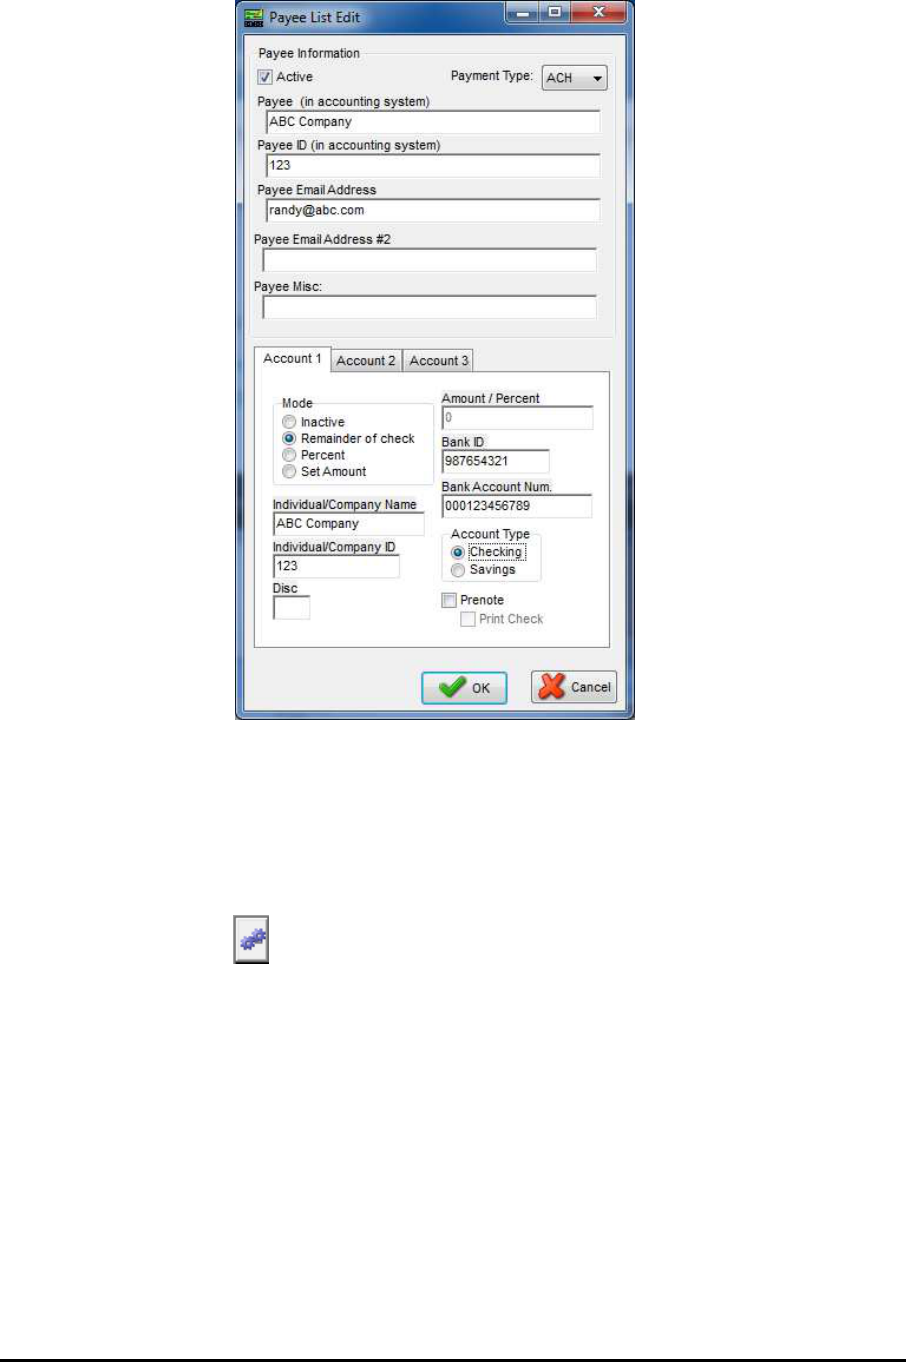
PrintBoss 142 Electronic Copy
b. Select Active in the top left corner. Notice the Payment Type was automatically set to ‘ACH’.
c. Enter the first Payee name as it was entered in the accounting software.
d. Enter the Payee ID.
e. Select ‘Remainder of check’ for the ‘Mode’ in Account 1. We will discuss other options later.
f. Copy the Payee data to the ‘Individual / Company Name’ field on Account 1.
g. Copy the Payee ID to the ‘Individual / Company ID’ field on Account 1.
h. Select ‘Checking’
i. Click O.K. to save this record.
6. Right click on the gears in the top left corner of the Payee List Browse grid and choose Export.
PrintBoss will indicate 1 record is selected.
7. Click Yes.
8. Enter a name and location to save this file. PrintBoss will save it as a Comma Delimited (*.csv) file.
9. Navigate to the save location and open the *.csv file.
10. Enter values in the following fields. Many of these fields are associated with the Detail tab of the ACH
File Editor:
a. Payee – Enter the payee name as it appears in the accounting software. PrintBoss uses this field to
match the payee name on the check. DocRecip must be assigned in the PrintBoss form to match
on the Payee field. PrintBoss stops once it finds an exact match. Duplicates will be ignored.
b. Payee ID – Enter an ID for this payee. Alternatively, the Payee ID can be used by PrintBoss to
match an ID on the check advice. DocPayeeID must be assigned in the PrintBoss form to match
on the Payee ID field. When both Payee ID and Payee are used, PrintBoss will use Payee ID first
and only use Payee when not match is found for Payee ID.
c. Active – There will be a ‘Y’ in this field for ‘activate’. Copy this value down the list for all
records. ‘N’ denotes an inactive record.

PrintBoss
143 Electronic Copy
d. Email – Enter a primary email to send a notification of payment to the recipient if you plan to
email the direct deposit statements. You may ignore this field if the email address is passed by
your accounting system.
e. Email2 – A second email field is provided if a second recipient is necessary.
f. Payment Type (PYMNTTYPE} – The Payment Type is a numeric value based on the type of file
selected. Enter 1 for ACH. The other values are:
i. 0 – N/A This type is never used for ACH but may be selected when the Payee List is only
used to store email addresses for emailing documents through PrintBoss.
ii. 2 – PS16 Only select this type when instructed by a Wellspring Software technician.
g. Payee Misc (MISC) – The Payee Misc field is provided for any additional information for
PrintBoss to retrieve and include in a file or email.
h. Mode1 – Enter the Mode for Account 1 to determine the amount of the ACH transfer. The most
common choice is 1, Remainder of Check, to pay the entire amount of the check. This value can
be copied down the csv column for vendors. Other choices are available for payroll as follows:
i. Inactive – Enter 0 (zero).
ii. Remainder of Check – Enter 1.
iii. Percent – Enter 2.
iv. Set Amount – Enter 3.
i. Amnt1 – Enter a fixed Percent or Amount for Account 1 if 2 for ‘Percent’ or 3 for ‘Set Amount’
were selected as the Mode for this payee. Leave blank if Remainder of check is selected for the
Mode. The field name is {ACHAmount} and contains 10 characters, 8-dollar places and 2 cents
places.
j. BnkID1 – Enter the routing number for Account 1 for this payee. This matches the Bank ID field
on the Payee List. The field name is {ACHRecvBankID} and contains 9 characters, 8 for the
routing number and a check digit added by PrintBoss in accordance with ACH Rules.
k. BnkAct1 – Enter the account number for Account 1 for this payee. This matches the Bank
Account Num. field on the Payee List. The field name is {ACHRecvBankAcct} and contains 17
characters.
l. Name1 – Enter the Individual/Company Name for this payee as it appears on Account 1. The
field name is {ACHRecvName} and contains 22 characters.
m. ID1 – Enter the Individual/Company ID for this payee if there are two or more identical names.
The field name is {ACHRecvID}, contains 15 characters, and is optional.
n. Prenote (PRE1) – Only select PreNote (Y) if this account is added after the PreNote file has
passed the bank.
o. Print Check (PREPRNT1) – This option is only available when Prenote is selected. A value of
T (True) is entered to print a check when for this Prenote. Otherwise, the value is F (False).
p. TransCode1 – Enter a code to identify if the Account Type. The field name is
{ACHTransCode} and contains 2 characters. The values are:
i. 22 = Checking
ii. 32 = Savings
q. Disc1 – Enter an optional 2-digit code for this account that is meaningful only to the originator.
The field name is {ACHRecvDisc}, contains 2 characters, and is optional.
r. Repeat for Account 2 or Account 3 ONLY if the check is payroll and the amount is divided
between 2 or 3 bank accounts.
s. The following is an image of the Details tab for the ACH File Spec where these fields are used:
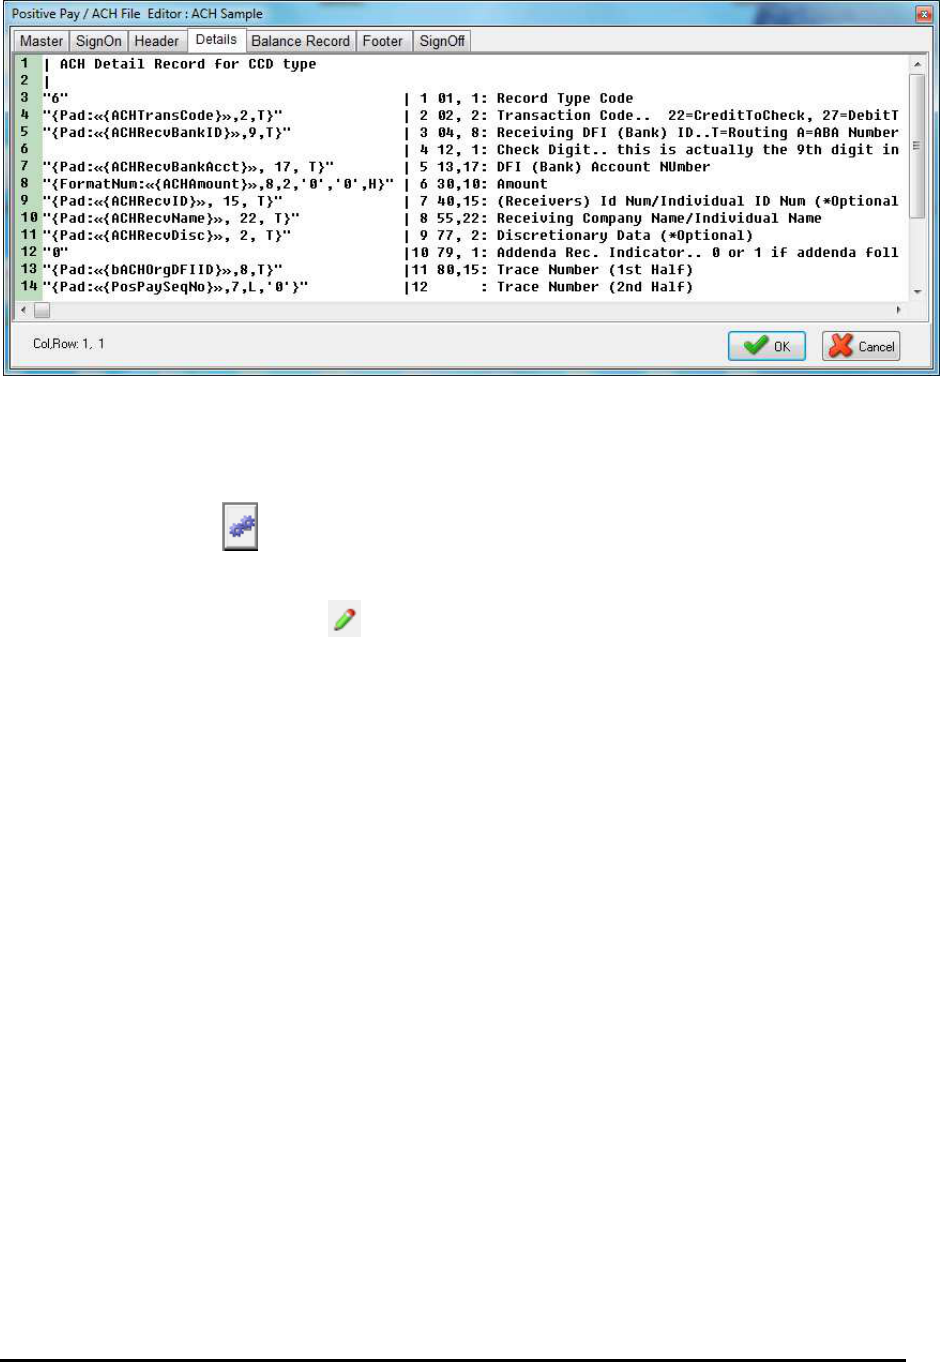
PrintBoss 144 Electronic Copy
11. Save changes to this file and click Yes to keep the features. We recommend you save the file as an xls or
xlsx file if you need to open it multiple times before importing as the csv format will drop leading zeros.
Then resave as a csv file (without opening the csv file) prior to importing.
12. When the csv file is finished, return to PrintBoss, click on the Edit menu, and choose Payee Lists.
13. Select the appropriate Payee List and click Editor.
14. Left click on the gears in the top left corner of the Payee List Browse grid and select Import.
15. Select the appropriate csv file and click Open. The list will populate with the csv entries.
16. PrintBoss will prompt if there are duplicates and provide the choice to Save or Ignore.
17. Select a record and click the pencil to make changes to the selected file.
18. Click the Close button when you are finished.
FORM SETUP
In addition to the Bank and Payee Lists, the PrintBoss Form needs to be setup to print the ACH file. First, we will
add a copy to the PrintBoss form to create the ACH file.
1. Open the PrintBoss Master Application.
2. Click on the Edit menu and choose Form Files.
3. Select the appropriate PrintBoss form and click the Editor button. The Editing Form window opens.
4. Select the Settings tab.
5. Increase the number of copies by 1. For example, if the current Copies value is zero, type1 in the field.
6. Select the Multi-Parts & Printers tab.
7. Click on the Printer & Tray Selections Saved In… drop-down menu and select <Form> to save these
changes for all users.
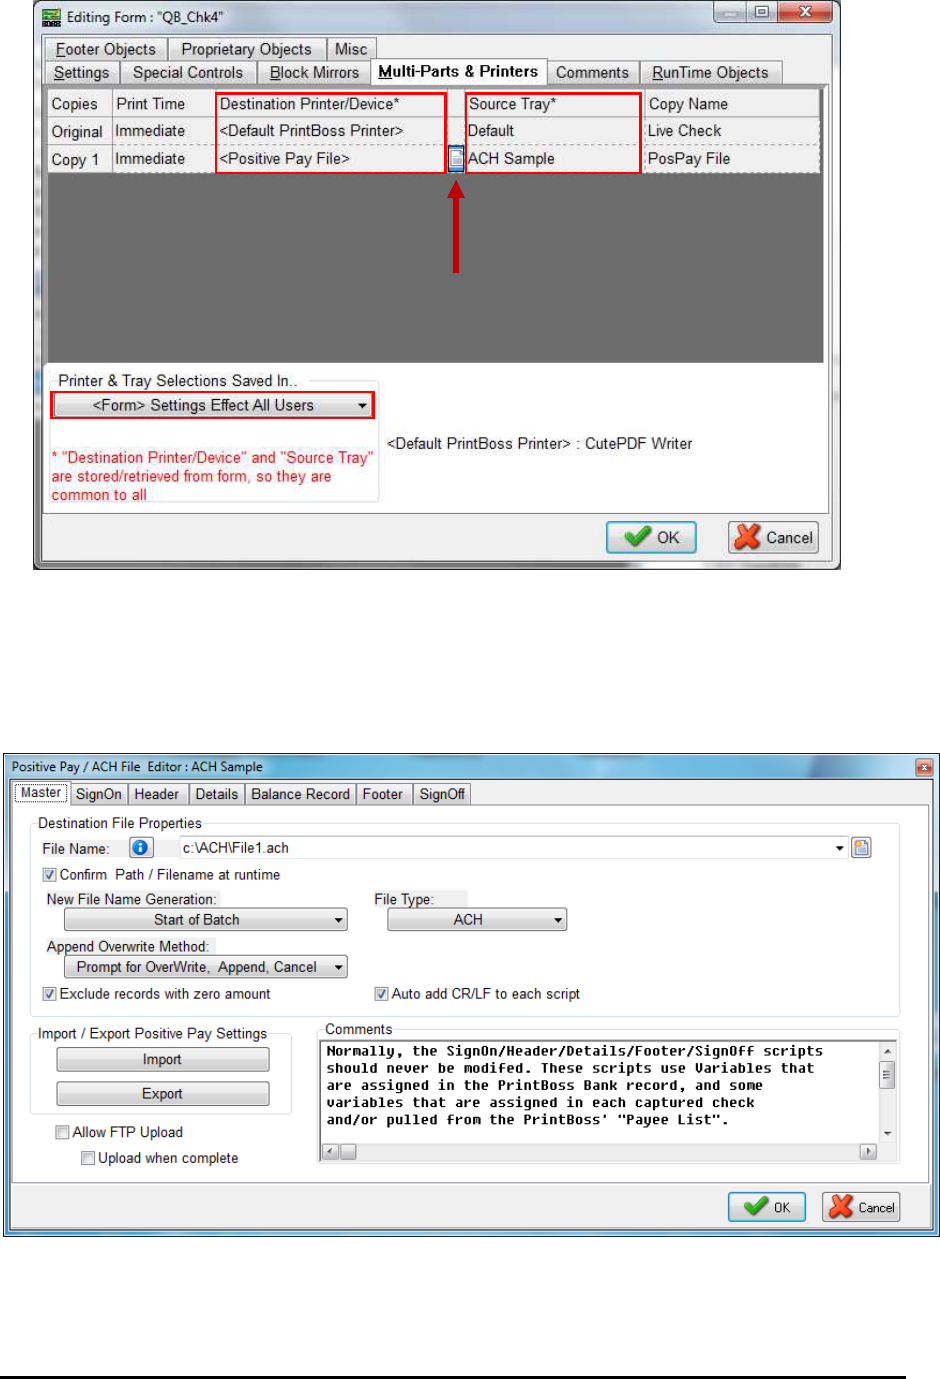
PrintBoss
145 Electronic Copy
8. Locate the new copy, click on the Destination Printer/Device drop-down menu, and select <Positive Pay
File>. This feature supports ACH files in addition to Positive Pay files.
9. Click on the Source Tray drop-down menu and choose ACH Sample. This is the NACHA file that comes
with PrintBoss.
10. Change the File Path and Name if needed.
a. Click on the page symbol to the left of the Source Tray for the <Positive Pay File> copy to open
the Positive Pay / ACH File Editor. The following is an image of the Master tab.
1. File Name – Set the destination path and file name for the ACH file in the File
Name field. The browse button at the end of this field can be used to navigate to
a location and will save the path when a file name is entered.
2. Confirm Path / Filename at runtime – Select this option to verify the
destination location or file name before PrintBoss saves the ACH file.

PrintBoss 146 Electronic Copy
Enterprise users typically use a dynamic naming convention instead of this
feature.
3. New File Name Generation – The default is to generate a new file at Start of
Batch. This is the recommended setting.
4. File Type – The file type should be set to ACH.
5. Append Overwrite Method – The default is Overwrite existing File. The
choices are:
a. Overwrite existing File
b. Append to existing File
c. Prompt for Overwrite, Append, Cancel
6. Exclude records with zero amount – This option is used when there are
overflow pages in the batch.
7. Auto add CR/LF to each script – This feature adds a carriage return to the end
of each script and should ALWAYS be checked for ACH.
8. Import – This feature is not used with ACH.
9. Export – This is feature is not used with ACH.
10. Allow FTP Upload – Only select this option when FTP has been setup for ACH. This
feature is only available when Security is enabled. See Chapter 21, FTP, for more
information. This is an Enterprise Only feature.
11. Upload when complete – Select this option to automatically upload the FTP file
once it is created by PrintBoss. Only select his option after FTP has been setup.
This feature is only available when Security is enabled. See Chapter 21, FTP,
for more information. This is an Enterprise Only feature.
12. Comments – Provides comments associated with the ACH file if desired.
b. The ACH Sample can be used in more than one PrintBoss Form. Contact Wellspring Support if
you need a different File Path or Name for each Form.
11. There are 7 tabs associated with the ACH File. The first 5 have been described previously in this
document. The last two are as follows:
a. Footer – The Footer tab contains fields for the “8” record(s) and apply specifically to a batch.
i. ACH Service Class Code – The information for this field is entered in the ACH
Definition tab of the PrintBoss bank record. The variable name is
{bACHSvcClasscode}.
ii. Batch Count – Generates the total number of entries for the preceding batch. The
variable name is {BatchCount}.
iii. ACH Batch Hash – This variable generates a value from the routing numbers entered for
each detail record in the batch. The value provides a check against inadvertent alteration
of data contents. The variable name is {ACHBatchHash}.
iv. Batch Amount – Generates the sum of all check amounts for the preceding batch. The
variable name is {BatchAmnt}.
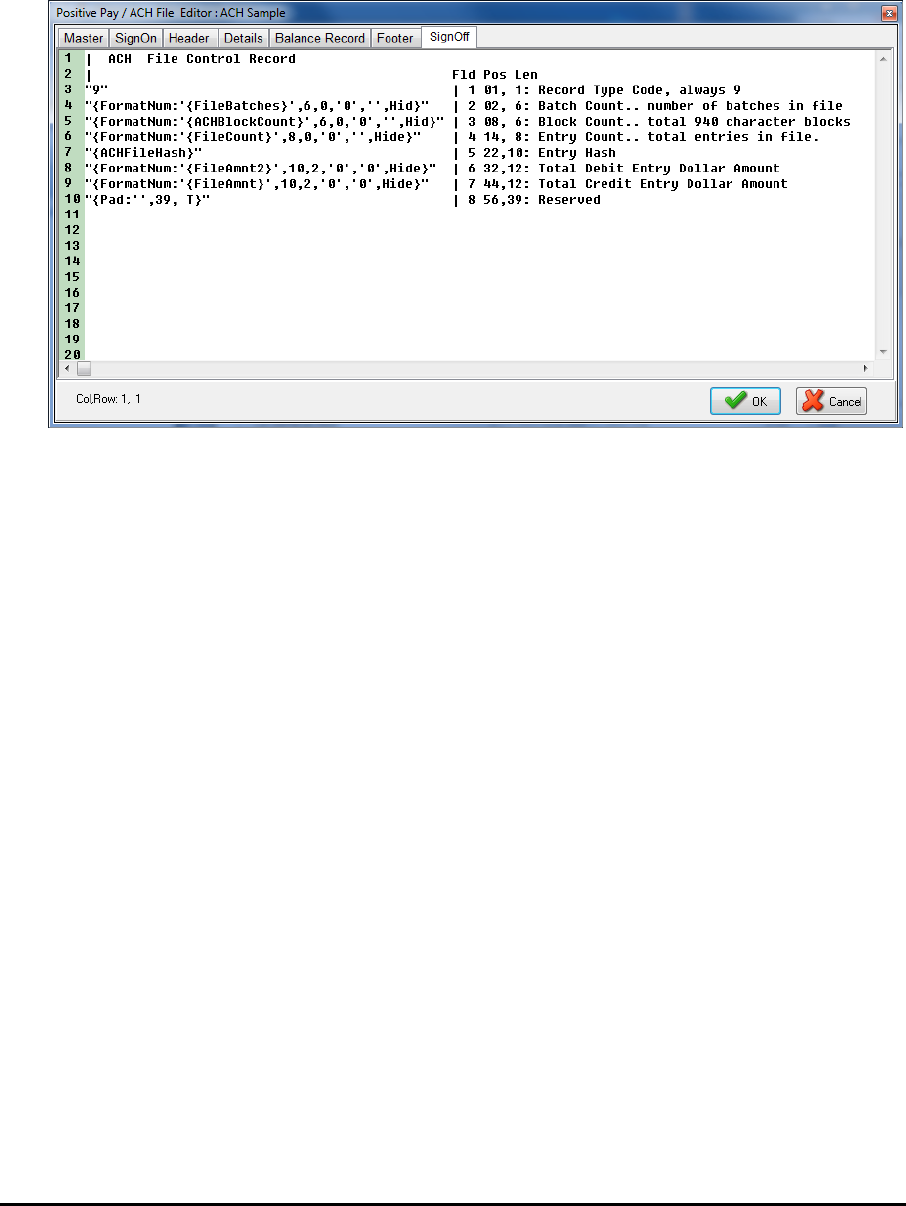
PrintBoss
147 Electronic Copy
v. ACH Company ID – The information for this field is entered in the ACH Definition tab
of the PrintBoss bank record. The variable name is {bACHCompID}.
vi. Originating DFI ID – The information for this field is entered in the ACH Definition tab
of the PrintBoss bank record. The variable name is {bACHOrgDFIID}.
vii. Batch Number – PrintBoss generates a sequential number for each batch in the file
beginning with 0000001. The variable name is {FileBatches}.
b. SignOff – The SignOff tab contains fields for the “9” record and applies to the entire file.
i. File Batches – Generates the total number of batches in the file. The variable name is
{FileBatches}.
ii. ACH Block Count – Generates the correct number of lines to create complete blocks of
10 lines or 940 characters. These appear as rows of 9 at the end of the file. The variable
name is {ACHBlockCount}.
iii. File Count – Generates the total number of entries in the file. The variable name is
{FileCount}.
iv. ACH File Hash - This variable generates a value from the routing numbers entered for
each detail record in the file. The value provides a check against inadvertent alteration of
data contents. The variable name is {ACHFileHash}.
v. File Amount – Generates the sum of all Debit and Credit check amounts in the file. The
variable name is {FileAmnt}.
12. Changes should not be made to the ACH file without consulting a Wellspring Software technician as these
variables are defined by NACHA.
13. Click OK to save changes to the Editing Form.
Additional setup may be needed in the Form including:
Setting up E-mail.
Assigning ACH fields in the Form instead of using the Payee List.
Adding Process Page commands to determine when to print the ACH file when live checks are included in
the print batch from the accounting system.
Please contact Wellspring Software’s Technical Support for assistance with additional Form setup
CREATING THE ACH FILE
The ACH file is created automatically during the print process. No further steps are necessary.
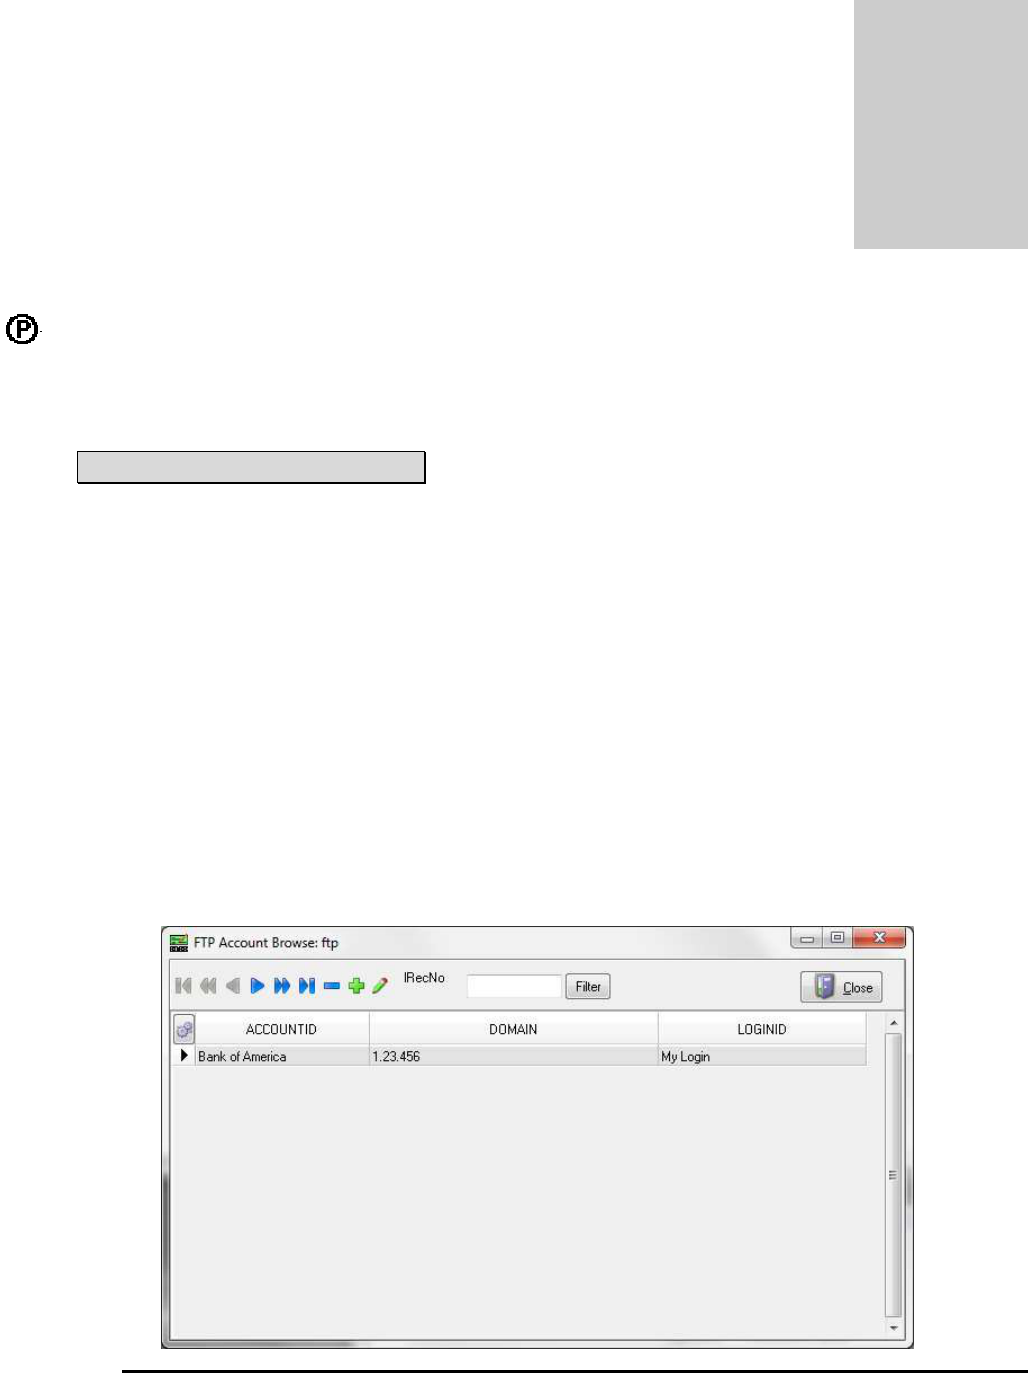
PrintBoss
148 Electronic Copy
Chapter
21
Chapter
20
FTP
FTP is a File Transport Protocol used to securely transmit files. The Enterprise edition of PrintBoss version 6.0 and
above includes the convenience of an FTP upload tool.
NOTE:
PrintBoss supports FTPS and beginning with version 6.03.1 SFTP.
SECURITY
There are 2 settings under the Basic User Rights tab on the Security Settings dialog under the Options menu in
PrintBoss. They are:
1. Allow FTP selection –The FTP tab is available on the bank record when this setting is selected.
2. Edit FTP List – The FTP feature is available under the Edit menu when this setting is selected.
Verify both settings are selected before proceeding with the FTP Setup.
FTP SETUP
FTP is setup under the Edit menu in PrintBoss as follows:
1. Open the PrintBoss Master Application.
2. Click on the Edit menu and select FTP Accounts.
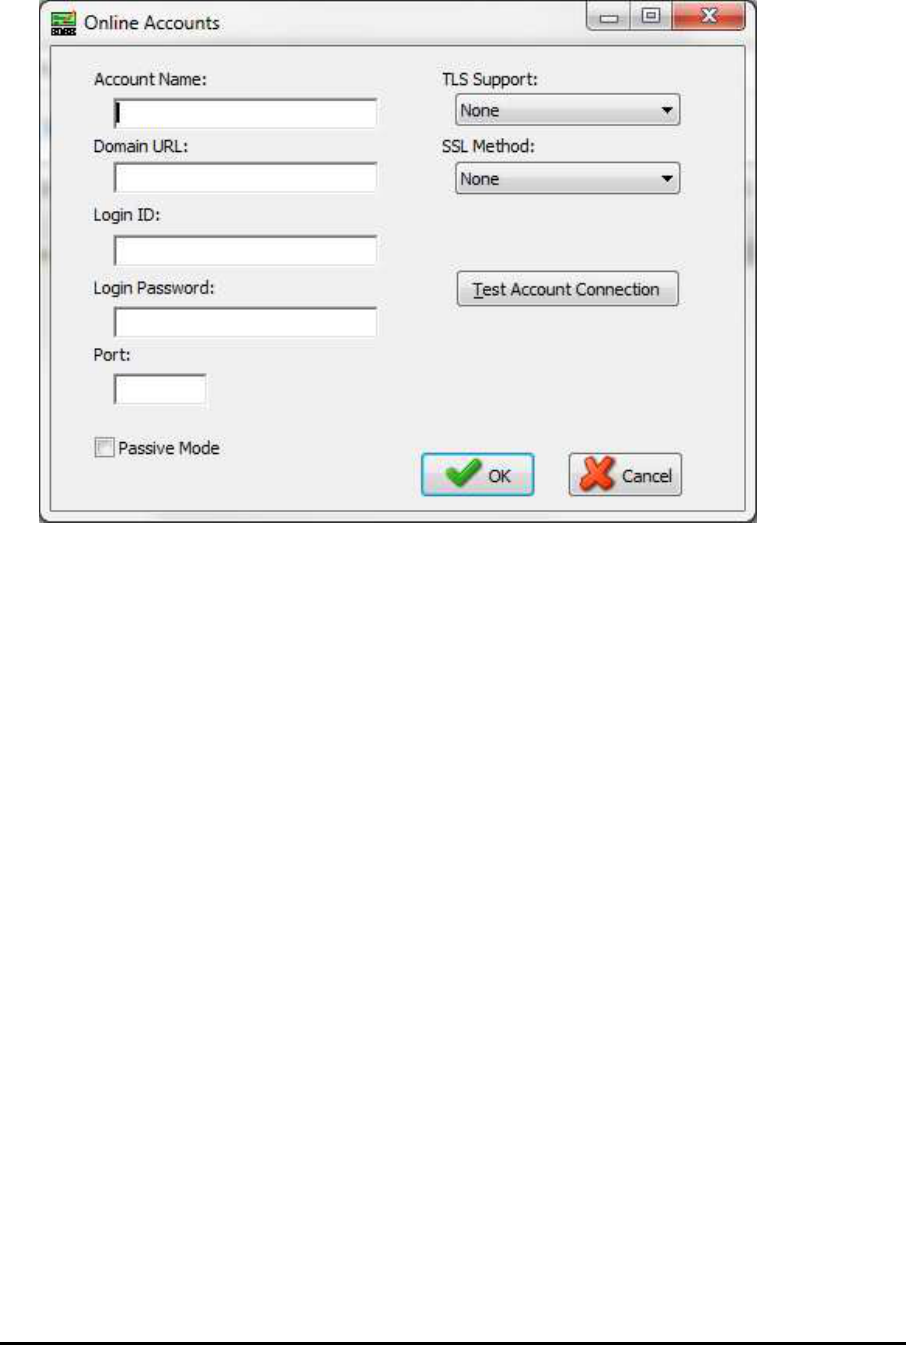
PrintBoss
149 Electronic Copy
3. Click on the + sign in the menu bar to add a new record. The Online Accounts window will open.
4. Fill in the left fields as follows:
a. Account Name – This is a user selectable field. Enter a descriptive name that will help you
recognize this account. For example, Trust Bank. This field holds up to 25 characters.
b. Domain URL – Enter the URL provided by the financial institution. This field holds up to 40
characters.
c. Login ID – Enter the Login ID provided by the financial institution. This field holds up to 74
characters.
d. Login Password – Enter the Login Password provided by the financial institution. This field
holds up to 30 characters.
e. Port - Enter the Port provided by the financial institution. This field holds up to 4 characters.
f. Passive Mode – Select if directed by the financial institution.
5. Select the TLS Support value provided by the financial institution if applicable.
6. Select the SSL Method provided by the financial institution if applicable.
7. Click Test Account Connection to confirm the setup is correct.
8. Click OK to save these changes.
BANK SETUP
FTP is associated with a file type in the PrintBoss Bank Record. A separate FTP account can be associated with
ACH, Positive Pay, or PS16 files.
1. Open the PrintBoss Master Application.
2. Click on the Edit menu and choose Bank List.
3. Select the desired bank record and click on the Edit Bank button in the menu bar.
4. Select the FTP tab.
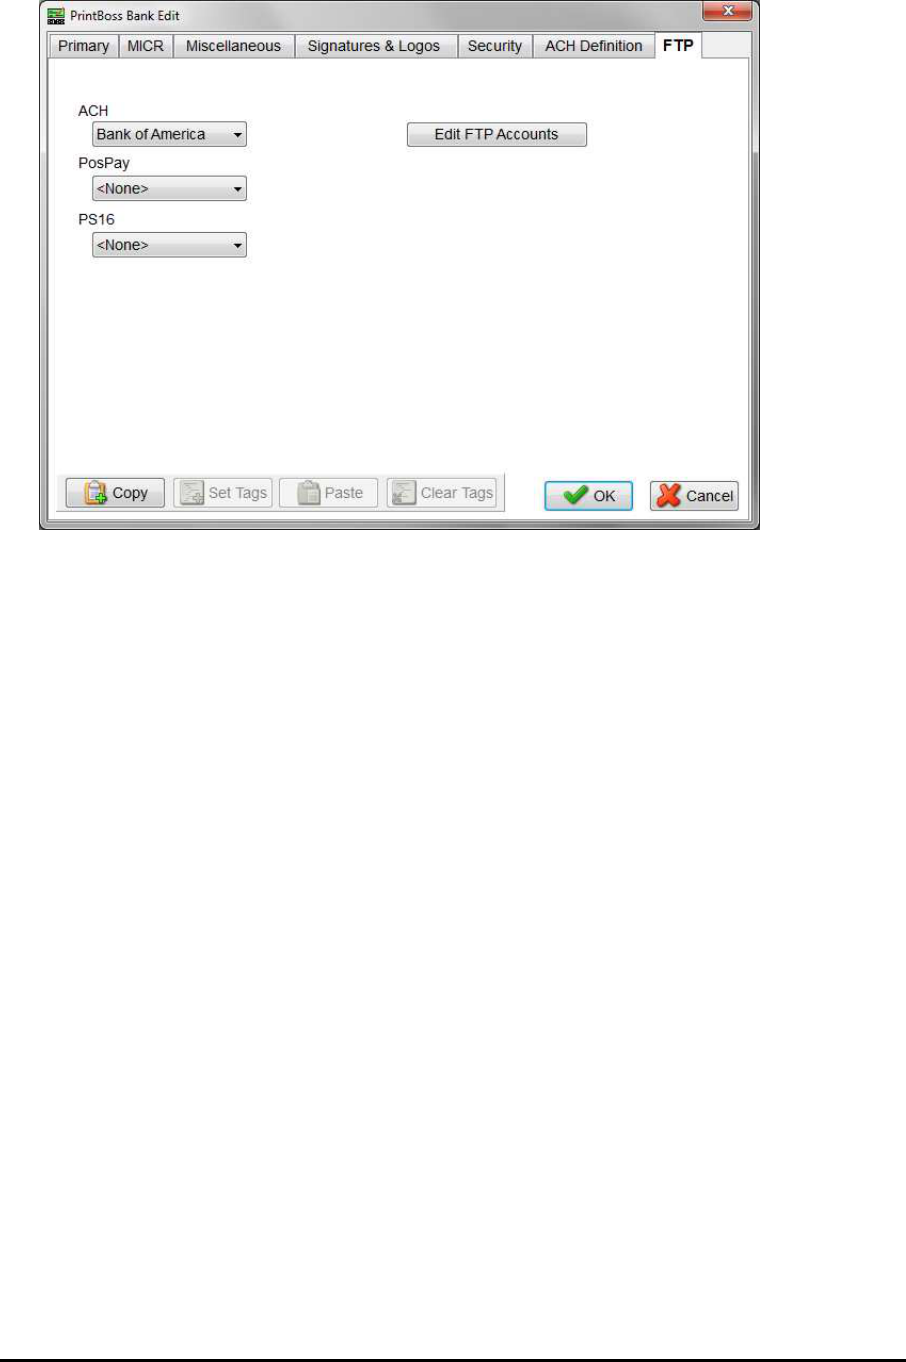
PrintBoss 150 Electronic Copy
5. Click the drop-down menu for one of the following file types:
a. ACH
b. PosPay (Positive Pay)
c. PS16
6. Select the appropriate FTP account.
7. A different FTP can be selected for each file type.
a. Use the Edit FTP Accounts button to immediately access the FTP Account Browse window to
make changes to one of the FTP accounts.
b. The FTP Account button will be grayed out if security to Edit FTP List is removed for the user
under Security Settings in PrintBoss.
8. Click OK to save these changes.
FORM SETUP
The PrintBoss Form needs to be setup to use FTP In addition to the Bank and FTP Accounts lists. These steps
should only be followed after a Positive Pay, ACH, or PS16 file has been setup on the PrintBoss Form.
See Chapter 19, Positive Pay or Chapter 20, ACH Setup for information on setting up a copy in the Form.
1. Open the PrintBoss Master Application.
2. Click on the Edit menu and choose Form Files.
3. Select the appropriate PrintBoss Form and click the Editor button. The Editing Form window opens.
4. Select the Multi-Parts & Printers tab.
5. Locate the <Positive Pay> copy and click on the page symbol to the left of the Source Tray column. This
opens the Positive Pay/ACH File Editor.
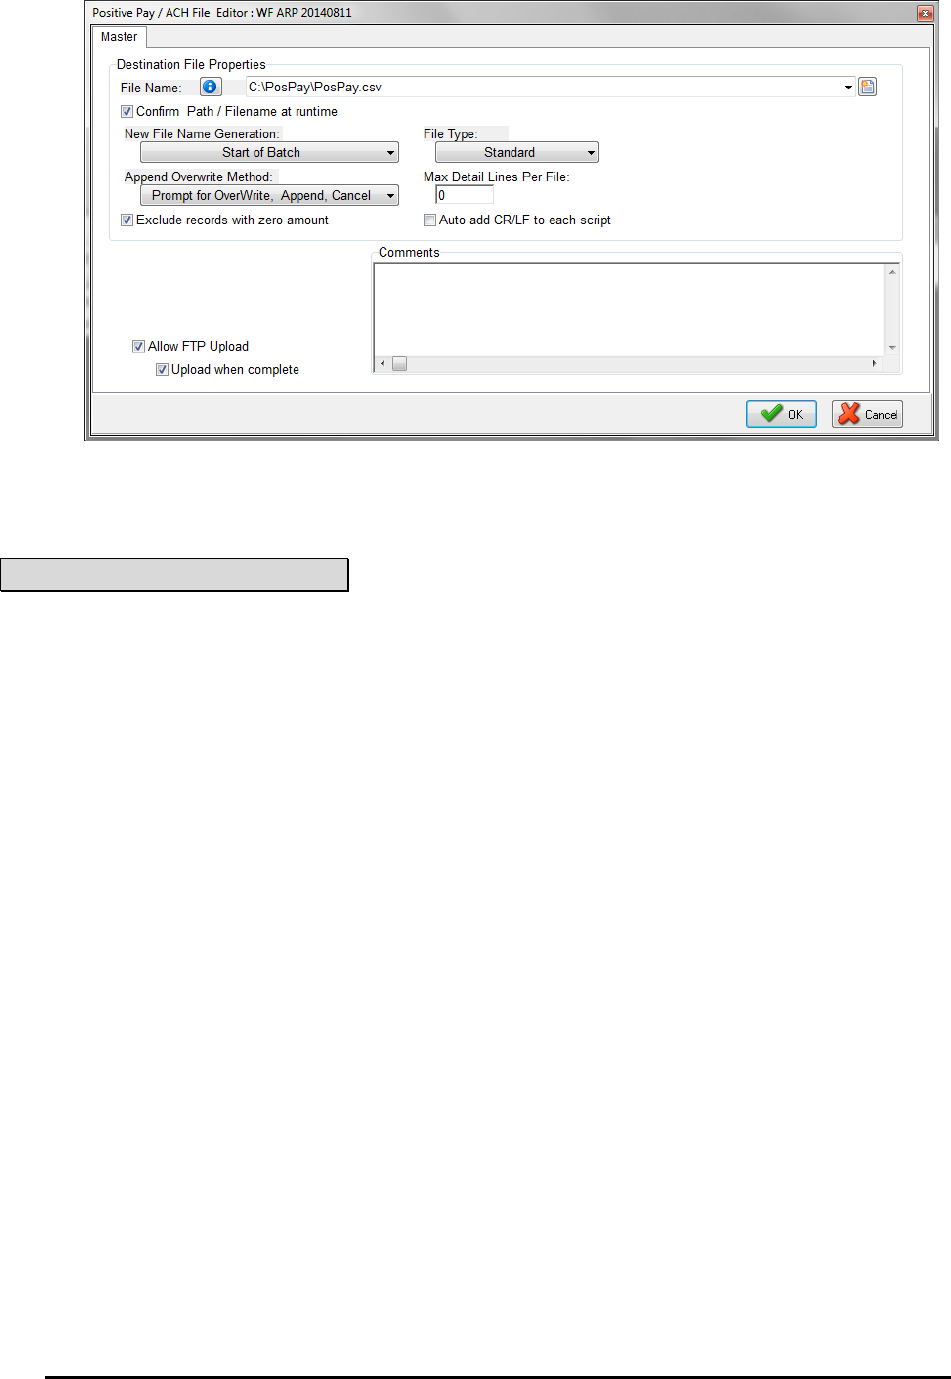
PrintBoss
151 Electronic Copy
6. Select ‘Allow FTP Upload’
7. If you would like PrintBoss to automatically upload the file once it is complete, also select the ‘Upload
when complete’ checkbox.
8. Click OK to save this change.
NOTE:
The ‘Allow FTP Upload’ and ‘Upload when complete’ checkboxes are not available unless an actual file is selected
from the Source Tray drop-down menu on the Multi-Parts & Printers tab of the PrintBoss Form. The <Embedded
in Form> selection will not work.
MANUAL UPLOAD OF COMPLETED FILE
The following are instructions to manually upload a completed file.
1. Open the PrintBoss Master Application.
2. Click on the Utilities menu and select FTP Uploader.
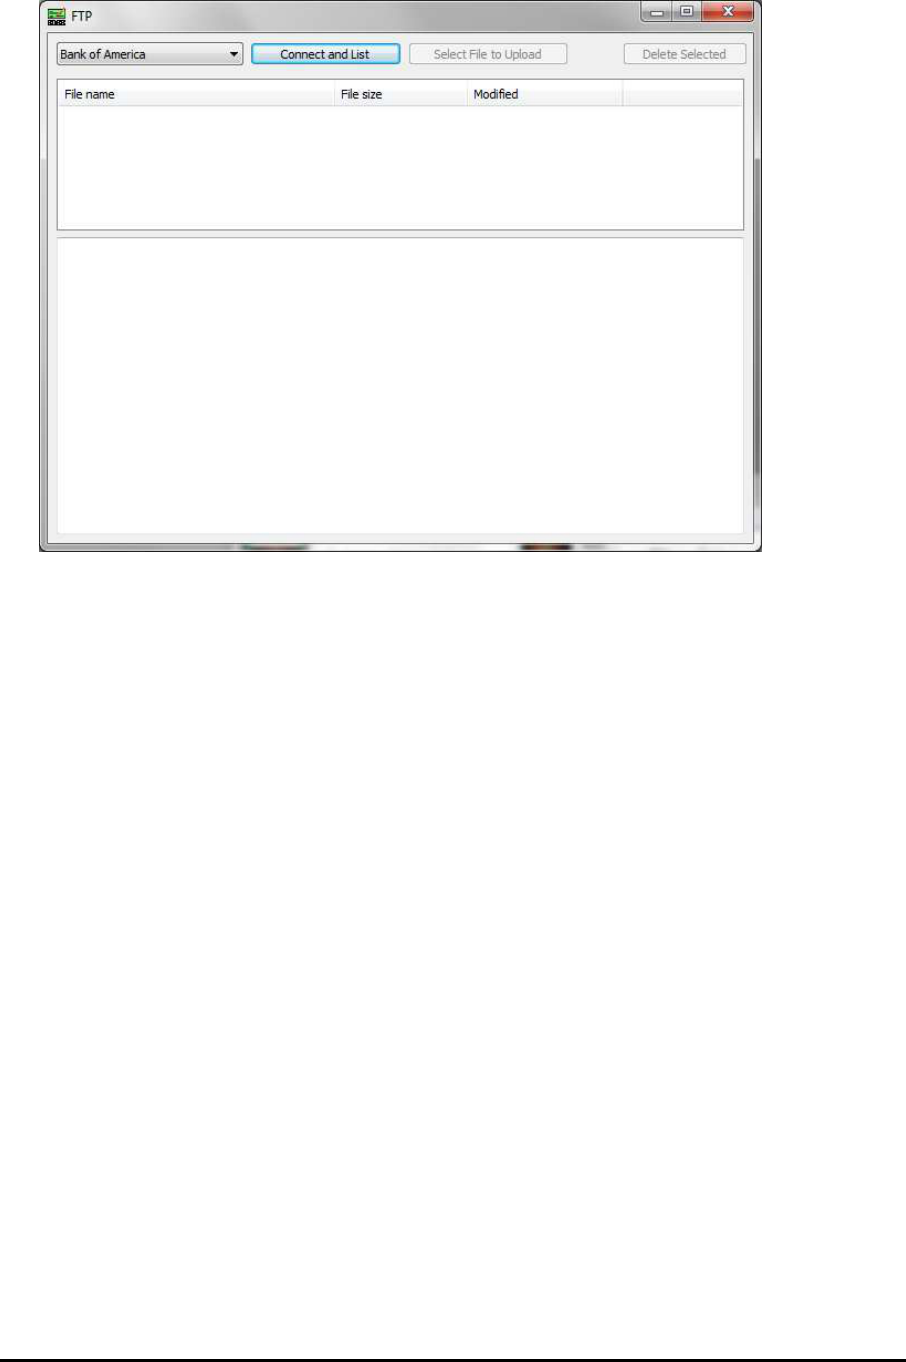
PrintBoss 152 Electronic Copy
3. Select an FTP Account Name from the first drop-down menu.
4. Click ‘Connect and List’. PrintBoss will provide a list of completed FTP files. These all have a ‘upl’
extension.
5. Select a *.upl file from the list. The file will only upload if the Account Name in the file matches the
Account Name selected from the first drop-down list on the FTP Loader. For example, the image above
displays ‘Bank of America’ as the Account Name. The selected *.upl file must have been created with the
‘Bank of America’ account name in order to upload.
6. An ‘Upload Complete’ message will appear in the lower left corner of the FTP window when the file
finishes uploading. The actual file name may be hidden in any message returned from the bank if the
bank’s policy is to hide this information. Do not be concerned if the file name does not display.
7. Close the window by clicking on the red button with the white ‘x’ when finished.
PrintBoss
153 Electronic Copy
Chapter
21
Chapter
21
WORKFLOW/DOCUMENT APPROVAL PROCESS
Workflow allows companies to assign approvers to accept or decline checks. Checks that are not declined move on
to the next approver. The last person in the process is the person who prints the checks. Typically, the person who
generates the checks is also the person who prints the checks and handles the declines.
NOTE:
We suggest ‘Auto-Archiving’ should be set to ‘None’. Copies should be set to ‘Batch’. This will prevent the batch
from being overwritten as it flows through the approval process. You may also set Auto Archiving to Delete after a
certain number of days. If you choose the latter, make sure the number of days will allow for all the approvers to
view the checks.
WORKFLOW SETUP
1. In ‘Multi-Parts and Printers’, set all copies to Batch.
a. Open PrintBoss
b. Click on the Edit menu and select ‘Form Files’.
c. Locate your Form and click the ‘Editor’ button.
d. Locate Multi-Parts and Printers.
e. Click in the ‘Print Time’ column for each copy and select ‘Batch’ from the drop-down menu.
2. Select the ‘Run Time’ section.
3. Add a script anywhere on this page.
a. Ex: #AssignWorkflow workflow, ">Jack,Logan,Mary”
4. Click ‘OK’ when you are finished.
You my also add more complex routines. The following example uses dollar limit in addition to approver names:
#AssignWorkflow workflow1, ">wsuser" |by default, everything goes here.
#If[[>, “{DocAmnt}”, 100] |all documents with DocAmnt>100
#Assign Workflow, workflow2
#Endif
#If [>,"{DocAmnt}",500] |all documents with DocAmnt>500
#Assign workdflow, workflow3
#ENDIF
#If [>,"{DocAmnt}",1000] |all documents with DocAmnt>1000
#Assign workdflow, workflow4
#ENDIF
#AssignWorkflow workflow2, ">James" |everything >$100 goes this route

PrintBoss 154 Electronic Copy
#AssignWorkflow workflow3, ">ceo,Jane,wsuser" |everything >$500 goes this route
#AssignWorkflow workflow4, ">ceo,WSUser" |everything >$1000 goes this route
In the above example, all checks less than or equal to $100 are automatically approved. Then two users approve
everything above $100; the CEO, paulam, and wsuser approves all checks above $500, and finally, only the CEO
and WSUser approves all checks above $1,000. These are just examples. You may arrange your dollar amounts
and approvers to meet your needs.
TRAY UTILITY
In order to alert each approver that the checks are ready for approval, PrintBoss uses a Tray Utility. The following
are instructions to setup the Tray Utility.
1. Open PrintBoss.
2. Click on the Options menu and select ‘Configuration’.
3. Check ‘Launch PrintBoss Windows Tray Utility on Setup’ at the bottom of the Settings tab under
Workflow. This will auto launch the ‘PrintBoss Tray Utility’ the next time you log into your computer.
4. Click on the button at the end of the Windows Tray Utility to launch the Tray Utility now. The user name
will populate the ‘WinUser monitoring’ field.
5. PrintBoss will alert the user when a batch is waiting.
6. Click OK to close the PrintBoss Configuration Dialog.
The Tray Utility has several useful features:
Monitor when a batch is ready for approval.
Click on the File menu and select ‘Launch PrintBoss’ or use the button on the front of the utility to launch
PrintBoss.
Click on the Edit menu to select Configuration. The ‘Scan Interval’ is set in minutes. A ‘Reminder’ can be
set in minutes as well.
Verify the ‘Run PrintBoss Tray Utility on Windows startup’ is selected. You may want to remove this
checkbox if you will be out of the office.

PrintBoss
156 Electronic Copy
Chapter
21
Chapter
22
CUSTOM INTERFACES
PrintBoss can be configured to work with almost any Windows package that prints documents if one of these
conditions are met:
1. the printing operation is able to select the PrintBoss printer driver or
2. the document can be printed as a text file.
If the document is a check, the next question is, "How is the check number generated?" If the accounting software
can send the check number, then PrintBoss will use it. If this is not possible, the check number can be set in the
PrintBoss Bank List record. Once the checks have been printed and the print job received by PrintBoss, the form
selection is made. The PrintBoss form contains instructions on how to process the incoming data. The following is a
typical setup using the PrintBoss printer driver and the PrintBoss Form/Bank Request List to determine the bank and
the form combination to be used.
PRINTING TO PRINTBOSS PRINTER DRIVER
Now that a custom interface method is established, there are still a few questions that must be answered. The first is
how the check number will be determined when the document is a check. If available, it is preferred that the check
number from the accounting software. If this is not possible, the check number can be set in the PrintBoss Bank List
record.
See Chapter 8, Bank Accounts – Next Check Number.
When a print job is received, a fundamental decision needs to be made by PrintBoss – what PrintBoss form should
be used to process the incoming data? The following steps walk through a typical setup using the PrintBoss Printer
Driver and the PrintBoss Request List to determine the form and bank combination used by PrintBoss.
SETUP
1. Open the PrintBoss Master Application.
2. Click on the Options menu and select PrintBoss Driver Settings.
3. Set the Capture Mode to Always Capture.
4. Select the Block all Non-captured pages option if it is available. This only appears in older versions of
PrintBoss.
5. Click OK.
6. Click on the Options menu again and select Configuration.
7. Select the Request List determines Form/Bank option under the Always Capture Settings section.
8. Click OK.
CREATE A PRINTBOSS FORM FILE – SEE CHAPTER 9 FOR MORE INFORMATION
1. Click on the Edit menu and select Form Files.
2. Click the Create button to create a new Form.

PrintBoss
157 Electronic Copy
3. Enter a File Name of not more than 8 characters for the form and click OK. This new form should be
highlighted in the Form Select list.
4. Click the Editor button.
5. Verify Copies is set to 0 on the Settings tab and the Auto-Archiving Completed Records is set to None
(Manual). This will make it easier to test the interface. When everything is correct, these settings may be
changed.
6. PrintBoss Enterprise users may choose to allow PrintBoss to capture graphics from the accounting
software. All graphic elements (lines, boxes, shading, logos, etc.) are automatically stripped out by the
standard edition of PrintBoss. Select the Text AND Graphics are captured option under Text / Image
Capture Mode on the Settings tab to accept graphics.
DEFINE A BANK – SEE CHAPTER 8 FOR MORE DETAILS
1. Click on the Edit menu and select Bank List if this document requires bank account information.
2. Create a new bank record or edit an existing record.
3. Set the Check Number variable on the MICR tab to {CChkNo} if the check number will be passed from
the accounting software. Otherwise, set it to {BChkNo}. The bank account information will only appear
on the printed document if these fields are referenced in the Form, usually through #Text commands.
DEFINE A FORM / BANK REQUEST LIST – SEE CHAPTER 18 FOR MORE DETAILS
1. Click on the Options menu and select Form / Bank Request List.
2. Add a new entry.
3. Enter a Prompt. This should be something the user will understand to represent the form and bank
combination.
4. Select the custom form you created from the drop-down menu of the Form field.
5. Select the appropriate bank for the Bank field (or NONE if this is not a check).
6. Repeat as often as necessary to create a list of all the required form and bank account combinations. DO
NOT create more than one entry for the same Form.
PRINT A TEST CHECK
1. Return to the accounting software and print a check (or another document) to PrintBoss. Make sure the
PrintBoss Printer Driver is selected as the destination printer for the accounting software. The Request List
should pop up.
2. Choose the appropriate Form / Bank record.
3. Edit the Form / Bank Request List conditions to automatically pick the correct entry in the future.
See Chapter 18, Form / Bank Request List.
EDIT THE PRINTBOSS FORM – SEE CHAPTER 9, FORM FILES, FOR MORE DETAILS
It is easier to make final adjustments to the Form File once you print data to the work file.
1. Click on the File menu and select Open Document Work Files.
2. Select the work file for your form and click the Browse button.
3. Select a document in the work file and click View.
4. Double click any object in the View to see its coordinates. Edit the form as necessary.
5. Assign any text objects that will be moved or reformatted. Assign at least the following variables.
a. DocAmnt
b. DocNo
c. DocRecip
d. DocDate
See Chapter 23, Capturing and Assigning Text.
Hints
It is usually easier to blank out a second advice that may be printed from your accounting software and use the
PrintBoss Block Mirrors function instead.
RegionMove commands are normally used to align the advice and check sections to print properly. For this reason,
the order the source check is received (Advice-Check, Check-Advice, Advice-Check-Advice) is not important since

PrintBoss 158 Electronic Copy
it can always be arranged to fit PrintBoss' standard check stock. It is better to use a separate Region Move command
for each section for flexibility in positioning data.
It is relatively easy to capture fields on the check to assign variables and place each variable on the final document
with #Text commands. A common exception is the advice detail that can be placed accurately with the RegionMove
command.

PrintBoss
159 Electronic Copy
Chapter
23
CAPTURING AND ASSIGNING TEXT
When documents are processed through PrintBoss, there are many times when text on the document from the
accounting software is captured and formatted or specifically placed on the PrintBoss Form before it is printed.
For example:
The check number in a check is added to the MICR line.
The bank account data on a check is used to automatically select a bank record in PrintBoss.
An E-mail address is captured and used in sending the document.
The value of a check is examined to determine the appropriate signature(s) to print on the check.
Distribution methods are defined so PrintBoss can conditionally e-mail, or print.
This chapter explains the three methods for assigning data. These methods are fundamental to many tasks in Form
design. All the methods assign the value of the captured text to an arbitrary variable name in PrintBoss. The
variable name can be used in various ways by enclosing it in braces and adding it to expressions in a PrintBoss
Form. For example:
#Text 7, 1, Arial/14/B, “{DocNo}”
This expression prints the document number in the top right corner of the page, assuming it is captured and assigned.
METHOD 1: PRINTBOSS TRIGGER (USE OF PB#INFO ….)
The PrintBoss Trigger is only used for passing four very common pre-defined variable names, DocNo, DocAmnt,
DocRecip, and DocMisc, to PrintBoss. It can ALSO communicate the name of the Form and the Bank Code for
PrintBoss to use. This method requires the ability to edit the accounting software report content in order to properly
add the PB#INFO expression. The syntax follows:
PB#INFO <Form>, <Bank>, <DocNo>, <DocAmnt>, <DocRecip>, <DocMisc>
The PB#INFO MUST BE CAPITALIZED. Delimiters such as quotes, double quotes, or brackets are not required,
but are recommended for some of the variables to avoid confusion when a comma occurs in the data, such as the
thousands separator in the amount.
Only the first parameter, Form, is required. So, the simplest use of this command might be:
PB#INFO MYFORM
The expression should be on a line all by itself, though it can be any size font and can occur anywhere on the page,
though we recommend the trigger be placed in a Header or Footer so it prints on every page if the document flows to
additional pages. The trigger prints as "View Only" in newer versions of PrintBoss. The trigger is removed at
printing and does not appear on the final printed document.
Here is an example of a line that would print from the accounting software:
PB#INFO MyChk1, “Checking 1”, “100456”, “1,456.23”, “Acme Electric”, “527-0012”

PrintBoss 160 Electronic Copy
Of course, this is the expression after it is evaluated and all the variables are replaced with data. The evaluation
occurs after the report is printed from the accounting software. The actual content might be similar to the following,
although the actual syntax and field names are dependent on your report writer:
"PB#INFO MyChk1, “+
“[“+ dbf.BankCode + “],” +
“[“+ dbf.CheckNo + “],” +
“[“+ dbf.Amount + “],” +
“[“+ dbf.Payee + “],” +
“[“+ dbf.VendorEmail + “],” +
The five assigned variables used in this method can be referenced in any PrintBoss script.
METHOD 2: EXPLICIT VARIABLE ASSIGNMENT WITHIN THE
ACCOUNTING SOFTWARE REPORT
Define a field in the source report to pass the assignment to PrintBoss if you have the ability to edit the accounting
software report. It is important that the variable is just ONE field. This usually means you must create a variable in
the source report that uses a combination of text and database fields. The resulting field must be similar to the
following example:
PB#Assign EmailTo, Orders@WellspingSoftware.com
This is the field after it is evaluated and the text and database fields are replaced with data. The actual content might
be similar to the following, although the actual syntax and field names are dependent on your report writer:
"PB#Assign EmailTo," + CustomerDBF.ContactEmail
This expression must be on a line all by itself, though it can be any font size or color and occur anywhere on the
page. For example, a series of assignments can be printed very close together using a 4-point font. Once PrintBoss
sees each line, it will automatically assign the value to the suggested variable name and remove the expression
before printing.
The variables assigned in this method can only be referenced in the RunTime Objects section of PrintBoss when
Pre-Process Assignments is checked on the Special Controls tab of the Form.
METHOD 3: CAPTURED FROM THE PRINTED DOCUMENT BASED
ON COORDINATES
This method requires the value that is to be captured and assigned by PrintBoss is displayed somewhere on the
source report. PrintBoss can blank out the data after it is captured (if desired).
Verify the value appears in the document sent by the accounting software before setting up the assignment. This
may entail opening the accounting system's report writer, finding the field in its databases, and inserting it
somewhere on the report. It is very important that the data ALWAYS appears at the same location from page to
page. This usually means inserting the field into the Header or Footer sections of the report.
Print a document to PrintBoss once the value appears in the report. The PrintBoss Form must be clearly defined.
See the Custom Interfaces chapter for more information if this is not clear.
After PrintBoss has received a print job, open PrintBoss and select FILE / OPEN DOCUMENT WORK FILES.
Select the desired work file and click the Browse button. There may be only one document in the work file, but that
is all that is needed.
1. Select a document and click View.
2. Right click anywhere in the view and select View Raw Capture. You are now only viewing the actual text
printed from the accounting software.
3. Locate the text field on the screen containing the desired captured value.
4. Double click on the field to open the Captured Text Command Properties dialog.
5. Select the Click to Assign to Variable bar in the top right of the dialog.

PrintBoss
161 Electronic Copy
6. Replace ReNameMe in the Variable Name field with your own variable name. For example: MyVar
7. A description of some of the options follows:
a. Capture Coordinates – This section allows you to set a range for the capture coordinates to account for
small deviations in the location of the data.
i. Some reporting engines (such as the latest Crystal Reports) tend to break up the text fields into
smaller contiguous fields. A good practice is to click the ‘+/-‘ button for the Horizontal field to
change the coordinate range. This toggle button changes from +/- to ‘to’. Set the ending
coordinate far enough to the right to pick up the longest imaginable value without overlapping
unrelated fields.
ii. The "to" range is often used in conjunction with Add together fields in horizontal range.
b. Add together fields in horizontal range – Select this option when the data field is fragmented. Use
this in conjunction with changing for coordinate range from +/- to "to".
c. Trim choices applied after segments appended – This option is only available after Left Trim, Right
Trim, or both are selected along with Add together fields in range. The trim is not applied until after
the fields are appended.
d. Make only 1 assignment per capture field – This option is used when capture fields overlap more
than one data source. PrintBoss captures the first data that occurs within the capture coordinates.
e. Capture Raw Text Objects Only – This option is often checked to allow PrintBoss to only capture
Raw Text objects and not graphics or added test.
f. Left Trim and Right Trim – These options removed leading and trailing spaces.
g. Upper Case – This option converts captured text to Upper Case. Capture text can also be converted to
Upper Case by using a #Text command.
h. Blank Out After Capture – Select this option to hide the raw data after it is captured. The data can
be display elsewhere on the Form by using a #Text command.
i. Substr of Value – Select a starting character in the field and a length if the field is actually a long
string and you only need to use part of the data.
8. Click OK when you are finished assigning properties to your variable. Variables assigned in the View are
automatically inserted at the top of RunTime Objects tab in the Form.
9. Close the Properties dialog.
10. Right click on the raw view and deselect View Raw Capture to return to the formatted view.
11. Right click anywhere on the View and choose Insert an Object / Text if you would like to add the
captured data to a different location. The Text Command Properties dialog opens.
12. Enter your variable in the Text field enclosed in brackets. For example: {MyVar}. You may change
properties and add conditions as needed. Commands added to the View are automatically inserted at the
end of Footer Objects tab in the Form.
13. Click OK when you are finished.
14. Close the View when you are finished and click Yes to save changes.
The variables assigned in this method cannot be referenced in RunTime Objects of PrintBoss unless Pre-Process
Assignments is selected on the Special Controls tab of the Form. Assigned variables are not always printed.
Sometimes they are used for the Email functions of PrintBoss.
EXAMINING ASSIGNED VARIABLES
It can be very helpful to review a list of all the variables that have been assigned in a Form. Right click on a View
from either the Form Editor or the work file Browser and select Display Assignments. The Form Assignments dialog
opens. The assignments that are currently defined will show up grouped by category. Note that some of the
categories such as E-mail Fields have variables that may not be assigned. They are listed because they are pre-
defined and will be used in a specific way by PrintBoss if they are assigned.
View variables assigned in a specific script by clicking on the plus sign in front of Assignments made in form. The
subcategories will identify where the variables are assigned, such as Assigned in Form’s Runtime Section or
Assigned in Captured text. Navigate to the designated script or back to the accounting software report (in the case of
Captured text) to adjust these assignments.
PrintBoss
163 Electronic Copy
Appendix
A
APPENDIX A: PRINTBOSS BANK LIST
The following detail describes the fields on the tabs of the Bank List. Rarely will all of the fields in a bank record be
used. Each field in the PrintBoss bank record can be referenced in the PrintBoss form as a variable. The data in a
field will not be used unless the PrintBoss Form references the associated variable. You only need to reference the
fields you want to use. Place and hold your cursor over a field in the PrintBoss Bank Edit window to view a pop up
indicating the field's variable name. Variable names are NOT case sensitive. A #Text command is typically used
to reference a variable in a form or the variable may be used as part of a Condition.
See Chapter 9, Form Files.
One of the fields that is required is the Bank Code. Enter the exact name used for this account in the accounting
software if your accounting software can print data that can be used for a bank code (see the Installation Notes
printed during the PrintBoss installation). This code is used to synchronize your accounting software with
PrintBoss. Do not leave the Bank Code field empty.
NOTE:
PrintBoss prompts the user to select an account from a list when printing checks from accounting software that can
print data used for a bank code when no entry in the PrintBoss list matches the code from the accounting software.
A check box in the lower right of the prompt indicates PrintBoss will update the selected bank code to match the
bank code sent from the accounting software. This box is checked by default.
Follow these steps to view the tabs:
1. Click on the Edit menu on the main PrintBoss window and select Bank List.
2. Select a Bank Record (any line in the list) and click the Edit Bank button.
The PrintBoss Bank Edit window opens on the Primary tab.
Primary
This tab contains the company and bank information printed on the checks. The Next Check Number field is usually
not relevant. Please check the Installation Notes specific to the accounting software to determine if this field should
be used.
BANK CODE
This field identifies the desired bank account. Either the accounting software or the Request List identifies the
appropriate bank account by matching this code. PrintBoss requires an exact match of the database code with the
code passed from the accounting software (though it is not case sensitive) to automatically select the bank account.
There is an option in PrintBoss to allow Partial Matches. This is not recommended but is available for special cases
– usually legacy PrintBoss installs. To activate this setting, navigate to the main PrintBoss window and click on
OPTIONS / CONFIGURATION. Select the Internal tab. The name of the setting is Method of matching a Bank
Code and is found near the bottom of the screen. Change the setting to Allow Partial Match of Bank Code that
follows colon:. Once this is selected, the Bank Code must match exactly up to the colon, if a colon exists. The
PrintBoss 164 Electronic Copy
match is not case-sensitive. Following the colon, there must be a character-by-character match with the PrintBoss
Bank Code until all characters in the Bank Code are used. The following chart illustrates successful matches:
Bank Code in PrintBoss Bank Code from Accounting System Match
Mai
n Checki
ng
Main
Checking
Yes
Main Checking Main Checking:ABC Yes
Main Ch
ecking
Main Checking:XYZ
Yes
Main Checking Main Check No
Main Check
ing:A
Main Checki
n
g
No
Main Checking:A Main Checking:ABC Yes
Main C
hecki
n
g
:A
Ma
in
Checking:
X
YZ
No
Notice the first three scenarios are all a match for PrintBoss. If there are bank codes that are very similar, set the
Configuration / Internal setting to Enforce Exact Bank Code Match.
There may be an instance where more than one account with the exact bank code is passed from the accounting
software, such as multiple payroll accounts for the same company. In this case, check the box labeled Allow for
Selection when multiple Bank Codes match on the Internal tab of the Configurations Dialog. This box is found in
the Bank Application Properties section. Enabling this check box alerts you to duplicates and possible mistakes
even if you do not expect to have identical bank accounts.
The variable associated with the Bank Code field is:
Field
Name
Variable Name Additional Description Length
Bank
Code
{BCode}
Code used to define record. This should match the
bank name in yo
ur accounting
s
oftw
are.
30-60
ALIAS
PrintBoss can work with more than one accounting software package using the same bank account, but the
accounting software packages may need different Bank Codes. Instead of entering all of the information twice, you
may use the ALIAS option. The Alias option allows two different Bank Codes to be used with the same bank
account. This option will only work if both accounting packages use the same variable for the check number (see
the Installation Notes printed during the PrintBoss installation for each accounting software package). If the check
number variable must be different, two separate bank list entries need to be created in the PrintBoss bank list. An
Alias will use one entry within the PrintBoss Bank list. This is important when considering the purchase of
additional Bank Modules.
See the MICR section later in this chapter for more information about the check number variable.
BANK PROMPT
The Bank Prompt provides a user-friendly definition for the account. This field is often used to give the account a
nickname. It should not be left blank, but it can be filled with the same value as the Bank Prompt field. The
variable associated with the Bank Prompt field is:
Field
Name
Variable Name Additional Description Length
Bank
Prompt
{BPrompt}
Name given for user recognition. PrintBoss will
automatically copy the information entered in the
Bank Code
f
iel
d
whe
n thi
s f
ield is left blank
25
BANK INFORMATION NORMALLY PRINTED ON CHECK
Enter the bank information that should be printed on the check. This does not need to match the information in the
accounting software database. Leave a field blank if it is not needed. There are some interfaces that do not use the
bank information from the bank list. See the Installation Notes that were printed during the PrintBoss installation or
the Comments tab of the Form Files Editor for more detail.
PrintBoss
165 Electronic Copy
The variables associated with the fields in the Bank Information section are:
Field Name Variable Name Additional Description Length
Bank Name {BName} Name of bank 40
Bank Addr
ess 1
{BAds1}
Add
r
ess L
i
ne
1 of
b
ank (usually city, state)
40
Bank Address 2 {BAds2} Address Line 2 of bank (often left blank) 40
Bank A
ddres
s
3
{BAds3}
Addr
ess Li
ne 3 of ban
k (often left blank)
40
COMPANY INFORMATION NORMALLY PRINTED ON CHECK
Enter the company information you would like printed on the checks. This does not need to match the information
in the accounting software database. Leave a field blank if it is not needed. There are some interfaces that do not
use the company information from this list. See the Installation Notes printed during the PrintBoss installation or
the Comments tab of the Form File Editor for more detail.
The variables associated with the fields in the Company Information section are:
Field Name Variable Name Additional Description Length
C
o
mpa
ny N
a
m
e
{BCName}
Company Name as it
i
s
to
appe
a
r on th
e checks
60
Company Name 2 {BCName2}
2nd Company Name as it is to appear on the checks.
This
field is optional
60
Company Address 1
{BCA
ds1}
Company
Addres
s Line 1
40
Company Address 2 {BCAds2} Company Address Line 2 40
Company Address 3 {BCAds3}
Company Address Line 3. This may be used for a
tele
phone num
ber,
fa
x number, or e
mail a
ddress
40
Company Address 4 {BCAds4}
Company Address Line 4. This may be used for a
telep
hone number, fax
n
umber
,
or
ema
i
l
address
40
FRACTIONAL CODE
The fractional code is the group of bank numbers that is often printed in a small font near the bank information on
the check or near the check number. Not all banks require this information. Often, this information is represented
as a number over a second number, similar to a fraction. PrintBoss places the first number next to the second with a
slash ( / ) between. This method is perfectly acceptable to the American Banking Association and Canadian
Payments Association.
Contact your bank if you do not know the fractional code. The variable associated with the Fractional Code
field is:
Field Name Variable Name Additional Description Length
Fractional Code
{BFr
ac}
Fract
ional
Code
20
NEXT CHECK NUMBER
This field is only relevant for accounting software that does not pass a check number to PrintBoss, such as
QuickBooks. It is seldom used except for QuickBooks/Quicken. PrintBoss will increment this number by 1 for
each document that is processed by PrintBoss with this bank account, even if this field is not used. PrintBoss will
pop up the check number for the bank record during printing when the Confirm Check # at start of batch is set to
Auto... and the Check Number on the MICR tab is set to a value beginning with "B" or the Confirm Check # at start
of batch is set to YES... If the pop-up number is edited, the PrintBoss bank record will be updated. Editing this field
will not update the accounting software. The variable associated with the Check Number field is:
Field Name Variable Name Additional Description Length
Next Check Number {BChkNo}
Next Check Number Counter (only used if Check #
is no
t sent
from
the
a
ccounting software
)
10

PrintBoss 166 Electronic Copy
CONFIRM CHECK # AT START OF BATCH
This is set to Auto… Confirm. For accounting software that passes the check number to PrintBoss, setting this field
to Yes... is IRRELEVANT since editing the number in the PrintBoss Bank List will NOT impact the actual check
number used on the document. We recommend setting this option to No.. Rely on Chk# from host accounting for
accounting software that prints check numbers.
INCLUDE BANK ON POPUP BANK REQUEST LIST
For interfaces that use the PrintBoss Request List to prompt the user to select a bank, this option can restrict an
account from appearing in the list. Often, this option is used when adding a bank account prior to the actual start
date for use. The options are:
Suppress if "Unused" in BankCode – Suppresses this record from the Select Bank Account popup list when
the word Unused appears in the Bank Code field. This is the default.
Suppress this bank – Suppress this record from the Select Bank Account popup list. It will still appear on
the Bank List and on the Bank Select for non-matched Bank Codes list when a bank field is passed to
PrintBoss and a match is not found on the Bank List.
Include this bank always – This bank will always appear in the Select Bank Account popup list.
See Chapter 18, Form Bank / Request List, for more information.
PASSWORD REQUIRED AT START OF BATCH
A password may be added to a bank account either for security purposes or as an additional confirmation that the
correct account has been selected. There are 3 options to require a password. No selection indicates no password is
required.
When picking Popup Bank Request List
This option requires a password to be entered when a bank is selected from the Select Bank Account list.
See Chapter 18, Form Bank / Request List, for more information.
During Un-Matched Bank Selection
This option requires a password to be entered when selecting a match from the Select Bank Account list when no
match is found by PrintBoss.
Every time bank is auto-picked
This option requires a password to be entered any time a bank account is automatically selected by PrintBoss. This
option is primarily used for security purposes.
ACCOUNT AUTO SELECT OPTIONS
This section contains options for PrintBoss when it is automatically selecting a bank account.
Always Confirm Auto Selection
This option requires the user to always confirm the selected account when it is auto selected and is usually selected
when two or more bank accounts have identical Bank Codes. This setting is grayed out unless the ‘Allow for
Selection when multiple Bank Codes match’ option is enabled at the bottom of the Internal tab on the Configuration
dialog. Once both bank accounts exist and a request is made for the shared Bank Code, a popup allows the operator
to select the correct account. The popup occurs even when only one bank is identified. This allows the operator to
select the single account or cancel and identify another account that will share the code.
PrintBoss
167 Electronic Copy
Enable "Payroll" alias name
In most cases, PrintBoss automatically chooses the bank account via the Form/Bank Request List function. (See the Options
menu for the Form/Bank Request List.) Some accounting software will print both the Checking Account ID from the chart of
accounts and the Company Name on a check. When used together they create a more precise match on the Bank Code. In a
few cases, the Checking Account ID can be printed for AP, but not for Payroll. The difference in the bank code matching
when the same bank account is used for both AP and Payroll triggers PrintBoss to constantly request the user to rename the
Bank Code. Select this option to allow PrintBoss to "ignore" the Checking Account ID when looking for a match on a Payroll
account and only use the Company Name for a match. The Bank Code will remain 'Checking Account ID:Company Name'
and it will no longer trigger the request to rename the Bank Code. This option is often selected for QuickBooks and
Timberline users.
MICR
This tab holds the MICR information for the selected Bank record: Routing Number, Account Number, and Check Number
fields.
It is important that the MICR line is accurate. Enter the Routing Number and Account Number exactly as they are provided
by the bank. Use periods to represent spaces and a single dash ( - ) to represent the three dash MICR symbol (see Substitute
Characters later in this section).
The PrintBoss variable {CChkNo} is normally used to capture check numbers passed from accounting software. The
{BChkNo} variable is normally used for accounting software that does not pass check numbers, such as Quicken and
QuickBooks. The {BChkNo} variable will use the check number from the PrintBoss bank record.
STANDARD FORMAT FIELDS
Instead of entering the MICR line directly, each component may be entered separately. One advantage is PrintBoss will
automatically suggest proper placement of special characters based on American Banking Association (ABA) standards. As
a starting point, refinements can be made based on the bank’s unique specifications.
At the very bottom of the MICR tab is the same MICR line in the actual MICR font characters. This is a visual confirmation
of the components entered above. The MICR characters will update to reflect any changes made on the MICR tab.
Routing Number
Enter the correct routing number for the bank account. Do not use any substitute characters. The variable associated with
the Routing Number field is:
Field Name Variable Name Additional Description Length
Routing Number {BMICRRoutNo} Routing Number from bank 9
Account Number
Enter the account number. Use a period to designate a space. It is very common to have a leading space (period). Use a
dash if there is a three-dash character in the account number. The variable associated with the Account Number field is:
Field Name Variable Name Additional Description Length
Account Number {BMICRAcctNo} Account Number from bank 20
Check Number
One portion of the MICR line is the Check Number. Since this value changes from check to check, a variable is entered.
The available variables are:
{BChkNo} Check number pulled from bank record.
{CChkNo} Check number printed from accounting software.
{DocNo} Check number passed from accounting software (Does not appear in drop-down menu).
Often {DocNo} and {CChkNo} are interchangeable.
BBBBBB Check number pulled from bank record with the number of digits specified by the number of letters.
Left filled with zeros. You can choose 6 or 8 digits.
CCCCCC Check number passed from accounting software with the number of digits specified by the number of
letters. Left filled with zeros. You can choose 6 or 8 digits.
PrintBoss 168 Electronic Copy
Select the appropriate variable from the drop-down menu. See the Installation Notes specific for the accounting
software for a recommendation.
Include US Funds flag…
See Character 45 below.
CHECK FORMAT TYPE
The check style only determines the order of the components for the MICR line on the check. This does not
impact the actual style of the check form. Select the appropriate style for the check stock that is going to be used.
Standard 8.5" Business Check
Standard interfaces use this style. Usually this is for a check between 7" and 8.5" wide.
Small 6" Wallet Size Type 1:
This option is for a wallet-sized check with the check number on the far right of the MICR line.
Small 6" Wallet Size Type 2:
This option is for a wallet-sized check with the check number in the middle of the MICR line.
Deposit Slip:
This option is for printing deposit slips that do not have a check/document number. Only the bank routing number
and account number will appear.
Custom (enter MICR line directly):
The MICR line may be edited directly instead of editing the individual components. This allows any formatting
required by your bank. This option enables the "Custom Format" field at the bottom of the window. The MICR
characters will adjust accordingly.
CUSTOM FORMAT
This section displays how the MICR line will appear when printed. The field updates to reflect changes made in the
individual components. On rare occasions, it is better to modify the line directly rather than use the individual
components. This requires selecting the Custom option under Check Format Type.
Each character (including blank spaces) must be entered exactly as it is received by the bank. A common MICR
string would be similar to the following:
/{BChkNo}/ [123456789[ 123-12345/
The variable associated with the MICR Line is:
Field Name Variable Name Additional Description Length
MICR Line {BMICR} MICR Line (See #MICR in Chapter 8) --
SUBSTITUTE CHARACTERS
Whether the MICR line is entered directly or through the individual components, substitute characters and check
number variables must be used. Substitute characters replace the special MICR characters with keyboard strokes.
Check number variables are used to place the correct check number on each check.
Four characters that may appear in the MICR line of a check cannot be reproduced with any computer keyboard key.
Therefore, we have assigned replacement characters for the MICR line characters as listed in the following table:
Symbol Description Represented By
Transit
[
On Us
/
Dash
-
Amount
$
MODULUS 9
On occasion, a bank will request a modulus 9 character to follow the check number. PrintBoss will perform the
modulus 9 calculation and insert the digit when it sees an asterisk ( * ) at the end of the check number. To add the
PrintBoss
169 Electronic Copy
modulus 9 calculation to the MICR line, simply insert an asterisk immediately following the check number variable.
This can be done by typing in the Check Number field or, if you have the Custom check format type selected,
directly in the Custom Format field.
CHARACTER 45
The Canadian Payments Association regulations suggest a "Character 45" in the MICR line of accounts printing
checks drawn on US Dollars. Select the Include US Funds flag… option to add this character.
Miscellaneous
This tab provides miscellaneous variables that can be customized for specific needs.
MISCELLANEOUS INFORMATION
The Misc fields are optional and may contain a string, numeric value, or a file path and name. The description for
each of these fields is editable to add a reminder for the contents of the field. Roll your mouse over the Values field
to view the name of the associated variable. The following table outlines all the variables in this section:
Field Name Variable Name Additional Description Length
2
nd
Log
o
{BMisc1}
Often used
to place a 2
nd
Logo on a c
he
ck
40
Misc Field 2 {BMisc2} Miscellaneous Field 2 40
Misc
Field
3
{BMi
sc3}
Miscell
aneou
s F
ield 3
4
0
Misc Field 4 {BMisc4} Miscellaneous Field 4 40
Misc
Fi
eld
5
{BMisc
5}
Miscellan
e
ous
Field 5
4
0
MISCELLANEOUS FLAGS
The Miscellaneous Flags return a value of TRUE when checked. The first flag, {BFlag1}, is assigned to the 2
nd
Signature Line and the text ‘Two Signatures are Required’ in the Form script. Check the flag to enable a second
signature line on checks for this specific bank record. Misc Flags 2 – 4 are user definable and have description
fields that may be edited as a reminder of their purpose. Roll you mouse over the Values field to view the name of
the associated variable. The following table outlines all the variables in this section:
Field Name Variable Name Additional Description Length
2
nd
Signature Line
{BFlag1}
Use f
or a 2nd
signature
line
–
YES if
check
ed
--
Misc Flag 2 {BFlag2} Miscellaneous Flag 2 – returns TRUE if checked --
Misc
Fl
ag 3
{BFlag3
}
Miscellane
o
us
F
lag 3
–
r
etu
rns TRUE if
c
hec
ked
-
-
Misc Flag 4 {BFlag4} Miscellaneous Flag 4 – returns TRUE if checked --
Dat
e/Amount Bo
x
{BFlag5}
Mi
scella
neo
us
Flag 5
–
re
tu
rns
TRUE
if che
c
k
ed
--
Miscellaneous Information and Flags are independent of each other.
SPECIAL ITEMS
Check the Canadian Style Date/Amount box if this bank account requires the newer Canadian format (often referred
to as the CPA06 style). This activates conditional formatting in standard PrintBoss Forms. For additional
information regarding Canadian check requirements, please see our web site's SUPPORT DOCUMENTS page for
Canadian Customers.
Signatures & Logos
This tab allows the assignment of bank account specific signatures and logos.
If unique placement, resizing, or conditional use based on a required amount is needed, use the appropriate fields to
assign properties to the specified file.
tried to do a WS install to install the driver again but it needs admin permission and she doesn't have it; she'll have
the IT run the setup and reinstall the driver. tried to do a WS install to install the driver again but it needs admin
permission and she doesn't have it; she'll have the IT run the setup and reinstall the driver.
PrintBoss 170 Electronic Copy
See Chapter 9, Form Files, for further information.
LOGO PROPERTIES
PrintBoss can read logo files in BMP, PCX, and JPG file formats. PrintBoss will assume the location of a file
entered in this field is the LOGOS folder under the PrintBoss HOME DIRECTORY. . This is the preferred location.
Otherwise, the full path and file name need to be entered. Use the browse button (folder icon) to select a file and
enter the correct path and file information. The variable associated with the Logo Properties field is:
Field Name Variable Name Additional Description Length
Logo Properties {BLogoFile} Logo file name, Ex: Mycompany.jpg 40
NOTE:
Logos will not view or print when the file path and name exceed 40 characters.
SIGNATURE AND SIGNATURE 2 PROPERTIES
PrintBoss can read signature files in BMP, PCX, SIG, and JPG file formats. PrintBoss will assume the location of a
file entered in this field is the LOGOS folder under the PrintBoss HOME DIRECTORY. This is the preferred
location. Otherwise, the full path and file name need to be entered. Use the browse button (folder icon) to select a
file and enter the correct path and file information. The variables associated with the Signature Properties fields are:
Field Name Variable Name Additional Description Length
Signature
Properties
{BSigFile} Signature File Name, Ex: JohnSmith.sig 40
Signature 2
Propert
ies
{BSig2File}
Second Signature File Name; this signature will
appea
r on the top signature
line
40
NOTE:
Signatures will not view or print when the file path and name exceed 40 characters.
POSITION
These coordinates are used to place files of any size on a form. Coordinates are measured from the edge of the
paper to the top left corner of the file, not the graphic, by default. A different justification can be set in the
associated command (i.e. #PIC). The variables associated with the Position fields are:
Field Name Variable Name Additional Description
Logo X {BLogoX} X Coordinate for logo
Log
o
Y
{BLogoY}
Y Coordinate for logo
Signature X {BSigX} X Coordinate for signature
Signat
ure Y
{BSig
Y}
Y C
o
ordinate
for signature
Signature 2 X {BSig2X} X Coordinate for signature 2
Si
gnature
2
Y
{
BSig2Y}
Y Co
o
r
dinate f
or sig
nature
2
OPTIONS
These fields are for additional options available for the file, such as size or watermark.
See Chapter 9, Form Files, for further information on the #PIC command.
The variables associated with the Options fields are:
Field Name Variable Name Additional Description
Logo Options {BLogoOp} Optional properties for logo file
Signature
O
ptio
ns
{BSigOp}
Optio
nal propert
ies
fo
r
signatur
e file
Signature 2 {BSig2Op} Optional properties for signature 2

PrintBoss
171 Electronic Copy
Options
PrintBoss version 5.736 and above includes the options to automatically align the Company Name and Address ‘Below’ the logo or to
the ‘Right’ of the logo. This feature automatically works with newer PrintBoss Forms included with PrintBoss 6.0 and above.
RANGE CONDITION
Typically used for signatures, this option can indicate a low and high dollar amount to limit when the signature
prints. The variables associated with the Range Condition fields are:
Field Name Variable Name Additional Description
Logo Hi {BLogoHi}
Maximum $ for AmntRange condition – typically used only if the logo
is an additional signa
tu
re
Logo Lo {BLogoLo}
Minimum $ for AmntRange condition – typically used only if the logo
is an additional signature
Si
gna
ture Hi
{
BS
i
gHi
}
Ma
x
i
m
um
$ for Am
nt
Ran
ge condition
(
o
ptional)
Signature Lo {BSigLo} Minimum $ for AmntRange condition (optional)
Si
gnature 2 Hi
{
B
Sig2Hi}
Maxim
um
$ f
or AmntRange cond
ition (opti
onal)
Signature 2 Lo {BSig2Lo} Minimum $ for AmntRange condition (optional)
SIZE
PrintBoss is able to resize a file down to 10% and up to 300% of the original size. These fields indicate a change in
either the specific size in inches using width (Wdt) and height (Ht) or a percent. Either percent or inches should be
used – not both. The variables associated with the Size fields are:
Field Name Variable Name Additional Description
Logo Width {BLogoWd} The Logo Width in inches
Logo Height
{BL
ogoHt}
The
Logo H
e
ight in in
ches
Logo Percent {BLogoSize} Logo size adjusted by Percent from 10% - 300%
Sig
nature Width
{
B
SigWd}
T
he Si
gnature Width in inches
Signature Height {BSigHt} The Signature Height in inches
Signature Pe
rce
nt
{BSigSize}
Signat
ure size ad
justed
by percent
from 10%
-
300%
Signature 2 Width {BSig2Wd} The Signature Width Size in inches
Signature 2
H
e
ight
{BS
ig2Ht
}
The Signature Height S
ize
in
i
nches
Signature 2 Percent {BSig2Size} Signature size adjusted by percent from 10% - 300%
Security
Security can be added to each Bank Record to define the users who may access the Bank Record. This process is
outlined in Chapter 8, Bank Accounts and is separate from the Password section on the Primary tab.
ACH Definition
The ACH Definition tab may be used to enter data to be used in creating an ACH file for this bank record
according to the NACHA Operating Rules and Guidelines.
FILE HEADER RECORD FIELDS
These fields are used in the SignOn tab of the ACH File and are defined in the bank record. They apply to every
record in the file.
Field Name Variable Name Additional Description
Immediate
De
sti
nation
{bACHImdDstNo}
Contains a space followed by the 9-digit routing number of the
ACH Oper
at
or or receivin
g
point where
the
fi
le is being sent.
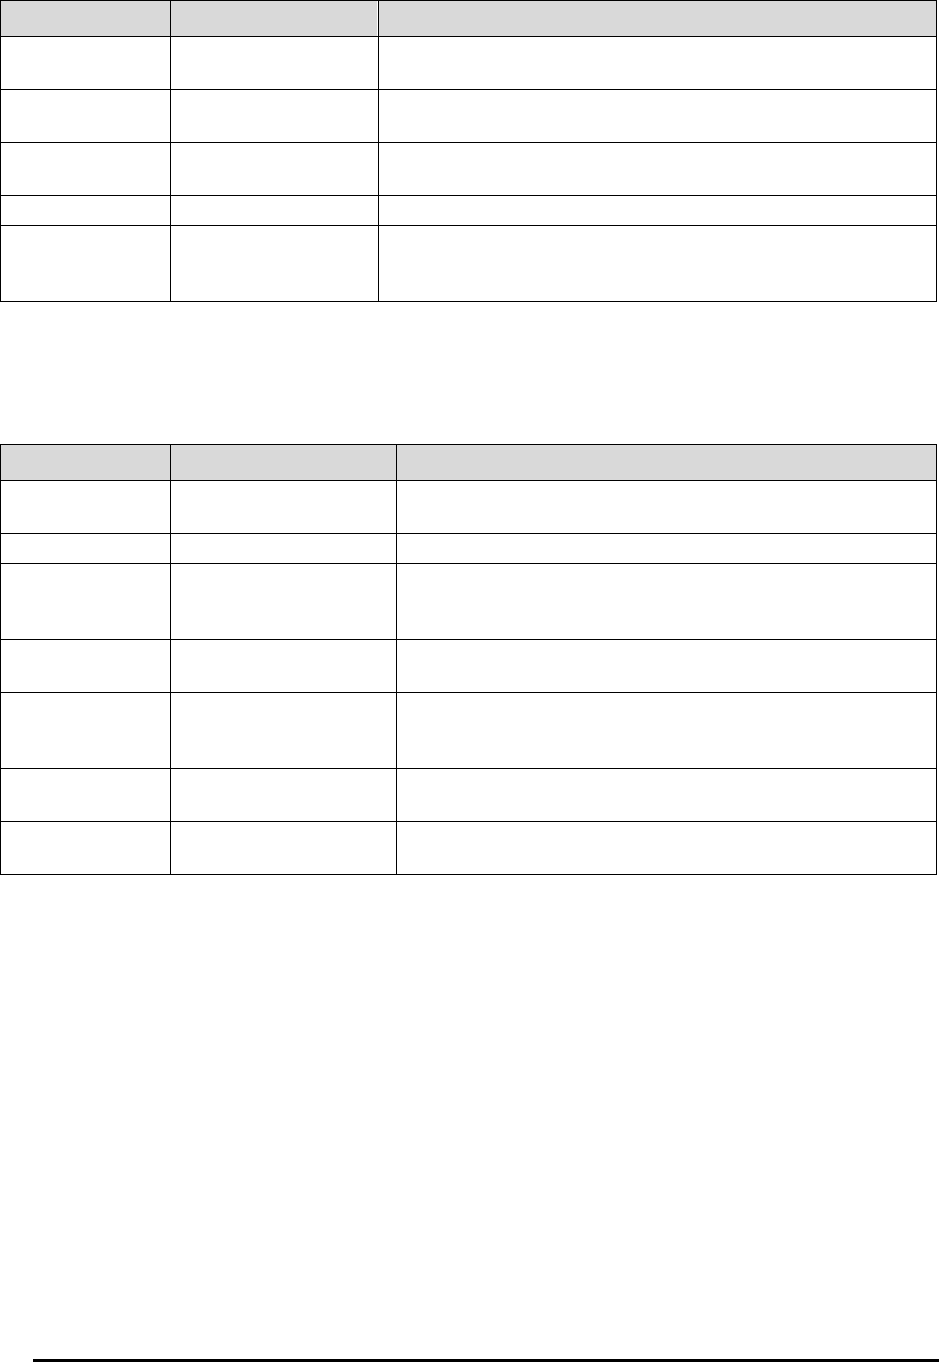
PrintBoss 172 Electronic Copy
Field Name Variable Name Additional Description
Immediate Origin {bACHImdOrgNo}
Contains a space followed by the 9-digit routing number of the
ACH Operat
or
or sending po
i
n
t that i
s sen
ding the file.
Immediate
D
est
in
ation Name
{bACHImdDstName} Optional. The name of the ACH receiving point; 23 characters.
Immediate Origin
Name
{bACHImdOrgName} Optional. The name of the ACH sending point; 23 characters.
File Mode ID {bACHFileIDMode} Increments beginning at A for multiple files in a day; 1 character.
Pre-Note Override {bACHPreNote}
Global override of the PreNote setting. This should only be used
once, the first time an ACH batch is processed. The values are N
or Y.
COMPANY BATCH RECORD FIELDS
These fields are used in the Header tab of the ACH File and are defined in the bank record. They apply to every
record in a batch.
Field Name Variable Name Additional Description
Service Class
Cod
e
s
{bACHSvcClassCode} Identifies type of ACH file; 3 characters.
Compa
ny
Nam
e
{bACHCompName}
Name of the Compan
y
or Payee
; 16 c
h
aracters.
Company
Discretionary
Dat
a
{bACHCompDisc}
Optional. Allows Company to include codes of significance
only to them to enable specialized handling of all entries in the
batch
; 20 character
s.
Company
Identification
{bACHCompID}
An alphanumeric code used to identify the Originator; 10
characte
rs.
Standard Entry
Class
{bACHStdEntryClsCod}
This field holds various predefined character abbreviations
representing standard descriptions. Ex: CCD (Corporate Credit
or Debit).
Company Entry
Description
{bACHCompEntry}
Provides a description for the purpose of the transaction. Ex:
Payroll; Water Bill; etc
.,
up to 10
ch
a
rac
ters
.
Originating DFI
Identificatio
n
{bACHOrgDFIID}
Bank routing number plus ABA number with no leading space;
8 ch
ar
acters total.
SAVED BANKS
Banks are saved in a file located at the root of the PrintBoss Home directory. The main bank file is Banks.pbb. You
may also see Banks.smt and Banks.nsx. A history of changes is also kept at the root of the PrintBoss Home
directory. There files are numbered sequentially beginning with Banks000.pbb. It is prudent to keep a backup of
the most current version of Banks.pbb in the event your server or computer crashes.

PrintBoss
173 Electronic Copy
Appendix
B
APPENDIX B: FORM EDITOR
The following detail applies to PrintBoss Form Files. Form Files capture data from accounting software and use
scripts to add additional objects or format captured text.
FORM EDITOR
The Form Editor has several tabs and options for customizing forms or handling special needs. Some of the tabs
only display when they are selected. The following provides descriptions for the options available on each of the
primary tabs on the Form Editor.
Settings
This tab contains general settings for the form including the form size and orientation, the number of copies,
archiving options, and whether the form will require a keystroke acknowledgment to start printing. The order copies
of the form will print is determined here as well.
DESCRIPTION
This field contains a brief description of the purpose of the form and often identifies the accounting software
associated with the form. This information is kept when a new form is copied from an older form.
FORM DATE
The date & time the original form was created. This information is kept when a new form is copied from an older
form.
INTER FORM DELAY
This field inserts a pause between each page processed with the form. The length of the pause is measured in
seconds. Zero indicates no pause.
FORM NEXT NUMBER
This field is used to provide independent numbering on the form. This is NOT recommended for checks. This field
is typically used for other types of forms, such as invoices. Once the option is activated (check the box), a next
number can be designated. Each time a document is created with this form, PrintBoss will increment the number by
one. There is no confirmation dialog for the number.
The number can be used in the form by referencing the variable {FormNextNumber} in a command. More
information about variables is provided in the Form File Commands section later in this chapter.
CAPTURED TEXT TREATMENT
This section allows PrintBoss to format the font of the text captured from the accounting software, changing the
original font. These settings are global for all of the data from the accounting software using this form. This DOES
NOT override #TEXT commands.
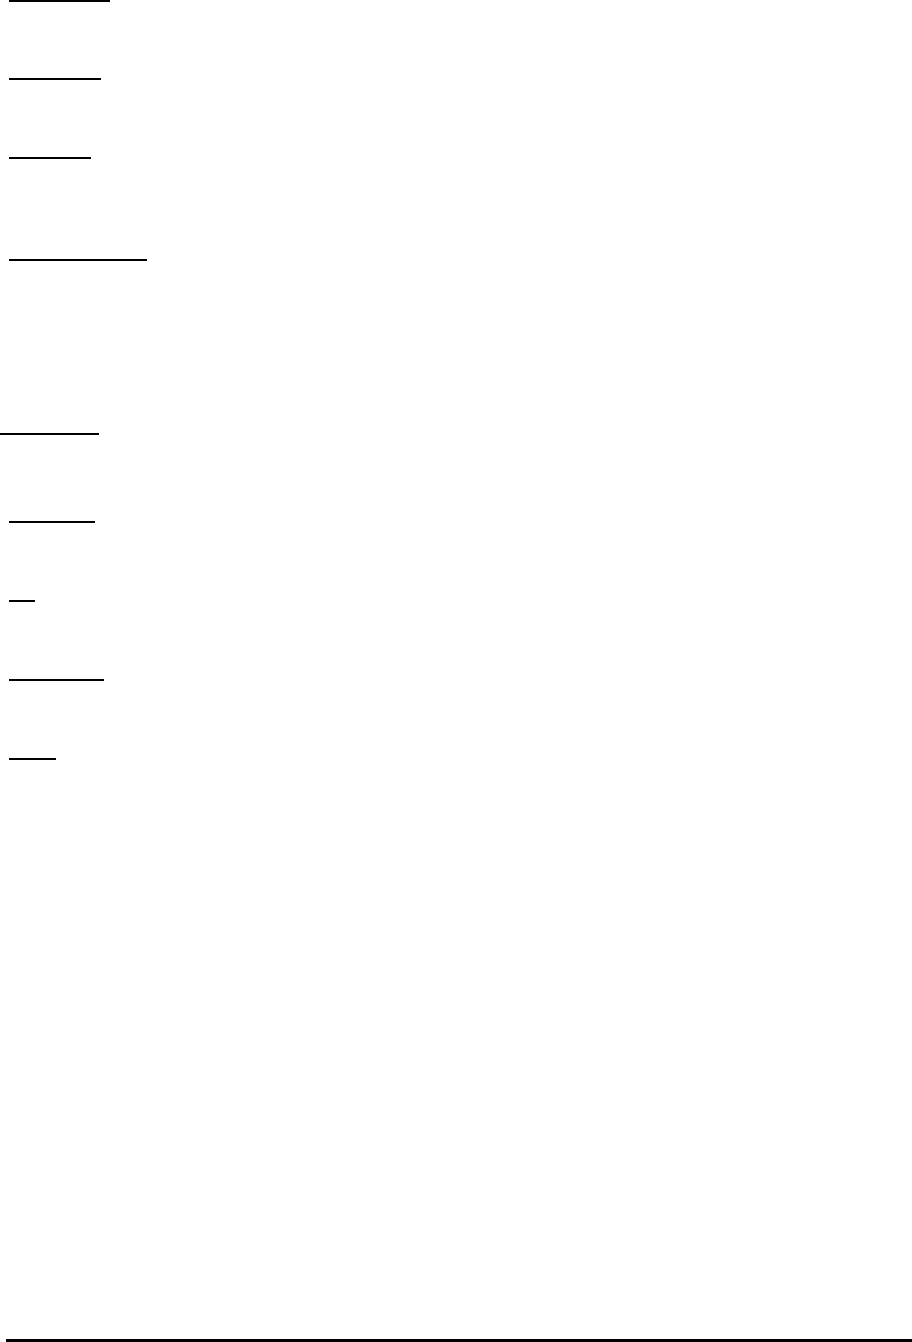
PrintBoss 174 Electronic Copy
X, Y Text Offset
This option provides a global offset of the placement of all the data from the accounting software. This is typically
used for centering data on the page.
Font Override
This option designates a specific font style to be used for the data from the accounting software in place of the font
passed with the data. This does not override #TEXT commands.
Point Adjust
This field increases or decreases the original font size by the number indicated: 0 = original size, 2 = increase the
original size by 2 points. A negative number decreases the original size. The Point Adjust field will be ignored
when there is a font description in the Font Override field.
Ignore Text Between
PrintBoss will remove any incoming data on the page within the vertical coordinates of this option. The full width
of the page is assumed. The coordinates measure in inches from the top edge of the page.
TEXT / IMAGE CAPTURE MODE
This field is typically set to Text Only is captured. The alternate method is Text AND Graphics are captured. The
following options are available when Text AND Graphics are captured.
Graphic Image
This option is only available for PrintBoss Enterprise edition using the PrintBoss 50 driver and allows
graphic images to pass to PrintBoss.
Graphic Text
This option allows graphic text to pass through to PrintBoss. This is often necessary for printing from PDF file
formats, such as QuickBooks Online.
Adj.
This option only applies to the Graphic Text option. PrintBoss will automatically switch to Captured Text option
when Adj. is selected and the source is from an NT40 work file.
Captured Text
This is the typical capture by PrintBoss. Checking only this box is the same as using the Text Only option for the
capture mode.
Default
Clicking this box sets the check boxes back to their default settings (Graphic Image & Captured Text checked,
Graphic Text unchecked).
FORM WIDTH, LENGTH
This is the measurement of the form's size in inches followed by the standard paper size option. The paper size
option can be changed if it does not match the data sent from the accounting software.
ORIENTATION
No orientation request is sent to the printer when this option is set to Default. Choose portrait or landscape to send
an orientation command change to the printer. This command overrides the default of the printer at time of printing.
SIZE/ORIENTATION ALERTS
PrintBoss has a feature to alert the user when the page size and orientation do not match the information passed by
the accounting software. The choices are: Suppress Alerts (no alert will be provided), Orientation Mis-Match, and
Orientation or Size Mis-Match.
PRINTER PAPER SIZE
When PrintBoss prints this form, it will NOT tell the printer what paper to select when this option is set to Default.
The other options will tell the printer to use the specified paper size.
COPIES
Enter a value from 1 to 7 in this field to set the number of COPIES PrintBoss should generate: 0 = 1 original and no
copies, 1 = 1 original AND 1 copy (2 pages), etc. PrintBoss can generate the original plus up to 7 copies.

PrintBoss
175 Electronic Copy
If at least 1 copy is designated, the order of the copies needs to be set. The default is Documents. This will print the
original and all of the copies for the first page prior to the second page if there is more than 1 page. Click on the
drop-down menu for this field and select Copy Type to print the originals for all pages first, and then copy 1 for all
pages, then copy 2 for all pages, and so on for as many copies as are specified for the form.
SPECIAL HANDLING
Special handling is only available when at least 1 copy is selected and the drop-down menu is set to Copy Type.
No special handling
PrintBoss will not pause between copy types. This is the default setting.
Pause printing between copy types
PrintBoss will pause between copies to allow paper to be changed when Copy Type is selected and this option is
selected. The user will be prompted to confirm the paper has been changed before printing the next copy type. This
is typically used when only one paper tray is available and check copies are printed on blank paper. Another
common use is with Invoices where each page requires a different paper color and the paper needs to be changed in
the tray after each copy.
This option is only available when printing one or more copies and Copy Type is selected.
Send as single print job
PrintBoss will send all of Copy 1, then all of Copy 2, etc., but it will not pause the process to change paper. This is
often helpful when sending a print job to a printer with a stapling function or when using Copy Type to streamline
the sending of Emails.
FORMS PER PAGE
Enter a value to determine the number of forms printed on a single piece of paper. This might be more than 1 when
printing wallet sized checks. A value of zero is not valid and will generate an error message.
ASK 1
ST
PAGE
This option is only available when printing more than one form per page. The feature is most commonly used when
printing 3 checks per page and the last check run only printed one or two checks on the last page. PrintBoss prompts
the user to enter the number of checks to print on the first page of the run to allow all portions of the page to be used.
WORK/ARCHIVE FILE COMPRESSION
This feature is rarely used. It allows for slight compression of the work and archive files to save space.
WORK FILES INDEXED AT CREATION
Indexing the work file automatically prepares it to be sorted in an order other than generation. Generation is the
order the work file batch was sent by the accounting software.
ARCHIVE FILES INDEXED AT CREATION
Indexing the archive file automatically prepares it to be sorted in an order other than generation. Generation is the
order the archive file batch was sent by the accounting software.
DEFAULT PRINT ORDER
If either the archive or work files are indexed at creation, this option will designate the order the documents should
be printed. The default value (Natural Order) is the order generated by the accounting software. The other choices
are:
Recipient
Amount
Doc Number
Misc Field
Bank
Misc2 Field
Payee ID

PrintBoss 176 Electronic Copy
IMMEDIATE PRINT DIALOG METHOD
Typically, this field is set to ‘Start printing w/out a prompt’. A prompt may be preferred to confirm printer
availability or as a reminder to put checks in the paper tray. In this case, select Prompt to start printing. PrintBoss
will open the Print Copies Dialog and wait for the user to click on the Print Start button before the print job is sent
to the printer.
COLLAPSED WHEN OPENED
Select this checkbox to collapse the bottom portion of the Print Copies Dialog from the Scope down when it is
automatically opened by PrintBoss.
AUTO-ARCHIVING OPTIONS FOR RECORDS
Every time PrintBoss processes a batch of documents, the records are sent to a work file. Any copies of the form set
to Immediate in the Multi-Parts and Printers tab will print immediately. This option controls what happens to the
work file both before the batch begins and after the batch is processed.
None (Manual) – The work file for this form is appended each time data is sent to PrintBoss and will grow
indefinitely. Typically, this setting is only used for testing.
Archive Completed Records – The files are transferred from the work file to an archive file of the same
name when all copies of each record have been successfully processed. Archive Records w/Prompt
prompts the user before transferring the records. Refer to the ‘Special Controls’ tab to add a suffix to the
Archive file name.
Delete Completed Records – The work file records are all deleted when all copies of each record have been
successfully processed. Historical information is not available once the work file is deleted. Delete
Records w/Prompt prompts the user before deleting the records.
Overwrite Work File at Start of Batch – This is the default setting. Each time a new batch of data is sent to
PrintBoss the new batch overwrites the previous work file for the form. All documents in the current work
file, regardless of the status, are overwritten. Files not processed (printed, emailed, etc.) are lost. The
resulting work file always contains the latest batch of documents sent to PrintBoss.
Archive Records after _ days – PrintBoss displays a Days till Archiving field when this option is selected to
allow the user to input when the completed records are automatically transferred to archives. The largest
available value is 299999. Archive Records after _ days w/Prompt prompts the user before transferring the
records.
Delete Records after _ days – PrintBoss displays a Days till Deleting field when this option is selected to
allow the user to input when the completed records will be deleted. The largest available value is 299999.
Delete Records after _ days w/Prompt prompts the user before deleting the records.
Archive Work File at Start of Batch – Completed work file documents are automatically transferred to
Archives at the start of the next batch printed to the same PrintBoss work file. The resulting work file
always contains the latest batch of documents sent to PrintBoss.
If no choice is of particular interest, the default option is Overwrite work files at start of batch. This setting
requires little maintenance.
Special Controls
This tab gives note to special requirements for the form.
MINIMUM PRINTBOSS VERSION REQUIRED FOR THIS FORM
This field identifies the oldest version of PrintBoss that can successfully use this form. Older versions of PrintBoss
do not have all of the features accessed by this form. An error message will appear if this form is accessed by an
older version warning PrintBoss should be updated to allow full functionality of the form.
REQUIRES INPUT FROM PB50 PRINTER DRIVER
Features on some forms may require the use of the PB50 printer driver to work correctly instead of the NT40 printer
driver. This option will be checked when the PB50 printer driver is required for full functionality of the form. The
NT40 driver is no longer used, but this feature is retained for compatibility with older forms still in use.

PrintBoss
177 Electronic Copy
LOG FILE MODE
The default setting for this field is No Logging. Change the setting to Text Log to create a text file that will record
each printing/processing action of a document page. Each line will include the date, time, and operator name.
LOG FILE NAME
This field displays the name of the file created when the Log File Mode is set to Text Log. The default value may be
changed.
WELLSPRING STOCK NO
This field displays the Wellspring paper stock item number to use with this form. Click on the link for the
Wellspring Software web site to order additional checks and paper stock. The link opens to the check stock page of
the online store.
LEFT ZERO FILL CHECK NUMBER
This field will add the designated number of zeros to the left of the check number for all accounts that use this form.
DOCUMENTS PER INPUT PAGE
This field indicates the number of documents passed by the accounting software on a single page. Often this is used
with wallet style checks. Enter the height of the document in the Input Document Height field. The value in this
field is 1 when only one document per page is passed.
INPUT DOCUMENT HEIGHT
Indicate the height per document when more than one document per page is passed from the accounting software.
This field is not available when there is only one document per page. (See Documents Per Input Page above).
ENABLE PRINTING ON BACK OF PAGE
This option allows printing on the back of a form. A duplex printer is required to use this option and the duplexer
option on the printer must be activated. An additional tab called Page Back will appear in the form editor when this
option is checked. Commands entered on this tab will appear on the reverse side of the form. The text can be set by
copy.
If this feature is activated while using a printer that does not have an activated duplexer, the back page will print as a
separate page.
NOTE: This is not a duplex option. This feature merely activates a new tab to add text and formatting that may be
printed on the back of a page when duplex is enabled on the printer. Click “View” and then “View Back of Check”
at the top of the Form View to preview items entered on the Page Back tab.
PRE-PROCESS ASSIGNMENTS
Click on the drop-down menu and select Special to cause PrintBoss to process the assignments in the Runtime,
Footer, Page Back, and Design Objects tabs before processing the rest of the document.
This must be active when there is a #PaperBin, #SkipPage, or #ProcessPage command in use.
Activation of the Pre-process Assignments feature may slow the printing process slightly.
SCAN FORM FOR {BANKCHKNUMINC}
Select this field to include the {BankChkNumInc} variable in the pre-processing of assignments when Pre-process
Assignments is active. The {BankChkNumInc} variable increments the ‘Next Check Number’ in the PrintBoss
bank record.
SUPPRESS CONFIRMATION OF CHECK NUM.
Check this field to suppress the Check Number Confirmation pop up for the form. This is especially helpful when
using two accounting packages – one that passes check numbers and one that does not. This setting can always be
checked on the forms for the accounting packages that DO pass check numbers.

PrintBoss 178 Electronic Copy
FLIP TOP TO BOTTOM WHEN PRINTING
Check this setting to print the bottom edge of the document first. This is often used when the bottom margin of the
printer is too large for correct placement of the MICR line. Check paper needs to be rotated 180 degrees in the
paper tray for this to work.
ACCESS
This feature is used to limit some tabs from appearing in the Form Editor. Most notably, the Design Objects is no
longer used and the Proprietary tab is not currently used on all standard forms. RunTime, Footer, and Page Back
Objects tabs can also be disabled. This button requires an access code to enable or disable tabs. The Access Code is
the same as the Security Master Password.
STANDARD SHADE
Adjust the shade often used in many graphic objects, such as the legend area of a grid, with this option. It may be
desirable to lighten or darken shaded areas when using some printers. This feature is offered as a convenience to
avoid selecting and changing the shade of individual objects on the form.
SECURITY STAMP STRING
This field is an additional security feature. Select a security stamp from the drop-down menu and reference the
{SecurityStamp} variable in the form (usually with a #Text command) to place the security stamp information on
each document using this form. Typically, the font size is small so as not to detract from the document.
WORK FILE NAME SUFFIX
Select or enter a suffix to attach to each work file name (optional).
Dynamic components can be used as the suffix in the Enterprise edition. For example, enter {YYYY_MM}
in this field for the Ca_ap1 form to date stamp the work file. A new work file will be created each month
stamped with the year and month: Ca_ap12016_10.
ARCHIVE FILE NAME SUFFIX
Select or enter a suffix to attach to each work file name (optional). This function works in both the Standard and
Enterprise editions of PrintBoss.
Block Mirrors
This tab defines an area of the form and copies it to another area of the same page. Define the top and bottom edge
of an area (or Block). The entire width of the page is automatically included in the defined area. The mirrored copy
can be the same height or it can be resized either smaller or larger. Check Enable any mirrored blocks to use Block
Mirrors.
This feature is most frequently used to duplicate a stub section or, as in many standard interfaces, to copy the check
and stub sections into the mini copy at the top of the page.
SUPPRESS BLOCK MIRROR ON THESE COPIES
Enter a copy number, such as 1, to suppress Block Mirrors on that copy. This is often used when Overflow is
printed with the check batch.
START OF SOURCE BLOCK
Enter the top edge in inches of the area to be copied.
END OF SOURCE BLOCK
Enter the bottom edge in inches of the area to be copied.
DESTINATION SIZE
Enter the height of the destination area to place the copy. PrintBoss will compress or stretch the original block to fit
within the designated space.
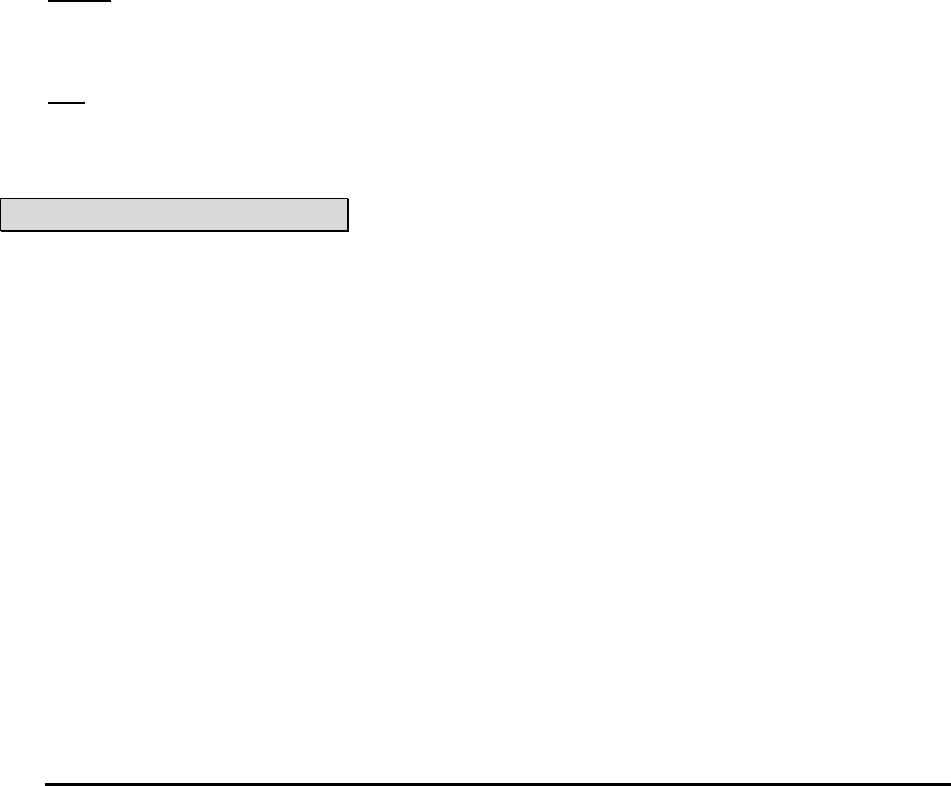
PrintBoss
179 Electronic Copy
TOP OF DESTINATION 1
Enter the top edge of destination area where the mirrored copy should start.
TOP OF DESTINATION 2
Enter the top edge of a 2
nd
destination where the mirrored copy should start. (Optional. Enter zero to disable). This
feature is often used with deposit slips.
TOP OF DESTINATION 3
Enter the top edge of a 3
rd
destination where the mirrored copy should start. (Optional. Enter zero to disable). This
feature is often used with deposit slips.
TEXT FONT SIZE CALCULATION IN DEST BLOCK
This section adjusts the font size in the mirrored copy section. By default, the font size is reduced (or enlarged)
using the same percentage applied to the whole block. This default value is displayed in gray and cannot be edited.
Often, the text is hard to read when the block is reduced. This setting allows you to increase the font size a little for
readability. The down side of increasing the font is at some point the lines of text will start overlapping each other
or the outline of the destination block. A bit of trial and error will allow you to pick a reasonable compromise
between readability and staying true to the original block.
FORCE FONT SIZE TO THIS PERCENT OF ORIGINAL
Enter a different percent to override the automatic sizing when text is difficult to read. It can be helpful to
separately control the reduction percentages between captured text and text that is part of the form design in
PrintBoss.
Captured
Adjust the size of captured fonts as a percent of the original size. This field is not available if the capture font has
an override that indicates no compression in copies (indicated as a + after the font size in the captured font
description).
#Text
Adjust the size of text items placed with #Text commands. This will not impact any items that have a font
description forcing no compression in the copies.
Note:
Objects can be suppressed from the Block Mirrors by adding a ‘B’ after the Copy number. For example:
#[C,0B]Pic 5.500, 9.850, "Your_sig.pcx", "/MIR",,DEFGA
The B after the zero for Copy 0 will suppress the signature file in the Block Mirror. If the value needs to be
suppressed in more than 1 copy, then the B needs to follow every Copy number. For example:
#[C,0B1B2B3B]Text 8.24R, {LASTLINEY}, "Arial/13/B", "{CChkNo}"
See Chapter 10, #Text Command, for more information.
Multi-Parts & Printers
These settings relate to individual copies of the form.
COPIES
This is a list of the copies activated for this form, including the original. (See Settings / Copies). Copies are
numbered sequentially.
PRINT TIME
Select whether a copy (or original) prints immediately, is sent to a batch in the work file to be processed later, or
will never print.
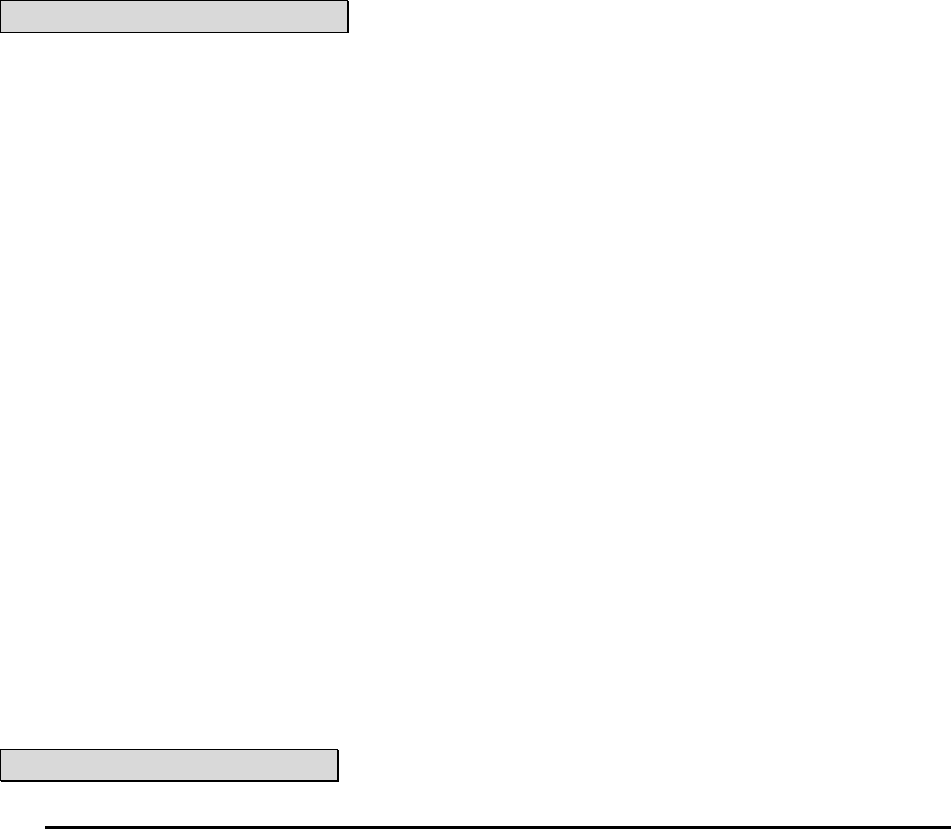
PrintBoss 180 Electronic Copy
DESTINATION PRINTER/DEVICE*
Define the destination or printer for the selected copy. The destination choice defines the Source Tray selections.
Choose <Manual Select> to receive the printer list and select a specific printer at the beginning of the document
batch.
Destination options include printers as well as other PrintBoss functions such as Positive Pay, PDF, and E-mail.
When PDF is selected as a destination, a new PDF tab will appear in the Form Editor.
See Chapter 18, Positive Pay, and Chapter 16, E-Mailing. Also see section on PDF later in this section.
BLANK
A page symbol will appear in the blank column between the Destination Printer/Device and Source Tray columns
when Destination Printer/Device is set to <Positive Pay>. Click on the page symbol in that column to open the
Positive Pay/ACH File Editor.
SOURCE TRAY*
Choose the appropriate paper tray for the selected copy. The tray options are defined by the printer selected in the
Destination Printer/Device column. The tray names are sent by the selected printer driver and do not always
correspond to the tray names on the hardware. Test each tray to find the one desired. Note that anytime the printer
is changed (like in the Destination Printer/Device column or by changing the PrintBoss Default printer) the tray
selection will be reset to Default.
This field also allows the selection of existing Positive Pay files when Destination is set to <Positive Pay File>.
NOTE:
Selection of a manual tray will result in a physical prompt from the printer hardware for each document. Find a
tray selection that pulls from the correct tray without the prompt. This can still be the manual feed tray.
COPY NAME
This field is provided as a label for the different copies and can be used as a reminder. The copy name will appear
in the Print Documents dialog. This value can also be referenced by a command in the form using the {CopyName}
variable. For example, #Text can use this variable to print Original or Packing Slip on the associated documents.
PRINTER & TRAY SELECTIONS SAVED IN..
PrintBoss allows the settings on the Multi-Parts & Printers tab to be saved by Form or User. Form is a global
setting that shares the features marked with an asterisk ( * ) on this tab with everyone using this PrintBoss form and
license. If one person in the group changes the destination of a form to a new printer, all users will print to the new
destination. Locally is also a global setting, but it allows each user to save their own settings. If someone changes
the print destination, no one else is affected.
A third option, Independent, allows individual users to choose between the global Form settings or their own Local
settings. When Independent is selected, a second drop-down menu appears to allow the user to choose the Form
setting or Local setting for each situation.
FORM PRINTER/DEVICE*
This feature appears in versions of PrintBoss prior to 5.3 and is available after 5.3 as a setting on the Legacy tab
under Options / Configuration. This feature is called Original Method with Form Printer.
Set the printer/device for this form. Any copy whose ‘Destination Printer/Device’ is set to <Form Printer> will use
this value as its destination. If the value of this field is set to <Default PrintBoss Printer>, PrintBoss will use the
printer selected under File / Printer Setup from the main screen of the PrintBoss Master application. The drop-down
menu will list all printers available to this workstation or user.
The default Destination Printer/Device setting for most forms is <Form Printer> and the default Form
Printer/Device is <Default PrintBoss Printer>. In this case, the printer selected under File / Printer Setup will
determine the printer for all copies of the form.
NOTE:
PrintBoss is very literal with printer names. If a printer name changes by a single character, PrintBoss will see it as

PrintBoss
181 Electronic Copy
a new printer.
Comments
The Comments tab contains notes associated with this form – often a version number or customization reminders.
Design Time Objects
This edit group allows backward compatibility of forms. It is no longer used in the creation of new forms.
This tab may appear in older forms. However, it does not appear in Wellspring Software's currently distributed form
files. It will no longer appear in new forms when clicking on Create in the Form Select window.
NOTE Regarding Runtime & Footer Tabs:
Virtually all commands defined later in this chapter can be entered in either the RunTime or Footer Objects tabs.
The result of the command can be affected by whether it is placed in the RunTime or Footer tab. This is due to the
order the scripts are processed. PrintBoss processes the RunTime scripts first. #Assign statements telling
PrintBoss the location of data elements coming from the accounting software are often included in RunTime
Objects. Then PrintBoss processes all the data that is captured from the accounting software, including the actual
values of the assigned variables. Finally, it processes commands in the Footer Objects. Any commands that use
one of these assigned/captured values will need to be placed in the Footer section. If they were placed in the
RunTime section, they would be blank since the data is not captured at that point.
RunTime Objects
This edit group allows the user to implement any of the PrintBoss commands listed later in this chapter. These
commands provide the ability to create any form design the user may require.
Assignments made in this tab can only be used in the Footer or Page Back Objects tabs unless the Pre-process
Assignments option is selected on the Special Controls tab.
See Chapter 9, Form Files, for more information on #Assign.
Footer Objects
This group of design objects is processed at the end of printing the form. The same commands are available in this
group but they are processed after all of the other commands.
Variables assigned in the RunTime Objects tab can be referenced here (see #Assign in Chapter 9).
Proprietary Objects
Occasionally the Proprietary Tab may appear. This is similar to the RunTime Objects tab and holds commands that
need to be processed prior to the Footer Objects Page. Often this tab will contain scripts used with ACH.
Misc
The Misc tab allows users to import and manage jpg or bmp files to use in the background of a PrintBoss form. A
#Pic command must reference this file in the RunTime Objects section of the form in order to view or print the
graphic. The graphic is selected by clicking on the button at the end of the Graphic File option on the Pic Command
Properties window.
This tab also includes special treatment of key fields during the creation of the PrintBoss Work File. These fall into
the following two categories.
KEY FLDS RE-CALC FORWARD
This section provides options that allow PrintBoss to carry forward or re-calculate values from selected fields under
special circumstances. This area is primarily for use by a Wellspring Software Technician.
PrintBoss 182 Electronic Copy
KEY FLDS RE-CALC BACKWARDS
This section provides options that allow PrintBoss to process documents backwards immediately after they are
processed forward for the purpose of counting or calculating values from the end of a group or file. This area is
primarily for use by a Wellspring Software Technician.
Page Back
This tab only appears when the Enable Printing on Back of page option is enabled on the Special Controls tab. This
script uses commands the same way as Footer Objects, but all items will appear on the reverse side of the page.
A printer with duplexing capabilities is necessary for this page back feature to function properly. If duplexing is not
activated, the page back information will be printed on a separate page.
PDF
This tab only appears when the Destination Printer/Device in the Multi-Parts & Settings tab is set to PDF.
DESTINATION FILE NAME
Enter a path and filename to store the PDF file.
Example: C:\PDF\Invoices\inv.pdf
Click the information button to view instructions for creating dynamic file names. It is often helpful to
include the date and time as part of the file name or path. Variables from the form can also be used, enabling
values like Company Name or Invoice Number to be part of the file name or path. Counter characters may
be used at the end of a file name to dynamically increment a sequential number.
Example: C:\PDF\Invoices\{YYYYMMDD} {DocNo}
CONFIRM DESTINATION FILENAME AT RUNTIME
Enable this option to provide a pop-up window displaying the current destination for the file. The prompt will allow
the destination to be changed before printing the documents.
NEW FILE NAME GENERATION
This option determines when a new PDF file name is created.
Start of Batch
Create a new PDF file at the beginning of each batch.
Each New Page
Create a new PDF file for each page.
Each New DocNo
Create a new PDF file for each new document number. This option assumes the form is utilizing the {DocNo}
variable. This option should be used whenever variables are used in the PDF File Name. The use of variables in the
File Path or Name is only available in the Enterprise edition of PrintBoss.
APPEND OVERWRITE METHOD
Select the appropriate option to Overwrite Existing File automatically, Append to Existing File automatically, or
prompt the user to choose Overwrite, Append, or Cancel. Note the Append option is only available for PDF and
Tiff file types.
FILE TYPE
The default file type is PDF. However, Tiff, JPG, and BMP files can also be created. The File Properties section
changes to display options for the chosen file type. The Append option is only available for PDF and Tiff files.

PrintBoss
183 Electronic Copy
PDF FILE PROPERTIES
Resolution of PDF File
Choose the resolution of the PDF in DPI (Dots Per Inch). Typically, the best resolution for a black and white
document is 300 dpi (the default setting). Higher DPI values will generate a larger PDF file. Choose the 216 dpi -
Color setting if there is color or shades of gray in the PDF file. The best choice for most cases is 216 dpi - Color.
Searchable Text PDFs
Select this option to create a searchable PDF file. PDF readers, such as the Adobe PDF Reader, will be able to
search for specific text in this file.
NOTE:
Selecting the ‘Searchable Text PDFs’ feature will remove any hyperlinks from the document.
Embed TrueType Fonts
Select this option to permanently embed TrueType Fonts into the PDF file. This increases the size of the file, but it
maintains the look and size of the fonts. Otherwise, a substitute font may be used and the text could appear smaller.
This option is only available when the Searchable Text PDFs option is selected.
SECURITY
PrintBoss Enterprise users may activate additional security that is recognized by all PDF readers.
View Only
Select this option to only open and read PDF files. No printing.
Read Only in a PDF editor
Select this option to prevent anyone from opening the file in a PDF Editor and making changes.
Password to open PDF
Enter a password that must be used to open and read the PDF file. One password is assigned to all PDF files. No
variables can be used here. A dynamic password may be assigned in the Form's Footer Objects section. The use of
a Variable to define a dynamic password is only available in the Enterprise edition of PrintBoss.
TIFF FILE PROPERTIES
Compression Method
Choose a compression method if you need to reduce the size of the TIFF file. The default value is No Compression
All Colors. The choices are the standard compression methods for a TIFF file.
Changes to the Compression Method also affect the color depth of the file. The best color depth is True Color
(24bit). Higher color depth will generate larger TIFF files. Some color depth choices are not available with certain
Compression Methods.
Resolution (DPI)
Choose the resolution of the TIFF in DPI (Dots Per Inch). Typically, the best resolution for black and white
documents is 300 dpi. Higher DPI values will generate larger TIFF files. The default value is 150.
JPEG FILE PROPERTIES
Quality
Choose a Quality setting if you need to reduce the size of the Jpeg file. The default value is 75 with 100 as the best.
Click on the right arrow to access a slider bar to choose a different quality level. The slider moves in increments
of 5.
Resolution (DPI)
Choose the resolution of the Jpeg in DPI (Dots Per Inch). Typically, the best resolution for black and white
documents is 300 dpi. Higher DPI values will generate larger Jpeg files. The default value is 150.
BMP FILE PROPERTIES
Resolution (DPI)
Choose the resolution of the BMP in DPI (Dots Per Inch). Typically, the best resolution for black and white
documents is 300 dpi. Higher DPI values will generate larger BMP files. The default value is 150.
PrintBoss 184 Electronic Copy
Positive Pay
Positive Pay is no longer a tab on the Form Editor. Instead, a separate window can be opened by clicking on the
page symbol to the right of the <Positive Pay File> Destination.
See Chapter 19, Positive Pay, for additional information.
FORM FILE COMMANDS
Form File commands are used to accomplish various tasks in PrintBoss. These commands are entered on the Object
tabs of the Form Editor. The following is a description commands not included in Chapter 9.
#AssignLines
#AssignLines <VarName>
This is used to assign several lines of data at one time. This is very similar to the #Paragraph command. It appends
all lines after the #AssignLines command until another #command is encountered. It is recommended that a #Rem
command be placed at the end of the paragraph of lines after the #AssignLines command.
For example:
#AssignLines EmailBody
Thank you for your order from Wellspring Software, Inc.
The invoice for your order is attached to this e-mail for your convenience.
The original paper invoice is being mailed.
Please call us with any questions.
#Rem – end of EmailMsg
Once assigned, the variable is actually a multiple line variable. See the Multi-Line Variables section in Chapter 9.
#AssignmentsBlock
#AssignmentsBlock X1, Y1, X2, Y2 or #AssignmentsBlock Y1, Y2
This command is used to capture a group of assignments made in a specification or report. It allows variable names
and values to be assigned dynamically from the host. The first text object on any line within this block becomes a
variable name and the following text objects become the value (more than one object is appended together). All text
within the block can be blanked out after capturing.
For example, assume the following lines are in the defined block:
DocNo 1234
DocRecip John Smith
DocAmnt $1,200.00
PrintBoss reads the first text object in each line (i.e. DocNo, DocRecip, and DocAmnt) as the variable names and the
second text object in each line (i.e. 1234, John Smith, and $1,200.00) as the variable values. This method is often
used with Adagio Software.
#Assigns
#Assigns 'VarName', 'Value' [, CaptXRange, CaptYRange [, Options]]
The parameters for #Assigns are identical to the #Assign command (without the ending “s”) and is used to assign a
multi-line variable. There are 2 methods to assign a value, though they differ from the #Assign command.
The first method is to simply provide the value by entering the Value parameter. Each time an additional #Assigns
command occurs with the same VarName, an additional line is added to the multi-line variable. For example:
#Assigns EmailBody, "Thank you for your order from Wellspring Software, Inc."
#Assigns EmailBody, "The invoice for your order is attached to this e-mail for your convenience."
#Assigns EmailBody, "The original paper invoice is being mailed."
PrintBoss
185 Electronic Copy
#Assigns EmailBody, " "
#Assigns EmailBody, "Please call us with any questions"
The second method to assign a value is to supply coordinates to capture data. Of course, it is expected that the
vertical range includes a region large enough to capture more than one line. If the option Add together fields in
horizontal range is checked, each ROW of text objects will be added together and treated as a single element in the
multi-line variable. For example, to capture a variable for the payee lines in a check that occur between 8 and 9.5
inches down the page, the following command might be used:
#Assigns PayeeAds, "", 1.183/.0100, 8000-9.500, LRB1WS |This command captures several lines of text
at once. These lines can be printed as a
group using the VText command.
The first value range defines the CaptXRange and the second defines the CaptYRange. The letters and number
represent various options for the captured text. For example, B indicates the raw data is blanked out after capture.
See Chapter 9, Form Files – Multi-Line Variables, and Form File Commands – for more information.
#BMP
#BMP X, Y, "GraphicFileName"[, Options]
This command prints a graphic on the document and operates the same as the #PIC except that it expects a .BMP
file type. It has been replaced in favor of the #PIC command. See #PIC in Chapter 9 for more information.
#Disable / #Enable / #SetEnable
The #Disable and #Enable command pair allow for deactivation of sections of commands. When #Disable is
encountered, all commands following it will be ignored until #Enable occurs. At least one of the 2 commands will
logically have a condition. (See Conditional Commands in Chapter 9). It is not necessary to have matching pairs.
The #SetEnable [Condition] is an alternate way to enable or disable the processing of commands. For example,
#SetEnable[true] is equivalent to #Enable and, likewise, #SetEnable [false] is equivalent to #Disable.
Here is a simple example of using these commands to create blocks of commands (in this case just one text
command) that run based on a condition. It must be unconditionally enabled so all further lines will be processed
normally.
#SetEnable [Copy, 0]
#Text 1, 10, Arial/12, ‘This is my message for Copy 0’
#SetEnable [Copy, 1]
#Text 1, 10, Arial/12, ‘This is my message for Copy 1’
#Enable
Use of the #If / #Endif commands is recommended instead of using #Enable / #Disable / #SetEnable when
reasonable. These newer commands are clearer and can be nested more logically.
#Else
See #If / #ElseIf / #Else / #Endif.
#ElseIf
See #If / #ElseIf / #Else / #Endif.
#Enable
See #Disable.

PrintBoss 186 Electronic Copy
#EndIf
See #If / #ElseIf / #Else / #Endif.
#FileErase
#FileErase <FileName/Path>
This command will erase the file(s) specified by the FileName/Path. The FileName may include an * (asterisk) or
? (question mark) as a wildcard(s). It is mainly used internally by PrintBoss but is available if needed.
#For N =
#For N = <starting number> TO <ending number> [STEP n.nn]
This command provides a loop to repeat the number of times indicated by the starting and ending numbers.
Designate the end of the loop with a #Next N command. By default, each loop will increment the value of n by 1.
Append the phrase STEP to the end of the line followed by the desired increment to change the step. All three entry
values (Starting Number, Ending Number, and Step) may be decimal numbers (i.e. 1.456). The loop will end at the
matching #Next command when the value of n is greater than the ending number after it is incremented by the
STEP.
#ForceWinPrintJob
#ForceWinPrintJob
This command forces the Windows print job to end and a new print job to start with a specified page. Typically, a
condition is placed on this command. Otherwise, a new print job would be forced with every single page. An
example of using this command is to start a new Print Job with each new invoice number so all the pages of the
same invoice number can be stapled by an advanced printer that supports stapling by print jobs. The Pre-process
Assignments option must be set ‘Special’ on the Special Controls tab of the Form Editor for this command to work.
For example:
#[Copy,0][!=e, ÷{DocNo}÷, ÷{Prev.DocNo}÷]ForceWinPrintJob
See Chapter 9, Form Files – Conditional Commands.
#GoToMarker / #Marker
#GoToMarker <MarkerName>
#Marker <MarkerName>
The GoToMarker command jumps FORWARD in the RunTime Objects, Footer Objects, or Page Back Objects tabs
without considering ANY commands in between this command and its Marker. Even #Enable/#Disable and
#If/#Endif commands are ignored. The #GoToMarker must be used in conjunction with a #Marker command to
identify where PrintBoss should jump. The GoToMarker should not be used to jump into or out of matched pairs of
#If / #Elseif/ #Else/ #Endif commands.
#HGrid
#HGrid X1, Y1, X2, Y2, Ya, Yb ...Yz [, Options]
This command creates a frame and then draws horizontal lines to fit into the frame. Options provide further
modifications with corner radius, shadow, and edge shading. This command has been largely replaced by the #Grid
command.
X1, Y1
These are the coordinates for the top left corner of the frame in inches from the left and top edge of the page. The
coordinates may be entered in thousandths of an inch.
X2, Y2
These are the coordinates for the bottom right corner of the frame.

PrintBoss
187 Electronic Copy
YA, YB…YZ
This parameter represents any number of lines drawn horizontally across the frame. Each line is defined as the
distance in inches from the top of the page.
OPTIONS
Radius
/Rnnn where nnn is the radius size. For example, /R.1 is a corner radius of 1/10 of an inch.
Edge Shading
/STnnn (Shade Top), /SLnnn (Shade Left), /SBnnn (Shade Bottom) or /SRnnn (Shade Right) where nnn is the width
of the edge shade in inches.
Shadow
/SHDnnn where nnn is the width of the shadow in inches.
Line Color
/0LC followed by a number representing a color. The color number can be 4 to 8 digits.
#If, #ElseIf, #Else, #Endif
#If [Parameter]
#ElseIf [Parameter]
#Else
#EndIf
Blocks of code can be conditionally processed based on the parameters that follow #IF and #ElseIf commands.
There must be a matching #Endif whenever a #If [Parameter] occurs. Optionally, any number of #ElseIf
[parameter] sections can follow the original #IF. Finally, a single #Else may occur after the #IF and all #ElseIf, but
before the #Endif.
#If / #Endif structures may be nested. They may not stretch from one section to the next, such as going from the
RunTime to the Footer Objects section.
Use of the #If / #Endif is encouraged over the #Enable / #Disable / #SetEnable, and neither constructs should pass
across the boundaries of the other type. For example:
#If «[FileExists, "{BLogoFile}"]»
#If «[Inu, ÷/AB÷, {BLogoOp}]»
#Pic {BLogoX}, {BLogoY}, "{BLogoFile}", "/Size:{BLogoSize} ",,DEFGA
#Text 0.35, {LastLineYEnd+.03}, "Arial/12/B", ÷{BCName}÷
#Else
#Pic {BLogoX}, {BLogoY}, "{BLogoFile}", "/Size:{BLogoSize} ",,DEFGA
#Text {LastLineXEnd+.05}, 7.750, "Arial/12/B", ÷{BCName}÷
#Endif
#Else
#Text 0.350, 7.750, "Arial/13/B", ÷{BCName}÷
#Endif
Notice there are delimiters around the parameters. These are created automatically by PrintBoss when you double
click on the #IF to enter the parameter(s). The delimiter can be added manually by clicking Ctrl+’. This keyboard
shortcut only works within an Objects tab of the PrintBoss software.
Two or more parameters may be used. Each parameter needs to be enclosed in square brackets [ ]. Two or more
parameters default to ‘and’. For example:
#If «[Empty, "{DDInfo1}"][!In,'DD','{CChkNo}']»
This can be changed to an ‘or’ by adding two pipe symbols || between the parameters as follows:
#If «[Empty, "{DDInfo1}"]||[!In,'DD','{CChkNo}']»
See PrintBoss Conditional Commands in chapter 9.
PrintBoss 188 Electronic Copy
#Lines
#Lines X1, Y1, X2, Y2, … Xn,Yn [,/Wn.nnn] [,/C<color>]
This command draws a line from point X1, Y1 to Xn, Yn, passing through all the points in between. The width and
color are set as options.
#LineSet
#LineSet StartingY, LineSpacing
This command is useful in formatting a series of commands with coordinates that follow one after another. Use this
command prior to the first line to define the starting Y coordinate as well as the consecutive line spacing. This is
especially helpful in eliminating blank lines from an address used in conjunction with conditional #Text commands.
This command overrides any internal variable, such as {LineY}. The variable {LineY+} will use the current
coordinate and increment it internally by the LineSpacing amount.
The following example uses the #LineSet to place the Bank Fractional Code directly under the last non-blank bank
address line.
#LineSet 7.9, .15
#Text 3.8, {LineY+}, 'Arial/12', '{BName}'
#[!Empty, BAds1]Text 3.8, {LineY+}, 'Arial/12', '{BAds1}'
#[!Empty, BAds2]Text 3.8, {LineY+}, 'Arial/12', '{BAds2}'
#[!Empty, BAds3]Text 3.8, {LineY+}, 'Arial/12', '{BAds3}'
#Text 3.8, {LineY+}, 'Arial/12', '{BFrac}'
NOTE:
It is more common to use the {LastLineY+n.nnn} variable instead of using this command.
#Macro
#Macro X, Y, PrinterMacroCode
This command calls a Hewlett-Packard printer macro using Windows Passthrough printer escape sequence. If X
and Y are passed as non-zero, then the cursor control commands will be executed to place the cursor prior to calling
the macro.
#Marker
See #GoToMarker.
#Next N
This command indicates the end of a loop.
See #For N =.
#PaperBin
#PaperBin <PaperBin number>
This command conditionally selects the source paper bin based on dynamic values and overrides the value set in the
Multi-Parts & Printers tab of the Form. For example:
#[C,1]PaperBin 261
NOTE:
The Pre-process Assignments property on the Special Controls tab of the Forms MUST be set to ‘Special’ to use
the #PaperBin command (EDIT / FORM FILES / <highlight form> / EDITOR / SPECIAL CONTROLS).
PrintBoss
189 Electronic Copy
The command expects the numeric ID of the tray in the PaperBin parameter. To determine the numeric ID of the
tray: Select FILE / PRINTER SETUP in PrintBoss. Choose the printer (this may be temporary, and when finished,
set back to the desired default printer.) Click on the Printer Setup button at the bottom of the screen. Find the
Source field, select the appropriate tray, and click OK. Notice the PrintBoss Printer Setup screen shows the selected
Paper Source tray with a number preceding it in parentheses. Take note of this number to enter in the PaperBin
command.
If the PaperBin number (or Tray ID) evaluates to 0, the command is ignored and the tray is selected based on the
parameters specified in the Multi-Parts & Printers tab or the printers default tray.
#Paragraph
#Paragraph X, Y, "Font/Size", Spacing
This command places a paragraph of text without printing each line as a separate #Text command. The paragraph
command ends as soon as the program encounters the next #. A good practice is to use the remark #REM or
#ParagraphEnd command to end a paragraph.
The properties of the font in the paragraph are set similar to the #Text command.
The paragraph will NOT automatically word wrap. Lines appear exactly as they are entered in the command. Set a
Width to the paragraph to cause lines to append and apply word wrap. New paragraphs within the text will occur
after blank or indented lines. Be sure to start the text in the first column in the editor if the width is set to initiate
word wrap. If the width is enabled, the justification box may also be checked to force the right edge of paragraphs
to align.
For Example:
#Paragraph 3.500, 5.500, "Arial/10", .167, N,
This is the first line of the paragraph.
This is the second line of the paragraph.
#ParagraphEnd
Add //XJ2.00 immediately after the font size to right justify and set a width of 2 inches. The N indicates the Strict
Paragraph End Flag is not checked.
#PassThru
#PassThru X, Y, PassThroughString
The character string is passed directly through to the printer. The Windows’ printer driver does nothing to the
string. If the X or Y parameters are non-zero, the cursor position will be set to the X and Y location prior to the
PassThru and then the cursor position will be popped. If the ASCII character number 127 appears in the string, it
will be replaced with ASCII character 27 to allow Escape sequences in the string.
This is rarely used and its operation differs between printers due to differences in the way the Windows
PassThrough escape sequence was built into the printer drivers.
#PCX
#PCX X, Y, "GraphicFileName" [, Options]
The PCX command prints a graphic on the document. It operates the same as the #PIC except that it expects a PCX
or SIG file type. See #PIC in Chapter 9 for details on the operation of this command.
#Pie
#Pie <CenterX>, CenterY>, Radius, Start Degree, End Degree [, Options]
This command creates a circle (or part of a circle) in the Form. Zero degrees points to 12 o’clock.
For example:
#Pie 5.00, 4.00, 1.00, 0, 180
The object appears as:

PrintBoss 190 Electronic Copy
OPTIONS
/F<FillString> – This option defines the contents of the pie shape.
#Polygon
#Polygon X1, Y1, X2, Y2, X3, Y3, X4, Y4, …. (up to 20 different points) [/F<FillString>]
This command creates a polygon on the Form. Each point of a polygon is a different coordinate. The last
coordinate connects with the first coordinate, enclosing the polygon. The command can have up to 20 different
coordinates.
For example:
#Polygon .75, 1.15, 2.45, 5.00, 7.00, 6.35
The object appears as:
#Rem
Anything that follows #Rem is a remark or comment. Though any line without a ‘#’ is a comment, there are times,
like at the end of a paragraph, when it is helpful to enter #Rem to end a command.
#SetEnable
See #Disable / #Enable / #SetEnable.
#SIG
#SIG X, Y, "GraphicFileName" [, Options]
#Sig prints a signature graphic on a document. This command is virtually the same as #PIC, except the #SIG Hide
File Errors option is forced to true and cannot be changed. Use of #PIC instead of #SIG is recommended.
#SkipPage
#SkipPage
This command tells PrintBoss to skip the processing of a page. A condition must be placed on this command or all
pages will be skipped and nothing will be processed! The SkipPage command may be in either the RunTime
Objects or Footer Objects tabs. Pre-process Assignments MUST be set to ‘Special’ on the Special Controls tab of
the Form Editor to use the #SkipPage command.
The center
point would
be 5 inches
left and 4
inches from
the top of
the page.
PrintBoss
191 Electronic Copy
Unlike the #ProcessPage command, the #SkipPage command only skips and places an “S” in the printed column of
the work file or places an “s”, indicating an error. It does not provide a condition to process a page.
See Conditional Commands later in this chapter.
#SubCopyCount
#SubCopyCount SubCopyNo
The SubCopyCount command was created to print multiple copies of a specified PrintBoss Form Copy. For
example, Copy 0 on the PrintBoss form needs to be printed multiple times based on a value that is printed on form.
Copy 1 always needs to be printed 3 times. The commands may look like the following:
#[C,0]SubCopyCount {SubCopyNo} – Print the number of copies for Copy 0 based on the value assigned to
{SubCopyNo}.
#[C,1]SubCopyCount 3 – Always print 3 copies of Copy 1.
The variable {SubCopyNo} is usually assigned on the RunTime Objects tab of the PrintBoss form. This value may
change with each document.
NOTE:
This is an Enterprise only feature.
#VGrid
#VGrid X1, Y1, X2, Y2, Xa, Xb ... Xz [, Options]
This command creates a frame and then draws vertical lines to fit into the frame. This command is useful when
creating the background columns for the detail section of an invoice. Options provide further modifications with
corner radius, shadow, line color, and edge shading. This command has been largely replaced by the #Grid
command since the internal dimensions of the #Grid are relative, making it easier to move the grid.
X1, Y1:
These are the coordinates for the top left corner of the frame in inches from the top left edge of the page. The
coordinates may be entered in thousandths of an inch.
X2, Y2:
These are the coordinates for the bottom right corner of the frame.
XA, XB … XZ:
This parameter represents any number of lines drawn vertically across the frame. Each line is defined as the
distance in inches from the left edge of the page.
For example, the VGRID command could be used as follows to create a box the width of the check with four
columns:
#VGRID 0.250, 0.500, 8.250, 4.000, 2.000, 4.000, 6.000
This command produces a frame with three vertical lines inside. The first vertical line is at 2 inches from the left
edge of the page, the second vertical line is at 4 inches from the left edge of the page, and the third vertical line is at
6 inches from the left edge of the page.
PRINTBOSS CONDITIONAL COMMANDS & PARAMETERS
The following table lists the conditions available for use with the form commands.
Condition Parameters Notes
= 'String1', 'String2' Compares only as many characters as in string2

PrintBoss 192 Electronic Copy
=u 'String1', 'String2'
Same as "=", with Upper case Compare Option
(not
case se
nsitive)
=e 'String1', 'String2'
Same as "=", with Exact match Compare Option
(case sensitiv
e)
=ue 'String1', 'String2'
Same as "=", with Upper case and Exact match
Compare
O
p
tions
== 'NumericValue1', 'NumericValue2' Compares 2 numeric values
<> 'NumericValue1', 'NumericValue2' Compares 2 numeric values
<= 'NumericValue1', 'NumericValue2' Compares 2 numeric values
>= 'NumericValue1', 'NumericValue2' Compares 2 numeric values
< 'NumericValue1', 'NumericValue2' Compares 2 numeric values
> 'NumericValue1', 'NumericValue2' Compares 2 numeric values
AmntRange LoRange, HiRange, Test Amount Confirms DocAmnt is within the stated range
Assigned
'<Name of assigned variable to
tes
t
>'
True if assigned by #Assign or PB#Assign (Do
N
ot Include
Br
aces!)
Captured
'<Name of captured variable to
test>'
True if successfully captured from raw data (Do
Not Include Braces!)
Copy 'String of Digits' True if current copy is in string of digits
Dates= '<Date1>', '<Date2>' True if dates are equal
Dates> '<Date1>', '<Date2>' True if Date1 is greater than Date2
Empty 'StringToTest' True if StringToTest is empty
False Always false, helpful for debug purposes
FileExists '<FilePathName>' True if the specified file name exists
Flagged '<Bank Flag Name>'
True if expression starts with T,Y,t,y (True or
Yes)
In
'StringFragment',
'StringToSearchIn'
True if Fragment is anywhere in SearchIn, case
sensitive
Inu
'StringFragment',
'Str
i
ngToSearchIn'
Same as In, but not case sensitive
InsideOfCreation True when adding record to work file
InsideOfForwardCalc True when re-calculating key fields forward
InsideOfBackwardCalc True when re-calculating key fields backward
InsideOfRender
True when rendering or processing from work
file
PreLoadLoop
True when Pre-process Assignments is selected
on t
he Speci
al Controls t
ab
of the Form Edi
to
r
True Always true, helpful for debug purposes
Type 'SourceTypeName' True if current source is in SourceTypeList
View Only Sets an item to View, but not to print

PrintBoss
193 Electronic Copy
NOTE:
Although it is helpful for us humans to see the condition names spelled out completely, only as many characters as
is needed to make the condition unique are required. For example, Fi is enough to register as the FileExists
condition, or As is enough to register as the Assigned condition, or E as the Empty condition.
PrintBoss
195 Electronic Copy
Appendix
C
APPENDIX C: #TEXT FEATURES
SUBSTITUTION FUNCTIONS TABLE
There are times when a text command needs to be limited, formatted, or altered for special circumstances.
Substitution functions are available for the #Text command to accommodate those special situations. A list of
Substitution functions is available in the Form Editor by RIGHT clicking on an Objects tab and selecting List/Stuff
Assignments. Alt+A calls the list as well. Click on the plus sign in front of Substitution Functions to view the list.
A table of these functions follows.
Function Description
Abs: ‘<Str>’
Case:
'<Str>'
,'U
/L/P'
Chr: '<ASCII Value>'
CityStateZip
:
'Ci
t
y
State Z
ip stri
n
g'
CurrentDate: 'mm/dd/yyyy'
CurrentTime
:
'h
h:mm:ss t
t
'
Delete: '<Str>', <StartingCharIndex>, <NumToDelete>
DocAmnt
:
/HidDec /Zero
/Width:nn /Commas /Tr
im
DocWordAmnt DocWordAmnt: <Line 1 or 2> [, <LineLength90> [, <CurrencyDollars> [, <Style A or B> ]]]
Eval:
'<N
ume
ric Str>'[,
<
Num
of Decima
l P
laces>]
FormatDate: '<DateInExpr>', 'mm/dd/yyyy' [, AddDays [, AddMonths [, AddYears [,EOM]]]]
FormatDate2: '<DateInExpr>’,’<DateInExprMask>', 'mm/dd/yyyy' [, AddDays [,AddMonths [, AddYears
[
,EOM]]]]
FormatNum: '<NumStr>', WholeDigits, DecimalDigits, '<LeftFill>', 'RtFill', 'HideDec/Commas'
If
'<Conditi
on
>','<TrueStr>','
<
Fa
lseStr>'
Length: <value>
Mod:
<Val
ue>,<Divi
sor>
Pad: '<Str>', <Len> [, <Left, Rt, and/or Trunc> [, <PadChar>]]
Pos:
‘<Substr
>’,’<Lo
o
kI
nSt
r
>
’
, [, <
Occ
urrences’> [
,
Up
percase]]
PutDashInZip: '<ZipCodeString>'
RECAmnt
:
'#,###,##0.00
'
RECDate: 'mm/dd/yyyy'
RECTime
:
'hh:mm:ss tt'
StrExtract '<OrigString>', '<Delimiter>', <Occurrence>[, '<mode>']
StrExtract
'
<OrigStri
n
g
>', 'CDF
', <Com
m
aD
eli
m
i
t
edFldO
ccu
rrence>[, '<
m
ode
>']
PrintBoss 196 Electronic Copy
StrStuff
:
'<OrigS
t
ring>'
, '<StrToStu
ff>
', <Star
tCharIndex>
StrTran
:
'<OrigS
tri
n
g>
', 'SearchKey'
, 'ReplKey'
[
,
'
<Occurr
e
nces>
'
[
, Re
cursiv
e]
]
SubStr
:
'<St
r>', '
<Start
CharN
o
>', <Lengt
h
>
Trim
:
'<Str>'
[
,
<Left/R
ight/Bo
t
h>
]
TrimAll
'
<St
r>'
WordAmnt
:
<
Amnt>,[ <L
ine
1or2>[, <
L
ineLen
gth90>[, <Cu
rre
ncydolla
rs>[, <Style A
or
B>]]]]
NOTE:
Parameters enclosed in brackets [ ] are optional.
SUBSTITUTION FUNCTION DESCRIPTIONS
The following is a complete list. See Chapter 10, #Text Command, for descriptions of the more common
Substitution Functions.
Abs
Abs: '<String>'
This function changes negative numbers to positive numbers.
Case
Case: '<String>',’U/L/P’
This function changes the case of text to Upper, Lower, or Proper (first letter of word capitalized).
Chr
Chr: '<ASCII Value>'
Sometimes it is necessary to insert a specific ASCII character regardless of the font used. This function inserts these
ASCII characters and is often used for carriage returns in Positive Pay.
CityStateZip
CityStateZip: 'city state zip string'
This function is used to clean up data when all three fields are included in a single text string. It removes extra
spaces (over three consecutive spaces) and adds a comma after the city if necessary.
CurrentDate
CurrentDate: 'mm/dd/yyyy'
This function returns the current date as specified by the Windows Regional date.
CurrentTime
CurrentTime: 'hh:mm:ss tt'
This function returns the current date as specified by the Windows Regional date. Inserts the current time formatted
according to the mask. If no mask is passed, the Windows regional time mask will be used. The ‘tt’ forces a
12-hour clock with am or pm in place of tt. See Chapter 9, Form Files – Date & Time Format Masks, for more
format options.
PrintBoss
197 Electronic Copy
Delete
Delete: '<Str>', <StartingCharIndex>, <NumToDelete>
Sometimes it is necessary to delete some of the characters in a string. This function deletes characters starting at a
specific location for the number of characters indicated. This is most often used to eliminate extra spaces in the
middle of a string that repeat at the same location.
DocAmnt
DocAmnt: /HideDec /Zero /Width:nn /Commas /Trim
This function is used to specifically format the document’s amount as recorded in the work file Amount column.
Parameter Description
HideDec Determines if a decimal appears or not; only the H is required to hide the decimal
Z
er
o
N
umber of ze
ros
or places
follow
ing
the deci
mal
,
typic
ally 2
Width:nn nn specifies maximum width of the value in characters, such as 10
Commas Indicates whether or not commas separate thousands and millions; only the C is required to
display commas
Trim Trims the value; only the T is required to trim both sides of the DocAmnt.
FormatNum is more commonly used to format number as it has more features.
DocWordAmnt
DocWordAmnt: <Line 1 or 2> [, <LineLength90> [, <CurrencyDollars> [, <Style A or B> ]]]
This function calls the WordAmnt function using the current DocAmnt as the amount to be converted to words. See
WordAmnt function for a description of the parameters. There are several different syntaxes for this command
depending on whether Line 1 or 2 is part of the function name or the first character. An example of each syntax is
displayed below.
{DocWordAmnt: 1,90}
{DocWordAmnt1: 90}
{DocWordAmnt1.90}
{DocWordAmnt:1, 90, “Canadian Dollars”}
This function only works when DocAmnt is assigned.
Eval
Eval: ‘<Numeric Str>’[, <Num of Decimal Places>]
This function evaluates mathematical equations. The second parameter sets the number of decimal places to which
the answer is carried. Zero is the default when the Num of Decimal Places parameter is missing. For example:
#Assign X, ÷{Eval:"2.85+({n}*0.2)",3}÷
This function assigns the X value for placing detail on a deposit slip. The value is calculated to 3 decimal places.
This assignment is included in a #For loop where {n} is defined as 1 to 27. The loop starts at 1 and increments on
each pass until it reaches 27.
FormatDate
FormatDate: '<DateInExpr>', 'mm/dd/yyyy' [, AddDays [, AddMonths [, AddYears [,/EOM/FOM]]]]
This function is used to format a date. <DateInExpr> represents the date to format (or a variable referencing a date)
followed by the appropriate format mask. Typically {DocDate} is used as the variable when assigned in the form.
The mask may change the order or the separators of the date. By default, the AddDays/ AddMonths/ AddYears
parameters are 0. Insert positive or negative values for these parameters to shift the date accordingly. Include the
PrintBoss 198 Electronic Copy
"/EOM" option to return the end of month, or the last day of the month for the DateInExpr. FOM will return the
first day of the month for the DateInExpr. If the DateInExpr is empty, the FormatDate will use the date displayed on
your computer.
FormatDate2
FormatDate2: '<DateInExpr>', '<DateInExprMask>', 'mm/dd/yyyy' [, AddDays [,AddMonths [, AddYears
[,/EOM/FOM]]]]
Same as FormatDate, except this function includes identifying the DateInExprMask format for those cases where the
input is different than the Windows’ ShortDateFormat.
FormatNum
FormatNum: '<NumStr>', WholeDigits, DecimalDigits, 'LeftFill', 'RtFill', 'H/C'
This function formats the structure of a numeric value and is often used for Positive Pay. The following letters are
used to represent HideDecimal/Commas:
H Hide decimal (used in Positive Pay Scripts)
C Comma is inserted as the thousands and millions separator
These letters can be used separately or together. The following are examples of Hide Decimal and add Comma
separately:
{FormatNum: '{DocAmnt}', 8, 2, '0', '0', 'H'}
In this example, the number of Whole Digits is 8, the number of Decimal Digits is 2, zeros are used to fill Left, zeros
are used to fill Right, and the decimal is hidden. If the DocAmnt is $123.40 it would appear as: 0000012340
Here is an example of a #Text using the FormatNum Substitution function:
#Text 7.950R, 8.500, 'Arial/10/B', ÷**${FormatNum: '{DocAmnt}', 0, 2, '', '0', 'C’}÷
Here, the zero Whole Digits represents any number. Notice there is no Left Fill and the comma is inserted.
If
If: '<Condition>', '< TrueStr >', '<FalseStr>'
This function is used to define both results when a condition is evaluated. For example:
If: "[Flagged,{BFlag2}]", "Canadian Funds", "US Funds"
Length
Length: <Value>
This function returns the length of everything AFTER the colon, including spaces. For example:
#[V]Text 0.2, 0.00, Arial/10, «{Length: ÷{InvNo}÷}»
This line would display the number of characters and spaces in the {InvNo} string.
Mod
Mod: <Value>, <Divisor>
Use this function to determine the number of times a task is performed. For example, to place three details on a
single line, test the counter against a divisor or 3:
#Text 0.2, 0.00, Arial/10, «{Mod:÷{rowcounter}÷,3}»
If the evaluation above returns a value of zero, a CR/LF can be inserted.
PrintBoss
199 Electronic Copy
Pad
Pad: '<Str>', <Len> [, <Left/Rt,/Trunc> [, <PadChar>]]
This function defines the length of the string and adds extra characters when the string is short. Spaces are the
default characters when PadChar is not defined. This function is often used with Positive Pay.
The option parameter may specify L, R, or T for Leftpad, Rightpad, or Truncate. The Truncate will truncate it to the
length <Len> specified.
Pos
Pos: '<SubStr>', '<LookinStr>' [,<Occurrences> [,Uppercase]]
This function returns the position of a sub string within a string. For example:
#[View Only]Text 8.200R, 6.825, 'Arial/12', «{Pos:'$',÷{Deposit}÷, 1,}»
Returns the character position of the first instance of a dollar sign in the string Deposit and displays it in the view at
the specified coordinates.
PutDashInZip
PutDashInZip:'<ZipCodeString>'
This function inserts a dash into a zip code. This is usually used when the accounting software database sends a zip
code with the complete 9-digit American zip code minus the proper formatting.
RECAmnt
RECAmnt: '#,###,##0.00'
This function displays the amount of the document at the time the work file was generated. The only parameter is
the mask, and it is optional.
Mask Description
# Digit placeholders that are suppressed if not needed
0
D
i
g
it
place
hol
ders that wi
l
l f
orce a zer
o w
hen no va
l
ue i
s present
, Thousands separator (suppressed if not needed)
RECDate
RECDate: 'mm/dd/yyyy'
Inserts the date the PrintBoss work file was created. The optional mask uses the characters defined in Chapter 9,
Form Files – Date & Time Format Masks.
RECTime
RECTime: 'hh:mm:ss tt'
Inserts the time the PrintBoss work file was generated. The optional mask uses the characters defined in Chapter 9,
Form Files – Date & Time Format Masks.
StrExtract
StrExtract: '<OrigString>', '<Delimiter>', <Occurrence> [,'<mode>'] OR
StrExtract: '<OrigString>', 'CDF', <CommaDelimitedFldOccurrence> [,'<mode>']
This function extracts a substring from within a string. The original string is divided into substrings separated by the
specified delimiter. The following example extracts asterisks from the string before printing the word amount.
Example: #Text 0.675, 9.102, 'Arial/10', ÷{StrExtract:«{WordAmnt}», «**»,1} Dollars÷
PrintBoss 200 Electronic Copy
Parameter Description
Orig
S
t
ri
ng
Thi
s is the
o
rigi
n
a
l
string
wi
th substring
s
de
limited by
th
e delimit
e
r.
Delimiter Delimits the substrings. Often this is a comma or semi-colon, but it may be multiple characters.
This p
arameter is Case
Sensit
ive.
See C
D
F note bel
o
w.
Occurrence Identifies the substring to select within the original string. If this value is negative, it will count
occurrences fr
om
the right. An
o
ccurrence of
-
1
will
return the last s
ubstring
in t
he ori
ginal string.
Mode Enter any of the abbreviations L, R, B or U to indicate Left trim, Right trim, All trim, or
Up
percase.
CDF NOTE:
A special type of string is called a Comma Delimited String. In this case, each substring is delimited by a comma,
but the substring itself may also be delimited with double quotes. This enables the substring to contain commas.
Enter CDF as the delimiter for a Comma Delimited String and PrintBoss will look for the double quote substring
delimiters and treat them appropriately.
StrStuff
StrStuff: '<OrigString>', '<StrToStuff>', <StartCharIndex>
This is used to "stuff" a character or characters (StrToStuff) into a string (OrigString) before the specified number of
characters starting from the left. If the StartCharIndex is 1, the character(s) will be stuffed in front of the OrigString.
If the StartCharIndex is negative, PrintBoss will locate the insertion point by counting characters from the right.
StrTran
StrTran: '<OrigString>', '<SearchKey>', '<ReplKey>'[, '<Occurrences>' [, Recursive]]
This function replaces a substring (SearchKey) with another substring (ReplKey). A number entered in Occurrences
will limit the number of replacements starting from the left of the string. A negative number will count from the
right. An option of -1 will replace the last occurrence in a string. The following example removes all the asterisks
in the DocAmnt string by replacing the asterisks with nothing as symbolized by the two apostrophes.
Example: #Text 7.923R, 8.641, 'Arial/11', "{StrTran: '{DocAmnt}', '*', ''}"
SubStr
SubStr: '<Str>', '<StartCharNo>', <Length>
This function pulls a designated number of characters from a string. The following example removes asterisks after
the check amount:
#Text 8.00R, 8.7, "Arial/12", «{SubStr: ÷{DocAmnt}÷,2,}»|Canadian Style cheque
Trim
Trim: '<Str>' [, <Left/Right/Both>]
This function eliminates spaces at either end of a string based on L, R, or B as a second parameter. The default is R
when no second parameter is entered.
TrimAll
TrimAll: '<Str>'
This function trims the spaces from both ends of the string. It is the same as using the Trim function with the option
of B for both.
PrintBoss
201 Electronic Copy
WordAmnt
WordAmnt: <Amnt> [, <Line1or2> [, <LineLength90> [, <CurrencyDollars> [, <Style A, B, or C> [, <Language
E, F, S> [, <Decimal Length> ]]]]]]
This function takes the numeric value of a variable and translates it into English, French or Spanish text. PrintBoss
places the returned text on line 1 based on the length provided, but it will wrap to line 2 if necessary. If an entry in
the form specifies both line 1 and line 2, each line must use the same specified max line length. All parameters
except <Amnt> have defaults, so any parameter may be left blank and the default value will be used.
Example: #Text 0.700, 9.10, 'Arial/10', ÷{WordAmnt: ‘{DocAmnt}’, 1, 120, Dollars,A,F}÷
Example: #Text 0.700, 9.00, 'Arial/10', "{WordAmnt: ÷{DocAmnt}÷, 1, 90, Kuwaiti Dinars, C, 'E', 3} Fils"
Parameter Description
Amnt
Amou
nt to be converted to a
text exp
ress
ion
Line 1 or 2 Identifies the location for the returned text. Default is 1
LineLen
g
t
h90
L
e
n
gth of
li
ne based on
c
har
acters in
the
line. D
e
fault
is 90
. Max
va
lue is 1
30.
CurrencyDollars The currency phrase will use this value in the text. Default is Dollars. This can be replaced
wit
h oth
e
r denomina
t
ions.
Style A,
B
,
or C
:
D
efault s
t
y
le i
s
A
Style A example: Ten and 11/100 Dollars
Styl
e
B ex
ample:
Ten Do
ll
ars
and
Eleven Cents
Style C example: Ten Dinar and 103 Fils; The new value for ‘Cents’ needs to be added to the code in the
Fo
rm
af
t
er the las
t
brace but befor
e
t
he deli
miter.
Language Translates numeric values to French (,F) or Spanish (,S). The default is English (no
indic
at
or necessary).
De
cimal Length
E
nter the number of char
acters
af
ter
the de
cimal
. For examp
le, 3

PrintBoss
203 Electronic Copy
Appendix
D
APPENDIX D: SECURITY SETTINGS
GENERAL SETTINGS
SECURITY METHOD
The default security is the Standard method. The Advanced method allows User Disks and User Logins to be used
to access secured features. The Advanced method may be selected by default in older versions of PrintBoss that had
security activated and then upgraded to the newer version.
SUPPRESS PRINTING SIGNATURES IN ARCHIVE REPRINTS
Check this option to prevent a secure signature (file with the extension of “.sig”) on a document from printing when
the document is reprinted from the Archive files.
MASTER PASSWORD
The Master Password is used to access the security settings within PrintBoss. The initial password is ADMIN and it
is case sensitive beginning with PrintBoss version 5.71.3. A dialog box will confirm any changes to this field. This
password is also used for duplicating signature disks. This password is NOT linked to logging in to PrintBoss as a
user. It is recommended that an administrator user account be defined with a different password to have full access
to the PrintBoss program once security has been activated.
CONFIRM MASTER PASSWORD
This confirmation dialog box only appears if the Master Password is changed. If the confirmation does not match
the new password exactly, the security window will not close. An error message will warn that the two passwords
do not match and that both must be re-entered. The password is CASE SENSITIVE.
DRIVE WHERE USER DISK RESIDES
This option is only available when the Advanced security method is selected. Indicate the system wide drive letter
for user disks.
AUTO LOGIN MATCHING WINDOWS USERS
PrintBoss will automatically login a user based on their Windows User name if there is a match in the PrintBoss
users list (on the Advanced User Rights tab) when this option is selected.
DISPLAY ONLY PRIMARY FIELDS IN BANK LIST BROWSE AND ENCRYPT KEY FIELDS IN THE BANK LIST
Select this check box to only display primary bank fields (Bank Code, Bank Prompt and Bank Name) in the Bank
List (EDIT / BANK LIST) and encrypt key fields so they cannot be viewed or copied.
ENABLE USER SECURITY IN BANKS
Access to each bank account can be controlled by the Administrator when bank security is enabled. This button will
display ‘Disable User Security in Banks’ when the security is enabled.
PrintBoss 204 Electronic Copy
SIGNATURE DISK LOG
Logging Active
Select this check box to activate a log file for your secured signature disk(s).
SigDisk Log Retention in Days
Set the retention period for the SigDisk log file.
BASIC USER RIGHTS (STANDARD SECURITY MODE)
Determine security by menu function. Check all functions you want all users to access. Functions that are not
checked require specific permission assigned to a user on the Advanced User Rights tab. Otherwise, the function is
not available to the user.
SECURITY REQUIRED (ADVANCED SECURITY MODE)
This tab is only available when Advanced is selected as the Security Mode on the General Settings tab. Select the
menu functions that require security. There are two types of access – password and user device. No security is
required to access a function if there is no check in either the User Logged In or User Device columns. Functions
checked in the User Logged In column require the user to login to PrintBoss with a password to access the function.
Otherwise, it will not be available on the menu. Functions checked in the User Device column require an encoded
USB disk be used for access. Select check boxes in both columns to require User Login along with the use of a disk.
ADVANCED USER RIGHTS (STANDARD SECURITY MODE)
The administrator can define users on this tab and assign access to specific features not available to all users. Click
the Plus button to add a user. Enter the User Name and Password in the User Edit dialog box. All features that
are grayed out are automatically available to all users. Select additional options to assign to the current user. The
Uncheck All button will deselect all optional features (those that are bold). The Check All button selects all optional
features. Click OK to save changes after selecting the appropriate features.
ADVANCED USER RIGHTS (ADVANCED SECURITY MODE)
The administrator can define users and assign access to specific features not available to all users. The type of
access (password and device) is also defined. Click the Plus button to add a user. Enter the User Name and
Password in the User Edit dialog box. All features that are grayed out are automatically available to all users.
Check features on the list to provide access for this user. An L next to a field indicates a user password is required
for access. A D next to a field indicates a user device is required for access. A B next to a field indicates BOTH a
user login AND a user device are required for access. If this user only needs a password for access, click OK.
WRITE A USER DISK
If this user needs a User Device, enter the destination drive and set the expiration date for the device. Enter a
password in the field under the User Name to password protect the device. Place a USB device in the drive and
Write User Disk.
READING A USER DISK
The user name and expiration date of a user device may be verified. Open Security in PrintBoss and enter the
Master Password. The security method should be set to Advanced on the General Settings tab. Select the Advanced
User Rights tab and either edit a current user or add a new user by clicking on the plus symbol. Put the device in the
available USB drive and choose Read User Disk. The user properties will appear in the User Edit window. Click
OK after reading the disk. You may edit the user properties or click Cancel to exit without saving the changes.
PrintBoss
205 Electronic Copy
Appendix
E
APPENDIX E: VARIABLES BY CATEGORY
ACH VARIABLES
The following is a list of variables associated with the ACH function of PrintBoss, but not included in the Bank List
or the Payee List.
Field Name Variable Name Additional Description Length
ACH Active {ACHActive}
Returns Y for Yes or N for No based on whether the
Active checkbox for the Payee List is selected
1
ACH Amount {ACHAmount}
Returns the amount of the ACH after it is calculated
or zero when PreNote is selected. This applies per
account
10
ACH Batch Hash {ACHBatchHash} Entry Hash 10
ACH Block Count {ACHBlockCount} Total of the 940-character blocks 6
ACH Check
Amount
{ACHChkAmnt}
Provides the remaining amount to be paid by check.
The value is zero when there is no remaining amount
10
Effective Entry
Date
{ACHEfctvDate}
This optional field allows a date to be assigned in the
form. Otherwise, the date the file is created is used.
Add ‘!’ to the end of the variable and a calendar will
pop up to select a date on the fly when saving the
ACH file
6
ACH File Hash {ACHFileHash} Entry Hash 10
ACH Mode {ACHMode}
Returns the numeric value of the Mode, i.e. 0 =
Inactive; 1 = Remainder of Check, etc. This is only
used on the Payee List
1
ACH PreNote {ACHPreNote}
Returns the PreNote value if used. The default is
No; otherwise Yes
3
ACH Receiving
Bank Account
{ACHRecvBankAcct}
Account number for the receiving company or
individual
17
ACH Receiving
Bank ID
{ACHRecvBankID} Routing and ABA Number for the receiving bank 9
ACH Receiving
Discretionary
{ACHRecvDisc} Optional data that can be defined by the sender 2
ACH Receiving ID {ACHRecvID}
Optional Payee ID for the receiving Individual or
Company
15

PrintBoss 206 Electronic Copy
ACH Receiving
Name
{ACHRecvName} Receiving individual or company name 22
ACH Status {ACHStatus}
Numeric value of the active account status. Values
less than 1 indicate the record is inactive
1
ACH Total Amount {ACHTotAmnt}
Provides the calculated ACH total amount from all
accounts for this check
10
ACH Transaction
Code
{ACHTransCode}
Indicates credit or debit to Checking account or
Saving account
2
BANK VARIABLES
The following is a list of variables associated with the Primary tab of a PrintBoss Bank Record.
Field Name Variable Name Additional Description Length
Bank Code {BCode}
Code used to define record. This should match the
bank name in your accounting software
50-60
Bank Prompt {BPrompt}
Name given for user recognition. PrintBoss
automatically fills this field with a Record number
25
Bank Name {BName} Name of bank 40
Bank Address 1 {BAds1} Address Line 1 of bank (usually city, state) 40
Bank Address 2 {BAds2} Address Line 2 of bank (often left blank) 40
Bank Address 3 {BAds3} Address Line 3 of bank (often left blank) 40
Company Name {BCName} Company Name as it is to appear on the checks 60
Company Name 2 {BCName2}
2nd Company Name as it is to appear on the checks.
This field is optional
60
Company Address 1 {BCAds1} Company Address Line 1 40
Company Address 2 {BCAds2} Company Address Line 2 40
Company Address 3 {BCAds3}
Company Address Line 3. This may be used for a
telephone number, fax number, or email address
40
Company Address 4 {BCAds4}
Company Address Line 4. This may be used for a
telephone number, fax number, or email address
40
Alias {BankAliasedFrom}
Identifies the Bank Code of the bank record used as
the source for the Alias
50-60
Fractional Code {BFrac} Fractional Code 20
Next Check Number {BChkNo}
Next Check Number Counter (only used if Check #
is not sent from the accounting software)
10
The following is a list of variables associated with the MICR tab of a PrintBoss Bank Record.
Field Name Variable Name Additional Description Length
Routing Number {BMICRRoutNo} Routing Number from bank 9
Account Number {BMICRAcctNo} Account Number from bank 20
Check Number {BChkNo}
Check number pulled from bank record; also known as
Next Check Number
10
Check Number {CChkNo} Check number printed from accounting software 10
PrintBoss
207 Electronic Copy
Check Number {DocNo}
Check number passed from accounting software (Does
not appear in drop-down menu of MICR tab)
10
MICR Line {BMICR} MICR Line (See #MICR in Chapter 8) --
The following is a list of variables associated with the Miscellaneous tab of a PrintBoss Bank Record.
Field Name Variable Name Additional Description Length
Misc Field 1 /
2
nd
Logo
{BMisc1} Often used to place a 2
nd
Logo on a check 40
Misc Field 2 {BMisc2} Miscellaneous Field 2 40
Misc Field 3 {BMisc3} Miscellaneous Field 3 40
Misc Field 4 {BMisc4} Miscellaneous Field 4 40
Misc Field 5 {BMisc5} Miscellaneous Field 5 40
2
nd
Signature Line {BFlag1} Use for a 2nd signature line – YES if checked 1
Misc Flag 2 {BFlag2} Miscellaneous Flag 2 – returns TRUE if checked 1
Misc Flag 3 {BFlag3} Miscellaneous Flag 3 – returns TRUE if checked 1
Misc Flag 4 {BFlag4} Miscellaneous Flag 4 – returns TRUE if checked 1
Misc Flag 5 /
Date/Amount box
{BFlag5}
Use for Date/Amount Box format – returns TRUE if
checked
1
Canadian Style
Date/Amount
{bCDN_CkStyle} Returns TRUE if checked 1
Enable Security
Text on Check
{BSecurityText} Returns TRUE if checked 1
The following is a list of variables associated with the Signatures & Logos tab of a PrintBoss Bank Record.
Field Name Variable Name Additional Description Length
Logo Properties {BLogoFile} Logo file name, Ex: Mycompany.jpg 40
Logo X {BLogoX} X Coordinate for logo 5
Logo Y {BLogoY} Y Coordinate for logo 5
Logo Options {BLogoOp} Optional properties for logo file 10
Logo Hi {BLogoHi}
Maximum $ for AmntRange condition – typically used
only if the logo is an additional signature
10
Logo Lo {BLogoLo}
Minimum $ for AmntRange condition – typically used
only if the logo is an additional signature
10
Logo Width {BLogoWd} The Logo Width in inches 4
Logo Height {BLogoHt} The Logo Height in inches 4
Logo Percent {BLogoSize} Logo size adjusted by Percent from 10% - 300% 3
Signature
Properties
{BSigFile} Signature File Name , Ex: JohnSmith.sig 40
Signature X {BSigX} X Coordinate for signature 5
Signature Y {BSigY} Y Coordinate for signature 5
Signature Hi {BSigHi} Maximum $ for AmntRange condition (optional) 10
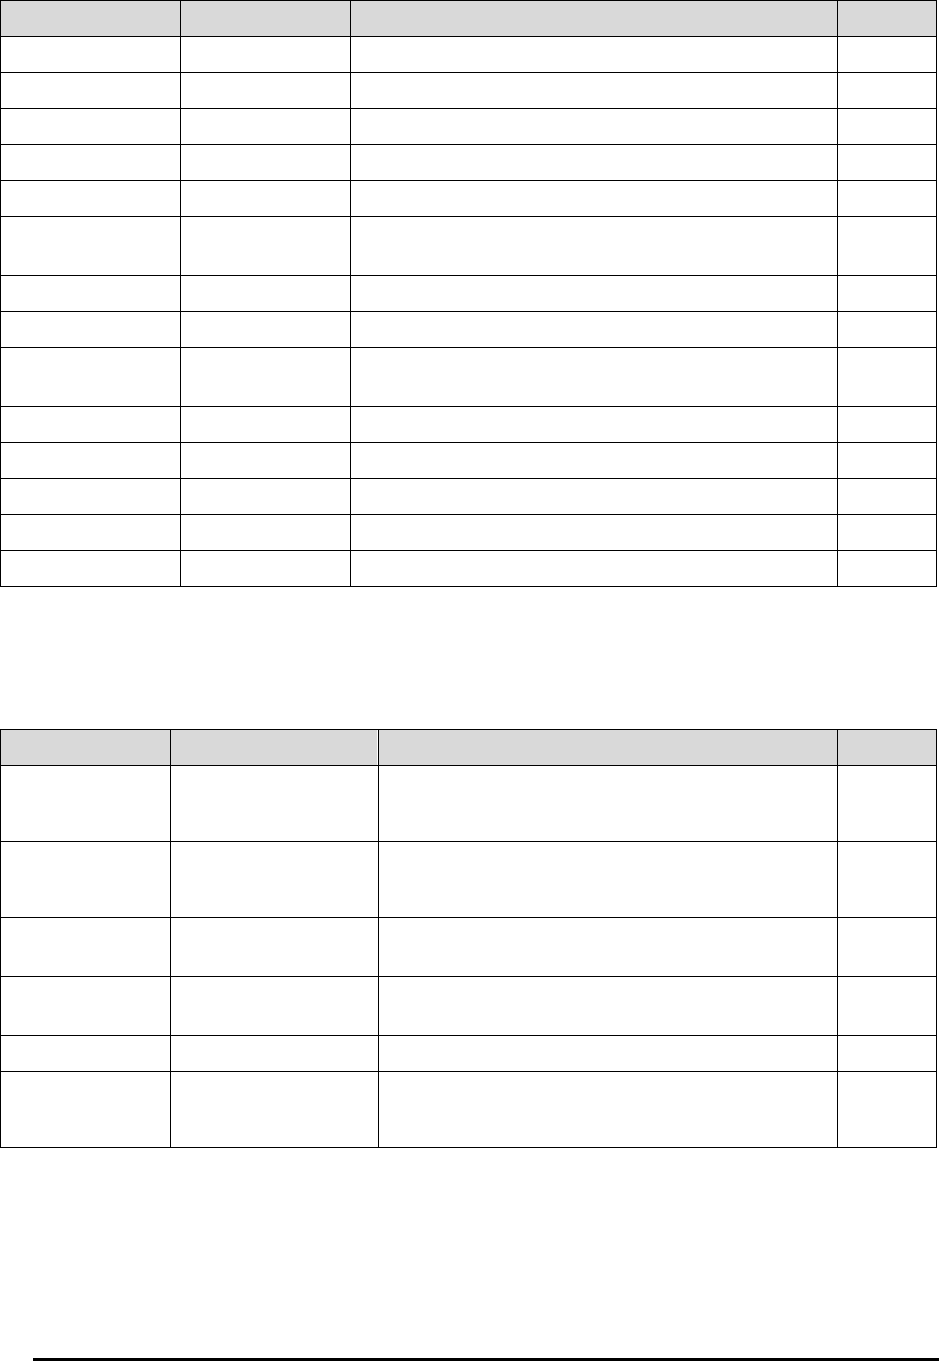
PrintBoss 208 Electronic Copy
Field Name Variable Name Additional Description Length
Signature Lo {BSigLo} Minimum $ for AmntRange condition (optional) 10
Signature Options {BSigOp} Optional properties for signature file 10
Signature Width {BSigWd} The Signature Width in inches 4
Signature Height {BSigHt} The Signature Height in inches 4
Signature Percent {BSigSize} Signature size adjusted by percent from 10% - 300% 3
Signature 2
Properties
{BSig2File}
Second Signature File Name; this signature will appear
on the top signature line
40
Signature 2 X {BSig2X} X Coordinate for signature 2 5
Signature 2 Y {BSig2Y} Y Coordinate for signature 2 5
Signature 2
Options
{BSig2Op} Optional properties for signature 2 10
Signature 2 Hi {BSig2Hi} Maximum $ for Amount Range condition (optional) 10
Signature 2 Lo {BSig2Lo} Minimum $ for Amount Range condition (optional) 10
Signature 2 Width {BSig2Wd} The Signature Width Size in inches 4
Signature 2 Height {BSig2Ht} The Signature Height Size in inches 4
Signature 2 Percent {BSig2Size} Signature size adjusted by percent from 10% - 300% 3
ACH FILE HEADER RECORD FIELDS
The following is a list of variables associated with the ACH Definition tab of a PrintBoss Bank Record. These fields
are used in the SignOn tab of the ACH File and are defined in the bank record. They apply to every record in the
file.
Field Name Variable Name Additional Description Length
Immediate
Destination
{bACHImdDstNo}
Contains a space followed by the 9-digit routing
number of the ACH Operator or receiving point where
th
e
file is
b
eing sent
10
Immediate Origin
{bACHImdOrgNo}
Contains a space followed by the 9-digit routing
number of the ACH Operator or sending point that is
sending the file
10
Immediate
Destination Name
{bACHImdDstName} Optional. The name of the ACH receiving point. 23
Immediate Origin
Name
{bACHImdOrgName} Optional. The name of the ACH sending point. 23
File Mode ID
{bACHFileIDMode} Increments beginning at A for multiple files in a day 1
Pre-Note Override
{ACHPreNote}
Global override of the PreNote setting. This should
only be used once, the first time an ACH batch is
proces
sed
.
1
ACH COMPANY BATCH RECORD FIELDS
These fields are used in the Header tab of the ACH File and are defined in the bank record. They apply to every
record in a batch.
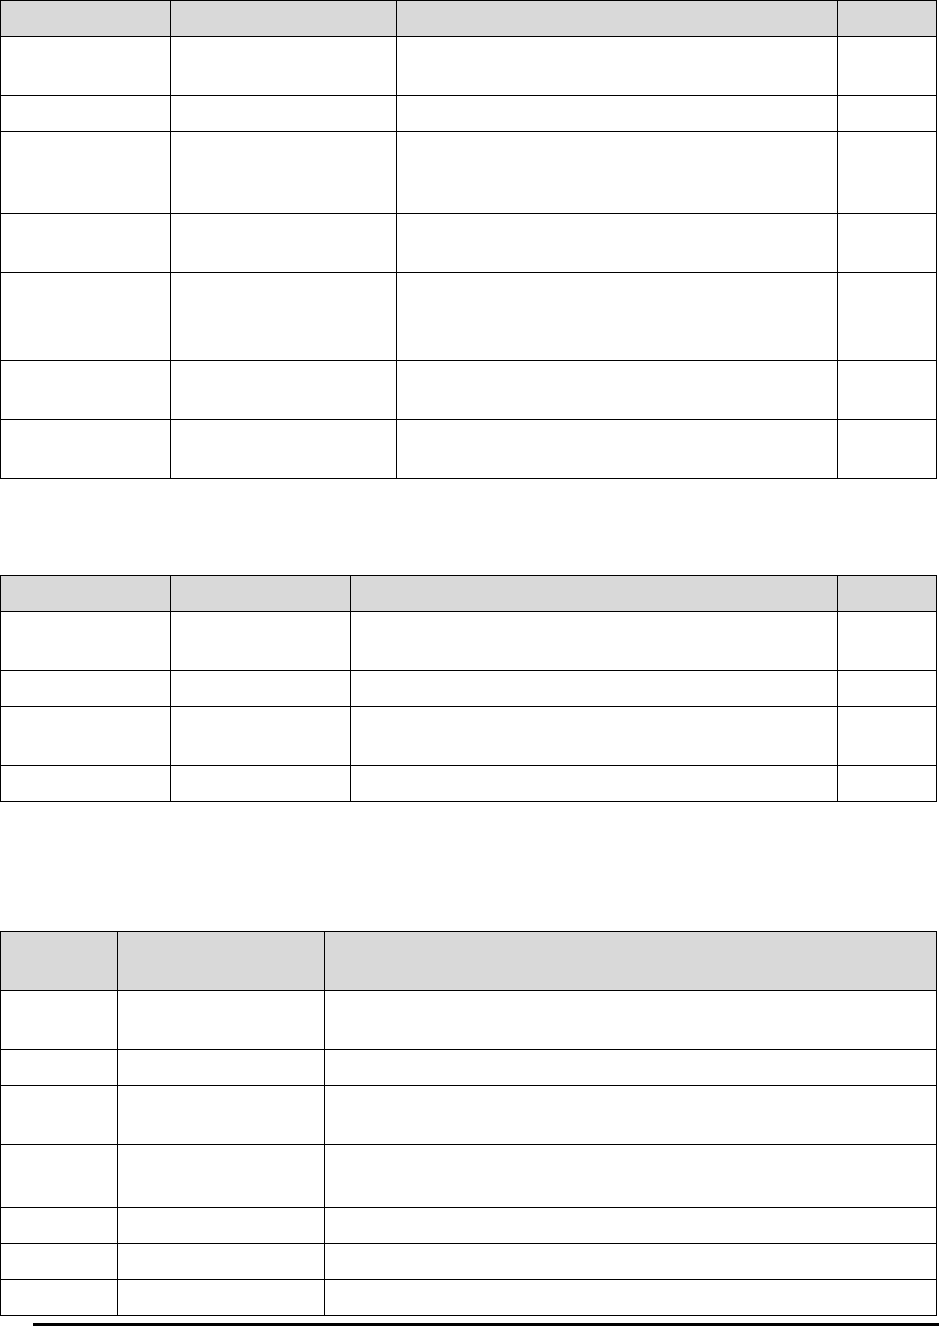
PrintBoss
209 Electronic Copy
Field Name Variable Name Additional Description Length
Service Class
Codes
{bACHSvcClassCode} Identifies type of ACH file
3
Company Name {bACHCompName} Name of the Company or Payee
16
Company
Discretionary
Data
{bACHCompDisc}
Optional. Allows Company to include codes of
significance only to them to enable specialized
handling of all entries in the batch
20
Company
Identification
{bACHCompID}
An alphanumeric code used to identify the
Originator
10
Standard Entry
Class
{bACHStdEntryClsCod}
This field holds various predefined character
abbreviations representing standard descriptions.
Ex: CCD (Corporate Credit or Debit).
3
Company Entry
Description
{bACHCompEntry}
Provides a description for the purpose of the
transaction. Ex: Payroll; Water Bill; etc.
10
Originating DFI
Identification
{bACHOrgDFIID}
Bank routing number plus ABA number with no
leading space
8
ACH BALANCE RECORD FIELDS
These fields are used in the Balance Record tab of the ACH File and are defined in the bank record.
Field Name Variable Name Additional Description Length
Balanced File {bACHBalFile}
This is the checkbox that determines whether a balanced
file is used for ACH. The value is either Y or N
1
Routing Number {bACHBalRout} Receiving DFI Bank Routing Number for balancing entry 8
Bank Account
Number
{bACHBalAcct} DFI (Bank) Account Number for balancing entry 17
Account Name {bACHBalName} Receiving Company Name for balancing entry 22
EMAIL AND SMTP VARIABLES
There are several e-mail variables PrintBoss automatically recognizes when they are assigned. These variables are:
Enterprise
Only
Variable Name Additional Description
{AttachmentCount}
Insert this variable in the email body to display the number of separate
attachments. This variable can also be used in the Email Subject.
EmailBCC The BCC address for sending the e-mail
EmailBody
The Message Body of the e-mail; overrides EmailBodyFile content when
defined
EmailBodyFile
Assigns a file to be used for the Email Body in the form. When no path
is present, PrintBoss points to the {PBDir}\Email\Body folder.
EmailCC The CC address for sending the e-mail
EmailFromAddress The From E-mail address
EmailFromName The From Name
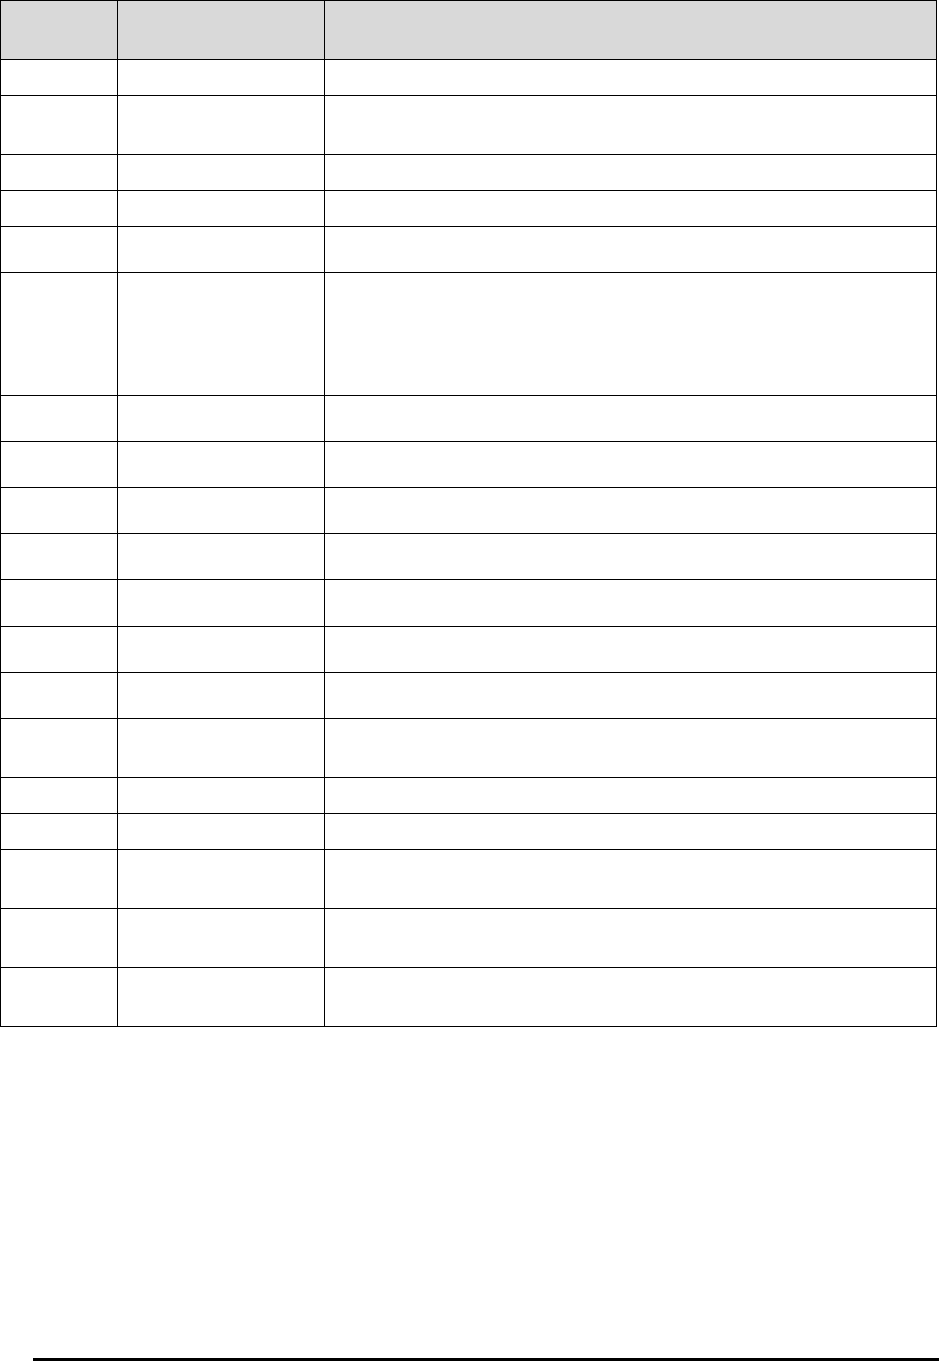
PrintBoss 210 Electronic Copy
Enterprise
Only
Variable Name Additional Description
EmailReplyAddress The Reply To e-mail address
EmailReqReadRcpt
Assign yes to request a Read Receipt for the e-mail. This feature only
works with mail applications that have this feature, such as Outlook
EmailSubject The Subject of the e-mail
EmailTo The To address for sending the e-mail
EmailAttachments Assign additional file attachments to the e-mail
EmailCombinePages
Conditionally assign this variable as follows:
0 = Never combine
1 = Combine when Email address is same as prior page
2 = Combine when Email address AND DocNo are same as prior page
EmailDelay /D:## Delay sending emails X number of seconds between emails
EmailPDFAlias The PDF File name alias
EmailOptions Add additional options to the e-mail
EmailPDFNoEdit Restrict the PDF file from being edited. Assign a Yes or No
EmailPDFNoPrint Restrict the PDF file from being printed. Assign a Yes or No
EmailPDFPassWord Assign a required password to open the PDF file
EmailProfile Assign a profile to use with Outlook.
SMTPHost
Assign the SMTP or Gmail host path, i.e. #Assign SMTPHost,
÷smtp.gmail.com÷
SMTPUserID Assign the User ID (email address) compatible with the SMTPHost
SMTPUserPassword Assign the Password associated with User ID
SMTPPort
Assign the Port used for the SMTP address. Common ports are 25 for
SMTP and 587 for Gmail
SMTPAuth
These values are 0, 1, 2, and correspond with the SMTP Authentication
Method drop-down menu from top to bottom. For example, 1 = Default.
SMTPSSL
These values are 0 through 6 and correspond with the SMTP SSL Type
drop-down menu from top to bottom. For example, 6 = TLS 1.2.
See Chapter 9, Form Files, for more information on #Assign.
{EMAILATTACHMENTS}
E-mail only attaches a PDF of the document printed to PrintBoss by default.
PrintBoss Enterprise allows adding other documents as attachments to the e-mail. The path and name of the
additional PDF attachments need to be entered in one of the Objects tabs of the Form Editor with an
assignment command and may use variables. Two examples of the syntax for this assignment follows:
#Assign EmailAttachments, "L:\Legal\Invoicing\Payment Requirements.doc"
#Assign EmailAttachments, "S:\Customers\{DocRecip}\Terms.*"
Wildcards can be included in the file name.

PrintBoss
211 Electronic Copy
{EMAILCOMBINEPAGES}
Standard e-mail does not combine attachments. Each document is sent in a separate e-mail with only 1 attachment.
PrintBoss Enterprise allows you to combine e-mails into one e-mail with one attachment containing multiple
pages. The choices are:
0 – Never combine emails or attachments
1 – Combine attachments into one email when the email address is the same as the prior page
2 – Combine attachments into one email when the email address AND DocNo are the same as the
prior page
An example of the syntax for this assignment follows:
#Assign EmailCombinePages, "1"
A condition can be used at the beginning of the assignment to determine when to combine pages.
#[Inu, ‘1’, {DelMethod}]Assign EmailCombinePages, "1"
{EMAILPDFALIAS}
The name of the PDF file attachment is the same as the PrintBoss Form file name by default.
PrintBoss Enterprise allows you to define the attachment name. The assignment for the PDF attachment
needs to be entered in one of the Objects tabs of the Form Editor and may use variables. Two examples of
the syntax for this assignment follows:
#Assign EmailPDFAlias, "Invoice from Wellspring Software, Inc."
#Assign EmailPDFAlias, "Invoice #{DocNo}"
{EMAILPDFNOEDIT}
The PDF file attachment may be edited by default when someone has the proper software.
PrintBoss Enterprise allows you to restrict editing the PDF file attachment. This is accomplished by
assigning the value of EmailPDFNoEdit to "NO". This assignment needs to be entered in one of the Objects
tabs of the Form Editor. The syntax for this assignment follows:
#Assign EmailPDFNoEdit, "NO"
{EMAILPDFNOPRINT}
The PDF file attachment can be printed by default.
PrintBoss Enterprise allows you to restrict the printing of the PDF file attachment. This is accomplished by
assigning the value of EmailPDFNoPrint to "NO". This assignment needs to be entered in one of the Objects
tabs of the Form Editor. The syntax for this assignment follows:
#Assign EmailPDFNoPrint, "NO"
{EMAILPROFILE}
Assign a profile to use with Outlook.
PrintBoss Enterprise allows you to assign an Outlook Profile when you have more than 1 Profile. The syntax
for this assignment follows:
#Assign EmailProfile, “outlookprofilename@yourcompany.com”
{EMAILOPTIONS}
The following options may be defined by assigning them to the EmailOptions variable. For example:
#Assign EmailOptions, "/FP /SD"
The following options are available:
/D:## - Delay in sending emails X number of seconds
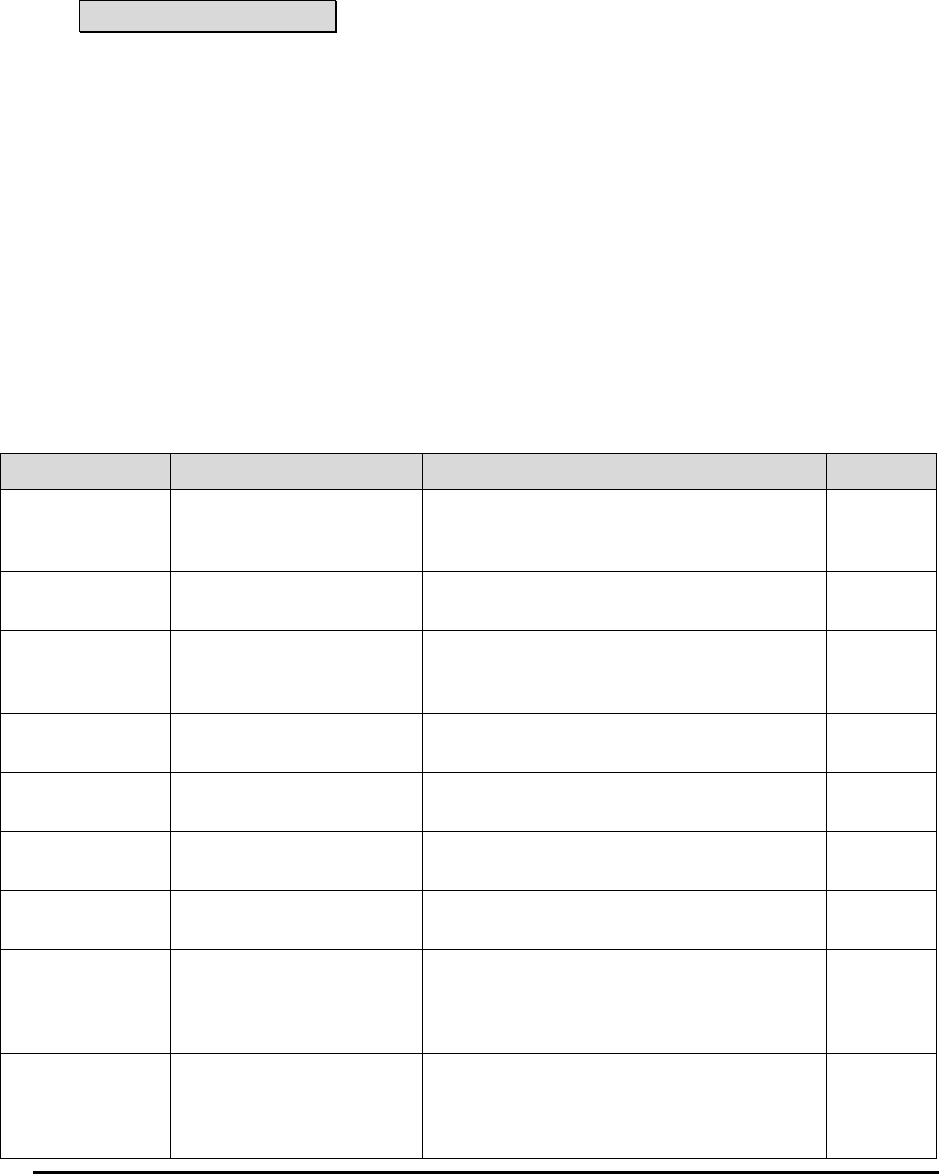
PrintBoss 212 Electronic Copy
/FP Force Pause
/NC No Combine
/SS Skip Sending e-mail
/SD Skip Deleting the PDF attachment (only when PDF Alias is assigned)
/OA Omit Attachments
NOTE:
Use of the /OA Omit Attachments condition, you must use PrintBoss release 6.1.1.3 dated 10/06/20
or higher.
{EMAILPDFPASSWORD}
The PDF file attachment does not use a password to open by default.
PrintBoss Enterprise allows you to password protect the PDF attachment. The password for the PDF file
needs to be entered in one of the Objects tabs of the Form Editor with an assignment command and may use
variables. Two examples of the syntax for this assignment follows:
#Assign EmailPDFPassWord, "abracadabra"
#Assign EmailPDFPassWord, "{SSN}"
FORM VARIABLES
The following standard variables are related to the PrintBoss Form.
Field Name Variable Name Additional Description Length
Font Override {CapturedTextFontOverride}
Assigns the font specified in the Font Override
field under the Captured Text Treatment section
on the Settings tab of the form
--
Check Number {CChkNo}
Returns the check number assigned in the form,
similar to DocNo.
12
Copy Name {CopyName}
Returns the name of the specified PrintBoss
copy, such as Copy 0 or Copy 1. C,0 and C,1
may also be used.
--
Destination Device
{DestDevice}
Returns the name of the Destination for the
specified copy
--
Destination Device
Status
{DestDeviceStatus}
Returns the Status Log information from the
Work File Edit window.
--
Document Amount
{DocAmnt}
Returns the amount, usually the check amount,
assigned in the form.
--
Bank {DocBank}
Assign values to allow PrintBoss to
automatically select a bank record.
--
Duplex Enabled {DuplexEnabled}
Add a condition to this variable to conditionally
turn Duplex off and on. This may be set by
User or some other value. Use with the
#ForceWinPrintJob command.
--
Form Next
Number
{FormNextNumber}
Provides an incremental value that can be
accessed in the Footer Objects tab of the Form.
Must be enabled on the Settings tab of the Form
to be used.
--
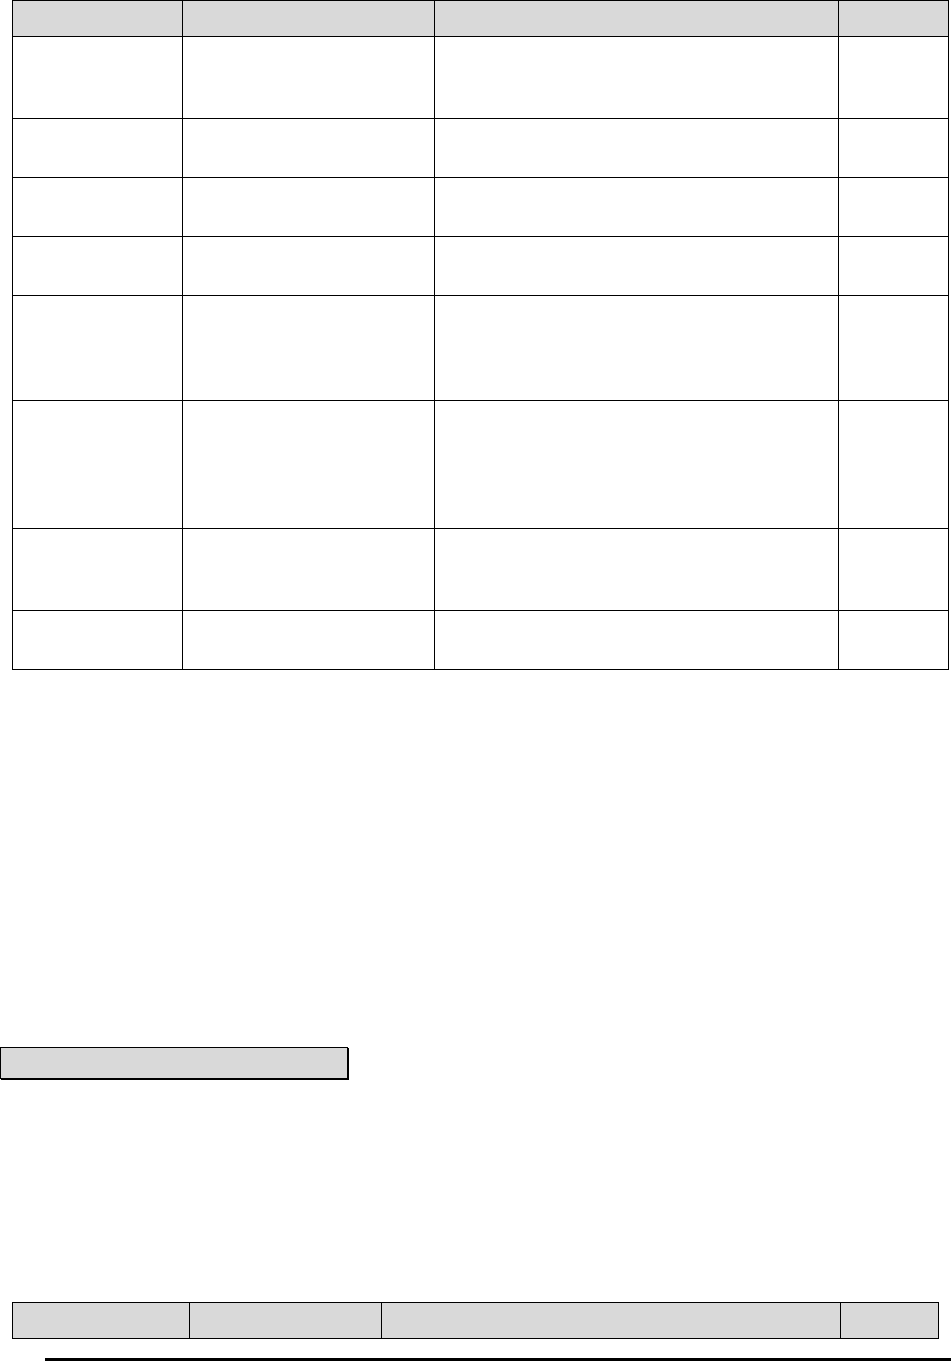
PrintBoss
213 Electronic Copy
Field Name Variable Name Additional Description Length
Page Options {PageOptions}
Assign this variable to /S to Suppress Block
Mirrors. Use a condition such as C,1 to
suppress by copy.
--
PDF File Path and
Name
Length of the PDF ‘Destination File Path and
Name’ field
80
Positive Pay File
Extension
{PosPayFileExt} Displays the Positive Pay file extension --
Positive Pay File
Name
{PosPayFileName} Displays the Positive Pay file name --
Security Stamp
String
{SecurityStamp}
Used to print information, such as Operator,
Current Date, Current Time, etc., on the check
as a security measure. The string is added on
the Special Controls tab of the Form.
--
Set Destination
Printer
{SetDestPrinter}
Use a condition with this variable and assign it
on either the Footer Objects or RunTime
Objects tab to the exact printer name. Set Pre-
process Assignments on the Special Controls
tab to Special.
--
Set Duplex
Enabled
{SetDuplexEnabled}
Use a condition with this variable to turn the
print on Page Back feature on or off. The
values are Y for Yes and N for No.
--
Sub Copy Number {SubCopyNo}
Assign any number of copies to the Sub Copy
Count function.
--
SET DUPLEX ENABLED
Example of the SetDuplexEnabled feature:
#IF «[>, {DOCNO},÷5250÷]»
#ASSIGN SETDUPLEXENABLED, ÷Y÷
#ELSE
#Assign SETDUPLEXENABLED, ÷N÷
#Endif
A #ForceWinPrintJob can be used to toggle this option between individual checks vs. the whole batch or to toggle to
different copies. This command is added to the top of the RunTime Objects of the PrintBoss Form. If the
#ForceWinPrintJob is not used, the second page will be printed on a separate piece of paper because the printer
cannot toggle during a print job.
NOTE:
This feature can only be used with printer drivers. It does not work with the internal PrintBoss PDF file creator as
this output is not accessed through a printer driver.
MISCELLANEOUS VARIABLES
The following variables are miscellaneous variables available in PrintBoss.
Field Name Variable Name Additional Description Length
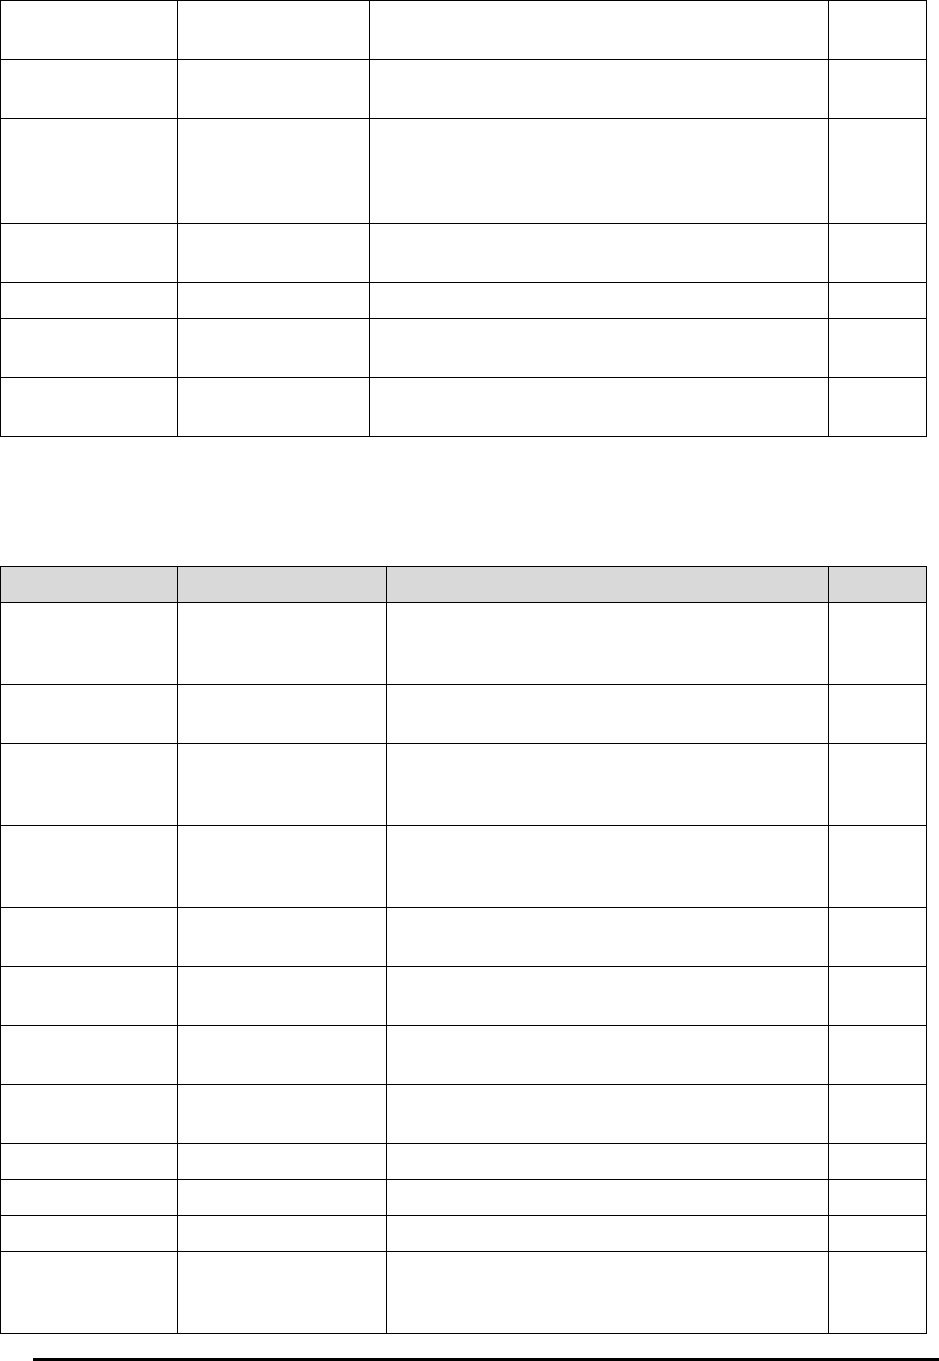
PrintBoss 214 Electronic Copy
Operator {Operator}
PrintBoss Login name or WinUserName when not
logged in
--
PrintBoss Home
Directory
{PBDir} Returns the path of the PrintBoss Home Directory --
Prev. and Next.
{Prev.DocXxx};
{Next.DocXxx}
Prev. and Next. can be used with variables populated in
the PrintBoss’ Work File to create a comparison
condition. This has been used with DocNo to define
when to use the ForceWinPrintJob function.
--
PrintBoss Serial
Number
{PBSerialNo}
Returns the serial number for the current copy of
PrintBoss
--
PrintBoss Version {PBVersion} Returns the version for the current copy of PrintBoss --
Windows Computer
Name
{WinComputerName}
Returns name of computer where PrintBoss is used --
Windows User
Name
{WinUserName} Returns Windows login name --
PAYEE LIST VARIABLES
The following variables are associated with the Payee List in PrintBoss.
Field Name Variable Name Additional Description Length
Active {ACHActive}
Returns Y for Yes or N for No based on whether the
Active checkbox for the Payee List entry is selected.
The default is N.
1
Payment Type {PLPaymentType}
Payment type entered in the Payee List; 0=N/A,
1=ACH
1
Payee (Name) {PLPayeeName}
Name of the Payee; defined by {DocRecip} in the
form and is used to match a check with a Payee List
entry when the Payee ID is not available
50
Payee ID {PLPayeeID}
ID for Payee; defined by DocPayeeID in the form
and is used to match a check with a Payee List entry.
This is the preferred method
50
Payee Email
Address
{PLEmail} Email address entered in the Payee List 50
Payee Email
Address #2
{PLEmail2}
This field is available for a 2
nd
Email Address if
needed.
50
Payee Misc {PLMisc}
This field is provided for Miscellaneous information
that may need to be stored in this record.
50
Mode {ACHMode}
Returns the numeric value of the Mode, i.e. 0 =
Inactive; 1 = Remainder of Check, etc.
1
Receivers Name {ACHRecvName} Receiving individual/company name 22
Receivers ID {ACHRecvID} Optional ID for the receiving individual /company 15
Discretionary Data {ACHRecvDisc} Optional data that can be defined by the sender 2
Amount/Percent {ACHAmount}
Returns the amount of the ACH after it is calculated
or zero when PreNote is selected. This applies per
account. See ACHTotAmnt for a total of all accounts.
10
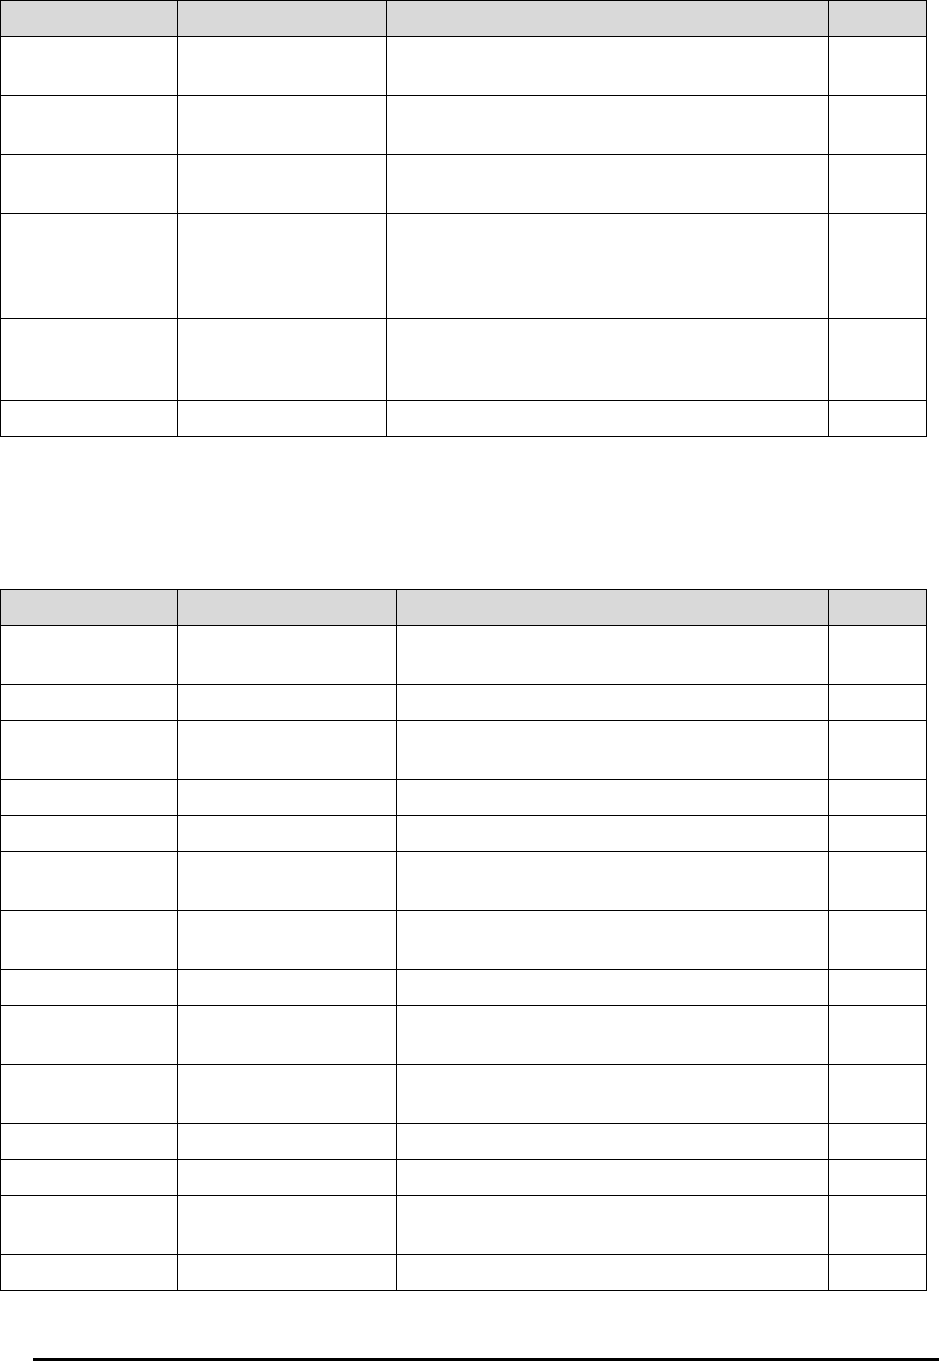
PrintBoss
215 Electronic Copy
Field Name Variable Name Additional Description Length
Receiving DFI
(Bank) ID
{ACHRecvBankID} Routing and ABA Number for the receiving bank 9
DFI (Bank)
Account Number
{ACHRecvBankAcct}
Account number for the receiving company or
individual
17
Account Type /
Transaction Code
{ACHTransCode}
Code indicates Credit or Debit to Checking or
Savings account
2
ACH PreNote {ACHPreNote}
PreNote may be set globally in the Bank Record or
on an individual record in the Payee List. This field
is Optional. The values are Y or N and the default is
N (blank).
1
ACH PreNote Print
Check
{ACHPreNotePrint}
Print a check when PreNote AND Print Check are
selected. The values are Y or N and the default is N
(blank).
1
Bank Payee List {BPayeeList} Defines the Payee List associated with a bank record --
POSITIVE PAY SUBSTITUTION FUNCTIONS & VARIABLES
The following variables are associated with the Positive Pay function in PrintBoss. These are Read Only variables
and are only available in the Positive Pay File Editor.
Field Name Variable Name Additional Description Length
Batch Amount {BatchAmnt}
Sum of all the checks in a batch or the sum of Credit
ACH transactions in a batch
--
Batch Amount2 {BatchAmnt2} Sum of the Debit ACH transactions in a batch --
Batch Check
Number Sum
{BatchChkNoSum} Sum of all the check numbers in a batch --
BatchCount {BatchCount} Count of all records in the batch --
CommaDelimit CommaDelimit See Notes below this section --
CR/LF {CR/LF}
Enters a Carriage Return/Line Feed; use at the end
of each PosPay tab with scripts
--
Comma Separated
Value
{CSV:…} See Notes below this section --
DBQuotes {DBQuotes: '<string>'} See Notes below this section --
Destination Device
Status Code
{DestDeviceStatusCode}
Returns the codes from the Printed column of the
work file
8
File Amount {FileAmnt}
Sum of all the checks in a file or the sum of Credit
ACH transactions in the file
--
File Amount2 {FileAmnt2} Sum of the Debit ACH transactions in the file --
File Batches {FileBatches} Count of all batches in the file
File Check Number
Sum
{FileChkNoSum} Sum of all the check numbers in a file --
FileCount {FileCount} Count of all records in the file --

PrintBoss 216 Electronic Copy
Positive Pay File
Counter
{PosPayFileCounter}
Provides a unique numeric value that increments
with each new Positive Pay file. The format is
PosPayFileCounter: ‘4’, where the ‘4’ represents the
numeric value indicating number of digits for the
counter
--
Positive Pay File
Extension
{PosPayFileExt}
Returns the extension of the Positive Pay file, i.e.
.txt or .csv
--
Positive Pay File
Name
{PosPayFileName} Returns the name of the Positive Pay file --
Positive Pay Line
Count
{PosPayLineCount}
Increments with each new Positive Pay line in the
file. The value starts over with each new file
--
Positive Pay
Sequence Number
{PosPaySeqNo}
Provides a unique ascending value for each new
Positive Pay line. This value does not start over
until it reaches 9999999
7
Tab Delimited {TabDelimit… See Notes below this section --
CommaDelimit
{CommaDelimit: ÷<string>÷[,<ForceQuotesY/N>]}
This function prepares a string for a csv file and encloses commas occurring in the string in double quotes as well as
quotes occurring in the string in double quotes. This allows all the data in the field to display. Otherwise, the field
will cut off at the comma or double quote. The function can be used in the Detail or Footer tab of the Positive Pay
File Editor and only applies to files that are saved to a csv format. An option allows forcing a field without quotes
to be encapsulated in double quotes if double quotes may occur in the field for uniformity in displaying the data.
Example: "{CommaDelimit: '{DocRecip}'}" |A name enclosed in quotes in the DocRecip field will evaluate
properly instead of cutting off part of the line. The name Robert "Bud" Shipman displays in full instead of stopping
after the name Robert. The same example would work if there was a comma in the DocRecip field, such as James
King, III.
CSV or TSV
{CSV: ÷<string>÷ [,<ForceQuotesY/N> [,<SuppressTrailingCommaYN>]]}
{TSV: ÷ <str>÷ [,<ForceQuotesY/N> [,<SuppressTrailingTABYN>]]}
This function creates a complete line for csv fields and encloses commas occurring in the string in double quotes as
well as quotes occurring in the string in double quotes. Unlike the CommaDelimit and DBQuotes functions, quotes
are not used to offset this function. An option allows forcing a field without quotes to be encapsulated in double
quotes if double quotes may occur in the field for uniformity in displaying the data.
TSV works the same as CSV to create a tab delimited file.
Example: {CSV:÷{DocRecip}÷,'Y'} |Forces all DocRecip fields to be enclosed in double quotes. Note there are no
quotes surrounding this function. The ‘Y’ at the end removes the last comma or tab.
DBQuotes
{DBQuotes: '<string>'}
This function is similar to the Comma Delimit function, but it only looks for double quotes in the string and applies
to Positive Pay files saved to the .txt format. The function can be used in either the Detail or Footer tab of the
Positive Pay File Editor.
Example: "{DBQuotes: '{DocRecip}'}" |The name Robert "Bud" Shipman will display fully in the Positive Pay
file using this function. Otherwise the name would display as Robert only.
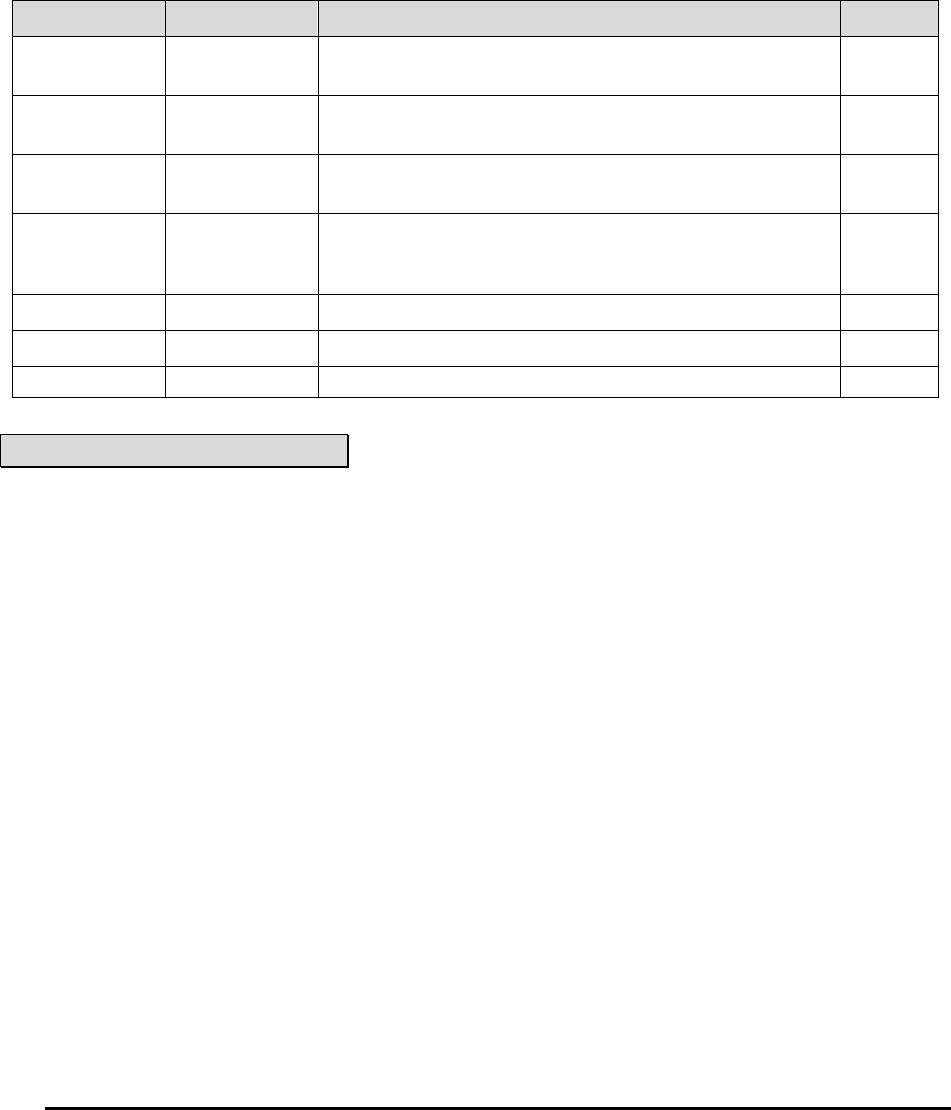
PrintBoss
217 Electronic Copy
TabDelimit
{TabDelimit: ÷<str>÷ [,<ForceQuotesY/N>]
This function prepares the string for a CSV file by replacing single quotes with double quotes and enclosing
commas in single quotes. This feature had been replaced by the TSV function.
WORK FILE VARIABLES
The following table provides the field lengths for the Work File Browse window:
Field Name Variable Name Additional Description Length
BankCode {BCode}
PrintBoss automatically populates the Bank Code field in the
work file.
50-60
Amount {DocAmntStr}
Document amount string is the value of the check amount sav
ed
in the work file.
12
Misc {DocMisc}
The Miscellaneous field can be used to store a variable printed
from the accounting software.
60
Misc2 {DocMisc2}
Additional miscellaneous field that is sometimes used to store
the E-mail address printed from the accounting software. This
field can be used to store any value.
60
DocNo {DocNo} Document Number 12
PayeeID {DocPayeeID} ID number to use with the Payee List 12
Recipient {DocRecip} Payee Name 30-60*
NOTE:
The DocRecip length is set under the Options menu in PrintBoss. Select Configurations, then the Internal Tab to
locate the DocRecip Length field.

PrintBoss
219 Electronic Copy
Appendix
F
FAQS
CAN PRINTBOSS PRINT CANADIAN CHEQUES?
Yes! PrintBoss is distributed with standard forms that allow checks to be printed in both the standard American
format and Canadian format as desired. In most cases, the only modification necessary is to check the Canadian
Style Date/Amount box in the Special Items area on the Miscellaneous tab of the PrintBoss Bank record. Please
consult the Support Documents section on our website for a complete list of standard PrintBoss forms that have been
modified to comply with the CPA standard.
See Chapter 9, Form Files, for more information on #CanadianDate.
CAN PRINTBOSS PRINT OTHER DOCUMENTS BESIDES CHECKS?
Yes! PrintBoss can print a variety of accounting forms such as invoices, picking slips, or statements. These forms
are printed on blank paper. PrintBoss specializes in printing multiple part forms. Each copy of a form is printed on
plain copy paper saving money over carbon-less or preprinted forms and making it easier to disperse the form
copies.
WHAT KIND OF PRINTER IS NEEDED TO PRINT DOCUMENTS WITH PRINTBOSS?
PrintBoss requires a PCL5 or PCL6 compatible Laser printer (100% HP Compatible). PrintBoss can access any font
that is available to the printer. Either internal fonts or cartridge fonts can be used to improve the look of the form.
Compatibility with MICR toner cartridges may be important for check printing so PrintBoss can produce a MICR
line readable by magnetic scanners. Be sure to investigate before purchasing a printer. MICR toner is not available
for all LaserJet printer models.
HOW SHOULD THE PRINTBOSS PRINTER DRIVER BE CONFIGURED?
Install the PrintBoss printer driver through the PrintBoss setup program. This process will configure the driver
properly for all systems. DO NOT change the properties of the PrintBoss printer driver.
Do not alter the Laser printer driver to use the PrintBoss driver.
SHOULD PRINTBOSS BE THE DEFAULT PRINTER?
NO. The only time the PrintBoss printer driver should be selected is for printing the specific documents required to
pass through PrintBoss. PrintBoss may be set as the default only for your specific accounting software reports.
The PrintBoss printer driver SHOULD NOT be designated as the Windows system default nor should it be set as the
accounting software’s default printer, except in special cases. The PrintBoss printer driver should also never be
selected as the PrintBoss default printer since PrintBoss needs to print to an actual physical printer.
CAN DIFFERENT COPIES BE PRINTED TO DIFFERENT TRAYS ON THE SAME PRINTER?
Yes. This selection is made within the PrintBoss form. Edit the Form file and select the Multi-Parts & Printers tab.
For each copy, including the original, there is a setting for the Source Tray. Select the desired tray from the drop-
down menu. The tray names are defined by the printer, so the tray names may change based on the printer model
selected within PrintBoss.

PrintBoss 220 Electronic Copy
CAN DIFFERENT COPIES BE PRINTED TO DIFFERENT PRINTERS?
Yes. This selection is made within the PrintBoss form. Edit the Form File and click on the Multi-Parts & Printers
tab. Select a printer from the Destination Printer/Device drop-down menu for the original and each copy. Choose
<Form Printer> to use the Default PrintBoss Printer.
CAN PRINTBOSS PRINT A SIGNATURE ON A CHECK?
Yes. PrintBoss can add one or more .BMP, .JPG, or .PNG files as signatures to a check. Conditions can be added to
the signature command to specify printing at a certain dollar amount or range. PrintBoss can also print a security
protected signature on checks with a .SIG extension. This signature requires a special disk to be inserted into the
computer to allow the signature to display or print. Contact Wellspring Software for more information on security
protected signatures.
CAN CUSTOM DESIGNED FORMS BE USED?
Wellspring Software can create custom forms according to your specifications. Submit a sample or a description for
a quote.
HOW CAN I ADD A SECOND SIGNATURE LINE TO A CHECK?
A second signature line can be added based on the bank account using a standard PrintBoss form. Edit the Bank
List. Select the account requiring the second signature line. Check the 2
nd
Signature Line box on the Miscellaneous
tab. Click OK. Repeat for any additional accounts requiring a second signature line.
HOW CAN I PRINT A SIGNATURE ONLY FOR CERTAIN DOLLAR AMOUNTS?
Use a condition on the command that prints the signature. See AmntRange in Chapter 9, Form Files.
HOW CAN I ADJUST THE MICR LINE?
Click the Options menu in PrintBoss and select Configuration. The MICR Offset Adjustment feature on the Settings
tab has two fields: Left/Right and Top/Bottom. The defaults are set to zero. Run the MICR Adjust Wizard to
properly adjust the values.
This setting is computer and printer specific.
WHAT LOGO FORMATS CAN PRINTBOSS READ?
PrintBoss can accept logos formatted as .PNG, .JPG, or .BMP files.
HOW CAN I ADD A LOGO TO A FORM?
Use a #PIC command in the Form. If the same logo will appear on all documents regardless of the Company,
reference the filename in the command. Otherwise, copy the logo to PRNTBOSS\LOGOS directory, reference the
variable {BLogoFile} in the command on the Form, and enter the filename of the logo in the respective field of each
bank record that will use the logo.
WHAT IF THERE IS A LOGO FOR ONLY SOME COMPANIES?
Logos are usually printed on the left side of a check and Company Information is printed to the right of the logo.
Conditions can be placed on the logo and company information commands to specify when to exclude or print the
logo and shift the company information. Most standard PrintBoss forms can handle these situations automatically.
Select EDIT/ BANK LIST in PrintBoss. Choose the appropriate bank record and click the Edit Bank button. Enter
the logo file name in the Logo Properties field on the Signatures & Logos tab. The form will automatically add this
logo when printing checks from this account. The company information can be set to shift down or to the right by
selecting the associated Align Address button below the Logo field. If there is no logo filename in the bank record,
the company information will remain left justified and no logo will print.
NOTE:
For additional information, please visit our Support Documents page at www.WellspringSoftware.com.
PrintBoss
221 Electronic Copy
Appendix
G
TROUBLE SHOOTING
Be sure to review the special instructions (Installation Notes) for the accounting software. Go to the
PRNTBOSS\DOC\ directory to retrieve the appropriate file and print it out.
NOTE:
For additional information, please visit our Support Documents page www.WellspringSoftware.com.
SAGE 300 ERP
ERROR MESSAGE: THE BATCH OF DOCUMENTS SENT TO PRINTBOSS DOESN’T HAVE A FLAG APPEARING
ANYWHERE IN THE DOCUMENT.
There are two possible causes for this message. First, the Crystal Report sent to the PrintBoss printer driver does not
contain a trigger line. PrintBoss cannot recognize the file without the trigger. Open the desired Crystal Report and
enter the trigger line. See the PrintBoss Specs for the appropriate accounting module for a sample. Second, the
report sent to PrintBoss may contain a valid trigger line, but the trigger has become fragmented. Check the Allow
Fragmented PB#INFO line box on the Settings tab of the Options/Configuration dialog. This option must be
checked for PrintBoss to recognize certain reports sent from Sage 300 ERP.
WHEN PRINTING A DOCUMENT TO PRINTBOSS, THERE IS A PARAGRAPH OF INFORMATION ON THE PAGE.
The PrintBoss printer driver needs to be selected within Sage 300 ERP just before printing. Usually this is selected
by clicking on the FILE menu in Sage 300 ERP and selecting PRINT SETUP. Choose the PrintBoss printer driver.
The PrintBoss 50 driver needs to be set in the crystal report to print directly to PrintBoss. Otherwise, print from
Preview in Sage 300 ERP.
WHEN PRINTING CHECKS, THE CHECK NUMBER IS SKIPPING.
There is a setting to change within Sage 300 ERP when this error occurs. Navigate to the Banks module and find
the check stock used with PrintBoss. Set the number of advice lines to 999.
SAGE 300 ERP WON'T HOLD THE PRINTBOSS PRINTER IN MEMORY.
When printing to Preview, Sage 300 ERP will automatically use the default printer unless another one is reselected
each time. We recommend setting the print destination to the PrintBoss 50 printer.
When printing to a printer, go into the Printer setup within the current Sage 300 ERP window just before printing the
document and choose the PrintBoss driver. Once selected here, Sage 300 ERP should remember PrintBoss the next
time this type of document is printed within this company.
WHEN PRINTING CHECKS, THEY GO THROUGH PRINTBOSS BUT AREN'T FORMATTED PROPERLY.
Go to the FILE / PRINT DESTINATION screen within Sage 300 ERP. The Report Orientation and Report Paper
Size must both be checked. The Use A4 instead of Letter must NOT be checked. If there is a choice between letter

PrintBoss 222 Electronic Copy
and legal as the default paper size, choose letter. Current versions of PrintBoss generate a warning when there is a
mismatch between the PrintBoss form and the paper orientation and size from Sage 300 ERP.
WHEN PRINTING A SINGLE CHECK, IT IS INCORRECTLY FORMATTED AND THERE ARE MULTIPLE PAGES PRINTING.
Select FILE / PRINT DESTINATION within Sage 300 ERP. The options for Report Paper Size and Report
Orientation must be selected. The option Use A4 instead of Letter should NOT be selected. If there is a choice for a
default paper size of letter or legal, select letter. Current versions of PrintBoss generate a warning when there is a
mismatch between the PrintBoss form and the paper orientation and size from Sage 300 ERP.
MICROSOFT DYNAMICS GP
THE CHECKS ARE PRINTING AS IF USING PREPRINTED STOCK.
Make sure the security has been turned on for this user / company / workstation combination. See the specific
installation notes for Dynamics for details.
Review the settings within Named Printers to verify only documents intended for PrintBoss are sent to the PrintBoss
printer driver.
WHEN PRINTING CHECKS, A POP-UP LIST IS CONSTANTLY APPEARING.
Make sure the security has been turned on for this user / company / workstation combination. See the specific
installation notes for Dynamics for details.
QUICKBOOKS
NO COMPANY INFORMATION IS APPEARING ON THE CHECKS.
Make sure to check the option to print the Company Name and Address within the QuickBooks printer setup (File/
Printer Setup/ ’Check/Paycheck’).
THE CHECK PRINTS WITHOUT THE MICR LINE AND BANK INFORMATION.
Verify the PrintBoss printer driver is selected for printing the checks.
ERROR MESSAGE: YOU HAVE PRINTED A DOCUMENT TO PRINTBOSS THAT IS NOT RECOGNIZED BY PRINTBOSS.
SPECIFICALLY, NO ENTRY IN THE "FORM / BANK REQUEST LIST" MATCHES THIS FORMAT.
Make sure the voucher style of check is selected within QuickBooks. Also verify the check is worth at least $0.01.
Zero-dollar checks are not recognized by PrintBoss. When printing from QuickBooks Online make sure to
download and save the check file first, then open that PDF from the location where it was saved, and print to
PrintBoss (use “Actual Size” – not “Shrink To Fit” ).
NT/W2000/WXP WORKSTATIONS
(THESE OPERATING SYSTEMS ARE NO LONGER SUPPORTED BY PRINTBOSS)
WHEN INSTALLING PRINTBOSS ON AN NT/W2000/WXP WORKSTATION, I AM UNABLE TO INSTALL THE
PRINTBOSS PRINTER DRIVER.
Log in as ADMINISTRATOR before installing PrintBoss. Reboot the workstation after installing the printer driver.
WHEN RUNNING PRINTBOSS ON AN NT/W2000/WXP WORKSTATION, PRINTBOSS DOES NOT LAUNCH
AUTOMATICALLY.
Log in as ADMINISTRATOR, rerun the workstation install, and restart the workstation. This should install the
PB32stub.exe into the Windows\System32 directory. The PB32stub process should run in the background to allow
PrintBoss to automatically load. PB32stub is listed in the Task Manager when it is running.

PrintBoss
223 Electronic Copy
W2003 SERVER
(THIS OPERATING SYSTEM IS NO LONGER SUPPORTED BY PRINTBOSS)
WHEN INSTALLING PRINTBOSS ON A W2003 SERVER FOR USE WITH TERMINAL SERVICES, I AM UNABLE TO
INSTALL THE PRINTBOSS PRINTER DRIVER.
The newest version of PrintBoss will automatically install the PrintBoss 50 printer driver. If the PrintBoss NT40
printer is necessary, a group policy will need to be changed.
See Chapter 5, PrintBoss Printer Driver.
WINDOWS 7AND ABOVE OPERATING SYSTEMS
WINDOWS 7/WINDOWS 8/ WINDOWS 8.1/ WINDOWS 10 WORKSTATION - I CANNOT ACCESS THE PRINTBOSS
DRIVER SETTINGS.
Close the PrintBoss Program. You must RIGHT CLICK on the PrintBoss Program and Run as administrator. The
settings on the PrintBoss Driver Settings screen will be available.
GENERAL
THE DOCUMENTS ARE PRINTING ON THE WRONG PRINTER.
Check the following areas:
Make sure the accounting software is printing to the PrintBoss printer driver.
Select FILE / PRINTER SETUP in the PrintBoss program. Choose the correct printer.
Edit the PrintBoss Form File and check the Multi-Parts & Printers tab. The Destination Printer/Device
should reflect the correct printer for each copy. The Default PrintBoss Printer is identified at the bottom of
this tab. Select <Default PrintBoss Printer> to print to the default PrintBoss printer.
THE DOCUMENTS ARE PRINTING FROM THE WRONG TRAY.
Leave the printers set to their auto select / default tray choice.
Edit the PrintBoss Form File, select the Multi-Parts & Printers tab, and select the Source Tray for each copy. The
tray choices listed are for the printer selected in the Destination Printer/Device column in PrintBoss. Test the
different choices to find the correct tray name.
THE PRINTER REQUIRES A MANUAL PROMPT ON THE FORM FEED BUTTON BETWEEN EACH PAGE.
Make sure to choose the correct tray from within the PrintBoss Form (Multi-Parts & Printers) instead of the printer
settings.
You have selected a Manual tray if you have chosen the tray within the PrintBoss Form. Choose a different setting
for the tray you want.
THE SIGNATURE WON'T PRINT.
Verify the signature disk is in the correct drive (if required).
Verify a copy of the *.sig file from the disk is placed into the PRNTBOSS\LOGOS directory.
Verify the PrintBoss Form references the signature file correctly.
THE SIGNATURE PRINTS ON VOID PAGES OF MULTIPLE PAGE CHECKS.
Add the following condition to the signature command in the PrintBoss Form:
[AmntRange, 0.01]
An example command would look like this:
#[AmntRange, 0.01]PIC 5.2, 9.85, "Your_Sig.Sig"

PrintBoss 224 Electronic Copy
THE LOGO IS THE WRONG SIZE.
Navigate to EDIT / FORM FILES / <highlight the form>. Select the correct bank at the bottom to the Form list, and
then click VIEW. You will see a rough view of your form (no data). Double click on the logo. Verify the Size
Adjust displays {BLogoSize} in both the Horizontal and Vertical fields. Click the Edit Bank button as the bottom of
the Pic Command Properties window to return to the selected bank record. Select the Signatures & Logos tab.
Adjust the Percent for the logo. Click OK to view your changes. Repeat if needed.
Changes will take affect the next time you print from this account.
MY SIGNATURE PRINTS ONLY ON SOME OF THE DOCUMENTS IN THE BATCH.
Check to see if there are any conditions on the command. If there are, this may be why it is not printing on some
documents (i.e. signature with an amount range, etc.)
See Chapter 9, Form Files, for more information on Conditional Commands.
If there are no conditions on the graphic commands, you may need to update the driver for your printer. Be sure to
download the latest PCL5e, PCL6, or universal driver for the printer and operating system if you are upgrading the
printer driver.
THE MICR LINE IS CUT IN HALF
Download the latest driver for the LaserJet printer. Be sure that it is a PCL5e, PCL6 or universal driver. If that
doesn't work, adjust the MICR line by changing the MICR Offset Adjustment settings in the OPTIONS /
CONFIGURATION window.
See Chapter 8, Bank Accounts.
THE COMPANY NAME AND ADDRESS LINES DO NOT FIT WITHIN THE ENVELOPE WINDOW
Edit the respective PrintBoss Form. Select EDIT / FORM FILES from the main PrintBoss screen. Highlight the
appropriate Form and select correct bank from the drop-down menu at the bottom of the Edit Form window. Click
the View button. Grab the Company Name and drag it to the desired location. A confirmation box will open, click
OK to close. The Company address will typically adjust accordingly if you are using one of our standard forms.
Close the View and click Yes to save the changes. This adjustment applies to all companies using this Form.
PrintBoss
225 Electronic Copy
Appendix
IH
GLOSSARY
ABA
American Banking Association
APOSTROPHE
'
BACKSLASH (a.k.a. reverse
solidus)
\
This slash is NOT under the question mark on a standard keyboard.
BRACES
{ }
Hold the SHIFT key and type the brackets on a standard keyboard.
BRACKETS (a.k.a. square
brackets)
[ ]
CAPTURED TEXT
This is text that is received from the accounting package.
COLON
:
Hold the SHIFT key and type a semicolon.
COMMENT
Enter a pipe symbol ( | ) in front of the command line to make PrintBoss skip that line.
Hold the SHIFT key and type a backslash on a standard keyboard. See also Pipe Symbol.
CPA
Canadian Payments Association; L'Association Canadienne des Paiements (L'ACP)

PrintBoss 226 Electronic Copy
CRYSTAL REPORT
A report used by several accounting packages (including Sage 300 ERP) to determine the data and layout sent to the
printer.
These reports are files with the .RPT extension.
DPI
DPI stands for Dots Per Inch.
DIVISON
÷
This special character is often used when there is some chance other delimiters appear within a string used in a
variable. Hold CTRL and type the apostrophe ( ' ) to generate this symbol within the PrintBoss Form Editor.
DUPLEX PRINTER
This is a printer that has the ability to print on both sides of the page in one pass.
FORM
The file used by PrintBoss to format data provided by the Host Accounting Software. This typically consists of
elements traditionally preprinted.
Forms are files with the PBF extension.
FORWARD SLASH (a.k.a. whack)
/
This is the key under the question mark on a standard keyboard.
Hash Tag
#
The symbol at the beginning of all active PrintBoss commands in the Form Editor. See also Pipe.
HOME
This is the path to the PRNTBOSS folder. For example, HOME would be C:\PrntBoss if the PrntBoss folder is
installed on the C:\ drive.
MICR / MICR LINE
Magnetic Ink Character Recognition – refers to the ABA characters at the bottom of a check.
MICR TONER
The toner used to print the MICR line at the bottom of checks so it can be read by magnetic scanning equipment.
Check with your bank to determine whether MICR toner is required.
MODULUS 9
An asterisk placed at the end of a series of numbers (usually the check number) that will be replaced with the
Modulus 9 check sum.
NAMED PRINTERS
Named Printers is a Microsoft Great Plains module used with Dynamics software packages. It is used to determine
the output printer for each printing function. Named Printers setup may be necessary for Dynamics (version 6.0 and
higher) to print to PrintBoss.
PrintBoss
227 Electronic Copy
PARENTHESES
( )
These characters are SHIFT 9 and 0 on a standard keyboard.
PCL5e
Printer Control Language 5e – PrintBoss uses this printer language to communicate with printer hardware. Most
Hewlett-Packard LaserJet printers use this language. PCL translates the data and sends it in binary form to the
printer.
PCL6
Printer Control Language 6 – Some of the new Hewlett-Packard LaserJet printers are distributed with this newer
PCL printer driver version. Be sure to download the newest version from the HP web site (www.hp.com) when
using this driver. PCL translates the data and sends it in binary form to the printer.
PIPE
|
Pipe is the symbol at the beginning of comments in the Form Editor.
Hold the SHIFT key and type a backslash on a standard keyboard to generate this symbol in the PrintBoss Form
Editor. See also Comment.
POUND
#
The symbol at the beginning of all active PrintBoss commands in the Form Editor. See also Hash Tag.
PS – POSTSCRIPT
PostScript printer drivers send a page description to a printer that is translated by the printer. We do NOT
recommend using PostScript drivers with PrintBoss. See PCL5e or PCL6 listed above.
QUOTE
"
Hold the SHIFT key and type an apostrophe.
REPORT
A file used by the Host Accounting Software to generate documents to be printed.
SEMI COLON
;
TEXT INPUT FILE
A text file generated by a Host Accounting Software that includes all of the document information. PrintBoss takes
the data from this file and places it on the Form.
TEXTCAPTURE SPECIFICATION
FILE
This is a file within PrintBoss that defines the structure of the Text Input File. It also defines the location(s) and
name(s) of the file(s) to be processed. The PrintBoss Form and Bank selection are also defined.

PrintBoss 228 Electronic Copy
TILDE
~
Hold the SHIFT key and type the graves symbol (`). This is above the Tab key on a standard keyboard.
UNCOMMENT
Remove the pipe symbol ( | ) from the beginning of the command line to activate the command.
VIEW or INSTALLATION NOTES
These are notes referencing a specific accounting package. These should be printed during the installation of
PrintBoss. They can also be found as *.rtf files in the PRNTBOSS/DOC directory.
WORK FILE
Work Files are a database of documents printed through PrintBoss. The work file has the same name as the
PrintBoss Form used at the time of printing. Options for retaining, deleting, or archiving completed work files can
be found on the Setting tab of the Form Editor.
